4. The Browser panel
The QGIS Browser panel is a great tool for browsing, searching, inspecting, copying and loading QGIS resources. Only resources that QGIS knows how to handle are shown in the browser.
Using the Browser panel you can locate, inspect and add data, as described in The Browser Panel. In addition, the Browser panel supports drag and drop of many QGIS resources, such as project files, Python scripts, Processing scripts and Processing models.
Python scripts, Processing scripts and Processing models can also be opened for editing in an external editor and the graphical modeller.
You can drag and drop layers from the Layers panel to the Browser panel, for instance into a GeoPackage or a PostgreSQL database.
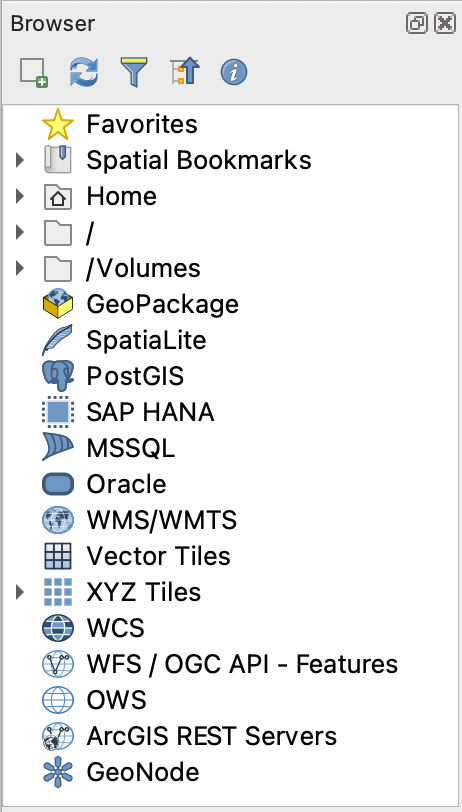
Fig. 4.1 The Browser panel
The browser panel (Fig. 4.1) is organised
as an expandable hierarchy with some fixed top-level entries that
organise the resources handled by the browser.
Node entries are expanded by clicking on  to the left
of the entry name.
A branch is collapsed by clicking on
to the left
of the entry name.
A branch is collapsed by clicking on  .
The
.
The  Collapse All button collapses all top-level
entries.
Collapse All button collapses all top-level
entries.
In it is possible to disable resources. If you, for instance, would not like to show Python scripts in the browser, you can uncheck the entry, and if you want to get rid of your home folder in the browser, you can uncheck the entry.
A filter ( Filter Browser) can be used for searching
based on entry names (both leaf entries and node entries in the
hierarchy).
Using the
Filter Browser) can be used for searching
based on entry names (both leaf entries and node entries in the
hierarchy).
Using the  Options pull-down menu next to the filter
text field, you can
Options pull-down menu next to the filter
text field, you can
toggle Case Sensitive search
set the Filter pattern syntax to one of
Normal
Wildcard(s)
Regular Expressions
The Properties widget, showing useful information about some
entries / resources, can be enabled / disabled using the  Enable/disable properties widget button.
When enabled, it opens at the bottom of the browser panel, as shown in
Fig. 4.2.
Enable/disable properties widget button.
When enabled, it opens at the bottom of the browser panel, as shown in
Fig. 4.2.
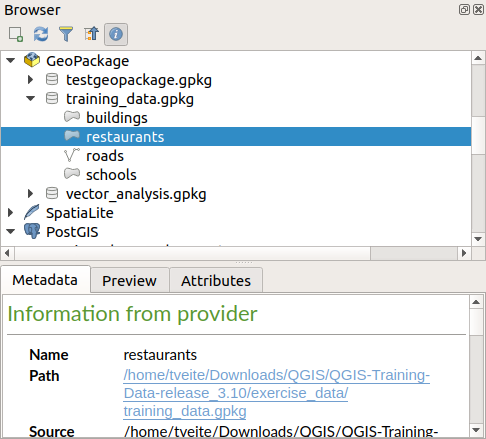
Fig. 4.2 The properties widget
A second browser panel can be opened by activating the Browser (2) panel in . Having two browser panels can be useful when copying layers between resources that are locationed deep down in different branches of the browser hierarchy.
4.1. Resources that can be opened / run from the Browser
A lot can be accomplished in the Browser panel
Add vector, raster and mesh layers to your map by double-clicking, dragging onto the map canvas or clicking the
 Add Selected Layers button (after selecting layers)
Run Python scripts (including Processing algorithms) by double-clicking or dragging onto the map canvas
Run models by double-clicking or dragging onto the map canvas
Extract Symbols… from QGIS Project files using the context menu
Open files with their default applications (Open <file type> Externally… in the context menu). Examples: HTML files, spreadsheets, images, PDFs, text files, …
Copy entries
Rename and delete (multiple) layers (context menu: )
Open a file explorer window and directly select the file Show in Files
Resource specific actions are listed for the different resource groups sorted under the top-level entries listed below.
4.2. Browser panel top-level entries
4.2.1. Favorites
Often used file system locations can be tagged as favorites. The ones you have tagged will appear here.
In addition to the operations described under Home, the context menu allows you to Rename Favorite… and Remove Favorite.
4.2.2. Spatial Bookmarks
This is where you will find your spatial bookmarks, divided into Project Bookmarks and User Bookmarks.
Level |
Contextual menu |
|---|---|
Spatial Bookmarks |
New Spatial Bookmark… |
Show the Spatial Bookmark Manager |
|
Import Spatial Bookmarks… |
|
Export Spatial Bookmarks… |
|
Bookmark group (Project Bookmarks and User Bookmarks) |
New Spatial Bookmark… |
Import Spatial Bookmarks… |
|
Export Spatial Bookmarks… |
|
Individual bookmark |
Zoom to Bookmark |
Edit Spatial Bookmark… |
|
Delete Spatial Bookmark |
4.2.3. Project Home
Available once the project file has been saved, the Project home entry is a folder containing data and other contents (scripts, models, text, …) that may be used within the current project. Displayed in the Browser panel, it allows you to quickly access data and other files of the project.
It defaults to the project file folder but can be changed through the option, or by right-clicking on the Project Home item of the Browser panel and selecting Set project home…. Customizing that folder is especially useful in contexts where QGIS projects are not stored in the root folder of an organisational ‘project’, along with datasets.
4.2.4. Drives and file system
The next items of the Browser panel depend on the OS in use and concern the top level entries of its file system.
They are mainly:
The Home folder, pointing to the current user home folder
on Unix-based machines, the root / folder
the connected drives, either local or network. Depending on the OS, they are directly listed (eg,
C:\,D:\) or through the/Volumesentry.
From the contextual menu of each of these folders or drives, you can:
refresh the contents
create a subitem that is a Directory, GeoPackage or ESRI Shapefile format dataset
hide the directory (Hide from Browser)
Set color: customize the folder icon color, aiding in rapid browser navigation of complex folder structures
enable Scanning:
 Monitor for changes: allows to manually control
whether a particular directory should be monitored and automatically updated.
This setting applies to the selected directory and all subdirectories.
This means that you can manually opt-in to monitoring of network drives
if you know there’s no issue, or manually opt-out of monitoring of large
directories which you don’t want monitored for other reasons.
By default, remote or network drives are not automatically monitored.
Monitor for changes: allows to manually control
whether a particular directory should be monitored and automatically updated.
This setting applies to the selected directory and all subdirectories.
This means that you can manually opt-in to monitoring of network drives
if you know there’s no issue, or manually opt-out of monitoring of large
directories which you don’t want monitored for other reasons.
By default, remote or network drives are not automatically monitored. Fast scan this directory
open the directory in your file manager (Open Directory…)
open the directory in a terminal window (Open in Terminal…)
inspect the Properties… or the parent Directory Properties…
4.2.5. Data type
Level and Context menu |
Types of layers |
|||
|---|---|---|---|---|
|
|
|
|
|
File |
||||
Delete File <dataset name> |
|
|
||
Show in Files |
|
|
|
|
|
|
|
|
|
File Properties… |
|
|
|
|
Open <file type> Externally… |
|
|||
Layer |
||||
Add Layer to Project |
|
|
|
|
|
|
|||
Layer Properties… |
|
|
|
|
Open with Data Source Manager… |
|
|
||
Execute SQL… |
|
|||


4.2.6. Database entries
Depending on your OS and installed drivers, you might have access to different database types to use in QGIS. Below are listed the different entries of contextual menu at each level of the dataset tree.
Level and Context menu |
Type of database |
|||||
GeoPackage ([1]) |
SpatiaLite |
PostgreSQL |
SAP HANA |
MS SQL Server |
Oracle |
|
Top menu |
||||||
Create a New Connection… to an existing database |
|
|
|
|
|
|
Create Database… |
|
|
||||
Create Database and Layer… |
|
|||||
Save Connections… details to a file |
|
|
|
|||
Load Connections… |
|
|
|
|||
Connection / Database |
||||||
Refresh a connection |
|
|
|
|
||
Edit Connection… settings |
|
|
|
|
||
Duplicate Connection |
|
|
|
|
||
Remove Connection… |
|
|
|
|
|
|
Import Vector Layer… |
|
|
|
|
|
|
|
||||||
|
||||||
|
||||||
New Relationship… |
|
|||||
Delete <database_name> |
|
|
||||
Compact Database (VACUUM) |
|
|||||
Create a New Schema… |
|
|
|
|||
Create a New Table… |
|
|
|
|
||
Execute SQL… query |
|
|
|
|
||
Schema |
||||||
Refresh a schema |
|
|
|
|||
|
|
|
||||
|
|
|
||||
|
||||||
|
||||||
Create a New Table… |
|
|
||||
Execute SQL… query |
|
|
||||
Table / Layer |
||||||
|
|
|
||||
|
|
|||||
Execute SQL… query |
|
|
|
|||
|
|
|
|
|
||
|
|
|
||||
|
|
|
|
|
||
|
|
|
|
|
||
|
|
|
|
|
||
|
|
|
|
|
||
|
|
|||||
|
|
|
|
|
||
|
||||||
|
|
|
|
|
||
Open Layer Properties… dialog |
|
|
|
|
|
|
Open File Properties… dialog |
|
|||||
Open with Data Source Manager |
|
|
||||
QGIS project |
||||||
Open Project… |
|
|
||||
Extract Symbols… |
|
|
||||
Export Project to File… |
|
|||||
Rename Project… |
|
|||||
Delete Project… |
|
|||||
Duplicate Project… |
|
|||||
Move Project to Schema… |
|
|||||
Fields |
||||||
Add New Field… |
|
|
|
|
||
Field |
||||||
Set Field Domain |
|
|||||
Rename Field ([2]) |
|
|
|
|||
Set Alias… |
|
|||||
Set Comment… |
|
|
||||
Delete Field… |
|
|
|
|
||


4.2.6.1. Importing vector layers into databases using Browser panel
QGIS provides easy ways to transfer vector layers directly to supported database formats using the Browser panel. You can start the import in two ways:
Drag and drop a single vector layer from the Browser panel or from the Project into a database connection or schema item.
Right-click on a database connection or schema item and choose Import Vector Layer… from the context menu.
This triggers the Import Vector Layer dialog for further customisation. When multiple layers are dragged into a database, they are imported immediately without further options. All imports run in the background, so the QGIS interface remains responsive during the process.
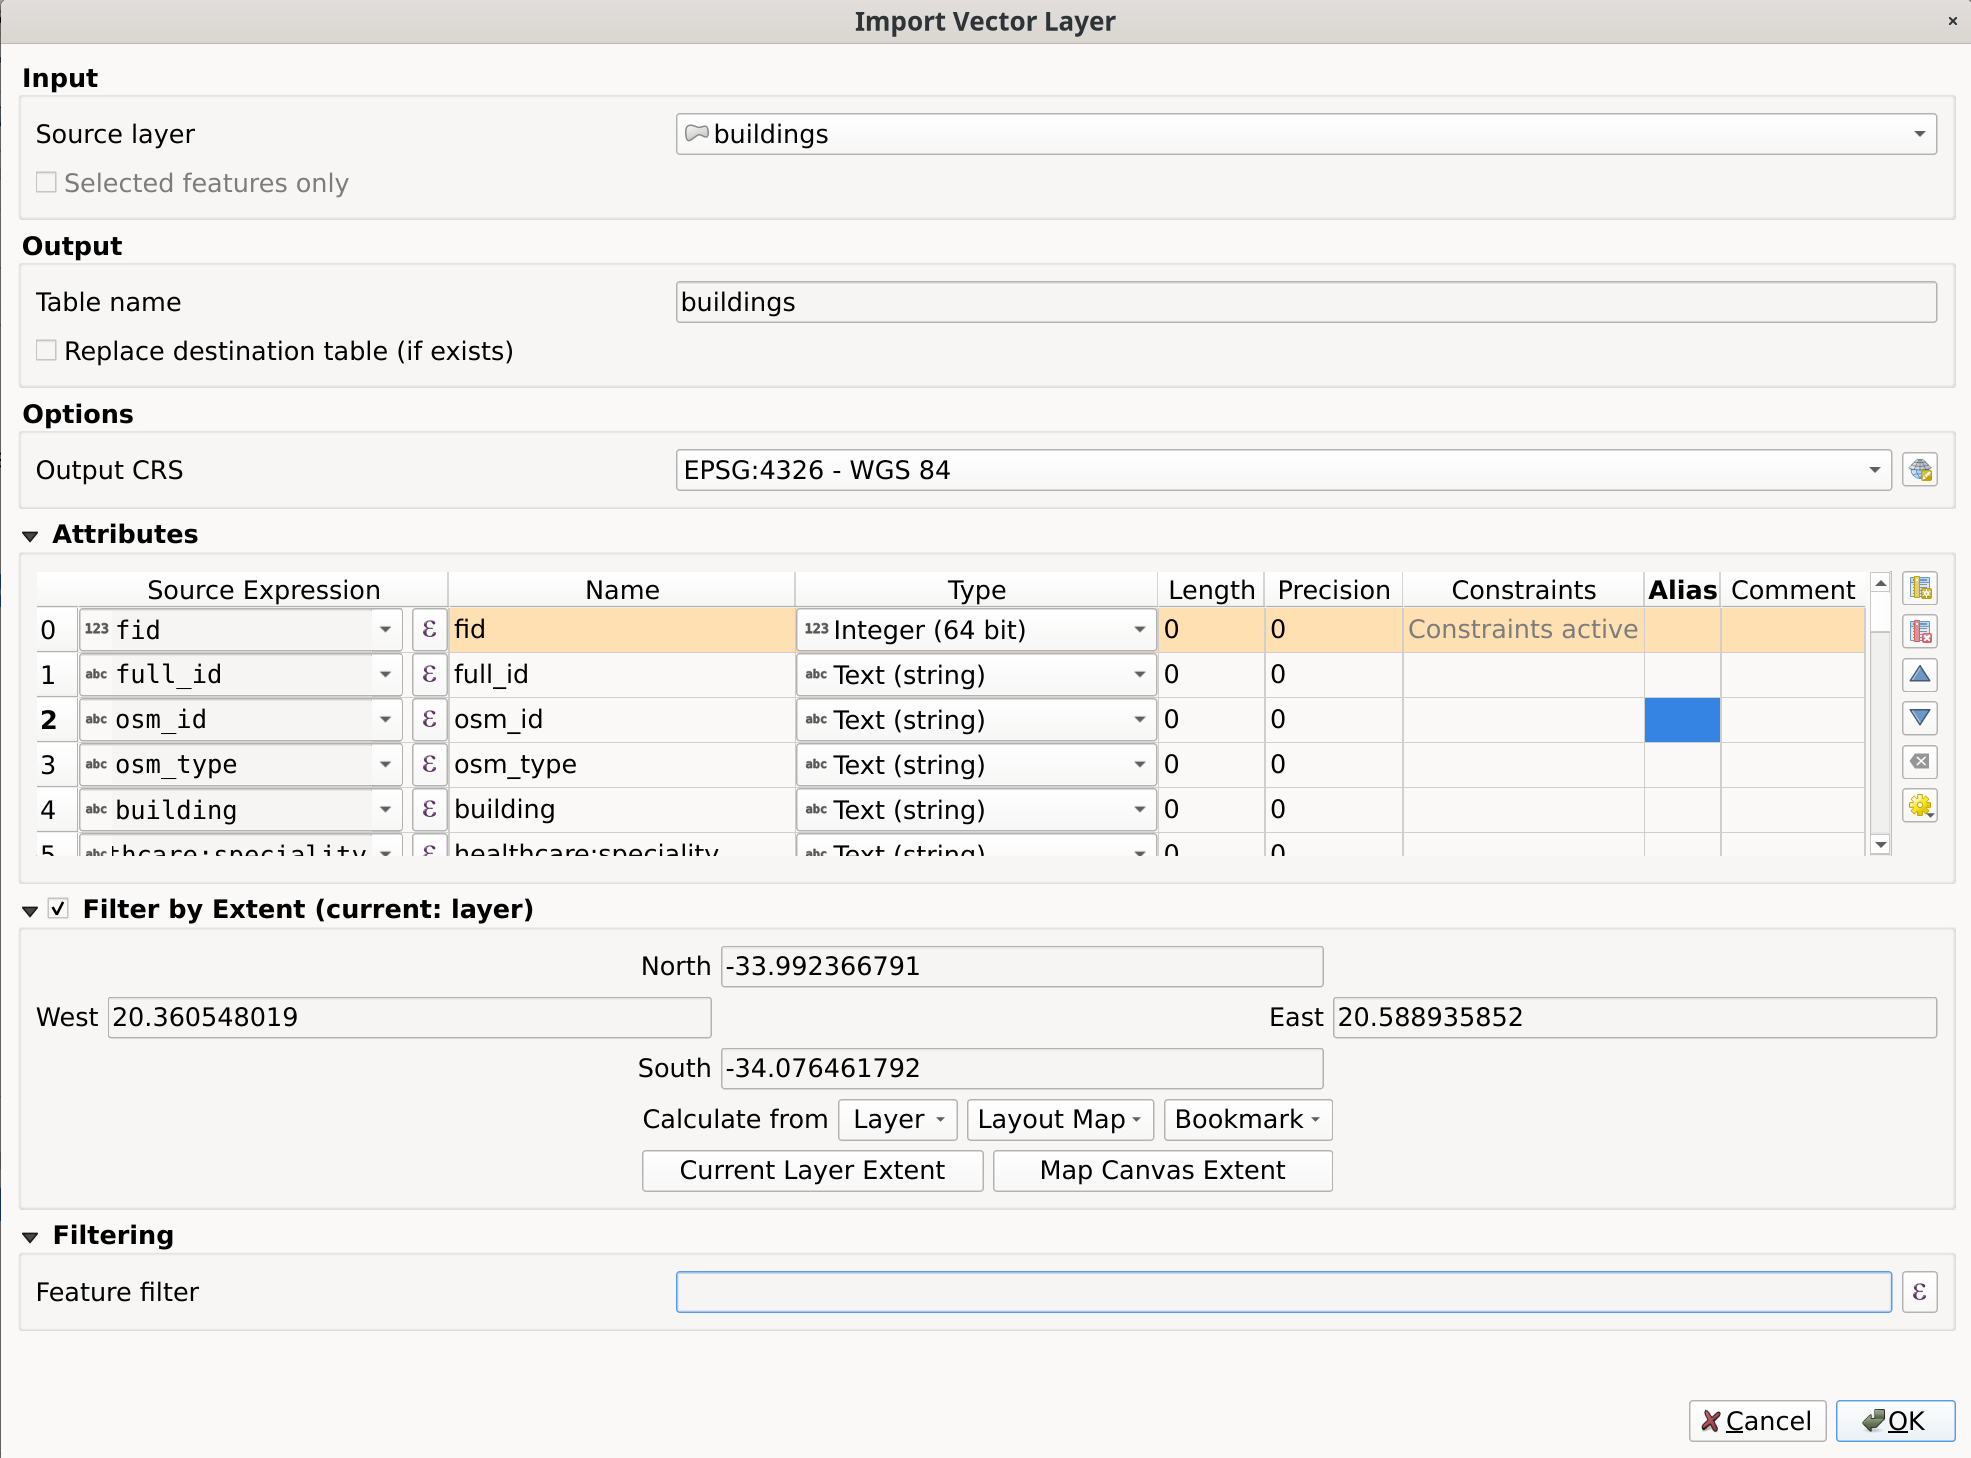
Fig. 4.3 Import Vector Layer dialog
You can then fill the following options:
Source for defining input layer
Source layer: the vector layer to import, chosen from the current project layers or the layer dropped onto the database entry.
To import only selected features of the source layer taken from the active project, use the
Selected features only option.
Output for defining the destination table
Schema: when supported by the database, the schema in which to import the layer. It should already exist in the database, or create it in the database and use the
 Refresh schemas button to update the list.
Table name: the name of the destination table in the database. By default, it is taken from the source layer name but can be modified. You can also use the
Replace destination table (if exists)
to overwrite an existing table.
Options for handling the data
Primary key: when supported by the database, sets the primary key name for the created table. Defaults to the source layer primary key name, or a default provider-specific name if the source layer does not have a primary key. It is also possible to use a custom name and define the new field in the Attributes group below.
- Geometry column: for spatially enabled layer
and when supported by the database, this represents the naming for the geometry column.
Defaults to the source layer geometry column name, or a default provider-specific name
if the source layer does not have a named geometry column.
Output CRS: the coordinate reference system of the destination table. By default, it is the CRS of the source layer, but it can be changed using the CRS selector.
Comment: when supported by the database, a description of the destination table
Attributes: allows you to modify the dataset (fields and values) as you want. By default, the widget is populated with fields in the source layer with their properties. You can adjust each of them:
Source expression: allows to use QGIS expressions to feed fields with calculated values. By default, no modification is applied to the input values.
Name: name of the field in the destination table.
Type: field data type (integer, text, real, etc.).
Length and Precision: length and precision of the field, where applicable.
Constraints: rules to enforce on the field values (e.g. NOT NULL, UNIQUE, DEFAULT). Support depends on the destination database.
Alias: an alternate display name for the field.
Comment: a description or note attached to the field.
You can use buttons on the right side to:
 Add new field to add a new field to the destination table.
 Delete selected field to avoid adding a field to the destination table.
 Move selected field up or
  Move selected field down to reorder fields.
 Reset all fields to clear any customization to the fields.
 Convert All Fields To Lowercase or Convert All Fields To Uppercase,
to change the case of all field names.
Convert All Fields To Lowercase or Convert All Fields To Uppercase,
to change the case of all field names.
Optionally, apply a spatial filter with Filter by Extent. This restricts the import to features within a defined bounding box.
Optionally, apply an attribute filter with Feature filter. This allows you to use an expression to select which features are imported.
4.2.7. Tiles and Web Services
Level and Context menu |
Type of services |
||||
|---|---|---|---|---|---|
WMS / WMTS |
XYZ Tiles |
WCS |
WFS / OGC API - Features |
ArcGIS REST Servers |
|
Top menu |
|||||
Create a New Connection… |
|
|
|
|
|
Save Connections… details to a file |
|
|
|
|
|
Load Connections… |
|
|
|
|
|
Connection |
|||||
Refresh connection |
|
|
|
|
|
Edit Connection… settings |
|
|
|
|
|
Duplicate Connection |
|
|
|
|
|
Remove Connection… |
|
|
|
|
|
View Service Info in Web browser |
|
||||
Table / Layer |
|||||
|
|
|
|
|
|
Add Layer to Project |
|
|
|
|
|
Add Vector Layer (FeatureServer) to Project |
|
||||
Add Raster Layer (MapServer) to Project |
|
||||
Add Raster with All MapServer Layers |
|
||||
Add Filtered Layer to Project… |
|
||||
Open Layer properties… dialog |
|
|
|
|
|
View Service Info in Web browser |
|
||||


Level and Context menu |
Type of services |
||||
|---|---|---|---|---|---|
Vector Tiles |
Scene |
Cloud |
SensorThings |
STAC |
|
Top menu |
|||||
Create a New Connection… |
|
|
|
|
|
Create a New Generic Connection… |
|
||||
Create a New ArcGIS Vector Tile Service Connection… |
|
||||
Save Connections… details to a file |
|
|
|
|
|
Load Connections… |
|
|
|
|
|
Connection |
|||||
Edit Connection… settings |
|
|
|
|
|
Duplicate Connection |
|
|
|
|
|
Delete Connection… |
|
|
|
|
|
Refresh |
|
|
|||
Details… |
|
||||
Table / Layer |
|||||
|
|||||
Add Layer to Project |
|
|
|
||
Open Layer properties… dialog |
|
|
|
||
Refresh |
|
||||
Download assets… |
|
||||
Details… |
|
||||


4.2.8. Supported file types
File type |
Context menu |
|---|---|
QGIS Layer Definition (.qlr) |
|
Processing Model (.model3) |
|
Print Composer Template (.qpt) |
|
Python script (.py) |
|