Importante
La traducción es un esfuerzo comunitario tú puedes unirte. Esta página está actualmente traducida en 38.64%.
25.2.1. Complemento de Administración de BBDD
The DB Manager Plugin is intended to be the main tool to integrate and
manage spatial database formats supported by QGIS (PostgreSQL, SpatiaLite,
GeoPackage, Oracle Spatial, Virtual layers) in one user interface.
The  DB Manager Plugin provides several features.
You can drag layers from the QGIS Browser into the DB Manager, and it
will import your layer into your spatial database.
You can drag and drop tables between spatial databases and they will
get imported.
DB Manager Plugin provides several features.
You can drag layers from the QGIS Browser into the DB Manager, and it
will import your layer into your spatial database.
You can drag and drop tables between spatial databases and they will
get imported.
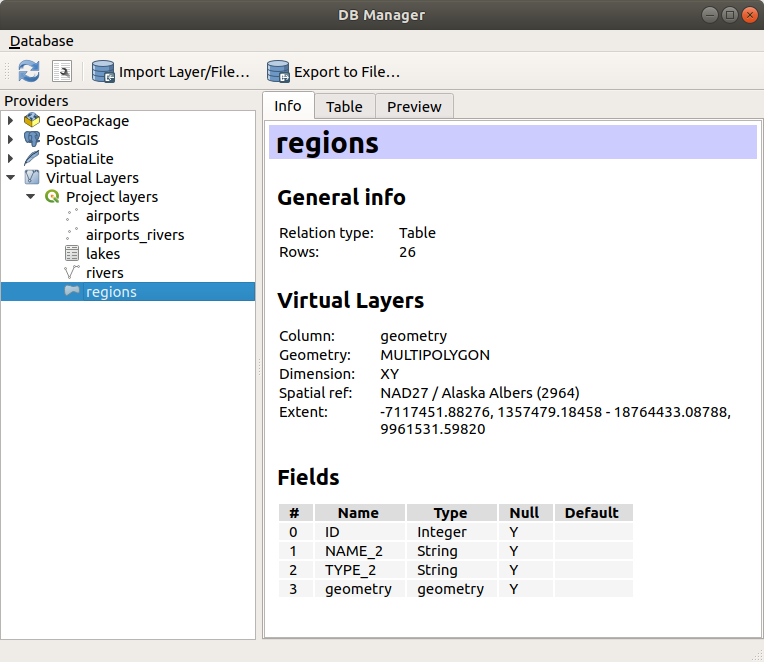
Figura 25.4 Diálogo del complemento administrador de BBDD
The menu allows you to connect to an existing database, to start the SQL window and to exit the DB Manager Plugin. Once you are connected to an existing database, the menus (relevant for DBMSs, such as PostgreSQL) and will appear.
El menú incluye herramientas para crear y borrar (solo si está vacía) esquemas y, si la topología está disponible (p.ej. con la topología PostGIS), para empezar una TopoViewer.
El menú le permite crear y editar tablas y eliminar tablas y vistas. También es posible vaciar tablas y mover tablas entre esquemas. Usted puede Run Vacuum Analyze para una tabla seleccionada. Vacuum reclama espacio y lo pone a disposición para su reutilización, y analyze estadísticas actualizadas que son usadas para determinar el modo mas eficiente para ejecutar una consulta. Change Logging… le permite agregar soporte de registro de cambios a una tabla. Finalmente puede Import Layer/File… y Export to File….
Nota
Usando DB Manager es posible agregar comentarios para tablas y columnas de una base de datos PostgreSQL.
La ventana Providers lista todas las bases de datos existentes soportadas por QGIS. Con un doble-click, puede conectar a una base de datos. Con el click derecho en el botón del ratón, puede renombrar y borrar esquemas y tablas existentes. Las tablas pueden además ser añadidas al canvas de QGIS con el menú contextual.
Si está conectado a una base de datos, la ventana main del administrador de BBDD le ofrece cuatro pestañas. La pestaña Info proporciona información sobre la tabla y su geometría, así como sobre campos existentes, restricciones e índices. Le permite crear un índice espacial en la tabla seleccionada. La pestaña Table muestra la tabla, y la pestaña Preview representa las geometrías como previsualización. Cuando abre una SQL Window, será ubicada en una nueva pestaña.
25.2.1.1. Trabajando con la ventana SQL
Puede usar el Administrador de BBDD para ejecutar consultas SQL en su base de datos espacial. Las consultas se pueden guardar y cargar, y allí el SQL Query Builder le ayudará a formular sus consultas. Incluso puede ver la salida espacial marcando Load as new layer y especificando Column(s) with unique values (IDs), Geometry column y Layer name (prefix). Es posible resaltar una parte del SQL para ejecutar solo esa parte al presionar Ctrl+R o clickando el botón Execute.
QGIS also adds support for the REGEXP function in some providers.
This allows users to use regular expressions in SQL filters or expressions, for example:
SELECT * FROM places WHERE name REGEXP '^A';
This returns all features where the name field starts with the letter A.
Después de ejecutar la consulta, puede seleccionar celdas específicas en el conjunto de resultados. Utilice el método abreviado Ctrl+C para copiar las celdas seleccionadas en el portapapeles. Los datos copiados estarán disponibles en forma de tabla formateada. Esto le permite pegar los datos en otras aplicaciones, como hojas de cálculo, donde aparecerán como una tabla.
El botón Historial de consulta almacena las últimas 20 consultas de cada base de datos y proveedor.
Al hacer doble clic en una entrada, se agregará la cadena a la ventana SQL.
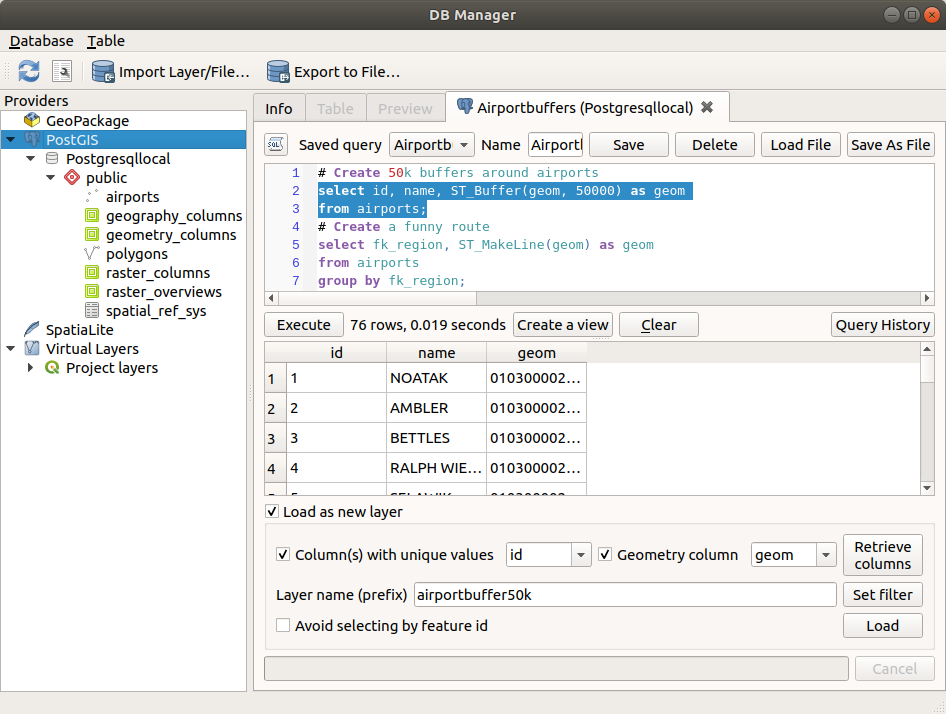
Figura 25.5 Ejecutando consultas SQL en la ventana SQL del Administrador de BBDD
Nota
La ventana SQL también se puede utilizar para crear capas virtuales. En ese caso, en lugar de seleccionar una base de datos, seleccione QGIS Layers debajo de Virtual Layers antes de abrir la ventana SQL. Ver Creando capas virtuales para instrucciones de la sintaxis SQL a usar.
25.2.1.2. Import Vector Layer
You can import layer or file into your database. Here are the parameters you can set for the import process:
Input: Select the layer or file to import. Using the dropdown menu, select from the list of loaded layers in QGIS or click on the … button to select a file from disk. Check the
 Import only selected features to import only the selected
features of the layer.
Import only selected features to import only the selected
features of the layer.Output table: Choose the Schema and provide a name for the new table.
Options: Here are some options for the import process:
- Primary key: Provide naming for the primary key field.
By default, it is named
id. - Geometry column: Provide naming for the geometry column.
By default, it is named
geom. - Source SRID: Define the SRID for the geometry column.
By default, it uses the layer’s CRS.
- Target SRID: Define the target SRID to reproject the geometries
during the import process. By default, it uses the layer’s CRS.
- Encoding: Define the encoding of the source data. By default, it uses
Automatic. It is QGIS’s automatic detection mode that attempts to guess the file’s character encoding based on available metadata or system locale. - Replace destination table (if exists): If a table with the same name already exists in the selected schema,
it will be replaced.
- Do not promote to multi-part: Geometries will be imported as single-part geometries.
- Convert field names to lower case: All field names will be converted to lower case.
- Create spatial index: A spatial index will be created on the geometry column after import.
- Comment: Add comments to table. Only available for PostgreSQL databases.

Figura 25.6 Importing a vector layer into a spatial database using DB Manager
25.2.1.3. Export to Vector File
To export a table from your database to a vector file, select the desired Format and Save as location. Under Options, you can set the following parameters:
- Source SRID: Define the source SRID of the geometry column.
By default, it uses the layer’s CRS.
- Target SRID: Define the target SRID to reproject the geometries
during the export process. By default, it uses the layer’s CRS.
- Encoding: Define the encoding of the output data.
- Replace destination table (if exists): If a table with the same name already exists at the selected location,
it will be replaced.

Figura 25.7 Exporting a table to a vector file using DB Manager