25.2.1. DB Manager Plugin
The DB Manager Plugin is intended to be the main tool to integrate and
manage spatial database formats supported by QGIS (PostgreSQL, SpatiaLite,
GeoPackage, Oracle Spatial, Virtual layers) in one user interface.
The  DB Manager Plugin provides several features.
You can drag layers from the QGIS Browser into the DB Manager, and it
will import your layer into your spatial database.
You can drag and drop tables between spatial databases and they will
get imported.
DB Manager Plugin provides several features.
You can drag layers from the QGIS Browser into the DB Manager, and it
will import your layer into your spatial database.
You can drag and drop tables between spatial databases and they will
get imported.
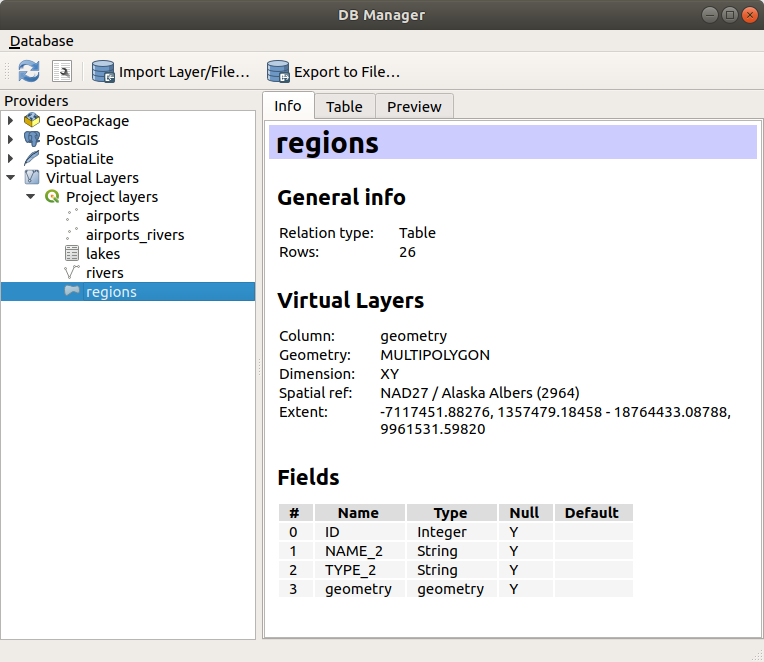
Fig. 25.4 DB Manager dialog
The menu allows you to connect to an existing database, to start the SQL window and to exit the DB Manager Plugin. Once you are connected to an existing database, the menus (relevant for DBMSs, such as PostgreSQL) and will appear.
The menu includes tools to create and delete (only if empty) schemas and, if topology is available (e.g. with PostGIS topology), to start a TopoViewer.
The menu allows you to create and edit tables and to delete tables and views. It is also possible to empty tables and to move tables between schemas. You can Run Vacuum Analyze for the selected table. Vacuum reclaims space and makes it available for reuse, and analyze updates statistics that is used to determine the most efficient way to execute a query. Change Logging… allows you to add change logging support to a table. Finally, you can Import Layer/File… and Export to File….
Note
Using the DB Manager it is possible to add comments for tables and columns of a PostgreSQL Database.
The Providers window lists all existing databases supported by QGIS. With a double-click, you can connect to the database. With the right mouse button, you can rename and delete existing schemas and tables. Tables can also be added to the QGIS canvas with the context menu.
If connected to a database, the main window of the DB Manager offers four tabs. The Info tab provides information about the table and its geometry, as well as about existing fields, constraints and indexes. It allows you to create a spatial index on a the selected table. The Table tab shows the table, and the Preview tab renders the geometries as preview. When you open an SQL Window, it will be placed in a new tab.
25.2.1.1. Working with the SQL Window
You can use the DB Manager to execute SQL queries against your spatial database. Queries can be saved and loaded, and there the SQL Query Builder will help you formulate your queries. You can even view spatial output by checking Load as new layer and specifying Column(s) with unique values (IDs), Geometry column and Layer name (prefix). It is possible to highlight a portion of the SQL to only execute that portion when pressing Ctrl+R or clicking the Execute button.
QGIS also adds support for the REGEXP function in some providers.
This allows users to use regular expressions in SQL filters or expressions, for example:
SELECT * FROM places WHERE name REGEXP '^A';
This returns all features where the name field starts with the letter A.
After executing your query, you can select specific cells in the result set. Use the Ctrl+C shortcut to copy the selected cells to the clipboard. The copied data is available as a formatted table. This allows you to paste the data into other applications, such as spreadsheet where it will show up as a table.
The Query History button stores the last 20 queries of each database and provider.
Double clicking on an entry will add the string to the SQL window.
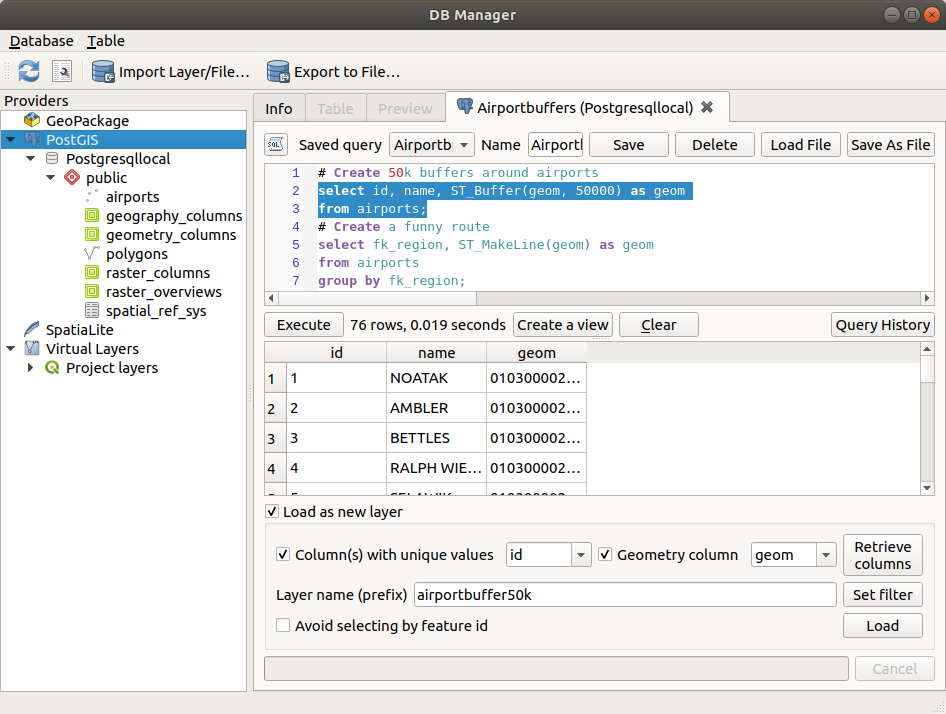
Fig. 25.5 Executing SQL queries in the DB Manager SQL window
Note
The SQL Window can also be used to create Virtual Layers. In that case, instead of selecting a database, select QGIS Layers under Virtual Layers before opening the SQL Window. See Creating virtual layers for instructions on the SQL syntax to use.
25.2.1.2. Import Vector Layer
You can import layer or file into your database. Here are the parameters you can set for the import process:
Input: Select the layer or file to import. Using the dropdown menu, select from the list of loaded layers in QGIS or click on the … button to select a file from disk. Check the
 Import only selected features to import only the selected
features of the layer.
Import only selected features to import only the selected
features of the layer.Output table: Choose the Schema and provide a name for the new table.
Options: Here are some options for the import process:
- Primary key: Provide naming for the primary key field.
By default, it is named
id. - Geometry column: Provide naming for the geometry column.
By default, it is named
geom. - Source SRID: Define the SRID for the geometry column.
By default, it uses the layer’s CRS.
- Target SRID: Define the target SRID to reproject the geometries
during the import process. By default, it uses the layer’s CRS.
- Encoding: Define the encoding of the source data. By default, it uses
Automatic. It is QGIS’s automatic detection mode that attempts to guess the file’s character encoding based on available metadata or system locale. - Replace destination table (if exists): If a table with the same name already exists in the selected schema,
it will be replaced.
- Do not promote to multi-part: Geometries will be imported as single-part geometries.
- Convert field names to lower case: All field names will be converted to lower case.
- Create spatial index: A spatial index will be created on the geometry column after import.
- Comment: Add comments to table. Only available for PostgreSQL databases.

Fig. 25.6 Importing a vector layer into a spatial database using DB Manager
25.2.1.3. Export to Vector File
To export a table from your database to a vector file, select the desired Format and Save as location. Under Options, you can set the following parameters:
- Source SRID: Define the source SRID of the geometry column.
By default, it uses the layer’s CRS.
- Target SRID: Define the target SRID to reproject the geometries
during the export process. By default, it uses the layer’s CRS.
- Encoding: Define the encoding of the output data.
- Replace destination table (if exists): If a table with the same name already exists at the selected location,
it will be replaced.

Fig. 25.7 Exporting a table to a vector file using DB Manager