12.1. Lesson: Instalarea GRASS
Using GRASS in QGIS requires you to think of the interface in a slightly different way. Remember that you’re not working in QGIS directly, but working in GRASS via QGIS. Hence, make sure you have installed QGIS Desktop with Grass support.
 To open a QGIS session with GRASS available on Windows you have to click
on the
To open a QGIS session with GRASS available on Windows you have to click
on the QGIS Desktop with GRASS icon.
Scopul acestei lecții: Pentru a începe un proiect GRASS în QGIS.
12.1.1.  Follow Along: Start a New GRASS Session
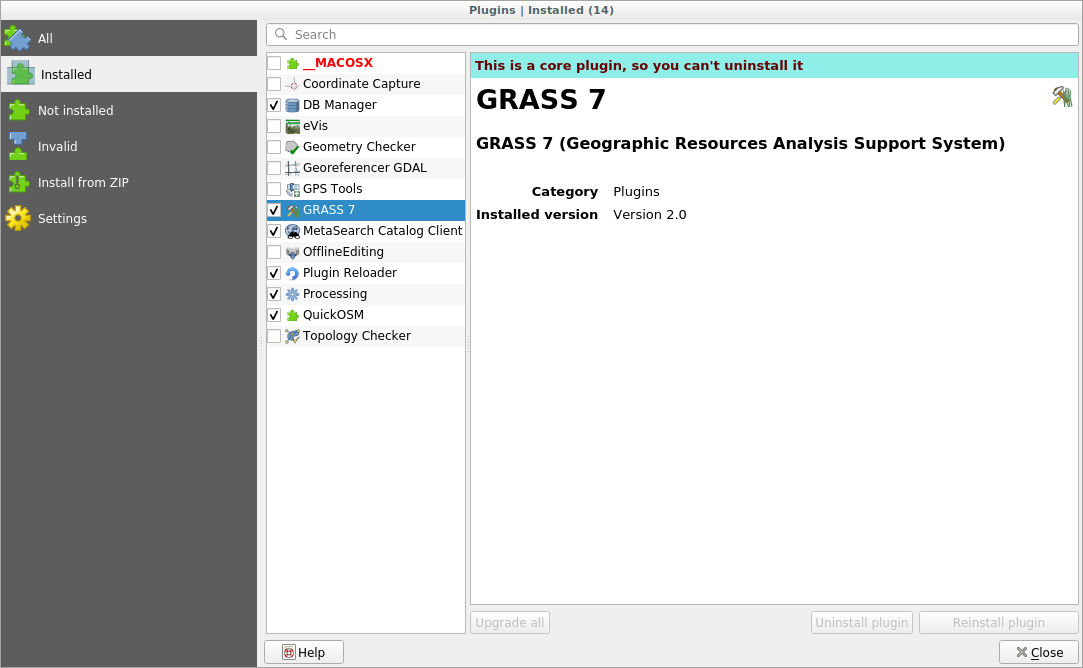
To launch GRASS from within QGIS, you need to activate it as with any other plugin:
First, open a new QGIS project.
În Managerul de plugin-uri, activați GRASS din listă:
The GRASS toolbar and the GRASS panel will appear:

Fig. 12.30 Bara de instrumente GRASS

Fig. 12.31 Panoul GRASS
The GRASS panel is not active because, before you can use GRASS, you need to
create a Mapset. GRASS always works in a database environment, which means
that you need to import all the data you want to use into a GRASS database.
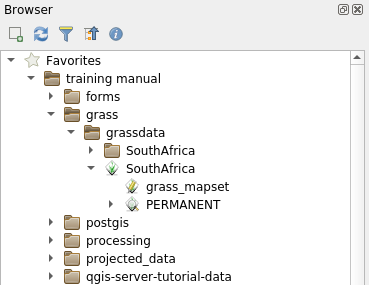
The GRASS database has a straightforward structure, even if at a first look it
seems very complicated. The most important thing you should know is that the
upper level of the database is the Location. Each Location can contain
different Mapset: in every Mapset you will find the PERMANENT
Mapset because it is created by default by GRASS. Each Mapset contains the
data (raster, vector, etc) in a particular structure, but don’t worry, GRASS will
take care of this for you.
Just remember: Location contains Mapset that contains the data. For more
information visit the GRASS website.

Fig. 12.32 GRASS database structure (from GRASS docs)
12.1.2. Follow Along: Începerea unui Nou Proiect GRASS
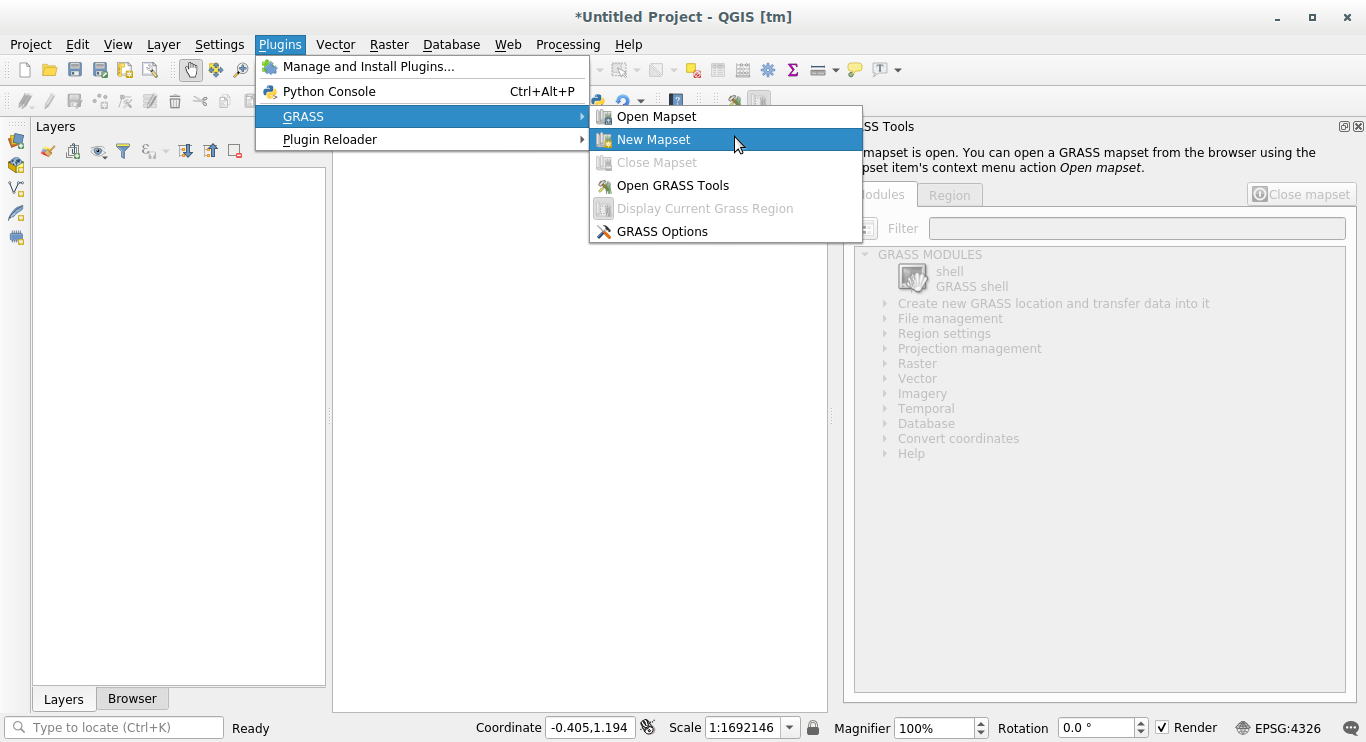
Click on the menu:
You’ll be asked to choose the location of the GRASS database.
Setați-l ca director care va fi utilizat de către GRASS pentru instalarea bazei de date:
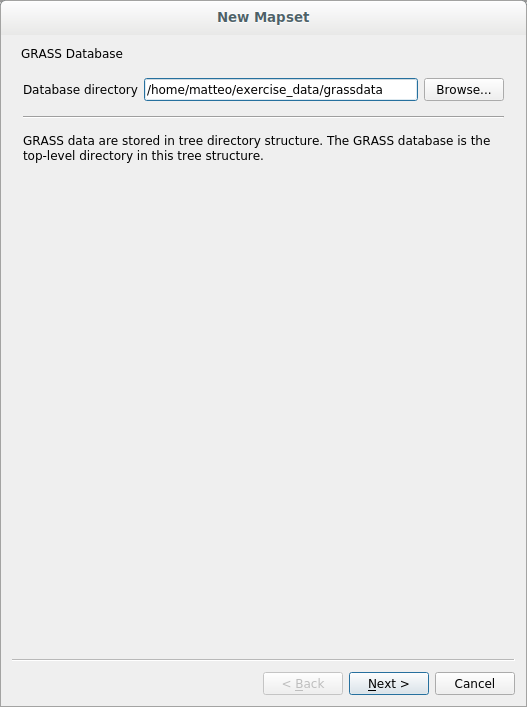
Clic pe Next.
GRASS needs to create a Location, which describes the maximum extent of the
geographic area you’ll be working in, also known as Grass Region.
Notă
the Region is extremely important for GRASS because it describes the area in which all layers will be taken into account for GRASS. Everything that is outside will not be considered. Don’t worry, you can always change the extent of the GRASS Region after the Location has been created
Call the new location
SouthAfrica: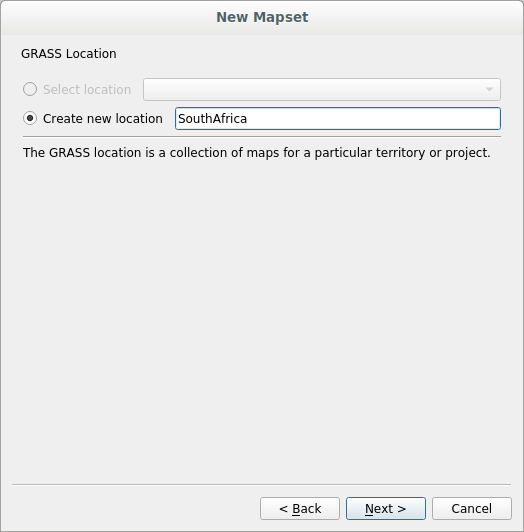
Clic pe Next.
We’ll be working with
WGS 84, so search for and select this CRS: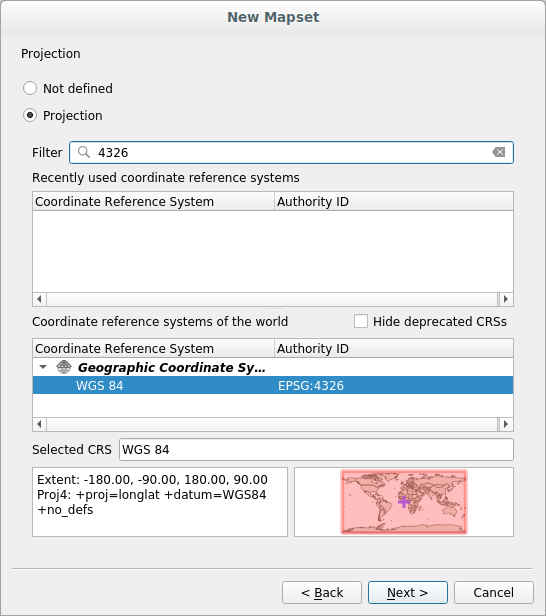
Clic pe Next.
Acum selectați regiunea Africii de Sud din caseta cu derulare verticală și faceți clic pe Set:
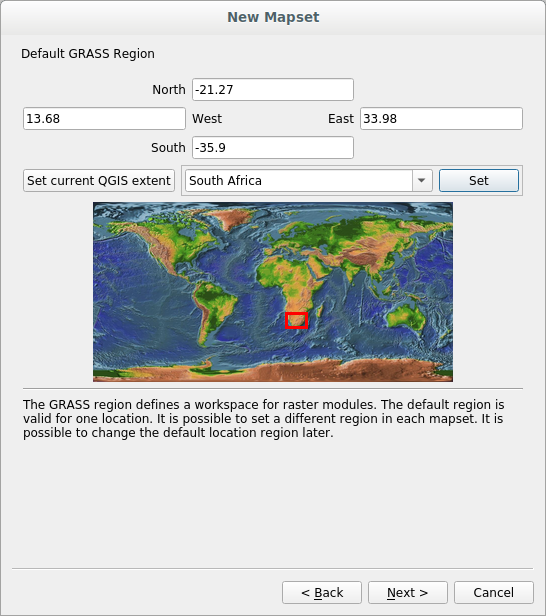
Clic pe Next.
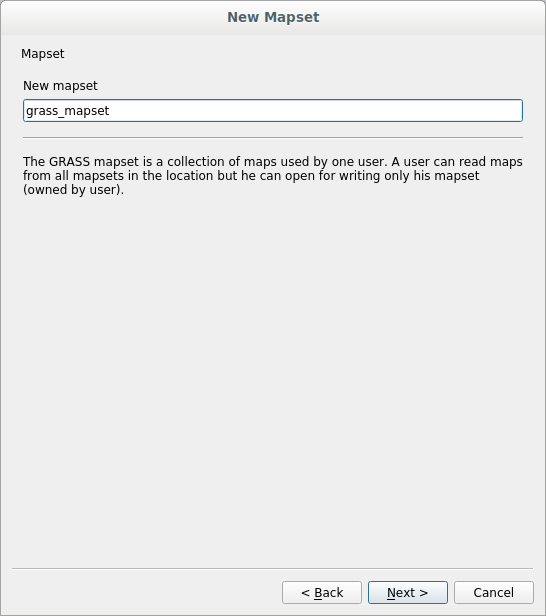
Creați un set de hărți, care este fișierul hărții cu care veți lucra.
Once you’re done, you’ll see a dialog asking with a summary of all the information entered.
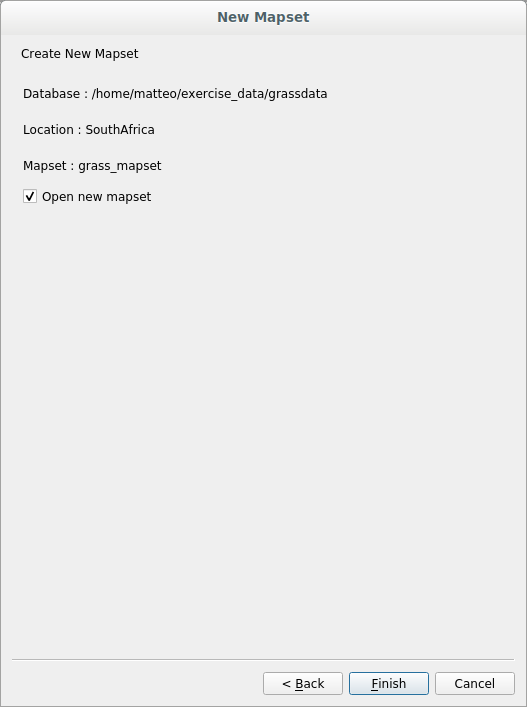
Clic Finish.
Clic pe OK, în dialogul de încheiere cu succes.
You will see that the GRASS Panel will become active and you can start to use all GRASS tools.
12.1.3. Follow Along: Încărcarea Datelor Vectoriale în GRASS
You have now a blank map and before you can start to use all the GRASS tools
you have to load data into the GRASS database, specifically into the Mapset.
You cannot use GRASS tools with layer that are not loaded into a GRASS Mapset.
There are many different ways to load data in the GRASS database. Let’s start with the first one.
Follow Along: Load data using the QGIS Browser
In section Panoul Navigatorului we saw that the easiest and quickest way to load the data in QGIS is the Browser Panel.
GRASS data are recognized from the QGIS Browser as real GRASS data and you can
notice it because you will see the GRASS icon next to the GRASS Mapset. Moreover
you will see the  icon next to the Mapset that is opened.
Notă
You will see a replication of the GRASS Location as normal folder:
GRASS Mapset data are those within the  folder
You can easily drag and drop layers from a folder to the GRASS Mapset.
Let’s try to import the roads layer into the grass_mapset Mapset
of the SouthAfrica Location.
Go to the Browser, and simply drag the roads layer from the
training_data.gpkg GeoPackage file into the grass_mapset Mapset.
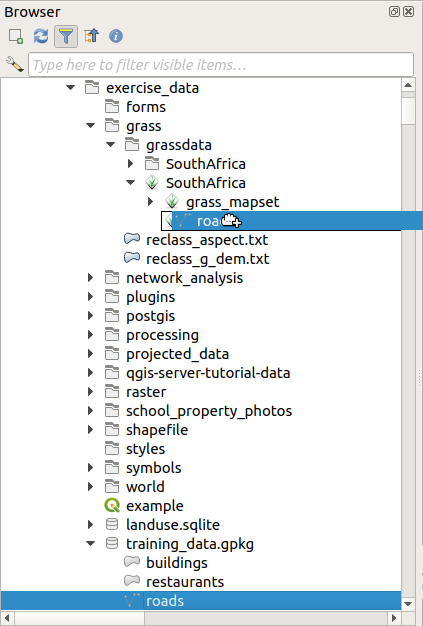
That’s it! If you expand the Mapset you will see the imported roads
layer. You can now load in QGIS the imported layer like all the other layers.
Sfat
You can also load layers from the Layer Legend Panel to Mapset in the Browser Panel. This will speed up incredibly your workflow!
Follow Along: Load data using the GRASS Panel
We will use now the long method to load the rivers.shp layer into the
same Mapset.
Load data into QGIS as usual. Use the
rivers.shpdataset (found in theexercise_data/shapefile/folder)As soon as it is loaded, click on the Filter box of the
GRASS Paneland find the vector import tool by entering the termv.in.ogr.qgis:Atenționare
There are 2 similar tools:
v.in.ogr.qgisandv.in.ogr.qgis.loc. We are looking for the first one.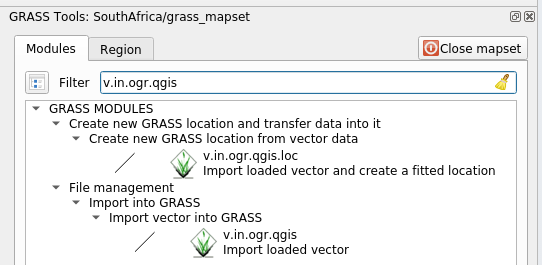
The
vstands for vector,inmeans a function to import data into the GRASS database,ogris the software library used to read vector data, andqgismeans that the tool will look for a vector from among the vectors already loaded into QGIS.Once you’ve found this tool, click on it to bring up the tool itself. Choose the rivers layer in the Loaded Layer box and type and name it
g_riversto prevent confusion: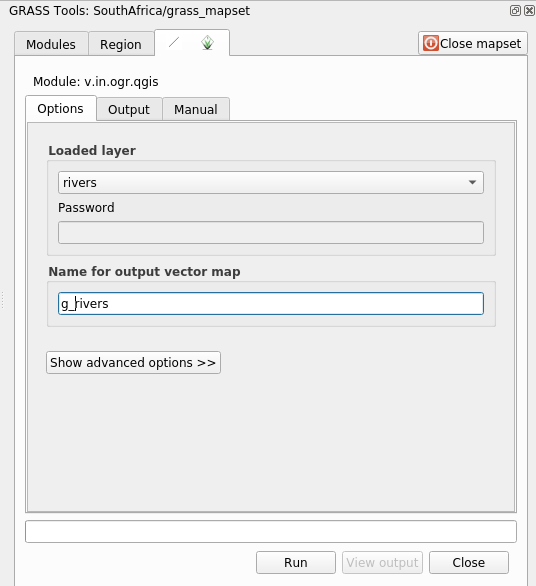
Notă
 Remarcați opțiunile suplimentare specificate la Advanced Options. Acestea includ facilitatea de a adăuga o clauză WHERE pentru interogarea SQL folosită la importul datelor.
Faceți clic pe Run pentru a începe importul.
După finalizare, dați clic pe butonul View output pentru a vedea noul strat GRASS importat în hartă.
Închideți primul instrument de import (dați clic pe butonul Close imediat în dreapta de View output), după care închideți fereastra GRASS Tools.
Remove the original rivers layer.
Acum ați rămas doar cu stratul GRASS importat, așa cum este afișat în harta dvs. din QGIS.
12.1.4. Follow Along: Încărcarea Datelor Raster în GRASS
You can import a raster layer in the same ways we imported vector layers.
We are going to import in the GRASS Mapset the layer srtm_41_19_4326.tif.
Notă
the raster layer is already in the correct CRS, WGS 84. If you
have layers in different CRS you must reproject them in the same CRS of the
GRASS Mapset
Load the
srtm_41_19_4326.tiflayer in QGISDeschideți iarăși dialogul Instrumentelor GRASS.
Clic pe fila Modules List.
Search for
r.in.gdal.qgisand double click the tool to open the tool’s dialog.Set it up so that the input layer is
srtm_41_19_4326.tifand the output isg_dem.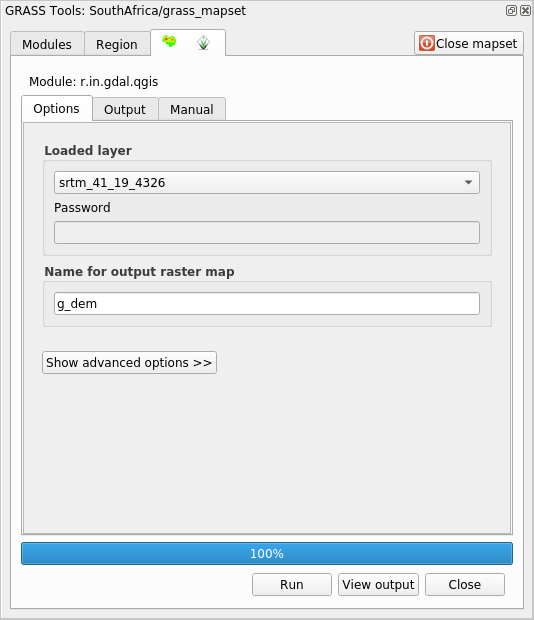
Clic pe Run
Când procesul s-a încheiat, faceți clic pe Vizualizare rezultat.
Închideți fila curentă, apoi Închideți întregul dialog.
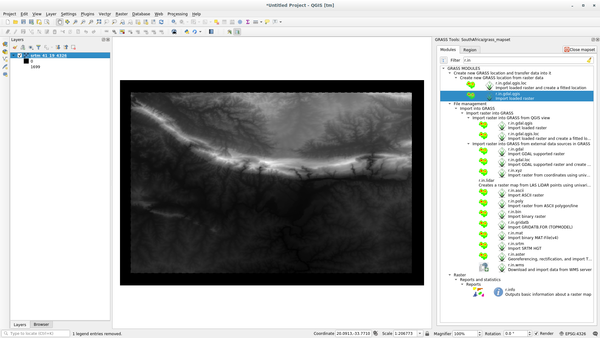
You may now remove the original
srtm_41_19_4326.tiflayer.
12.1.5. Try Yourself Add Layers to Mapset
Try to import in the GRASS Mapset the vector layers water.shp and
places.shp from the exercise_data/shapefile/ folder. As we did
for rivers rename the imported layer as g_water and g_places
to avoid confusion
Răspuns
You can add layers (both vector and raster) into a GRASS Mapset by drag and
drop them in the Browser (see Follow Along: Load data using the QGIS Browser) or by using the
v.in.gdal.qgis for vector and r.in.gdal.qgis for raster layers.
12.1.6. Open an existing GRASS Mapset
If you have an existing GRASS Mapset you can easily reopen it in another session of QGIS.
You have several method to open a GRASS Mapset, let’s explore some of them.
Let’s close the Mapset by clicking on the Close Mapset button of the GRASS Tools window.
Follow Along: Using the GRASS plugin
Click on the Plugins –> GRASS –> Open Mapset menu next to the Plugins –> GRASS –> New Mapset menu that we saw in the previous section.
Browse to the GRASS database folder: be careful! You must choose the parent folder, not the GRASS Mapset one. Indeed GRASS will read all the
Locationsof the database and all theMapsetsof eachLocation: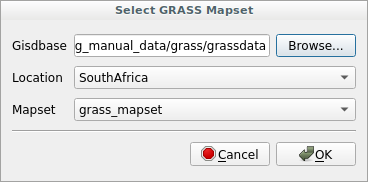
Choose the
LocationSouthAfrica and theMapsetgrass_mapset that we have created before.
That’s it! The GRASS Panel will become active meaning that the Mapset has been correctly opened.
Follow Along: Using the QGIS Browser
Even faster and easier is opening a Mapset using the QGIS Browser:
Close the Mapset (if it is open) by clicking on the Close Mapset button of the GRASS Tools window.
In the QGIS Browser, browse to the folder of the GRASS database.
Right click on the Mapset (remember, the Mapset has the
GRASS icon
next to it). You will see some options.Click on Open mapset:
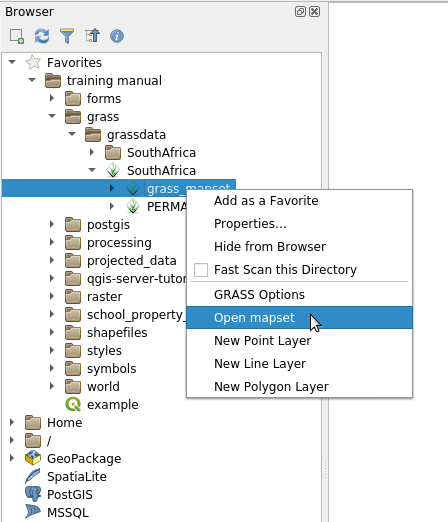
The Mapset is now open and ready to use!
Sfat
Right click on a GRASS Mapset offers you a lot of different settings. Try to explore them and see all the useful options.
12.1.7. In Conclusion
Fluxul de lucru GRASS pentru asimilarea datelor este ușor diferit de metoda QGIS pentru că GRASS încarcă datele într-o structură de bază de date spațială. Cu toate acestea, utilizănd QGIS ca interfață, puteți ușura setarea unui mapset GRASS prin utilizarea straturilor existente QGIS ca surse de date pentru GRASS.
12.1.8. What’s Next?
Acum, o dată ce datele sunt importate în GRASS, ne putem uita la operațiunile avansate de analiză pe care le oferă GRASS.