2.1. Lesson: O Privire de Ansamblu asupra Interfeței
Vom explora interfața cu utilizatorul QGIS, pentru a vă familiariza cu meniurile, barele de instrumente, canevasul hărții și lista de straturi care formează structura de bază a interfeței.
Scopul acestei lecții: De a înțelege noțiunile de bază ale interfeței QGIS.
2.1.1.  Try Yourself: Noțiuni de Bază
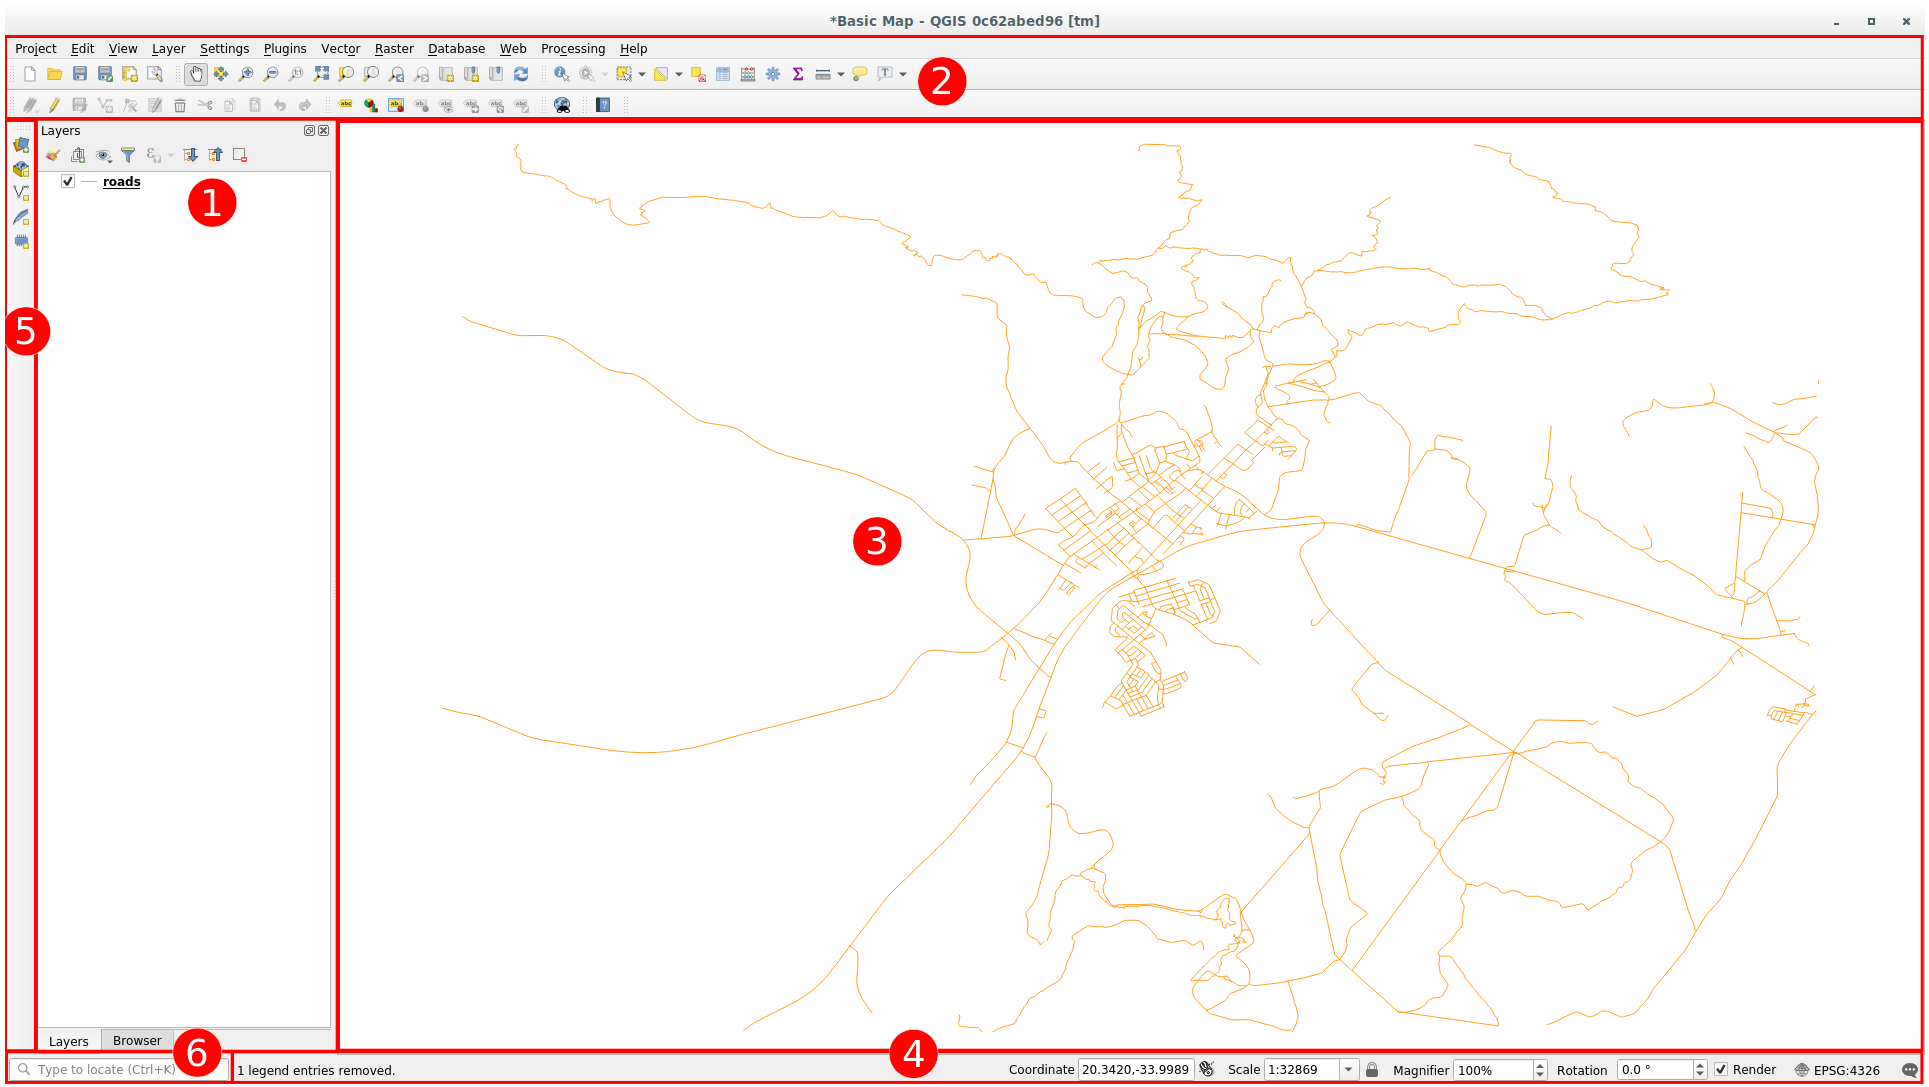
Elementele identificate în figura de mai sus sunt:
Lista Straturilor/Panoul Navigatorului
Bare de instrumente
Canevasul hărții
Bara de Stare
Bara Laterală de Instrumente
Bara locatorului
Lista Straturilor
În lista Straturi, puteți vedea o listă, în orice moment, a tuturor straturilor disponibile pentru dvs.
Extinderea obiectelor restrânse (făcând clic pe săgeata sau pe simbolul plus de lângă ei) vă va oferi mai multe informații despre aspectul stratului actual.
Hovering over the layer will give you some basic information: layer name, type of geometry, coordinate reference system and the complete path of the location on your device.
Un clic-dreapta pe un strat vă va oferi un meniu cu o mulțime de opțiuni suplimentare. Veți folosi unele dintre ele mult timp de acum înainte, așa că haideți să aruncăm o privire asupra lor!
Notă
Un strat vectorial este un set de date, de obicei, al unui anumit tip de obiect, cum ar fi drumuri, copaci, etc. Un strat vectorial poate consta fie în puncte, în linii sau poligoane.
Panoul Navigatorului
The QGIS Browser is a panel in QGIS that lets you easily navigate in your database. You can have access to common vector files (e.g. ESRI Shapefile or MapInfo files), databases (e.g. PostGIS, Oracle, SpatiaLite, GeoPackage or MS SQL Server) and WMS/WFS connections. You can also view your GRASS data.
If you have saved a project, the Browser Panel will also give you quick access to
all the layers stored in the same path of the project file under in the
 Project Home item.
Moreover, you can set one or more folder as Favorites: search under your path
and once you have found the folder, right click on it and click on Add as a
Favorite. You should then be able to see your folder in the  Favorites item.
Sfat
It can happen that the folders added to Favorite item have a really
long name: don’t worry right-click on the path and choose Rename Favorite...
to set another name.
Barele de instrumente
Your most often used sets of tools can be turned into toolbars for basic access. For example, the Project toolbar allows you to save, load, print, and start a new project. You can easily customize the interface to see only the tools you use most often, adding or removing toolbars as necessary via the menu.
Even if they are not visible in a toolbar, all of your tools will remain accessible via the menus. For example, if you remove the Project toolbar (which contains the Save button), you can still save your map by clicking on the Project menu and then clicking on Save.
Canevasul Hărții
This is where the map itself is displayed and where layers are loaded. In the map canvas you can interact with the visible layers: zoom in/out, move the map, select features and many other operations that we will deeply see in the next sections.
Bara de Stare
Shows you information about the current map. Also allows you to adjust the map scale, the map rotation and see the mouse cursor’s coordinates on the map.
The Side Toolbar
By default the Side toolbar contains the buttons to load the layer and all the buttons to create a new layer. But remember that you can move all the toolbars wherever it is more comfortable for you.
The Locator Bar
Within this bar you can access to almost all the objects of QGIS: layers, layer features, algorithms, spatial bookmarks, etc. Check all the different options in the Locator settings section of the QGIS User Manual.
Sfat
With the shortcut Ctrl+K you can easily access the bar.
2.1.2. Try Yourself 1
Încercați să identificați cele patru elemente enumerate pe ecranul dvs., fără a face referire la diagrama de mai sus. Vedeți dacă puteți identifica numele și funcțiile lor. Vă veți familiariza cu aceste elemente, pe măsură ce le veți folosi în următoarele zile.
Răspuns
Refer back to the image showing the interface layout and check that you remember the names and functions of the screen elements.
2.1.3. Try Yourself 2
Încercați să identificați fiecare dintre aceste instrumente pe ecran. Care este scopul lor?


 Render
Notă
Dacă nici unul dintre aceste instrumente nu este vizibil pe ecran, încercați să activați unele bare de instrumente care sunt în prezent ascunse. De asemenea, rețineți că, dacă nu există suficient spațiu pe ecran, o bară de instrumente poate fi redusă prin ascunderea unora dintre instrumentele sale. Puteți vedea instrumentele ascunse, făcând clic pe butonul cu două săgeți îndreptate în dreapta, de pe oricare bară de instrumente restrânsă. Puteți vedea un balon cu numele oricărui instrument, prin trecerea un pic a mouse-ului pe deasupra unui instrument.
Răspuns
Save as
Zoom to layer(s)
Invert selection
Rendering on/off
Measure line
2.1.4. What’s Next?
Now that you are familiar with the basics of the QGIS interface, in the next lesson we will see how to load some common data types.