14.3. Configurando um rótulo
Rótulos são informações textuais que você pode exibir em recursos ou mapas vetoriais. Eles adicionam detalhes que você não poderia necessariamente representar usando símbolos. Dois tipos de itens relacionados a texto estão disponíveis no QGIS:
Text Format: defines the appearance of the text, including font, size, colors, shadow, background, buffer, …
They can be used to render texts over the map (layout/map title, decorations, scale bar, …), usually through the font widget.
Para criar um item Formato de texto:
Open the
 Style Manager dialog
Ativar a aba Formato de texto
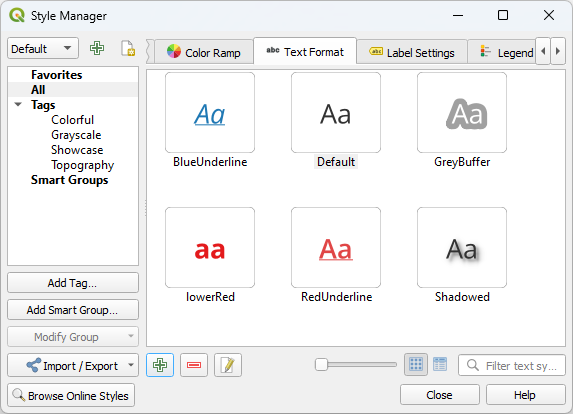
Fig. 14.21 Text formats in Style Manager dialog
Pressione o botão
 Adicionar item. O diálogo Formato do texto abre para configuração. Como de costume, estas propriedades são dados definíveis.
:guilabel:`Configurações de rótulos’: ampliar as configurações de formato do texto com propriedades relacionadas à localização ou à interação com outros textos ou características (:ref:`chamadas, :ref:`posicionamento’, :ref:`sobreposição, visibilidade em escala’, máscara …).
They are used to configure smart labelling for vector layers through the
 Labels tab of the vector Layer Properties
dialog or Layer Styling panel or using the Layer
Labeling Options button of the Label toolbar.
Labels tab of the vector Layer Properties
dialog or Layer Styling panel or using the Layer
Labeling Options button of the Label toolbar.Para criar um item :guilabel:`Configurações de rótulos’:
Open the
Style Manager dialogAtivar a aba :guilabel:`Configurações de rótulos’:
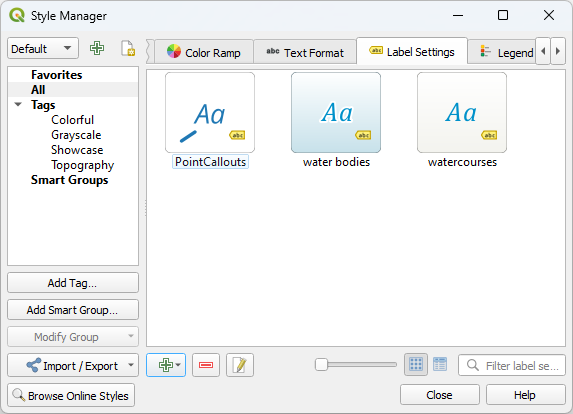
Fig. 14.22 Label Settings in Style Manager dialog
Pressione o menu
Adicionar item e selecione a entrada correspondente ao tipo de geometria das características que você deseja rotular.
The Label Settings dialog opens with the following properties. As usual, these properties are data-definable.
14.3.1. Formatando o texto do rótulo
Se você estiver configurando um item Formato de texto ou Configurações de rótulos, você terá as seguintes opções:
Aba de propriedades |
Formato de texto |
Configurações de rótulos |
|---|---|---|
Texto |
|
|
:guilabel:`Formatação’ |
|
|
Buffer |
|
|
Máscara |
|
|
Plano de Fundo |
|
|
Sombra |
|
|
Chamada |
|
|
Posicionamento |
|
|
Renderização |
|
14.3.1.1. Aba de texto
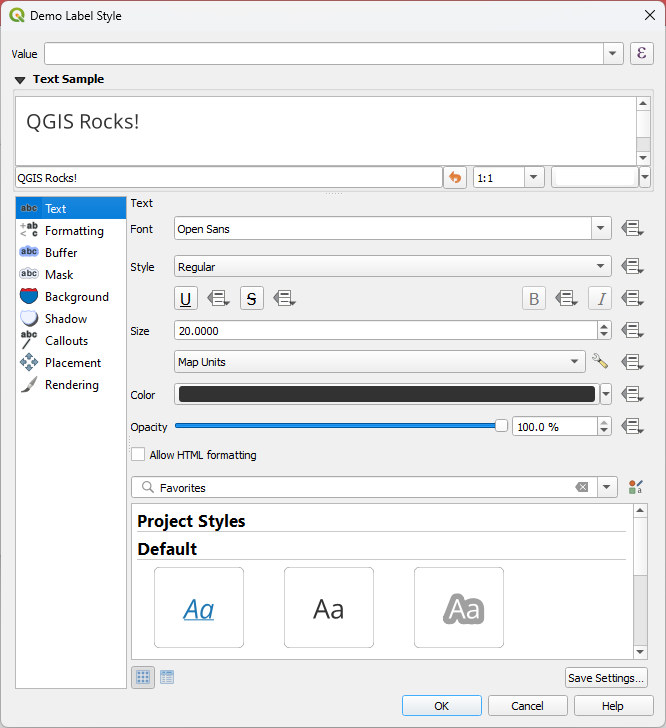
Fig. 14.23 Configurações de rótulos - Aba de texto
Na aba  Texto, você pode definir:
a Fonte, a partir das disponíveis em sua máquina
o Estilo: juntamente com os estilos comuns da fonte, você pode definir se o texto deve ser sublinhado ou riscado através
o tamanho em qualquer :ref:`unidade suportada `
A Cor
a Opacidade
and Allow HTML Formatting: The HTML formatting option enables the proper rendering of some HTML tags to customize the label. The supported HTML tags are:
Color, applicable to text, underline, strikethrough, and overline
Font properties (font family, font size, bold and italic)
Para utilizar a formatação HTML, você precisa fornecer o código HTML no campo Valor. A expressão é analisada e qualquer tag HTML suportada substitui sua configuração correspondente nas propriedades dos rótulos. Elas também combinam bem com outras propriedades de fundo, sombra, buffer… dos rótulos.
Abaixo um exemplo de uma expressão e renderização baseadas em HTML (aplica cores e sublinhados diferentes ao mesmo rótulo):
format(
  '<span style="color:blue">%1</span> ( <span style="color:red"><u>%2 ft</u></span> )',
  title( lower( "Name" ) ),
  round($length)
)
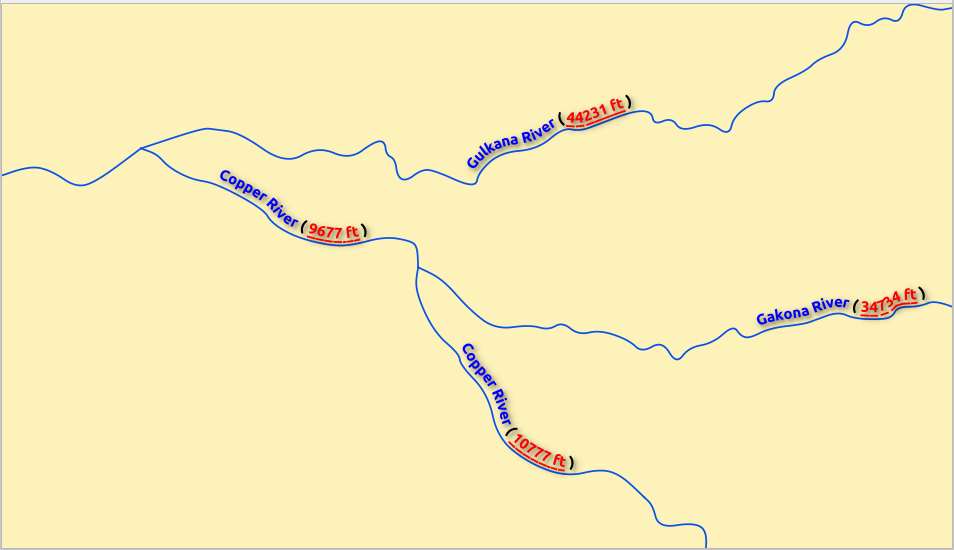
Fig. 14.24 Rotulagem com formatação HTML habilitada
At the bottom of the tab, a widget shows a filterable list of compatible items stored in your style manager database. This allows you to easily configure the current text format or label setting based on an existing one, and also save a new item to the style database: Press the Save format… or Save settings… button and provide a name and tag(s).
Nota
Ao configurar um item Configurações de rótulos, os itens de formato de texto também estão disponíveis neste elemento. Selecione um para sobrescrever rapidamente as :ref:`propriedades textuais <text_format>’ atuais da etiqueta. Da mesma forma, você pode criar/sobreescrever um formato de texto a partir daí.
14.3.1.2. Aba de formatação
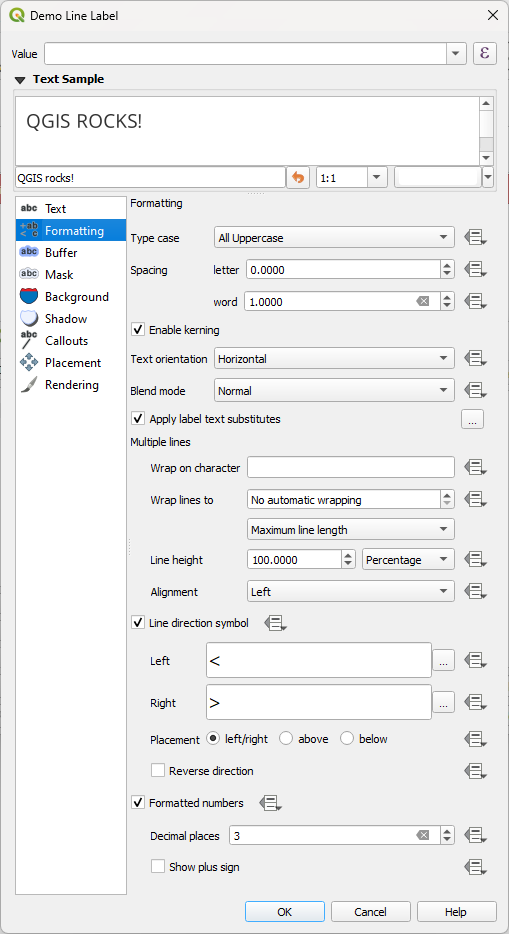
Fig. 14.25 Configurações de rótulos - Aba de formatação
Na aba  :guilabelting:`Formatação’, você pode:
Utilize a opção Tipo de formatação para mudar o estilo de capitalização do texto. Você tem a possibilidade de renderizar o texto como:
Sem mudança
Todas maiúsculas
Todas minúsculas
Caso de letra maiúscula: modifica a primeira letra de cada palavra em maiúscula, e transforma as outras letras em minúsculas se o texto original estiver utilizando um único tipo de caixa. No caso de casos de tipo misto no texto, as outras letras são deixadas intocadas.
guilabel:Forçar a primeira letra maiúscula: modifica a primeira letra de cada palavra em maiúsculas e deixa as outras letras no texto intocadas.
Sob Espaçamento, mude o espaço entre as palavras e entre as letras individuais.
Stretch ratio: allows text to be horizontally stretched or condensed by a factor. Handy for tweaking the widths of fonts to fit a bit of extra text into labels.
 Habilitar o kerning da fonte de texto
Definir a orientação do texto que pode ser Horizontal ou Vertical. Também pode ser Baseado na rotação ao definir um rótulo (por exemplo, para características de linha de rótulos adequadas em :ref:`paralelo ` ao modo de posicionamento).
Utilize a opção Modo de mistura para determinar como seus rótulos se misturarão com as características do mapa abaixo delas (mais detalhes em Modos de Mistura).
The
 Apply label text substitutes option allows you
to specify a list of texts to substitute to texts in feature labels (e.g.,
abbreviating street types). Replacement texts are used when displaying
labels on the map. Users can also export and import lists of
substitutes to make reuse and sharing easier.
Apply label text substitutes option allows you
to specify a list of texts to substitute to texts in feature labels (e.g.,
abbreviating street types). Replacement texts are used when displaying
labels on the map. Users can also export and import lists of
substitutes to make reuse and sharing easier.Configure Múltiplas linhas:
Set a character that will force a line break in the text with the Wrap on character option
Defina um tamanho de linha ideal para a quebra automática utilizando a opção :guilabel:`Quebrar linhas para’. O tamanho pode representar tanto o :guilabel:`Comprimento máximo da linha’ ou o :guilabel:`Comprimento mínimo da linha’.
Decide the Line Height: values can be set to be in Millimeters, Points, Pixels, Percentage, or Inches. When line height is set to percentage it is the percentage of the default text line spacing of that font family. Typically 1.2 to 1.5 times the text size.
Formatar o Alinhamento: os valores típicos disponíveis são Esquerda, Direita, :guilabel:`Justificado’ e :guilabel:`Centro’.
When setting point labels properties, the text alignment can also be Follow label placement. In that case, the alignment will depend on the final placement of the label relative to the point. E.g., if the label is placed to the left of the point, then the label will be right aligned, while if it is placed to the right, it will be left aligned.
Nota
A formatação Linhas múltiplas ainda não é suportada por curvas baseadas em posicionamento de etiquetas. As opções serão então desativadas.
For line labels you can include Line direction symbol to help determine the line directions, with symbols to use to indicate the Left or Right. They work particularly well when used with the curved or Parallel placement options from the Placement tab. There are options to set the symbols position, and to
Reverse direction.Use the
Formatted numbers option to format numeric
texts. You can set the number of Decimal places. By default, 3decimal places will be used. Use the Show plus sign if
you want to show the plus sign for positive numbers.
14.3.1.3. Aba de buffer
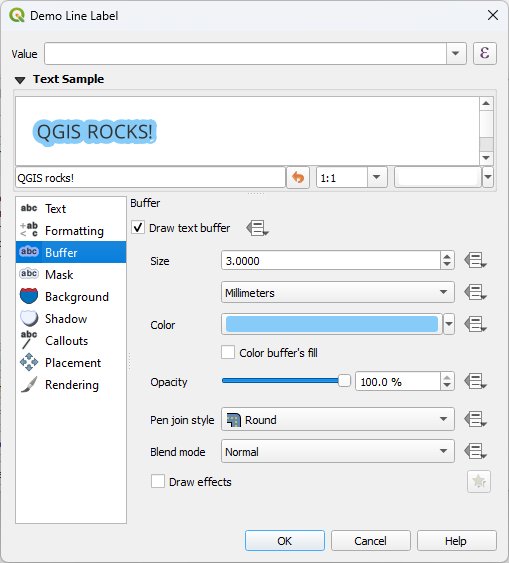
Fig. 14.26 Configurações de rótulos - Aba buffer
To create a buffer around the label, activate the Draw
text buffer checkbox in the  Buffer tab. Then you can:
Set the buffer’s Size in any supported unit
Select the buffer’s Color
- Color buffer’s fill: The buffer expands from the
label’s outline, so, if the option is activated, the label’s interior is
filled. This may be relevant when using partially transparent labels or with
non-normal blending modes, which will allow seeing behind the label’s text.
Unchecking the option (while using totally transparent labels) will allow you
to create outlined text labels.
Defina o deslocamento Opacidade
Apply a Pen join style: it can be Round, Miter or Bevel
Use the Blend mode option to determine how your label’s buffer will mix with the map components below them (more details at Modos de Mistura).
Check
Draw effects to add advanced  paint effects for improving text readability,
eg through outer glows and blurs.
paint effects for improving text readability,
eg through outer glows and blurs.
14.3.1.4. Aba de Plano de Fundo
The  Background tab allows you to configure a
shape that stays below each label. To add a background, activate
the Draw Background checkbox and select
the Shape type. It can be:
Background tab allows you to configure a
shape that stays below each label. To add a background, activate
the Draw Background checkbox and select
the Shape type. It can be:
uma forma regular, como Retângulo, quadrado, Círculo ou Elípse utilizando todas as propriedades de um símbolo de preenchimento.
um símbolo SVG de um arquivo, um URL ou embutido no banco de dados do projeto ou estilo (mais detalhes)
ou uma Símbolo de marcador você pode criar ou selecionar na biblioteca de símbolos.
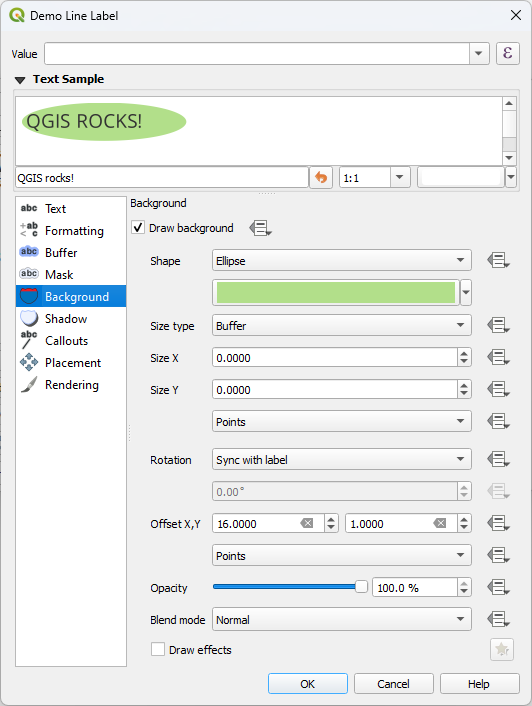
Fig. 14.27 Configurações de rótulos - Aba de Plano de Fundo
Dependendo da forma selecionada, você precisa configurar algumas das seguintes propriedades:
O Tipo de tamanho da moldura, que pode ser:
Fixado: utilizando o mesmo tamanho para todas os rótulos, independentemente do tamanho do texto
or a Buffer over the text’s bounding box
O tamanho da moldura nas direções X e Y, utilizando qualquer :ref:`unidades suportadas `
A Rotation of the background, between Sync with label, Offset of label and Fixed. The last two require an angle in degrees.
Um Deslocamento X,Y para mudar o item de fundo nas direções X e/ou Y
Um Radius X,Y para arredondar os cantos da forma do fundo (aplica-se somente a formas retangulares e quadradas)
Uma: ‘guilabel’:`Opacidade’ do plano de fundo
A Blend mode to mix the background with the other items in the rendering (see Modos de Mistura).
For SVG symbol, you can use its default properties (Load symbol parameters) or set a custom Fill color, Stroke color and Stroke width.
- Draw effects to add advanced
paint effects for improving text readability,
eg through outer glows and blurs.
14.3.1.5. Aba sombra
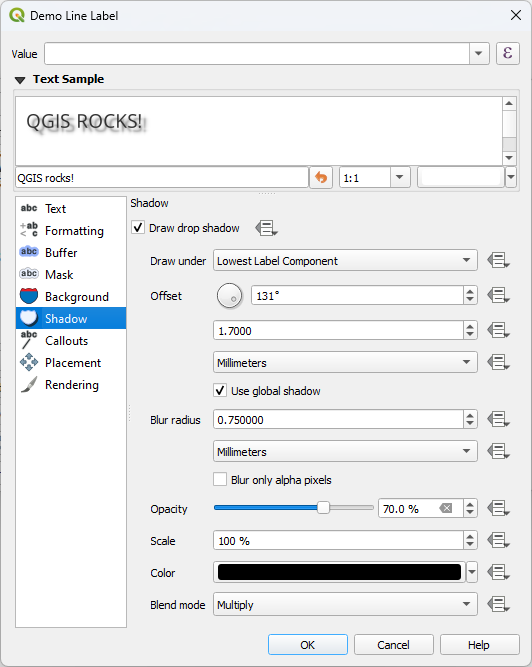
Fig. 14.28 Configurações de rótulo - guia Sombra
To add a shadow to the text, enable the  Shadow
tab and activate the Draw drop shadow. Then you can:
Shadow
tab and activate the Draw drop shadow. Then you can:
Indicate the item used to generate the shadow with Draw under. It can be the Lowest label component or a particular component such as the Text itself, the Buffer or the Background.
Set the shadow’s Offset from the item being shadowded, ie:
O ângulo: no sentido horário, depende da orientação do item subjacente
A distância do deslocamento do item que está sendo sombreado
As unidades do deslocamento
Se você marcar a caixa
Usar sombra global , então o ponto zero do ângulo é sempre orientado para o norte e não depende da orientação do item da etiqueta.Influenciar a aparência da sombra com o :guilabel:’Raio de embaçamento’. Quanto maior o número, mais suaves as sombras, nas unidades de sua escolha.
Defina para a sombra :guilabel:`Opacidade’.
Redimensionar o tamanho da sombra utilizando o fator escala
Escolha a cor da sombra Cor
Use the Blend mode option to determine how your label’s shadow will mix with the map components below them (more details at Modos de Mistura).
14.3.2. Configurando a interação com rótulos
Além das configurações de formatação de texto expostas acima, você também pode definir como os rótulos interagem umas com as outras ou com as feições.
14.3.2.1. Aba de máscara
The  Mask tab allows you to define a mask area around
the labels. This feature is very useful when you have overlapping symbols and
labels with similar colors, and you want to make the labels visible.
Mask tab allows you to define a mask area around
the labels. This feature is very useful when you have overlapping symbols and
labels with similar colors, and you want to make the labels visible.
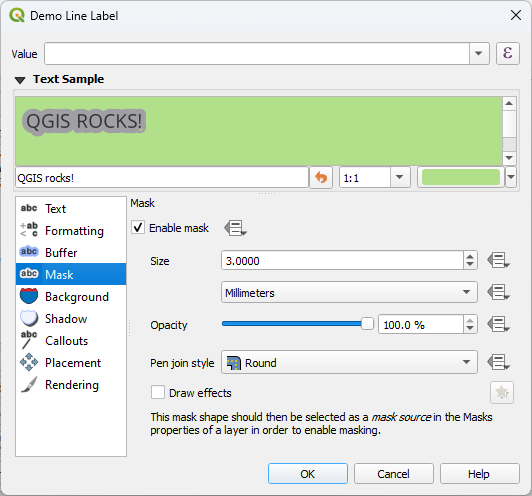
Fig. 14.29 Labels settings - Mask tab (with the text sample showing a green background representing another layer being excluded)
Para criar efeitos de mascaramento nos rótulos:
Activate the
Enable mask checkbox in the tab.Depois, você pode definir:
the mask’s Size in the supported units
a: ‘guilabel:`Opacidade’ da área da máscara ao redor do rótulo
a Pen Join Style
paint effects through the
Draw effects checkbox.
Select this mask shape as a mask source in the overlapping layer properties
Mask tab (see Propriedades das Máscaras).
14.3.2.2. Aba de chamadas
A common practice when placing labels on a crowded map is to use callouts - labels which are placed outside (or displaced from) their associated feature are identified with a dynamic line connecting the label and the feature. If one of the two endings (either the label or the feature) is moved, the shape of the connector is recomputed.
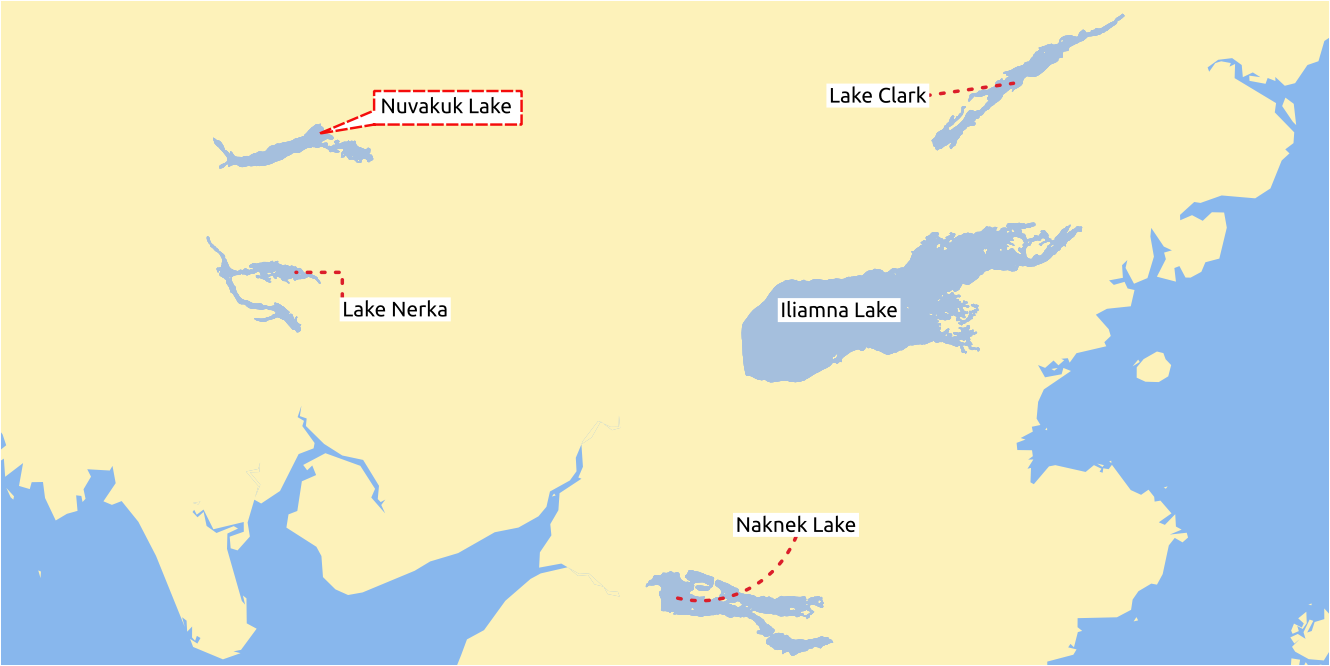
Fig. 14.30 Rótulos com várias configurações de chamadas
To add a callout to a label, enable the  Callouts
tab and activate the Draw callouts. Then you can:
Callouts
tab and activate the Draw callouts. Then you can:
Selecione o Estilo de conector, um de:
Linhas simples: uma linha reta, o caminho mais curto
Estilo Manhattan: uma linha quebrada a 90°
Linhas curvadas: uma linha curvada
:guilabel:`Balões’: uma bolha de fala que envolve o rótulo e aponta para a feição. Ela pode ter cantos arredondados.
For a line-based callout:
Select the Line style with full capabilities of a line symbol including layer effects, and data-defined settings
Se curvo, você também define:
a porcentagem de Curvatura da linha de conexão
e sua Orientação: começando do rótulo até a feição, pode ser Sentido horário ou Anti-horário, ou Automático (determinando uma orientação ótima para cada rótulo)
Configurar o Comprimento mínimo de linhas de chamada
Check whether to
Draw lines to all feature parts
from the feature’s labelSet the Label anchor point: controls where the connector line should join to the label text. Available options:
Ponto mais próximo
Centróide
Fixed position at the edge (Top left, Top center, Top right, Left middle, Right middle, Bottom left, Bottom center and Bottom right).
Set the Offset from label area option: controls the distance from the label anchor point (where the callout line ends). This avoids drawing lines right up against the text.
Para uma balão de chamada, seria necessário definir:
the Fill style with full capabilities of a fill symbol including layer effects, and data-defined settings
o: “guilabel: “raio de canto” do balão de fala
the Wedge width: how large the bubble speech connection with feature’s pointer should be
as Margens ao redor do texto do rótulo
Set the Offset from feature option: controls the distance from the feature (or its anchor point if a polygon) where callout lines end. Eg, this avoids drawing lines right up against the edges of the features.
Set the Feature anchor point for the (polygon) feature (the end point of the connector line). Available options:
Set the Blend mode: controls the blending of the callout.
Under the Data defined placement group, coordinates of the
Origin (on the label side) and/or Destination
(on the feature side) points of the callout can be controlled.
Callouts can also be controlled manually by using the  Move Label, Diagram or Callout tool in the Labeling Toolbar.
The start and end points of each callout can be moved this way.
The nodes should be highlighted when the mouse pointer is nearby.
If needed the Shift Key can be held during the movement.
This will snap the point in a way that the angle between the two callout points
increments by 15 degrees.
Move Label, Diagram or Callout tool in the Labeling Toolbar.
The start and end points of each callout can be moved this way.
The nodes should be highlighted when the mouse pointer is nearby.
If needed the Shift Key can be held during the movement.
This will snap the point in a way that the angle between the two callout points
increments by 15 degrees.
14.3.2.3. Aba de posicionamento
Choose the  Placement tab for configuring label placement
and labeling priority. Note that the placement options differ according to the
type of vector layer, namely point, line or polygon, and are affected by
the global PAL setting.
Placement tab for configuring label placement
and labeling priority. Note that the placement options differ according to the
type of vector layer, namely point, line or polygon, and are affected by
the global PAL setting.
Posicionamento para camadas de ponto
Os modos de posicionamento de rótulos de camadas de ponto disponíveis são:
:guilabel:`Cartográfico’: os rótulos pontuais são gerados com uma melhor relação visual com a feição pontual, seguindo as regras ideais de posicionamento cartográfico. Os rótulos podem ser colocados:
at a set Distance in supported units, either from the point feature itself or from the bounds of the symbol used to represent the feature (set in Distance offset from). The latter option is especially useful when the symbol size isn’t fixed, e.g. if it’s set by a data defined size or when using different symbols in a categorized renderer.
seguindo uma: ‘guilabel:`Posição prioritária’ que pode ser personalizada ou definida para uma característica individual utilizando uma lista definida de dados de posições priorizadas. Isto também permite que apenas certas posições sejam utilizadas, por exemplo, para características costeiras você pode evitar a colocação de etiquetas sobre a terra.
By default, cartographic mode placements are prioritised in the following order (respecting the guidelines from Krygier and Wood (2011) and other cartographic textbooks):
superior direito
superior esquerdo
inferior direito
inferior esquerdo
direita central
esquerda central
superior, ligeiramente à direita
inferior, ligeiramente à esquerda.
Around Point: labels are placed in a circle around the feature. equal radius (set in Distance) circle around the feature. The placement priority is clockwise from the “top right”. The position can be constrained using the data-defined Quadrant option.
Offset from Point: labels are placed at an Offset X,Y distance from the point feature, in various units, or preferably over the feature. You can use a data-defined Quadrant to constrain the placement and can assign a Rotation to the label.
Posicionamento para camadas de linha
Os modos de rótulos para camadas de linha incluem:
Paralelo: desenha o rótulo paralelamente a uma linha generalizada que representa a característica, com preferência para colocação em vez de porções mais retas da linha. Você pode definir:
Posições permitidas: Acima da linha, Em linha, Abaixo da linha e Posição dependente da orientação da linha (colocando a etiqueta à esquerda ou à direita do limite do polígono). É possível selecionar várias opções ao mesmo tempo. Nesse caso, o QGIS procurará a posição ideal do rótulo.
Distance between the label and the line
guilabel:Curvado: desenha o rótulo seguindo a curvatura da característica da linha. Além dos parâmetros disponíveis com o modo Paralelo, você pode definir a ângulo máximo entre caracteres curvados, seja dentro ou fora.
guilabel:Horizontal: desenha rótulos na horizontal ao longo do traço da linha.
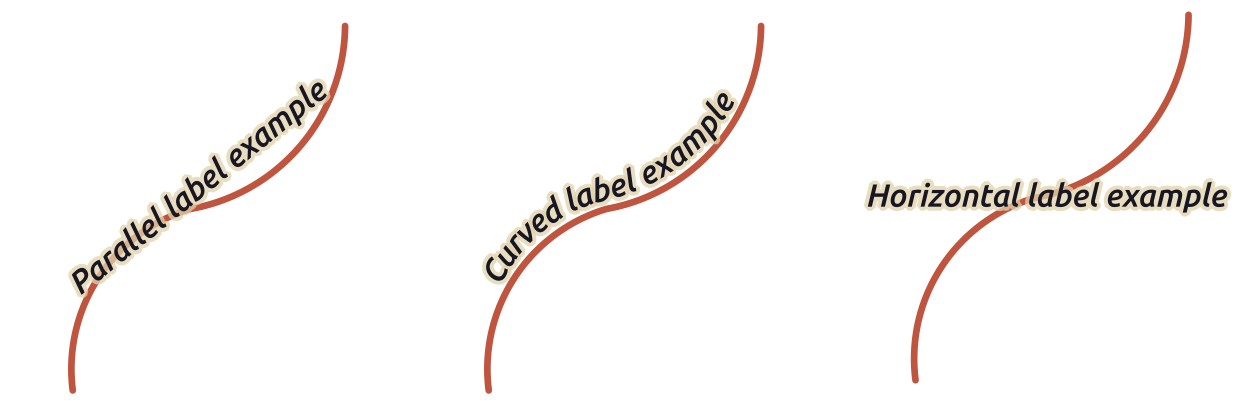
Fig. 14.31 Exemplos de posicionamento de rótulos para linhas
Ao lado dos modos de posicionamento, você pode definir:
:guilabel:`Rótulos repetitivos’ :guilabel:`Distância’ para exibir várias vezes o rótulo ao longo do comprimento do recurso. A distância pode ser em “Milímetros”, “Pontos”, “Pixels”, “Medidores em escala”, “Unidades do mapa” e “Polegadas”.
A Label Overrun Distance (not available for horizontal mode): specifies the maximal allowable distance a label may run past the end (or start) of line features. Increasing this value can allow for labels to be shown for shorter line features.
Label Anchoring: controls the placement of the labels along the line feature they refer to. Click on Settings … to choose:
a posição ao longo da linha (como proporção) a que rótulos serão colocados próximos. Pode ser definido pelos dados e os valores possíveis são:
 Centro da linha
 Começo da linha
 Final da linha
ou
 Customizar.
Clipping: Determines how the label placement on a line is calculated. By default only the visible extent of the line is used but the whole extent can be used to have more consistent results.
Anchor text: controls which part of the text (start, center or end) will line up with the anchor point. Using Automatic anchoring means that:
For labels anchored near the start of the line (0-25%), the anchor placement will be the start of the label text
For labels anchored near the end of the line (75-100%), the anchor placement will be the end of the label text
For labels anchored near the center of the line (25-75%), the anchor placement will be the center of the label text
Placement Behavior: use Preferred Placement Hint to treat the label anchor only as a hint for the label placement. By choosing Strict, labels are placed exactly on the label anchor.
Posicionamento para camadas de polígono
Você pode escolher um dos seguintes modos para a colocação de rótulos de polígonos:

Fig. 14.32 Exemplos de posicionamento de rótulos para polígonos
Offset from Centroid: labels are placed over the feature centroid or at a fixed Offset X,Y distance (in supported units) from the centroid. The reference centroid can be determined based on the part of the polygon rendered in the map canvas (visible polygon) or the whole polygon, no matter if you can see it. You can also:
forçar o ponto do centroide a ficar dentro de seu polígono
colocar o rótulo dentro de um quadrante específico
atribuir uma rotação
Allow placing labels outside of polygons when it is not possible to place them inside the polygon. Thanks to data-defined properties, this makes possible to either allow outside labels, prevent outside labels, or force outside labels on a feature-by-feature basis.
Around Centroid: places the label within a preset distance around the centroid, with a preference for the placement directly over the centroid. Again, you can define whether the centroid is the one of the visible polygon or the whole polygon, and whether to force the centroid point inside the polygon.
guilabel:Horizontal: coloca na um rótulo na melhor posição dentro do polígono. A colocação preferida é mais longe das bordas do polígono. É possível Permitir a colocação de rótulos fora dos polígonos.
guilabel:Livre (Angulado): coloca um rótulo na melhor posição girada dentro do polígono. A rotação respeita a orientação do polígono e a colocação preferida está mais longe das bordas do polígono. É possível Permitir a colocação de rótulos fora dos polígonos.
Usando o perímetro: desenha o rótulo paralelamente a uma linha generalizada que representa o limite do polígono, com preferência por porções mais retas do perímetro. Você pode definir:
:guilabel:``Posições permitidas`: Acima da linha, Em linha, Abaixo da linha e Posição dependente da orientação da linha (colocando a etiqueta à esquerda ou à direita do limite do polígono). É possível selecionar várias opções ao mesmo tempo. Nesse caso, o QGIS procurará a posição ideal do rótulo.
Distância entre o rótulo e o contorno do polígono
o :guilabel:`Repetindo Rótulos’ :guilabel:`Distância’ para exibir várias vezes o rótulo ao longo do comprimento do perímetro.
Usando Perímetro (Curvado): desenha o rótulo seguindo a curvatura do limite do polígono. Além dos parâmetros disponíveis com o modo :guilabel:`Usando Perímetro’, você pode definir o modo :guilabel:`ângulo máximo entre os caracteres curvos do polígono’, seja dentro ou fora.
guilabel:`Polígonos externos’: sempre coloca etiquetas fora dos polígonos, em um conjunto :guilabel:`Distância’.
Configurações comuns de posicionamento
Alguns ajustes de colocação de rótulos estão disponíveis para todos os tipos de geometria de camadas:
Gerador de Geometria
A seção Gerador de geometria permite ao usuário alterar a geometria subjacente utilizada para colocar e renderizar o rótulo, utilizando :ref:`expressões `. Isto pode ser útil para realizar o deslocamento da geometria dinamicamente ou para convertê-la em outra geometria (tipo).
A fim de utilizar o gerador geométrico:
Selecione a opção |caixaDeSeleção| Gerador de geometria
Digite a expressão gerando a geometria em que se pode confiar
Se relevante, selecione o tipo de geometria da saída da expressão: as configurações baseadas na geometria do rótulo, tais como posicionamento ou renderização, são atualizadas para combinar com as novas capacidades do tipo de geometria.
Alguns casos de utilização incluem:
Use uma geometria que é salva em outro campo “label_position”
Utilize a geometria gerada a partir da simbologia também para rotulagem
Use the @map_scale variable to calculate distances / sizes be zoom level independent.
Combinado com o modo de posicionamento curvo, cria uma etiqueta circular em torno de uma característica de ponto:
exterior_ring(make_circle($geometry, 20))
Adicionar um rótulo no início e no final de uma linha:
collect_geometries( start_point($geometry), end_point($geometry) )
Confie em uma linha suave de um rio para obter mais espaço para a colocação de rótulos:
smooth( $geometry, iterations:=30, offset:=0.25, min_length:=10 )
Dados Definidos
The Data Defined group provides direct control on labels placement, on a feature-by-feature basis. It relies on their attributes or an expression to set:
coordenada X e Y
o alinhamento do texto sobre a posição personalizada definida acima:
Horizontal: it can be Left, Center or Right
the text Vertical: it can be Bottom, Base, Half, Cap or Top
the text Rotation. Different units can be defined for the labeling rotation (e.g.
degrees,minutes of arc,turns). Check the Preserve data rotation values entry if you want to keep the rotation value in the associated field and apply it to the label, whether the label is pinned or not. If unchecked, unpinning the label rotation is reset and its value cleared from the attribute table.Nota
A rotação definida com características de polígono é atualmente suportada apenas com o modo de posicionamento Em torno do centróide.
Nota
Expressions can not be used in combination with the labels map tools (ie the Rotate label and Move label tools) to data-define labels placement. The widget will be reset to the corresponding auxiliary storage field.
Prioridade
Na seção Prioridade você pode definir o grau de prioridade de colocação de cada rótulo, ou seja, se houver diferentes diagramas ou possíveis rótulos para o mesmo local, o item com a prioridade mais alta será exibido e os outros poderão ser deixados de fora.
A classificação de prioridade também é usada para avaliar se um rótulo pode ser omitido devido a uma feição obstáculo de maior peso.
Obstáculos
Em alguns contextos (por exemplo, rótulos de alta densidade, feições sobrepostas…), a colocação dos rótulos pode resultar na colocação de rótulos sobre feições não relacionadas.
Um obstáculo é uma feição sobre a qual o QGIS evita a colocação de etiquetas ou diagramas de outras feições. Isto pode ser controlado pela :guilabel: seção: `Obstáculos’
Activate the
Features act as obstacles
option to decide that features of the layer should act as obstacles for
any label and diagram (including items from other features in the same layer).Instead of the whole layer, you can select a subset of features to use as obstacles, using the
 Data-defined override control next
to the option.
Data-defined override control next
to the option.Utilize o botão :guilabel:`Ajustes’ para ajustar o peso do obstáculo.
For every potential obstacle feature you can assign an Obstacle weight: any label or diagram whose placement priority rank is greater than this value can be placed over. Labels or diagrams with lower rank will be omitted if no other placement is possible.
Esta ponderação também pode ser definida por dados, de modo que, dentro da mesma camada, certas características têm mais probabilidade de serem cobertas do que outras.
Para camadas de polígonos, você pode escolher o tipo de obstáculo que a feição é:
over the feature’s interior: avoids placing labels over the interior of the polygon (prefers placing labels totally outside or just slightly inside the polygon)
or over the feature’s boundary: avoids placing labels over the boundary of the polygon (prefers placing labels outside or completely inside the polygon). This can be useful for layers where the features cover the whole area (administrative units, categorical coverages, …). In this case, it is impossible to avoid placing labels within these features, and it looks much better when placing them over the boundaries between features is avoided.
14.3.2.4. Aba de renderização
Na aba  :guilabel:`Renderização’, você pode afinar quando os rótulos podem ser renderizados e sua interação com outros rótulos e feições.
Opções de rótulos
Abaixo de :guilabel:`Opções de rótulos’:
You find the scale-based and the Pixel size-based visibility settings.
The Label z-index determines the order in which labels are rendered, as well in relation with other feature labels in the layer (using data-defined override expression), as with labels from other layers. Labels with a higher z-index are rendered on top of labels (from any layer) with lower z-index.
Além disso, a lógica foi ajustada de modo que se doiss rótulos tiverem índices z correspondentes, então:
se forem da mesma camada, o rótulo menor será desenhada acima do rótulo maior
se forem de diferentes camadas, os rótulos serão desenhados na mesma ordem que suas próprias camadas (ou seja, respeitando a ordem definida na legenda do mapa).
Nota
Esta configuração não faz com que os rótulos sejam desenhados abaixo das feições de outras camadas, apenas controla a ordem na qual os rótulos são desenhados por cima de todas as feições das camadas.
Allow inferior fallback placements: By default QGIS tries to render labels at their best placement, following your settings. Check this mode to allow features to fallback to worse placement options when there’s no other choice, e.g. when a line is too short to fit a curved label text then the label may be placed horizontally just over the feature’s center point.
Com expressões definidas em Mostrar rótulos e Sempre mostrar você pode ajustar quais rótuloss devem ser renderizados.
Permitir Mostrar rótulos ao contrário: as alternativas são Nunca, quando a rotação é definida ou sempre.
The Overlapping labels group allows you to control whether overlapping labels are permitted for features in the layer and how each of them should be handled:
Never overlap: never ever place overlapping labels for the layer, even if it means some labels will be missing
Allow overlaps if required: if the label can’t otherwise be placed, draw an overlapping label. This mode will cause the label to be moved to a less ideal placement if possible, e.g. moving the label further from the center of a line or polygon, IF doing so will avoid overlapping labels. But if there’s no other positions possible, then draw the label overlapping.
Allow overlaps without penalty: It doesn’t matter at all if the label overlaps other labels or obstacles, that’s fine to do and the best placement (e.g most central placement) should always be used even if an alternate further placement is possible which avoids overlaps entirely.
Allowing both overlapping labels and fallback placements options will guarantee that all features in the layer are labeled… not necessarily at their best rendering!
Opções de feição
Sob Opções de feição:
Você pode optar por Rotular cada parte de uma feição multi-parte e :guilabel:`Limitar o número de feições a serem rotutadas’.
Ambas as camadas de linha e polígono oferecem a opção de definir um tamanho mínimo para as características a serem rotuladas, utilizando :guilabel:`Rotulagem de características menores do que’.
Para as características poligonais, você também pode filtrar os rótulos para mostrar de acordo com se elas se encaixam completamente dentro de sua característica ou não.
For line features, you can choose to Merge connected lines to avoid duplicate labels, rendering a quite airy map in conjunction with the Distance or Repeat options in the Placement tab.