17.2.7. The Attribute Table Item
Any layer in the project can have its attributes shown in the print layout.
You can use this to decorate and explain your map with information about
underlying data.
Use the  Add Attribute Table tool following items
creation instructions to add a new map item that you can
later manipulate the same way as exposed in Interacting with layout items.
Add Attribute Table tool following items
creation instructions to add a new map item that you can
later manipulate the same way as exposed in Interacting with layout items.
By default, a new attribute table item loads first rows of the first (alphabetically sorted) layer, with all the fields. You can however customize the table thanks to its Item Properties panel. Other than the items common properties, this feature has the following functionalities (see figure_layout_table):
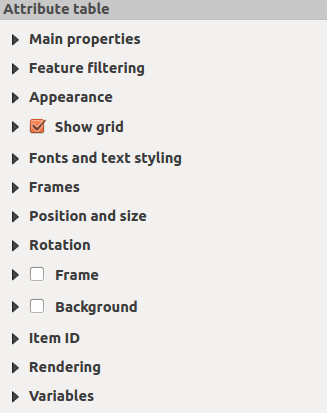
Fig. 17.36 Attribute table Item Properties Panel
17.2.7.1. Main properties
The Main properties group of the attribute table provides the following functionalities (see figure_layout_table_ppt):
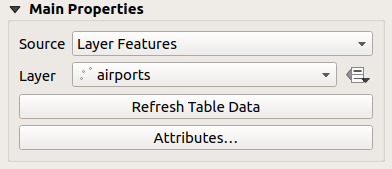
Fig. 17.37 Attribute table Main properties Group
For Source you can by default only select Layer features allowing you to select a Layer from the vector layers loaded in the project.
The
 data-defined override button near the layer list
allows you to dynamically change the layer which is used to populate the table,
e.g. you could fill the attribute table with different layer attributes per
atlas page.
Note that the table structure used (Fig. 17.40)
is the one of the layer shown in the Layer drop-down list and it is
left intact, meaning that setting a data defined table to a layer with different
field(s) will result in empty column(s) in the table.
data-defined override button near the layer list
allows you to dynamically change the layer which is used to populate the table,
e.g. you could fill the attribute table with different layer attributes per
atlas page.
Note that the table structure used (Fig. 17.40)
is the one of the layer shown in the Layer drop-down list and it is
left intact, meaning that setting a data defined table to a layer with different
field(s) will result in empty column(s) in the table.In case you activate the
 Generate an atlas option in
the Atlas panel (see Generate an Atlas), there are
two additional Source possible:
Generate an atlas option in
the Atlas panel (see Generate an Atlas), there are
two additional Source possible:Current atlas feature (see figure_layout_table_atlas): you won’t see any option to choose the layer, and the table item will only show a row with the attributes from the current feature of the atlas coverage layer.
and Relation children (see figure_layout_table_relation): an option with the relation names will show up. This feature can only be used if you have defined a relation using your atlas coverage layer as parent, and the table will show the children rows of the atlas coverage layer’s current feature.
The button Refresh Table Data can be used to refresh the table when the actual contents of the table has changed.
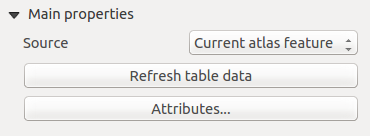
Fig. 17.38 Attribute table Main properties for ‘Current atlas feature’
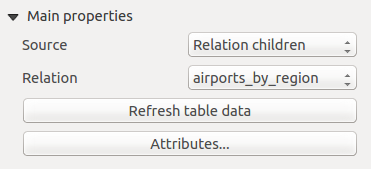
Fig. 17.39 Attribute table Main properties for ‘Relation children’
The button Attributes… starts the Select Attributes dialog, (see figure_layout_table_select) that can be used to change the visible contents of the table. The upper part of the window shows the list of the attributes to display and the lower part helps you sort the data.
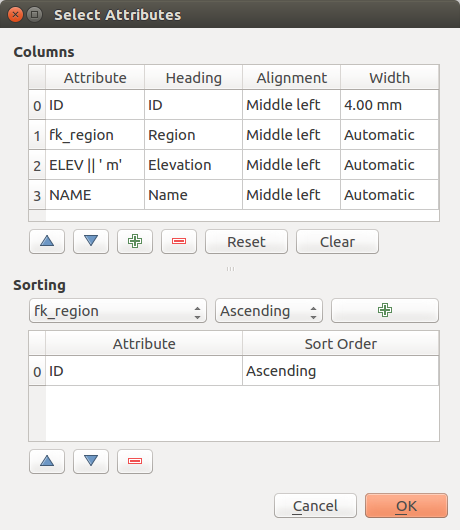
Fig. 17.40 Attribute table Select attributes Dialog
In the Columns section you can:
Move attributes up or down the list by selecting the rows and then using the
 and
and  buttons to shift the rows. Multiple rows can
be selected and moved at any one time.
buttons to shift the rows. Multiple rows can
be selected and moved at any one time.Add an attribute with the
 button. This will add an empty row at
the bottom of the table where you can select a field to be the attribute
value or create an attribute via a regular expression.
button. This will add an empty row at
the bottom of the table where you can select a field to be the attribute
value or create an attribute via a regular expression.Remove an attribute with the
 button. Multiple rows can be
selected and removed at any one time.
button. Multiple rows can be
selected and removed at any one time.Reset the attribute table back to its default state with the Reset button.
Clear the table using the Clear button. This is useful when you have a large table but only want to show a small number of attributes. Instead of manually removing each row, it may be quicker to clear the table and add the rows needed.
Cell headings can be altered by adding the custom text in the Heading column.
Cell alignment can be managed with the Alignment column which will dictate the texts position within the table cell.
Cell width can be manually managed by adding custom values to the width column.
In the Sorting section you can:
Add an attribute to sort the table with. Select an attribute and set the sorting order to Ascending or Descending and press the
button.
A new line is added to the sort order list.select a row in the list and use the
and buttons to
change the sort priority on attribute level. Selecting a cell in the
Sort Order column helps you change the sorting order of the
attribute field.use the
button to remove an attribute from the sort order list.
17.2.7.2. Feature filtering
The Feature filtering group of the attribute table provides the following functionalities (see figure_layout_table_filter):
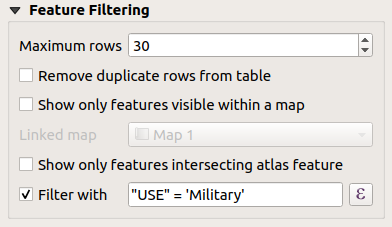
Fig. 17.41 Attribute table Feature filtering Group
You can:
Define the Maximum rows to be displayed.
Activate
Remove duplicate rows from table to show unique records only.Activate
Show only visible features within a map and select the
corresponding Linked map whose visible features attributes will be displayed.Activate
Show only features intersecting Atlas feature is only
available when Generate an atlas is activated. When activated it will
show a table with only the features which intersect the current atlas feature.Activate
Filter with and provide a filter by typing in the input line
or insert a regular expression using the given  expression button.
A few examples of filtering statements you can use when you have loaded the airports
layer from the Sample dataset:
expression button.
A few examples of filtering statements you can use when you have loaded the airports
layer from the Sample dataset:ELEV > 500NAME = 'ANIAK'NAME NOT LIKE 'AN%'regexp_match( attribute( $currentfeature, 'USE' ) , '[i]')
The last regular expression will include only the airports that have a letter ‘i’ in the attribute field ‘USE’.
17.2.7.3. Appearance
The Appearance group of the attribute table provides the following functionalities (see figure_layout_table_appearance):
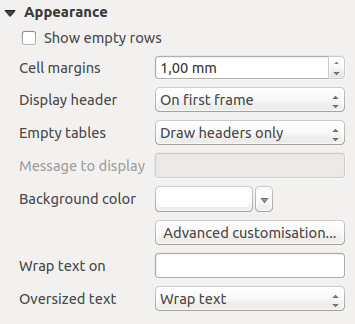
Fig. 17.42 Attribute table appearance Group
Click
Show empty rows to fill the attribute table with empty cells.
This option can also be used to provide additional empty cells when you have a result to show!With Cell margins you can define the margin around text in each cell of the table.
With Display header you can select from a list one of ‘On first frame’, ‘On all frames’ default option, or ‘No header’.
The option Empty table controls what will be displayed when the result selection is empty.
Draw headers only, will only draw the header except if you have chosen ‘No header’ for Display header.
Hide entire table, will only draw the background of the table. You can activate
Don’t draw background if frame is empty in Frames
to completely hide the table.Show set message, will draw the header and adds a cell spanning all columns and display a message like ‘No result’ that can be provided in the option Message to display
The option Message to display is only activated when you have selected Show set message for Empty table. The message provided will be shown in the table in the first row, when the result is an empty table.
With Background color you can set the background color of the table using the color selector widget. The Advanced customization option helps you define different background colors for each cell (see figure_layout_table_background)
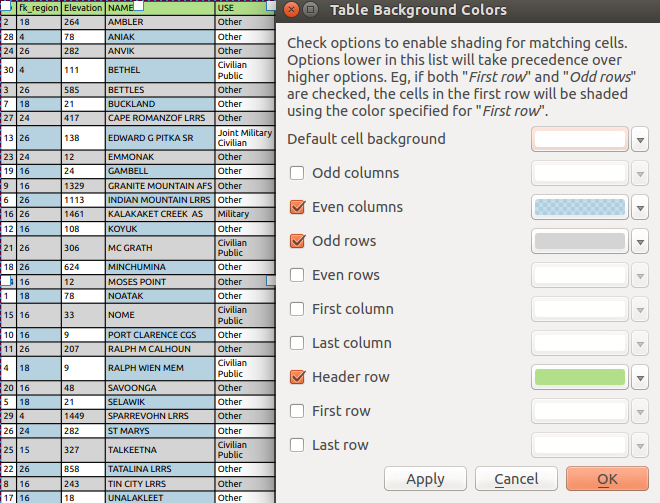
Fig. 17.43 Attribute table Advanced Background Dialog
With the Wrap text on option, you can define a character on which the cell content will be wraped each time it is met
With Oversized text you define the behavior when the width set for a column is smaller than its content’s length. It can be Wrap text or Truncate text.
17.2.7.4. Show grid
The Show grid group of the attribute table provides the following functionalities (see figure_layout_table_grid):
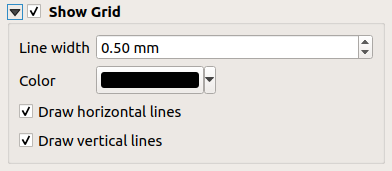
Fig. 17.44 Attribute table Show grid Group
Activate
Show grid when you want to display the grid,
the outlines of the table cells. You can also select to either Draw
horizontal lines or Draw vertical lines or both.With Line width you can set the thickness of the lines used in the grid.
The Color of the grid can be set using the color selection widget.
17.2.7.5. Fonts and text styling
The Fonts and text styling group of the attribute table provides the following functionalities (see figure_layout_table_fonts):
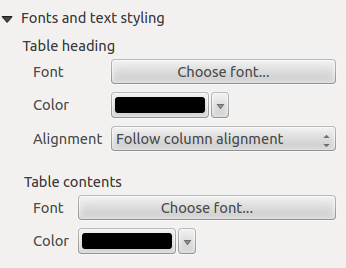
Fig. 17.45 Attribute table Fonts and text styling Group
You can define Font and Color for Table heading and Table contents, using font and color selector widgets.
For Table heading you can additionally set the Alignment to
Follow column alignmentor override this setting by choosingLeft,CenterorRight. The column alignment is set using the Select Attributes dialog (see figure_layout_table_select ).
17.2.7.6. Frames
The Frames group of the attribute table properties provides the following functionalities (see figure_layout_table_frames):

Fig. 17.46 Attribute table Frames Group
With Resize mode you can select how to render the attribute table contents:
Use existing framesdisplays the result in the first frame and added frames only.Extend to next pagewill create as many frames (and corresponding pages) as necessary to display the full selection of attribute table. Each frame can be moved around on the layout. If you resize a frame, the resulting table will be divided up between the other frames. The last frame will be trimmed to fit the table.Repeat until finishedwill also create as many frames as the Extend to next page option, except all frames will have the same size.
Use the Add Frame button to add another frame with the same size as selected frame. The result of the table that will not fit in the first frame will continue in the next frame when you use the Resize mode
Use existing frames.Activate
Don’t export page if frame is empty prevents
the page to be exported when the table frame has no contents. This means all
other layout items, maps, scalebars, legends etc. will not be visible in the result.Activate
Don’t draw background if frame is empty
prevents the background to be drawn when the table frame has no contents.