20.2. User Authentication Workflows
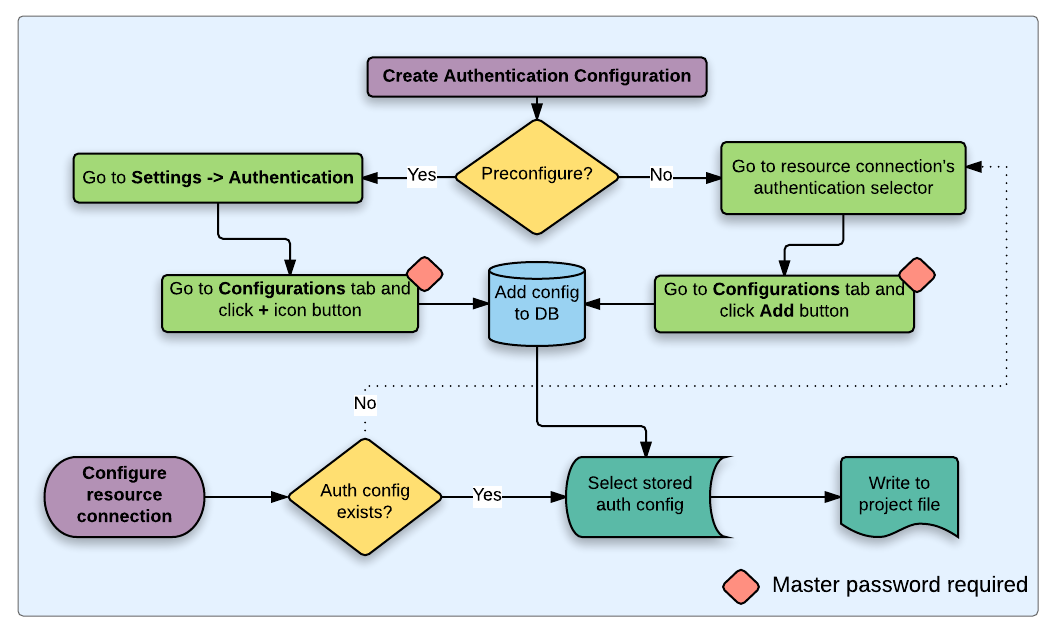
Fig. 20.19 Generic user workflow
20.2.1. HTTP(S) authentication
One of the most common resource connections is via HTTP(S), e.g. web mapping servers, and authentication method plugins often work for these types of connections. Method plugins have access to the HTTP request object and can manipulate both the request as well as its headers. This allows for many forms of internet-based authentication. When connecting via HTTP(S) using the standard username/password authentication method will attempt HTTP BASIC authentication upon connection.
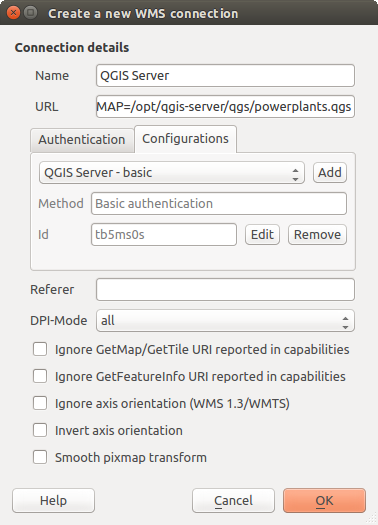
Fig. 20.20 Configuring a WMS connection for HTTP BASIC
20.2.2. Database authentication
Connections to database resources are generally stored as key=value pairs,
which will expose usernames and (optionally) passwords, if not using an
authentication configuration. When configuring with the new auth system, the
key=value will be an abstracted representation of the credentials, e.g.
authfg=81t21b9.
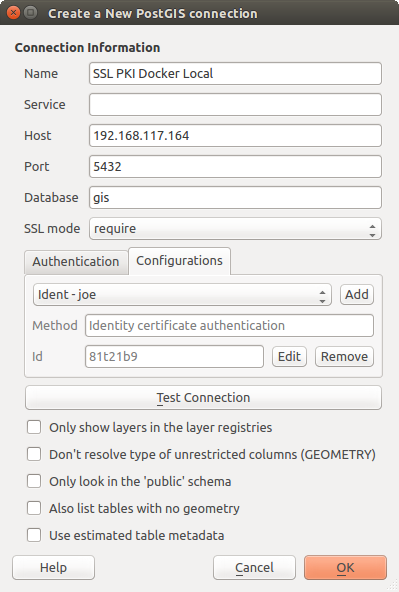
Fig. 20.21 Configuring a Postgres SSL-with-PKI connection
20.2.3. PKI authentication
When configuring PKI components within the authentication system, you have the option of importing components into the database or referencing component files stored on your filesystem. The latter may be useful if such components change frequently, or where the components will be replaced by a system administrator. In either instance you will need to store any passphrase needed to access private keys within the database.
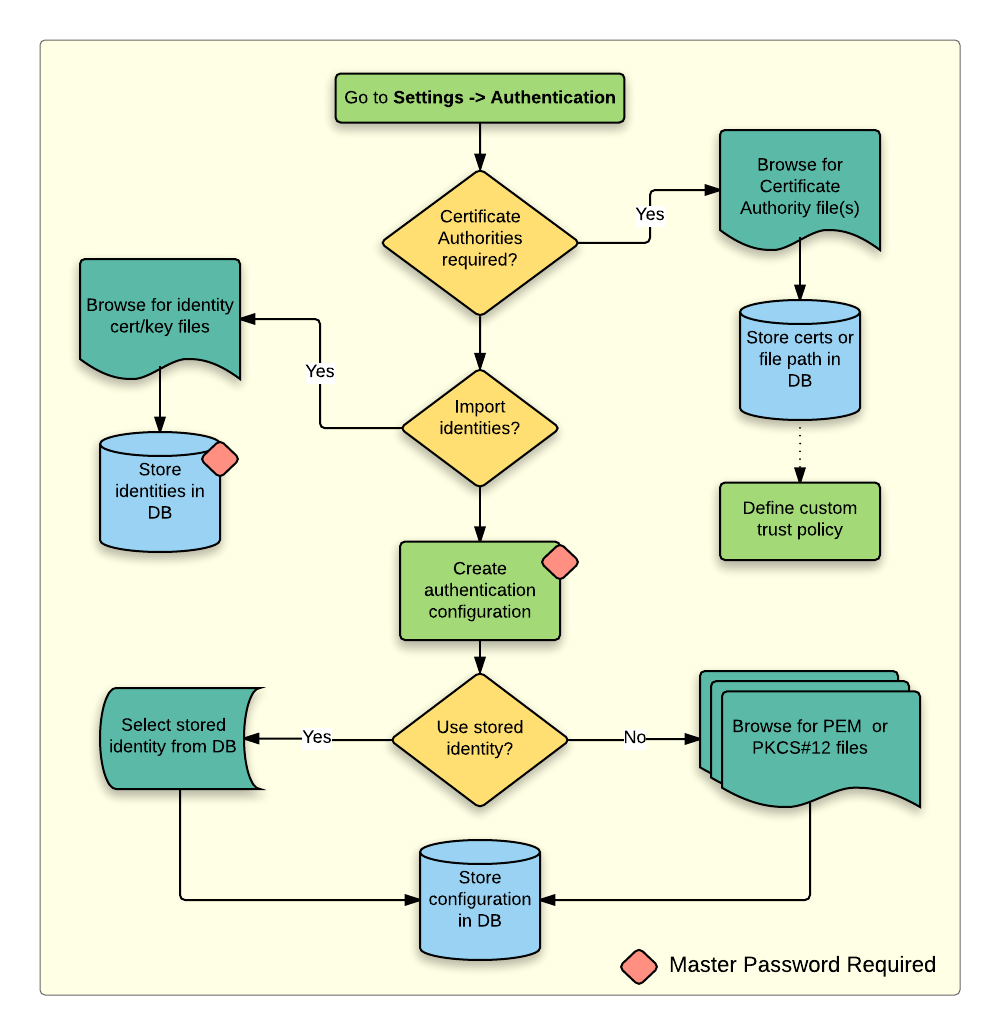
Fig. 20.22 PKI configuration workflow
All PKI components can be managed in separate editors within the Certificate Manager, which can be accessed in the Authentication tab in QGIS Options dialog () by clicking the Manage Certificates button.
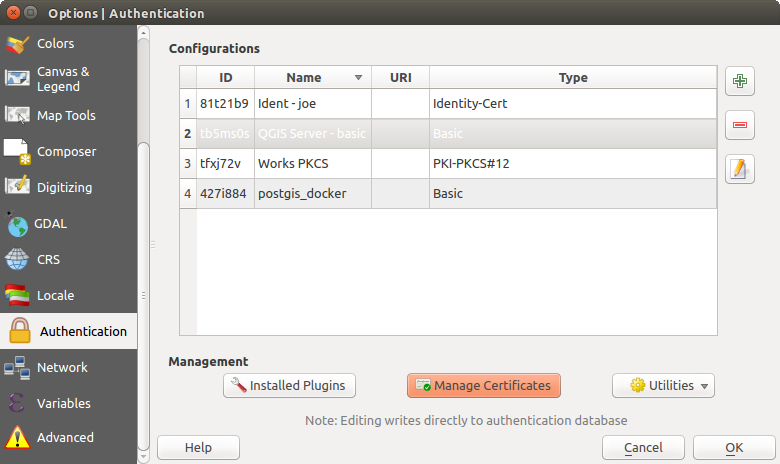
Fig. 20.23 Opening the Certificate Manager
In the Certificate Manager, there are editors for Identities, Servers and Authorities. Each of these are contained in their own tabs, and are described below in the order they are encountered in the workflow chart above. The tab order is relative to frequently accessed editors once you are accustomed to the workflow.
Note
Because all authentication system edits write immediately to the authentication database, there is no need to click the Options dialog OK button for any changes to be saved. This is unlike other settings in the Options dialog.
20.2.3.1. Authorities
You can manage available Certificate Authorities (CAs) from the Authorities tab in the Certificate manager from the Authentication tab of the QGIS Options dialog.
As referenced in the workflow chart above, the first step is to import or reference a file of CAs. This step is optional, and may be unnecessary if your PKI trust chain originates from root CAs already installed in your operating system (OS), such as a certificate from a commercial certificate vendor. If your authenticating root CA is not in the OS’s trusted root CAs, it will need to be imported or have its file system path referenced. (Contact your system administrator if unsure.)
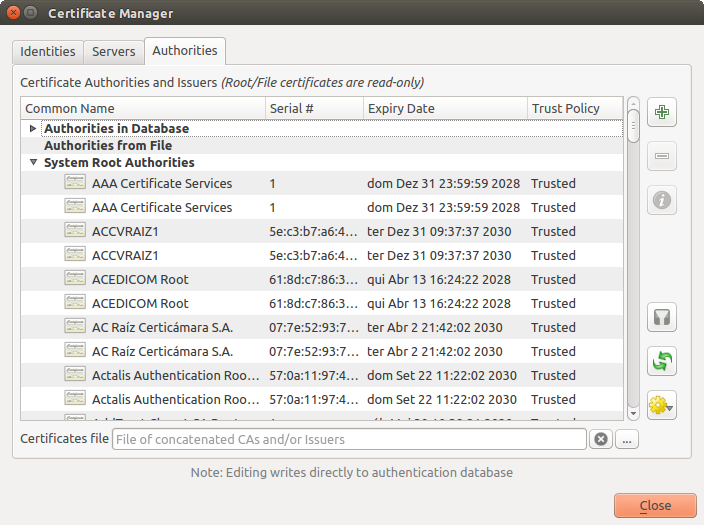
Fig. 20.24 Authorities editor
By default, the root CAs from your OS are available; however, their trust
settings are not inherited. You should review the certificate trust policy
settings, especially if your OS root CAs have had their policies adjusted. Any
certificate that is expired will be set to untrusted and will not be used in
secure server connections, unless you specifically override its trust policy. To
see the QGIS-discoverable trust chain for any certificate, select it and click
the  Show information for certificate.
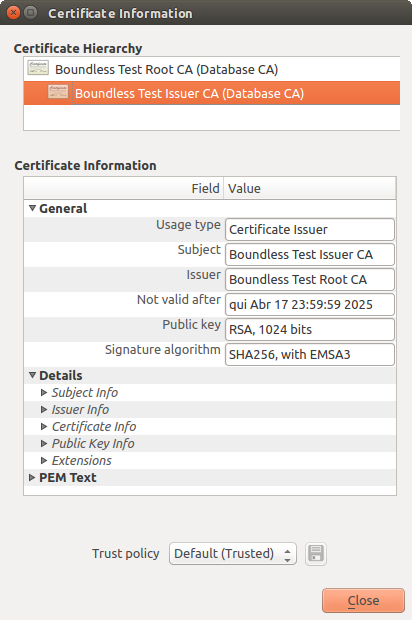
Fig. 20.25 Certificate info dialog
You can edit the Trust policy  for any selected
certificate within the chain. Any change in trust policy to a selected
certificate will not be saved to the database unless the
for any selected
certificate within the chain. Any change in trust policy to a selected
certificate will not be saved to the database unless the  Save certificate trust policy change to database button is clicked
per selected certification. Closing the dialog will not apply the
policy changes.
Save certificate trust policy change to database button is clicked
per selected certification. Closing the dialog will not apply the
policy changes.
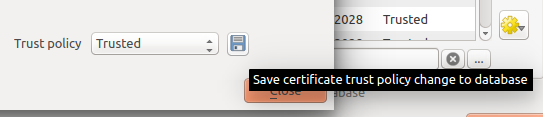
Fig. 20.26 Saving the trust policy changes
You can review the filtered CAs, both intermediate and root certificates, that
will be trusted for secure connections or change the default trust policy by
clicking the  Options button.
Warning
Changing the default trust policy may result in problems with secure connections.
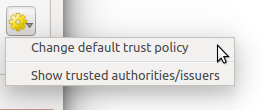
Fig. 20.27 Authorities options menu
You can import CAs or save a file system path from a file that contains multiple CAs, or import individual CAs. The standard PEM format for files that contain multiple CA chain certifications has the root cert at the bottom of the file and all subsequently signed child certificates above, towards the beginning of the file.
The CA certificate import dialog will find all CA certificates within the file, regardless of order, and also offers the option to import certificates that are considered invalid (in case you want to override their trust policy). You can override the trust policy upon import, or do so later within the Authorities editor.
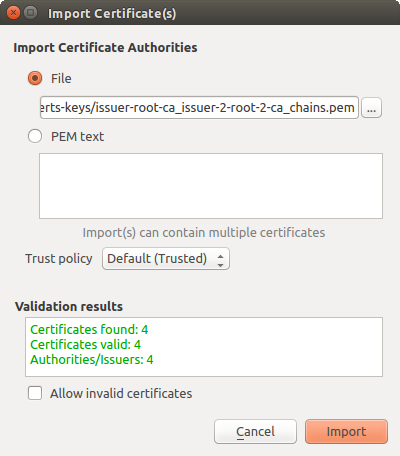
Fig. 20.28 Import certificates dialog
Note
If you are pasting certificate information into the PEM text field, note that encrypted certificates are not supported.
20.2.3.2. Identities
You can manage available client identity bundles from the Identities tab in the Certificate manager from the Authentication tab of the QGIS Options dialog. An identity is what authenticates you against a PKI-enabled service and usually consists of a client certificate and private key, either as separate files or combined into a single “bundled” file. The bundle or private key is often passphrase-protected.
Once you have any Certificate Authorities (CAs) imported you can optionally import any identity bundles into the authentication database. If you do not wish to store the identities, you can reference their component file system paths within an individual authentication configuration.
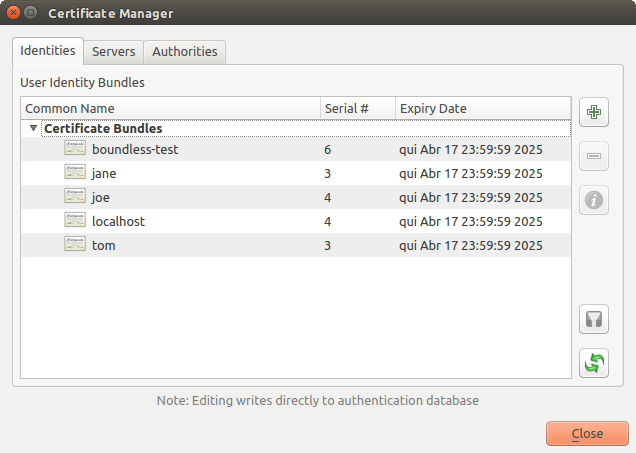
Fig. 20.29 Identities editor
When importing an identity bundle, it can be passphrase-protected or unprotected, and can contain CA certificates forming a trust chain. Trust chain certifications will not be imported here; they can be added separately under the Authorities tab.
Upon import the bundle’s certificate and private key will be stored in the database, with the key’s storage encrypted using the QGIS master password. Subsequent usage of the stored bundle from the database will only require input of the master password.
Personal identity bundles consisting of PEM/DER (.pem/.der) and PKCS#12 (.p12/.pfx) components are supported. If a key or bundle is passphrase-protected, the password will be required to validate the component prior to import. Likewise, if the client certificate in the bundle is invalid (for example, its effective date has not yet started or has elapsed) the bundle can not be imported.
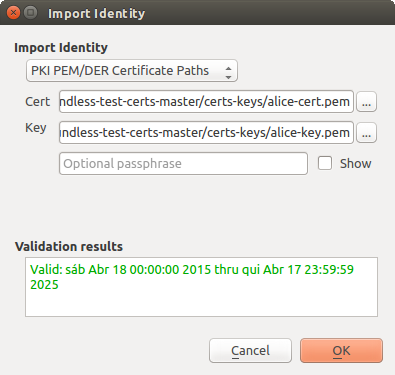
Fig. 20.30 PEM/DER identity import
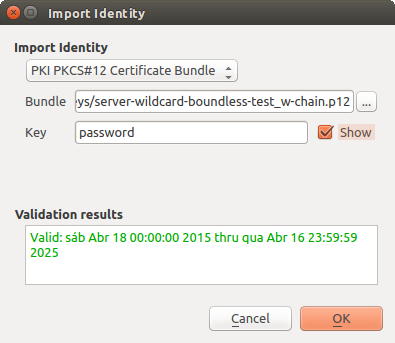
Fig. 20.31 PKCS#12 identity import
20.2.4. Handling bad layers
Occasionally, the authentication configuration ID that is saved with a project file is no longer valid, possibly because the current authentication database is different than when the project was last saved, or due to a credentials mismatch. In such cases the Handle bad layers dialog will be presented upon QGIS launch.
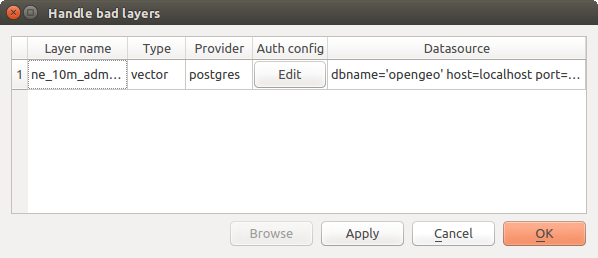
Fig. 20.32 Handle bad layers with authentication
If a data source is found to have an authentication configuration ID associated with it, you will be able to edit it. Doing so will automatically edit the data source string, much in the same way as opening the project file in a text editor and editing the string.
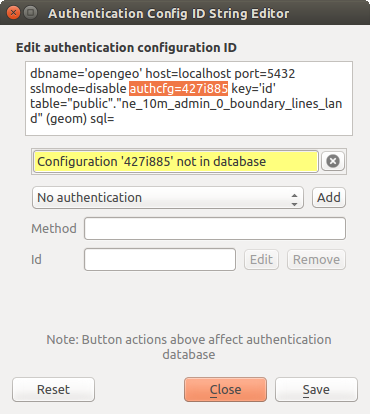
Fig. 20.33 Edit bad layer’s authentication config ID
20.2.5. Changing authentication config ID
Occasionally, you will need to change the authentication configuration ID that is associated with accessing a resource. There are instances where this is useful:
Resource auth config ID is no longer valid: This can occur when you have switched auth databases add need to align a new configuration to the ID already associated with a resource.
Shared project files: If you intended to share projects between users, e.g. via a shared file server, you can predefine a 7-character (containing a-z and/or 0-9) that is associated with the resource. Then, individual users change the ID of an authentication configuration that is specific to their credentials of the resource. When the project is opened, the ID is found in the authentication database, but the credentials are different per user.
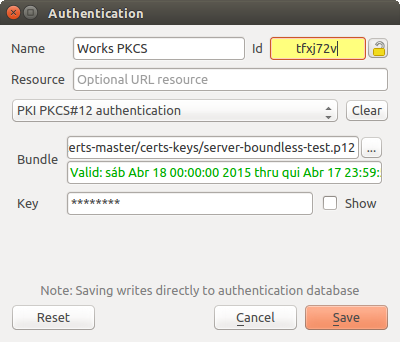
Fig. 20.34 Changing a layer’s authentication config ID (unlocked yellow text field)
Warning
Changing the auth config ID is considered an advanced operation and should only be done with full knowledge as to why it is necessary. This is why there is a lock button that needs clicked, to unlock the ID’s text field prior to editing the ID.
20.2.6. QGIS Server support
When using a project file, with layers that have authentication configurations, as a basis for a map in QGIS Server, there are a couple of additional setup steps necessary for QGIS to load the resources:
Authentication database needs to be available
Authentication database’s master password needs to be available
When instantiating the authentication system, Server will create or use
qgis-auth.db in ~/.qgis2/ or the directory defined by the
QGIS_AUTH_DB_DIR_PATH environment variable. It may be that the Server’s user
has no HOME directory, in which case, use the environment variable to define a
directory that the Server’s user has read/write permissions and is not located
within the web-accessible directories.
To pass the master password to Server, write it to the first line of file at a
path on the file system readable by the Server processes user and defined using
the QGIS_AUTH_PASSWORD_FILE environment variable. Ensure to limit the file
as only readable by the Server’s process user and to not store the file within
web-accessible directories.
Note
QGIS_AUTH_PASSWORD_FILE variable will be removed from the Server
environment immediately after accessing.
20.2.7. SSL server exceptions
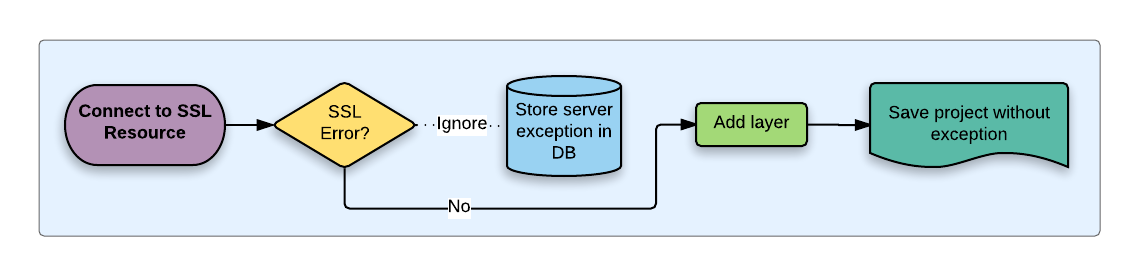
Fig. 20.35 SSL server exception
You can manage SSL server configurations and exceptions from the Servers tab in the Authentication section of the QGIS Options dialog.
Sometimes, when connecting to an SSL server, there are errors with the SSL “handshake” or the server’s certificate. You can ignore those errors or create an SSL server configuration as an exception. This is similar to how web browsers allow you to override SSL errors, but with more granular control.
Warning
You should not create an SSL server configuration unless you have complete knowledge of the entire SSL setup between the server and client. Instead, report the issue to the server administrator.
Note
Some PKI setups use a completely different CA trust chain to validate client identities than the chain used to validate the SSL server certificate. In such circumstances, any configuration created for the connecting server will not necessarily fix an issue with the validation of your client identity, and only your client identity’s issuer or server administrator can fix the issue.
You can pre-configure an SSL server configuration by clicking the  button. Alternatively, you can add a configuration when an SSL error occurs
during a connection and you are presented with an SSL Error dialog (where
the error can be ignored temporarily or saved to the database and ignored):
button. Alternatively, you can add a configuration when an SSL error occurs
during a connection and you are presented with an SSL Error dialog (where
the error can be ignored temporarily or saved to the database and ignored):
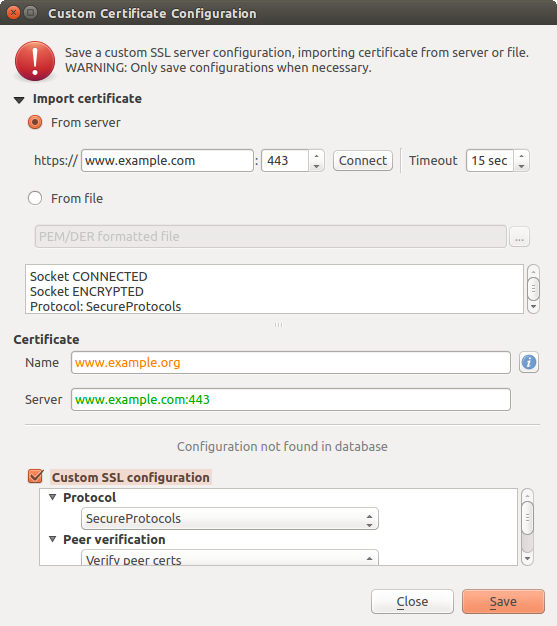
Fig. 20.36 Manually adding configuration
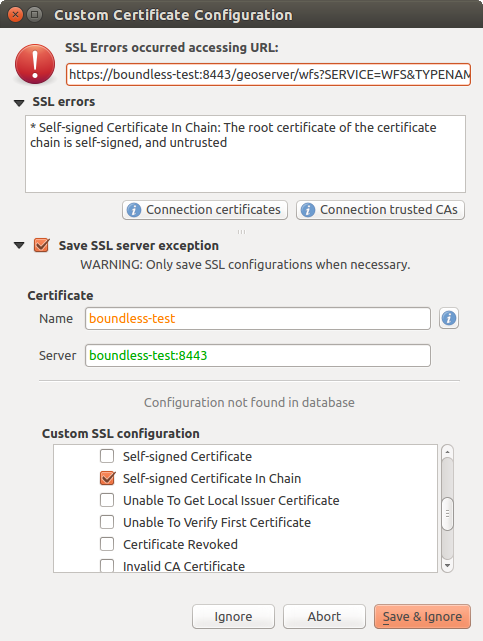
Fig. 20.37 Adding configuration during SSL error
Once an SSL configuration is saved to the database, it can be edited or deleted.

Fig. 20.38 Existing SSL configuration
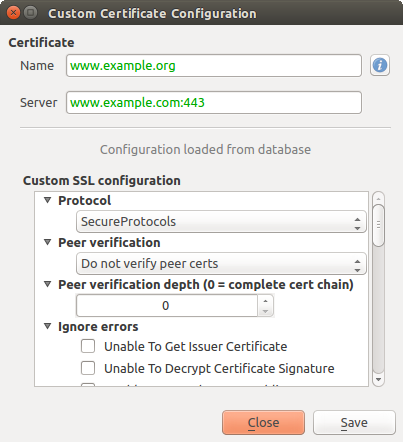
Fig. 20.39 Editing an existing SSL configuration
If you want to pre-configure an SSL configuration and the import dialog is not
working for your server’s connection, you can manually trigger a connection via
the Python Console by running the following code (replace
https://bugreports.qt-project.org with the URL of your server):
from qgis.PyQt.QtNetwork import QNetworkRequest
from qgis.PyQt.QtCore import QUrl
from qgis.core import QgsNetworkAccessManager

req = QNetworkRequest(QUrl('https://bugreports.qt-project.org'))
reply = QgsNetworkAccessManager.instance().get(req)
This will open an SSL error dialog if any errors occur, where you can choose to save the configuration to the database.