Important
La traduction est le fruit d’un effort communautaire auquel vous pouvez vous joindre. Cette page est actuellement traduite à 38.89%.
20.2. Suivi GPS en direct
QGIS can help you do field mapping with a GPS receiver. Such a live tracking operation is done using the GPS Toolbar. Some device configuration may be needed before connecting QGIS and the GPS receiver.
20.2.1. GPS toolbar
The GPS Toolbar provides the main tools to control a live tracking session. It can be activated from . It follows the state of the project, GPS, and current GPS track, and enables actions only when they make sense. Once a device is detected by QGIS, you will be able to interact with it:
 Connect to GPS
 Disconnect from GPS
 Recenter map on GPS location: the map will immediately recenter on the current GPS position
regardless of the automatic recentering parameter.
Recenter map on GPS location: the map will immediately recenter on the current GPS position
regardless of the automatic recentering parameter. Set destination layer for GPS digitized features:
By default, QGIS will Follow active layer for feature digitizing,
meaning that GPS digitizing tools will adapt to the layer selected in Layers panel
and created features will be stored in it accordingly.
While this may be useful in some contexts, it also implies careful interaction
with other layers to avoid storing inadvertently features in undesired layers.
This option allows you to explicitly indicate a layer for the data storage
during the live tracking session, and you could switch depending on your needs.
Exposed tools will adapt as well to the selected layer type.
Set destination layer for GPS digitized features:
By default, QGIS will Follow active layer for feature digitizing,
meaning that GPS digitizing tools will adapt to the layer selected in Layers panel
and created features will be stored in it accordingly.
While this may be useful in some contexts, it also implies careful interaction
with other layers to avoid storing inadvertently features in undesired layers.
This option allows you to explicitly indicate a layer for the data storage
during the live tracking session, and you could switch depending on your needs.
Exposed tools will adapt as well to the selected layer type.The GPS destination layer is made automatically editable when a feature is being created, and the user is notified accordingly.
actions for feature creation:
 Add vertex to GPS track using GPS current location
 Create a new point feature at current GPS location
 Create a new line feature using the current GPS track
 Create a new polygon feature using the current GPS track
 Reset track
 Show GPS information: opens the GPS Information panel
a display box for quick access to some GPS information components you may need:
 Show location
- Show altitude (Geoid)
- Show altitude (WGS 84 ellipsoid)
- Show ground speed
- Show bearing
- Show total track length
- Show distance from start of track
The
 Settings button opens a drop-down menu with common settings
which are expected to be modified mid-session:
Settings button opens a drop-down menu with common settings
which are expected to be modified mid-session:- Show location marker
- Show bearing line
- Rotate map to match GPS direction
Options to control map recentering:
 Always recenter map when the GPS position is offset
from the map canvas center by a certain distance (as a ratio of the map canvas extent)
Always recenter map when the GPS position is offset
from the map canvas center by a certain distance (as a ratio of the map canvas extent) Recenter map when leaving extent
- Never recenter
- Automatically add track vertices
whenever new locations are received from the GPS device.
- Automatically save added features:
features created from GPS locations are immediately committed to their target layers
(skipping the usual layer edit buffer)
Time stamp destination to adjust the field for time fix storage
- Log to GeoPackage/SpatiaLite…: When activated,
the user will be prompted to select an existing GeoPackage/SpatiaLite file
or enter a new file name.
A
gps_pointsandgps_trackstable will be created in the file with a predefined structure.All incoming GPS messages will be logged to the
gps_pointslayer, along with speed, bearing, altitude and accuracy information from the GPS.When the GPS is disconnected (or QGIS closed), the entire recorded GPS track will be added to the
gps_trackstable (along with some calculated information like track length, start and end times). - Log NMEA sentences…: enables logging all raw NMEA strings
from the device to a text file
- GPS settings… to access the GPS global options dialog
Astuce
Live status bar information on position
When a GPS device is connected and the user moves the cursor over the map canvas, a live status bar message displays the distance and bearing from the cursor to the GPS position. Project distance and bearing settings are respected in this display. On a touch screen device, use a tap-and-hold event to trigger the live status bar message.
20.2.2. GPS Information Panel
For full monitoring of a live GPS tracking in QGIS, you may need to enable the GPS Information Panel ( or press Ctrl+0).
In the top right corner of the GPS Information Panel, you press Connect to initiate connection between QGIS and a plugged-in GPS receiver, or Disconnect them.
In the top left of the panel, following buttons are accessible:
- Position: live details on the GPS position and sensors
 Signal: la puissance du signal des connexions par satellite
- Settings: drop-down menu to live tracking options
you may need to modify during a session
20.2.2.1. Coordonnées de la position
In the Position tab, if the GPS is receiving signals from satellites,
you will see your position in latitude, longitude and altitude
together with additional attributes.
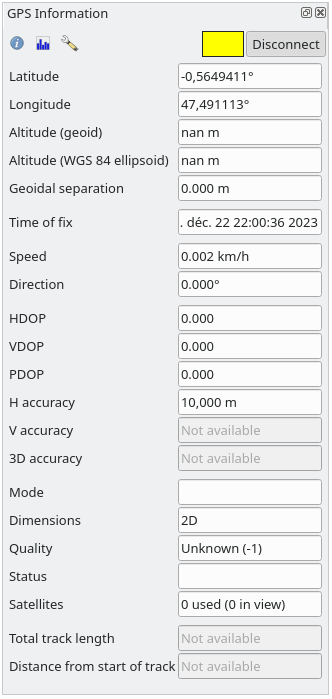
Fig. 20.3 Coordonnées de la position GPS et autres attributs
Latitude
Longitude
Altitude (Geoid): Altitude/elevation above or below the mean sea level
Altitude (WGS 84 ellipsoid): Altitude/elevation above or below the WGS-84 Earth ellipsoid
Geoidal separation: Difference between the WGS-84 Earth ellipsoid and mean sea level (geoid),
-means mean sea level is below ellipsoidTime of fix
Speed: Ground speed
Direction: Bearing measured in degrees clockwise from true north to the direction of travel
HDOP: Horizontal dilution of precision
VDOP: Vertical dilution of precision
PDOP: Dilution of precision
H accuracy: Horizontal accuracy in meters
V accuracy: Vertical accuracy in meters
3D accuracy: 3D Root Mean Square (RMS) in meters
Mode: GPS receiver configuration 2D/3D mode, can be
automaticormanualDimensions: Position fix dimension, can be
2D,3DorNo fixQuality: Positioning quality indicator
Status: Position fix status, can be
ValidorInvalidSatellites: Count of satellites used in obtaining the fix
Total track length: Total distance of current GPS track
Distance from start of track: Direct distance from first vertex in current GPS track to latest vertex
20.2.2.2. Signal
With Signal tab, you can see the signal strength of the satellites
you are receiving signals from.
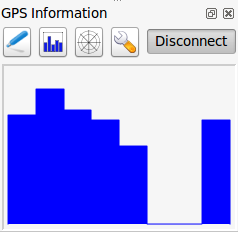
Fig. 20.4 Force du signal GPS
20.2.3. Connexion à un GPS Bluetooth pour le suivi en direct
Avec QGIS, vous pouvez vous connecter à un GPS Bluetooth pour la récupération de données terrain. Pour réaliser cette tâche, vous aurez besoin d’un GPS Bluetooth et d’un récepteur Bluetooth sur votre ordinateur.
Au démarrage, vous devez faire en sorte que votre GPS soit reconnu et appairé avec votre ordinateur. Allumer le GPS, cliquer sur l’icône Bluetooth de votre barre de notification et rechercher un Nouveau Périphérique.
Sur le côté droit du masque de sélection des périphériques, assurez-vous que tous les périphériques sont sélectionnés pour garantir que votre unité GPS apparaisse dans cette sélection. Dans la prochaine étape, un service de connexion série devrait être disponible. Sélectionnez-le et cliquez sur le bouton Configurer.
Retenez le numéro du port COM affecté à la connexion GPS dans les propriétés Bluetooth.
Une fois que le GPS a été reconnu, faîtes l’appariement avec la connexion. Généralement, le code d’autorisation est 0000.
Maintenant, ouvrez le panneau Information GPS et basculez dans l’écran des options GPS. Sélectionnez le port COM de la connexion GPS et cliquez sur le bouton Connecter. Après un moment, un curseur indiquant votre position doit apparaître.
Si QGIS ne peut recevoir de données GPS, vous devriez alors redémarrer votre GPS, attendre 5-10 secondes et réessayer de le connecter. Généralement, celle solution fonctionne. Si vous avez de nouveau une erreur de connexion, assurez-vous que vous n’avez pas un autre capteur Bluetooth à proximité, apparairé avec le GPS.
20.2.4. Examples of GPS devices connection in QGIS
20.2.4.1. Utiliser un Garmin GPSMAP 60cs
MS Windows
Easiest way to make it work is to use a middleware (freeware, not open) called GPSGate.
Launch the program, make it scan for GPS devices (works for both USB and BT ones) and then in QGIS:
In , detect the plugged-in device. You can use the
Autodetect mode.Press Connect in the GPS Information panel
Ubuntu/Mint GNU/Linux
Comme pour Windows le plus simple est d’utiliser un serveur intermédiaire, dans ce cas GPSD, donc
Installez le programme
sudo apt install gpsd
Vous pouvez alors charger le module du noyau
garmin_gpssudo modprobe garmin_gps
And then connect the unit and check with
dmesgthe actual device being used by the unit, for example/dev/ttyUSB0.Now you can launch gpsd
gpsd /dev/ttyUSB0
Connectez enfin avec l’outil de suivi en direct de QGIS.
20.2.4.2. Utiliser BTGP-38KM datalogger (seulement Bluetooth)
Utiliser GPSD (sous GNU/Linux) ou GPSGate (sous Windows) est très facile.
20.2.4.3. Utiliser BlueMax GPS-4044 datalogger (BT et USB)
MS Windows
The live tracking works for both USB and BT modes, by using GPSGate or even
without it, just use the Autodetect mode, or point
the tool to the right port.
Ubuntu/Mint GNU/Linux
Via USB
Le suivi en direct fonctionne avec les deux sous GPSD.
gpsd /dev/ttyACM3
ou sans lui en connectant l’outil de suivi en direct de QGIS directement au périphérique (par exemple /dev/ttyACM3).
Via Bluetooth
Le suivi en direct fonctionne avec les deux sous GPSD.
gpsd /dev/rfcomm0
ou sans lui en connectant l’outil de suivi en direct de QGIS directement au périphérique (par exemple /dev/rfcomm0).