` `
Plugin-ul eVis
(This section is derived from Horning, N., K. Koy, P. Ersts. 2009. eVis (v1.1.0) User’s Guide. American Museum of Natural History, Center for Biodiversity and Conservation. Available from http://biodiversityinformatics.amnh.org/, and released under the GNU FDL.)
The Biodiversity Informatics Facility at the American Museum of Natural History’s (AMNH) Center for Biodiversity and Conservation (CBC) has developed the Event Visualization Tool (eVis), another software tool to add to the suite of conservation monitoring and decision support tools for guiding protected area and landscape planning. This plugin enables users to easily link geocoded (i.e., referenced with latitude and longitude or X and Y coordinates) photographs, and other supporting documents, to vector data in QGIS.
eVis este instalat și activat automat în noile versiuni de QGIS și, similar tuturor plugin-urilor, poate fi dezactivat și activat cu ajutorul Managerului de Plugin-uri (v. Dialogul Plugin-urilor).
Plugin-ul eVis este compus din trei module: ‘Database Connection tool’, ‘Event ID tool’, și ‘Event Browser’. Acestea lucrează împreună pentru a permite vizualizarea fotografiilor geocodate și a altor documente care sunt legate de entități stocate în fișiere vectoriale, baze de date sau foi de calcul.
Browser-ul de Evenimente
The Event Browser module provides the functionality to display geocoded photographs that are linked to vector features displayed in the QGIS map window. Point data, for example, can be from a vector file that can be input using QGIS or it can be from the result of a database query. The vector feature must have attribute information associated with it to describe the location and name of the file containing the photograph and, optionally, the compass direction the camera was pointed when the image was acquired. Your vector layer must be loaded into QGIS before running the Event Browser.
Lansarea modulului Event Browser
To launch the Event Browser module, click on Database ‣ eVis ‣ eVis Event Browser. This will open the Generic Event Browser window.
The Event Browser window has three tabs displayed at the top of the window. The Display tab is used to view the photograph and its associated attribute data. The Options tab provides a number of settings that can be adjusted to control the behavior of the eVis plugin. Lastly, the Configure External Applications tab is used to maintain a table of file extensions and their associated application to allow eVis to display documents other than images.
Înțelegerea ferestrei de Afișare
To see the Display window, click on the Display tab in the Event Browser window. The Display window is used to view geocoded photographs and their associated attribute data.
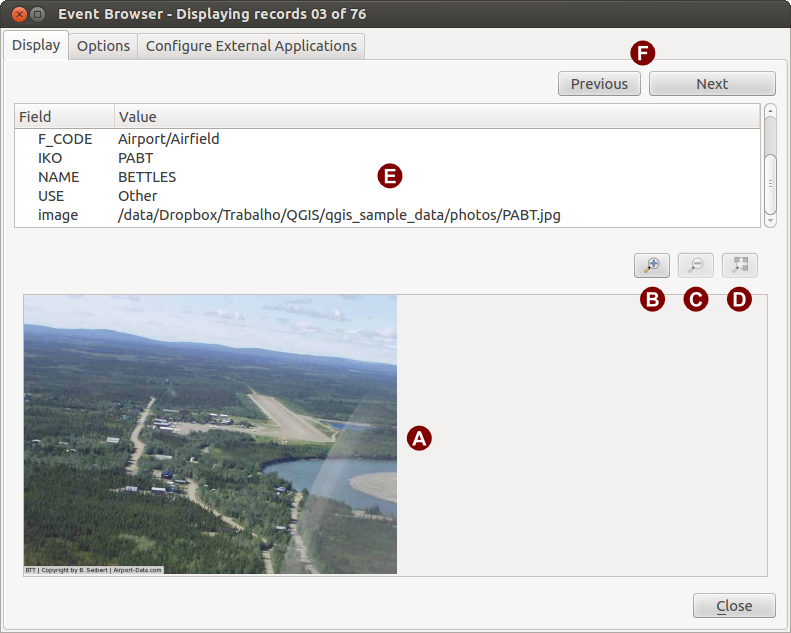
Fereastra de afișare eVis
Fereastra de afișare: O fereastră în care va apărea fotografia.
Zoom in button: Apropiați pentru a vedea mai multe detalii. Dacă nu se poate afișa întreaga imagine vor apărea bare de derulare în stânga și în josul ferestrei pentru a putea permite derularea imaginii.
Zoom out button: Depărtați pentru a vedea o zonă mai mare.
Butonul Zoom to full extent: Afișează întreaga fotografie.
Fereastra de informații despre Atribute: Toate informațiile atributelor punctului asociate cu fotografia vizualizată sunt afișate aici. Dacă tipul de fișier menționat în înregistrarea afișată nu este o imagine, dar este un tip de fișier definit în fila de Configurare a Aplicațiilor Externe, atunci când faceți dublu-clic pe valoarea câmpului care conține calea către fișier, aplicația îl va lansa, vizualizându-i sau ascultându-i conținutul. Dacă extensia fișierului este recunoscută, datele atributului vor fi afișate în verde.
Navigation buttons: Folosiți butoanele Anterior și Următor pentru a încărca entitatea precedentă sau următoare atunci când este selectată mai mult de o entitate.
Înțelegerea ferestrei Opțiuni
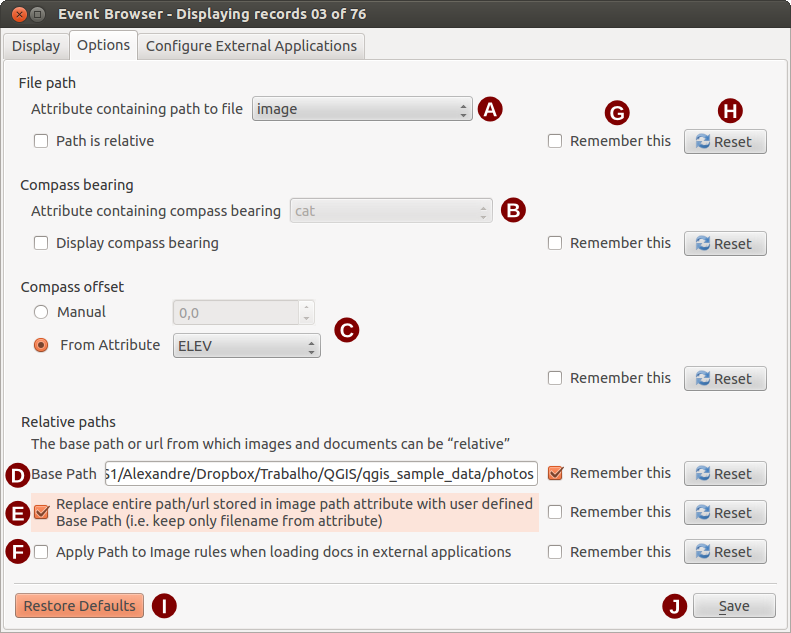
Fereastra de opțiuni eVis
- File path: A drop-down list to specify the attribute field that contains the directory path or URL for the photographs or other documents being displayed. If the location is a relative path, then the checkbox must be clicked. The base path for a relative path can be entered in the Base Path text box below. Information about the different options for specifying the file location are noted in the section Specificați locația și numele unei fotografii below.
- Compass bearing: A drop-down list to specify the attribute field that contains the compass bearing associated with the photograph being displayed. If compass bearing information is available, it is necessary to click the checkbox below the drop-down menu title.
- Compass offset: Compass offsets can be used to compensate for
declination (to adjust bearings collected using magnetic bearings to true north
bearings). Click the
 Manual radio button to enter
the offset in the text box or click the
From Attribute radio button to select the attribute field
containing the offsets. For both of these options, east declinations should
be entered using positive values, and west declinations should use negative
values.
Manual radio button to enter
the offset in the text box or click the
From Attribute radio button to select the attribute field
containing the offsets. For both of these options, east declinations should
be entered using positive values, and west declinations should use negative
values. - Directory base path: The base path onto which the relative path defined in Figure_eVis_options (A) will be appended.
- Replace path: If this checkbox is checked, only the file name from A will be appended to the base path.
Regula se aplică tuturor documentelor: Dacă se bifează, aceleași căi către reguli, care sunt definite pentru imagini, vor fi utilizate pentru documentele non-imagine, cum ar fi filmele, documentele de tip text și fișierele de sunet. Dacă nu se bifează, căile către reguli se vor aplica numai pentru imagini, iar restul documentelor vor ignora parametrul Path Base.
- Remember settings: If the checkbox is checked, the values for the associated parameters will be saved for the next session when the window is closed or when the [Save] button below is pressed.
Resetare valori: Resetează valorile de pe această linie la setarea implicită.
- Restore defaults: This will reset all of the fields to their default settings. It has the same effect as clicking all of the [Reset] buttons.
Salvare: Acest lucru va salva setările fără a închide panoul Opțiunilor.
Înțelegera ferestrei de Configurare a Aplicațiilor Externe
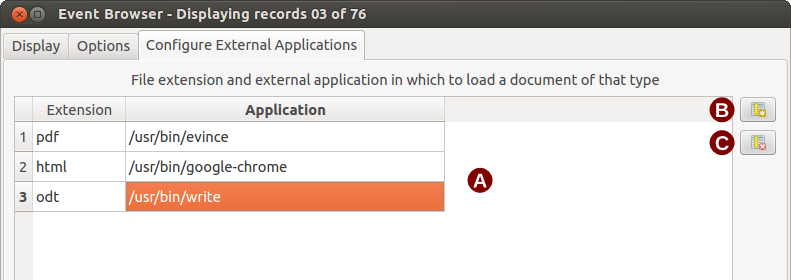
Fereastra Aplicațiilor Externe eVis
Tabela de referință a fișierelor: Un tabel care conține tipurile de fișiere care pot fi deschise cu eVis. Fiecare tip de fișier are nevoie de o extensie și de o cale către o aplicație care poate deschide acel tip de fișier. Astfel, în plus față de imagini, este posibilă deschiderea unui număr mare fișiere, cum ar fi filme, înregistrări sonore și documente text.
Add new file type: Adaugă un nou tip de fișier cu o extensie unică și calea către aplicația care poate deschide acel fișier.
Delete current row: Șterge tipul de fișier evidențiat în tabel și definit de o extensie de fișier și o cale către o aplicație asociată.
Specificați locația și numele unei fotografii
The location and name of the photograph can be stored using an absolute or relative path, or a URL if the photograph is available on a web server. Examples of the different approaches are listed in Table evis_examples.
X        Y        FILE                                                BEARING
780596   1784017  C:\Workshop\eVis_Data\groundphotos\DSC_0168.JPG     275
780596   1784017  /groundphotos/DSC_0169.JPG                          80
780819   1784015  http://biodiversityinformatics.amnh.org/\
                  evis_testdata/DSC_0170.JPG                          10
780596   1784017  pdf:http://www.testsite.com/attachments.php?\
                  attachment_id-12                                    76
Specificați locația și numele altor documente justificative
Supporting documents such as text documents, videos, and sound clips can also be displayed or played by eVis. To do this, it is necessary to add an entry in the file reference table that can be accessed from the Configure External Applications window in the Generic Event Browser that matches the file extension to an application that can be used to open the file. It is also necessary to have the path or URL to the file in the attribute table for the vector layer. One additional rule that can be used for URLs that don’t contain a file extension for the document you want to open is to specify the file extension before the URL. The format is — file extension:URL. The URL is preceded by the file extension and a colon; this is particularly useful for accessing documents from wikis and other web sites that use a database to manage the web pages (see Table evis_examples).
Lansarea modulului de Răsfoire a Evenimentelor
When the Event Browser window opens, a photograph will appear in the display window if the document referenced in the vector file attribute table is an image and if the file location information in the Options window is properly set. If a photograph is expected and it does not appear, it will be necessary to adjust the parameters in the Options window.
If a supporting document (or an image that does not have a file extension recognized by eVis) is referenced in the attribute table, the field containing the file path will be highlighted in green in the attribute information window if that file extension is defined in the file reference table located in the Configure External Applications window. To open the document, double-click on the green-highlighted line in the attribute information window. If a supporting document is referenced in the attribute information window and the file path is not highlighted in green, then it will be necessary to add an entry for the file’s filename extension in the Configure External Applications window. If the file path is highlighted in green but does not open when double-clicked, it will be necessary to adjust the parameters in the Options window so the file can be located by eVis.
If no compass bearing is provided in the Options window, a red asterisk will be displayed on top of the vector feature that is associated with the photograph being displayed. If a compass bearing is provided, then an arrow will appear pointing in the direction indicated by the value in the compass bearing display field in the Event Browser window. The arrow will be centered over the point that is associated with the photograph or other document.
To close the Event Browser window, click on the [Close] button from the Display window.
Instrumentul Event ID
The ‘Event ID’ module allows you to display a photograph by clicking on a feature displayed in the QGIS map window. The vector feature must have attribute information associated with it to describe the location and name of the file containing the photograph and, optionally, the compass direction the camera was pointed when the image was acquired. This layer must be loaded into QGIS before running the ‘Event ID’ tool.
Lansarea modulului Event ID
To launch the ‘Event ID’ module, either click on the  Event ID
icon or click on Database ‣ eVis ‣ Event ID Tool. This will
cause the cursor to change to an arrow with an ‘i’ on top of it signifying that
the ID tool is active.
Event ID
icon or click on Database ‣ eVis ‣ Event ID Tool. This will
cause the cursor to change to an arrow with an ‘i’ on top of it signifying that
the ID tool is active.
To view the photographs linked to vector features in the active vector layer displayed in the QGIS map window, move the Event ID cursor over the feature and then click the mouse. After clicking on the feature, the Event Browser window is opened and the photographs on or near the clicked locality are available for display in the browser. If more than one photograph is available, you can cycle through the different features using the [Previous] and [Next] buttons. The other controls are described in the Browser-ul de Evenimente section of this guide.
Conexiune la Baza de Date
Modulul ‘Database Connection’ pune la dispoziție unelte pentru conectarea și interogarea unei baze de date sau a unei alte resurse ODBC, cum ar fi o foaie de calcul.
eVis can directly connect to the following types of databases: PostgreSQL, MySQL, and SQLite; it can also read from ODBC connections (e.g., MS Access). When reading from an ODBC database (such as an Excel spreadsheet), it is necessary to configure your ODBC driver for the operating system you are using.
Lansarea modulului de Conectare la Baza de Date
To launch the ‘Database Connection’ module, either click on the appropriate icon
 eVis Database Connection or click on Database ‣
eVis ‣ Database Connection. This will launch the Database Connection
window. The window has three tabs: Predefined Queries,
Database Connection, and SQL Query. The Output
Console window at the bottom of the window displays the status of actions
initiated by the different sections of this module.
eVis Database Connection or click on Database ‣
eVis ‣ Database Connection. This will launch the Database Connection
window. The window has three tabs: Predefined Queries,
Database Connection, and SQL Query. The Output
Console window at the bottom of the window displays the status of actions
initiated by the different sections of this module.
Conectarea la baza de date
Click on the Database Connection tab to open the database
connection interface. Next, use the Database Type  combo box to select the type of database that you want to connect to. If a
password or username is required, that information can be entered in the
Username and Password textboxes.
combo box to select the type of database that you want to connect to. If a
password or username is required, that information can be entered in the
Username and Password textboxes.
Introduceți numele bazei de date în câmpul text Numele Bazei de Date. Opțiunea nu este disponibilă dacă alegeți ‘MS Access’ ca tip de bază de date. În cazul în care baza de date se află pe calculatorul dvs., va trebui să introduceți denumirea “localhost”.
Introduceți numele bazei de date în câmpul text Database Name. Dacă selectați ‘ODBC’ ca tip de bază de date, va trebui să introduceți numele sursei de date.
When all of the parameters are filled in, click on the [Connect] button. If the connection is successful, a message will be written in the Output Console window stating that the connection was established. If a connection was not established, you will need to check that the correct parameters were entered above.
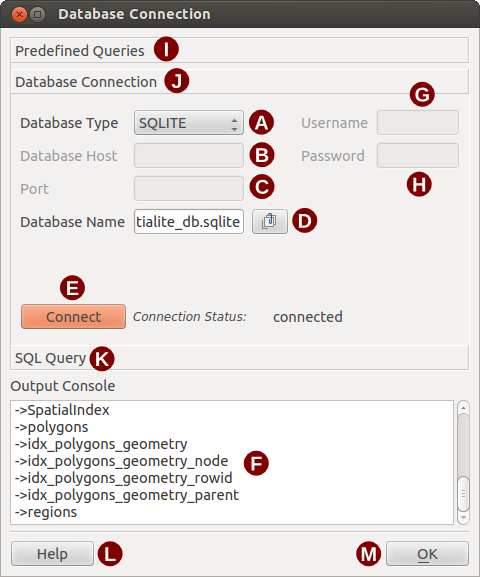
Fereastra de conectare la Baza de Date eVis
Tipul Bazei de Date: O listă derulantă în care se va specifica tipul bazei de date care va fi utilizată.
Database Host: Numele gazdei pentru baza de date.
Port: Numărul portului, atunci când tipul bazei de date este MySQL sau PostgreSQL.
Nume Bază de Date.: Numele bazei de date.
Conectare: Un buton pentru conectarea la baza de date, folosind parametrii definiți mai sus.
Consola de Ieșire: Fereastra consolei, în care sunt afișate mesajele referitoare la procesare.
Username: Nume utilizator care va fi utilizat atunci când o bază de date este protejată prin parolă.
Password: Parola care va fi utilizată atunci când o bază de date este protejată prin parolă.
Predefined Queries: Fila care va deschide fereastra “Interogărilor Predefinite”
Conectare la Baza de Date: Închide fereastra principală a Conexiunii la Baza de Date.
SQL Query: Fila care va deschide fereastra “SQL Query”.
Ajutor: Deschide fereastra de asistență online.
OK: Închide fereastra principală a “Conexiunii la Baza de Date”.
Rularea interogărilor SQL
SQL queries are used to extract information from a database or ODBC resource. In eVis, the output from these queries is a vector layer added to the QGIS map window. Click on the SQL Query tab to display the SQL query interface. SQL commands can be entered in this text window. A helpful tutorial on SQL commands is available at http://www.w3schools.com/sql. For example, to extract all of the data from a worksheet in an Excel file, select * from [sheet1$] where sheet1 is the name of the worksheet.
Click on the [Run Query] button to execute the command. If the query is successful, a Database File Selection window will be displayed. If the query is not successful, an error message will appear in the Output Console window.
In the Database File Selection window, enter the name of the layer that will be created from the results of the query in the Name of New Layer textbox.
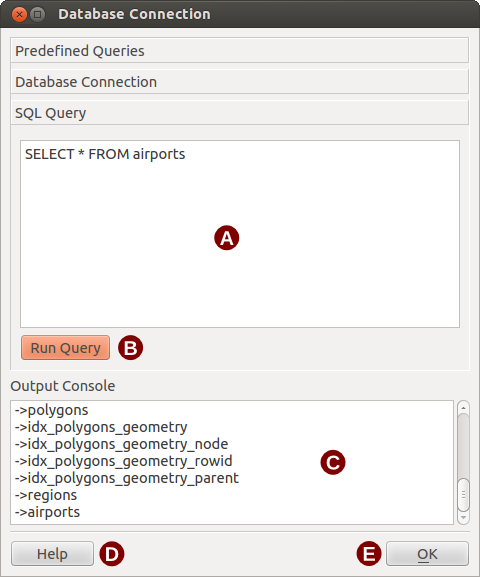
Fila de interogare eVis SQL
Fereastra Textului SQL de Interogare: O fereastră de introducere a interogărilor SQL.
Execuție Interogare: Butonul care va executa interogarea introdusă în Fereastra de Interogare SQL.
Fereastra Consolei: Fereastra consolei în care sunt afișate mesajele referitoare la procesare.
Ajutor: Deschide fereastra de asistență online.
OK: Închide fereastra principală a Conexiunii la Baza de Date.
Use the X Coordinate and Y Coordinate
combo boxes to select the fields from the database that stores the
X (or longitude) and Y (or latitude) coordinates. Clicking on the [OK]
button causes the vector layer created from the SQL query to be displayed in the
QGIS map window.
To save this vector file for future use, you can use the QGIS ‘Save as...’ command that is accessed by right-clicking on the layer name in the QGIS map legend and then selecting ‘Save as...’
Tip
Crearea unui strat vectorial dintr-o foaie de calcul Excel
When creating a vector layer from a Microsoft Excel Worksheet, you might see that unwanted zeros (“0”) have been inserted in the attribute table rows beneath valid data. This can be caused by deleting the values for these cells in Excel using the Backspace key. To correct this problem, you need to open the Excel file (you’ll need to close QGIS if you are connected to the file, to allow you to edit the file) and then use Edit ‣ Delete to remove the blank rows from the file. To avoid this problem, you can simply delete several rows in the Excel Worksheet using Edit ‣ Delete before saving the file.
Rularea interogărilor predefinite
With predefined queries, you can select previously written queries stored in XML format in a file. This is particularly helpful if you are not familiar with SQL commands. Click on the Predefined Queries tab to display the predefined query interface.
To load a set of predefined queries, click on the  Open File
icon. This opens the Open File window, which is used to locate the file
containing the SQL queries. When the queries are loaded, their titles as
defined in the XML file will appear in the drop-down menu located just below
the Open File icon. The full description of the query is
displayed in the text window under the drop-down menu.
Open File
icon. This opens the Open File window, which is used to locate the file
containing the SQL queries. When the queries are loaded, their titles as
defined in the XML file will appear in the drop-down menu located just below
the Open File icon. The full description of the query is
displayed in the text window under the drop-down menu.
Select the query you want to run from the drop-down menu and then click on the SQL Query tab to see that the query has been loaded into the query window. If it is the first time you are running a predefined query or are switching databases, you need to be sure to connect to the database.
Click on the [Run Query] button in the SQL Query tab to execute the command. If the query is successful, a Database File Selection window will be displayed. If the query is not successful, an error message will appear in the Output Console window.

Fila Interogărilor eVis Predefinite
Deschidere Fișier: Lansează navigatorul de fișiere “Deschidere Fișier”, pentru a căuta fișierul XML care conține interogări predefinite.
Interogări Predefinite: O casetă cu derulare verticală, care conține interogările predefinite, dintr-un fișier XML.
Descrierea interogării: O scurtă descriere a interogării. Această descriere face parte din fișierul XML de interogări predefinite.
Fereastra Consolei: Fereastra consolei în care sunt afișate mesajele referitoare la procesare.
Ajutor: Deschide fereastra de asistență online.
OK: Închide fereastra principală a “Conexiunii la Baza de Date”.
Formatul XML pentru interogări predefinite eVis
Etichetele XML citite de eVis
Etichetă |
Descriere |
|---|---|
interogare |
Definește începutul și sfârșitul unei expresii de interogare. |
scurtă descriere |
A short description of the query that appears in the eVis drop-down menu. |
descriere |
O descriere mai detaliată a interogării afișată în Fereastra Textului de Interogare Predefinită . |
| databasetype | The database type, defined in the Database Type drop-down menu in the Database Connection tab. |
| databaseport | The port as defined in the Port text box in the Database Connection tab. |
| databasename | Numele bazei de date, așa cum este definit în caseta de text Numele Bazei de Date din fila Conexiunilor la Baza de Date. |
| databaseusername | The database username as defined in the Username text box in the Database Connection tab. |
| databasepassword | The database password as defined in the Password text box in the Database Connection tab. |
| sqlstatement | Comanda SQL. |
| autoconnect | A flag (“true”” or “false”) to specify if the above tags should be used to automatically connect to the database without running the database connection routine in the Database Connection tab. |
Modelul complet de fișier XML, cu trei interogări, este afișat mai jos:
<?xml version="1.0"?>
<doc>
 <query>
   <shortdescription>Import all photograph points</shortdescription>
   <description>This command will import all of the data in the SQLite database to QGIS
      </description>
   <databasetype>SQLITE</databasetype>
   <databasehost />
   <databaseport />
   <databasename>C:\textbackslash Workshop/textbackslash
eVis\_Data\textbackslash PhotoPoints.db</databasename>
   <databaseusername />
   <databasepassword />
   <sqlstatement>SELECT Attributes.*, Points.x, Points.y FROM Attributes LEFT JOIN
      Points ON Points.rec_id=Attributes.point_ID</sqlstatement>
   <autoconnect>false</autoconnect>
 </query>
  <query>
   <shortdescription>Import photograph points "looking across Valley"</shortdescription>
   <description>This command will import only points that have photographs "looking across
      a valley" to QGIS</description>
   <databasetype>SQLITE</databasetype>
   <databasehost />
   <databaseport />
   <databasename>C:\Workshop\eVis_Data\PhotoPoints.db</databasename>
   <databaseusername />
   <databasepassword />
   <sqlstatement>SELECT Attributes.*, Points.x, Points.y FROM Attributes LEFT JOIN
      Points ON Points.rec_id=Attributes.point_ID where COMMENTS='Looking across
      valley'</sqlstatement>
   <autoconnect>false</autoconnect>
 </query>
 <query>
   <shortdescription>Import photograph points that mention "limestone"</shortdescription>
   <description>This command will import only points that have photographs that mention
      "limestone" to QGIS</description>
   <databasetype>SQLITE</databasetype>
   <databasehost />
   <databaseport />
   <databasename>C:\Workshop\eVis_Data\PhotoPoints.db</databasename>
   <databaseusername />
   <databasepassword />
   <sqlstatement>SELECT Attributes.*, Points.x, Points.y FROM Attributes LEFT JOIN
      Points ON Points.rec_id=Attributes.point_ID where COMMENTS like '%limestone%'
      </sqlstatement>
   <autoconnect>false</autoconnect>
 </query>
</doc>