` `
Plugin-ul de Captură a Coordonatelor
Plugin-ul de captură a coordonatelor este ușor de utilizat și oferă capacitatea de afișare a coordonatelor pe canevasul hărții, pentru cele două sisteme de coordonate de referință selectate (CRS-uri).
Plugin-ul de Captură a Coordonatelor
- Start QGIS, select
 Project Properties from the
Settings (KDE, Windows) or File (Gnome, macOS) menu
and click on the Projection tab. As an alternative, you can also
click on the
Project Properties from the
Settings (KDE, Windows) or File (Gnome, macOS) menu
and click on the Projection tab. As an alternative, you can also
click on the  CRS status icon in the lower
right-hand corner of the status bar.
CRS status icon in the lower
right-hand corner of the status bar. Clic pe caseta de bifare
 Activare proiecție din zbor și selectați sistemul de proiecție a coordonatelor dorit (v. Lucrul cu Proiecții).
- Activate the coordinate capture plugin in the Plugin Manager (see
Dialogul Plugin-urilor) and ensure that the dialog is visible by going to
View ‣ Panels and ensuring that
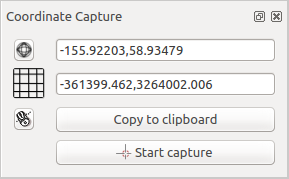
Coordinate Capture is enabled. The coordinate capture dialog
appears as shown in Figure figure_coordinate_capture. Alternatively,
you can also go to Vector ‣ Coordinate Capture and see
if Coordinate Capture is enabled.
Clic pe pictograma
 Click to the select the CRS to use for coordinate display și selectați un CRS diferit de cel selectat mai sus.
- To start capturing coordinates, click on [Start capture]. You can now click anywhere on the map canvas and the plugin will show the coordinates for both of your selected CRS.
Pentru a activa urmărirea coordonatelor mouse-ului, efectuați clic pe pictograma
 mouse tracking.
De asemenea, se pot copia în clipboard coordonatele selectate.