Outdated version of the documentation. Find the latest one here.

` `

属性テーブルアイテム

It is possible to add parts of a vector attribute table to the Print Composer canvas: Click the openTable Add attribute table icon, click and drag with the left mouse button on the Print Composer canvas to place and size the item. You can better position and customize its appearance in the Item Properties panel.

The Item properties panel of an attribute table provides the following functionalities (see figure_composer_table):

../../../../_images/attribute_properties.png

属性テーブル項目のプロパティパネル

メインプロパティ

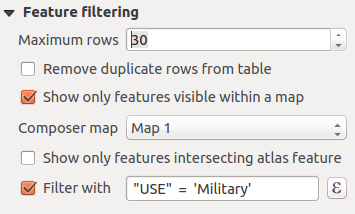
The Main properties dialog of the attribute table provides the following functionalities (see figure_composer_table_ppt):

../../../../_images/attribute_mainproperties.png

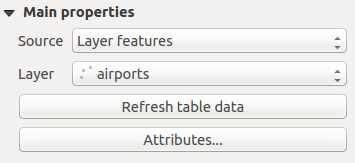
Attribute table Main properties Dialog

  • For Source you can normally select only Layer features.
  • With Layer you can choose from the vector layers loaded in the project.
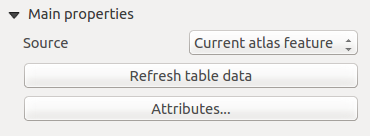
  • In case you activated the checkboxGenerate an atlas option in the Atlas generation panel, there are two additional Source possible:
    • Current atlas feature (see figure_composer_table_atlas): you won’t see any option to choose the layer, and the table item will only show a row with the attributes from the current feature of the atlas coverage layer.
    • and Relation children (see figure_composer_table_relation): an option with the relation names will show up. This feature can only be used if you have defined a relation using your atlas coverage layer as parent, and the table will show the children rows of the atlas coverage layer’s current feature (for further information about the atlas generation, see 地図帳を作成).
  • The button [Refresh table data] can be used to refresh the table when the actual contents of the table has changed.
../../../../_images/attribute_mainatlas.png

‘現在の地図帳地物’ の属性テーブルメインプロパティ

../../../../_images/attribute_mainrelation.png

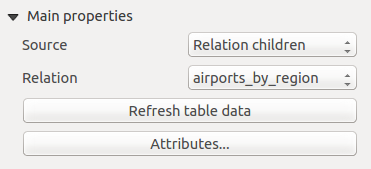
‘関係の子’ の属性テーブルメインプロパティ

  • The button [Attributes...] starts the Select attributes menu, see figure_composer_table_select, that can be used to change the visible contents of the table. After making changes use the [OK] button to apply changes to the table. The upper part of the window shows the list of the attributes to display and the lower part helps to set the way the data is sorted.
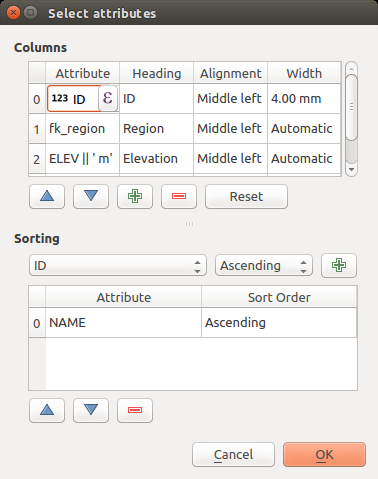
    ../../../../_images/attribute_select.png

    属性テーブル 属性選択ダイアログ

    セクションでは:

    • Remove an attribute, just select an attribute row by clicking anywhere in the row and press the minus button to remove the selected attribute.
    • Add a new attribute use the plus button. At the end a new empty row appears and you can select empty cell of the column Attribute. You can select a field attribute from the list or you can select to build a new attribute using a regular expression (expression button). Of course you can modify every already existing attribute by means of a regular expression.
    • Use the up and down arrows to change the order of the attributes in the table.
    • Select a cell in the Headings column and, to change the heading, just type in a new name.
    • set a precise Alignment (mixing vertical and horizontal alignment options) for each column.
    • Select a cell in the Width column and change it from Automatic to a width in mm, just type a number. When you want to change it back to Automatic, use the cross.
    • The [Reset] button can always be used to restore it to the original attribute settings.

    並べ替え セクションでは:

    • Add an attribute to sort the table with. Select an attribute and set the sorting order to ‘Ascending’ or ‘Descending’ and press the plus button. A new line is added to the sort order list.
    • select a row in the list and use the up and down button to change the sort priority on attribute level. Selecting a cell in the Sort Order column helps you change the sorting order of the attribute field.
    • use the minus button to remove an attribute from the sort order list.

地物フィルタリング

The Feature filtering dialog of the attribute table provides the following functionalities (see figure_composer_table_filter):

../../../../_images/attribute_filter.png

Attribute table Feature filtering Dialog

機能は:

  • 最大行数 で表示行を指定します.

  • checkbox テーブルから重複行を削除する をチェックすると, ユニークレコードのみ表示されます.

  • Activate checkbox Show only visible features within a map and select the corresponding Composer map to display the attributes of features only visible on selected map.

  • Activate checkbox Show only features intersecting Atlas feature is only available when checkbox Generate an atlas is activated. When activated it will show a table with only the features which intersect the current atlas feature.

  • checkbox フィルタ ではフィルタ機能が提供されます。入力行に直接入力するか、 expression ボタンから通常の式を挿入します。サンプルデータセットから空港レイヤーをロードしたとき使用できるいくつかのフィルタ式の例があります:

    • ELEV > 500
    • NAME = 'ANIAK'
    • NAME NOT LIKE 'AN%'
    • regexp_match( attribute( $currentfeature, 'USE' ) , '[i]')

    最後の式では、属性フィールド「USE」に文字「i」が含まれる空港だけを抽出しています。

外観

The Appearance dialog of the attribute table provides the following functionalities (see figure_composer_table_appearance):

../../../../_images/attribute_appearance.png

Attribute table appearance Dialog

  • checkbox 値が無い行の表示 をチェックすると属性テーブルが空のセルで埋められます. このオプションは結果表示に空白セルを追加するのにも使用できます.

  • セルマージン で, テーブルの各セルでテキストの周りのマージンを定義します.

  • ヘッダの表示 は, ‘最初のフレーム上’, ‘全フレーム上’ デフォルトオプション, または ‘ヘッダなし’ から選びます.

  • 値のないテーブル では, 選択結果が空となった場合の表示を制御します.

    • ヘッダーのみの描画 では, ヘッダーのみ描画します. ただし, ヘッダの表示 で ‘ヘッダなし’ を選んだ場合は除きます.

    • テーブル全体を隠す では, テーブルの背景のみ描画します. フレームcheckbox フレームの内容が無い場合は背景を描画しない をチェックすると, 完全にテーブルが隠れます.

    • 設定メッセージの表示 では、見出しを描画てすべての列にセルを追加し、 表示するメッセージ オプションに入力して ‘結果なし’ のようなメッセージを表示できます。

  • 表示するメッセージ値の無いテーブル設定メッセージの表示 を選んだ場合のみ有効となります. ここで入力するメッセージは結果が空のテーブルになった場合の1行目に表示されます.

  • With Background color you can set the background color of the table. The Advanced customization option helps you define different background colors for each cell (see figure_composer_table_background)
../../../../_images/attribute_background.png

属性テーブル [高度な背景色]ダイアログ

  • テキストを折り返す オプションで、セルの内容を折り返すための文字を定義します。

  • With Oversized text you define the behaviour when the width set for a column is smaller than its content’s length. It can be Wrap text or Truncate text.

グリッド表示

The Show grid dialog of the attribute table provides the following functionalities (see figure_composer_table_grid):

../../../../_images/attribute_grid.png

Attribute table Show grid Dialog

  • Activate checkbox Show grid when you want to display the grid, the outlines of the table cells.
  • 線幅 では, グリッドに使用する線の線幅を指定します.

  • The Color of the grid can be set using the color selection dialog.

フォントとテキストスタイリング

The Fonts and text styling dialog of the attribute table provides the following functionalities (see figure_composer_table_fonts):

../../../../_images/attribute_fonts.png

Attribute table Fonts and text styling Dialog

  • You can define Font and Color for Table heading and Table contents.
  • For Table heading you can additionally set the Alignment to Follow column alignment or override this setting by choosing Left, Center or Right. The column alignment is set using the Select Attributes dialog (see Figure_composer_table_select ).

フレーム

The Frames dialog of the attribute table provides the following functionalities (see figure_composer_table_frames):

../../../../_images/attribute_frame.png

Attribute table Frames Dialog

  • リサイズモード で属性テーブルの内容をどのように表現するか選択できます:

    • Use existing frames displays the result in the first frame and added frames only.
    • Extend to next page will create as many frames (and corresponding pages) as necessary to display the full selection of attribute table. Each frame can be moved around on the layout. If you resize a frame, the resulting table will be divided up between the other frames. The last frame will be trimmed to fit the table.
    • Repeat until finished will also create as many frames as the Extend to next page option, except all frames will have the same size.
  • Use the [Add Frame] button to add another frame with the same size as selected frame. The result of the table that will not fit in the first frame will continue in the next frame when you use the Resize mode Use existing frames.
  • Activate checkbox Don’t export page if frame is empty prevents the page to be exported when the table frame has no contents. This means all other composer items, maps, scalebars, legends etc. will not be visible in the result.
  • checkbox フレームの内容が無い場合は背景を描画しない をチェックすると, テーブルフレームに内容が無い場合に背景が描画されません.