` `
QGIS Anpassung
QGIS is highly configurable through the Settings menu. Choose between Options, Project Properties and Customization.
Bemerkung
QGIS follows desktop guidelines for the location of options and project properties item. Consequently related to the OS you are using, location of some of items described below could be in the Project or the Settings menu.
Optionen
 Some basic options for QGIS can be selected using the
Options dialog. Select the menu option Settings ‣
Options.
You can modify the options according to your needs. Some of the changes may
require a restart of QGIS before they will be effective.
Some basic options for QGIS can be selected using the
Options dialog. Select the menu option Settings ‣
Options.
You can modify the options according to your needs. Some of the changes may
require a restart of QGIS before they will be effective.
The tabs where you can customize your options are described below.
General Settings
Anwendung
- Select the Style (QGIS restart required)
 and choose
between ‘Oxygen’, ‘Windows’, ‘Motif’, ‘CDE’, ‘Plastique’ and ‘Cleanlooks’.
and choose
between ‘Oxygen’, ‘Windows’, ‘Motif’, ‘CDE’, ‘Plastique’ and ‘Cleanlooks’. - Define the Icon theme . It can be ‘default’ or ‘Night Mapping’.
- Define the Icon size .
- Define the Font and its Size. The font can be
 Qt default or a user-defined one.
 - Change the Timeout for timed messages or dialogs .
 Hide splash screen at startup
- Show tips at startup
- Check QGIS version at startup to keep you informed
if a newer version is released
- QGIS-styled group boxes
- Use native color chooser dialogs (see Farbauswahl)
- Use live-updating color chooser dialogs (see Farbauswahl)
- Canvas rotation support (restart required)
Projektdateien
- Open project on launch (choose between ‘New’,
‘Most recent’, ‘Welcome Page’, and ‘Specific’). When choosing ‘Specific’ use
the
 to define the project to use by default. The ‘Welcome Page’
displays a list of recent projects with screenshot.
to define the project to use by default. The ‘Welcome Page’
displays a list of recent projects with screenshot. - Neues Projekt aus Vorgabeprojekt erstellen. Sie haben die Möglichkeit auf Aktuelles Projekt als Vorgabe speichern oder Vorgabe zurücksetzen zu drücken. Sie können durch Ihre Dateien gehen und ein Verzeichnis definieren in dem Sie ihre benutzerdefinierten Projektvorlagen festlegen. Diese werden dann dem Menü Projekt ‣ Neu aus Vorlage hinzugefügt wenn Sie erst Neues Projekt aus Vorgabeprojekt erstellen aktivieren und dann ein Projekt in den Projektvorlagenordner speichern.
- Prompt to save project and data source changes when
required
- Prompt for confirmation when a layer is to be removed
- Warn when opening a project file saved with an older
version of QGIS
Makros aktivieren
. Diese Option wurde erstellt um Makros zu handhaben die geschrieben wurden um eine Aktion auf Projektereignisse auszuführen. Sie können zwischen ‘Nie’, ‘Fragen’, ‘Nur in dieser Sitzung’ und ‘Immer (nicht empfohlen)’ wählen.
System Settings
SVG paths
Add or Remove Path(s) to search for Scalable Vector Graphic (SVG) symbols. These SVG files are then available to symbolize features or decorate your map composition.
Erweiterungspfade
Add or Remove Path(s) to search for additional C++ plugin libraries
QSettings
It helps you Reset user interface to default settings (restart required) if you made any customization.
Umgebung
Systemumgebungsvariablen können nun eingesehen werden und viele von ihnen konfiguriert in der Umgebung Gruppe (siehe figure_environment_variables). Dies ist für Betriebssysteme wie Mac nützlich da dort eine GUI Anwendung nicht notwendigerweise die Shellumgebung des Benutzers übernimmt. Sie ist auch nützlich um Umgebungsvariablen für externe Werkzeuge die von der Verarbeitungs-Toolbox (z.B. SAGA, GRASS) kontrolliert werden zu setzen und zu visualisieren und um die Debug-Ausgabe für bestimmte Abschnitte des Quellcodes anzuschalten.
- Use custom variables (restart required - include separators).
You can [Add] and [Remove] variables. Already-defined environment
variables are displayed in Current environment variables, and it’s
possible to filter them by activating
Show only QGIS-specific variables.
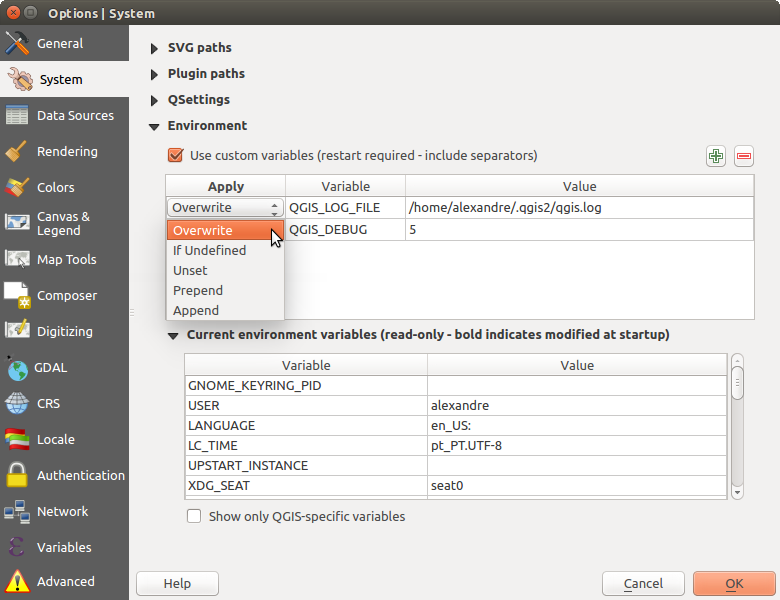
Systemumgebungsvariablen in QGIS
Data Sources Settings
Objektattribute und -tabelle
- Open attribute table in a dock window
- Copy features as ‘Plain text, no geometry’, ‘Plain text, WKT geometry’, or ‘GeoJSON’ when pasting features in other applications.
- Attribute table behavior : set filter on the attribute
table at the opening. There are three possibilities: ‘Show all features’,
‘Show selected features’ and ‘Show features visible on map’.
- Default view: define the view mode of the attribute table at every opening. It can be ‘Remember last view’, ‘Table view’ or ‘Form view’.
Attributtabellenzeilencache
 . Dieser Zeilencache erlaubt es, die N zuletzt geladenen Attributzeilen im Cache zu speichern. Dadurch wird das Arbeiten mit der Attributtabelle schneller. Der Cache wird wieder gelöscht, wenn man die Attributtabelle schliesst.
Repräsentation für NULL-Werte. Hier können Sie einen Wert für Datenfelder die einen NULL-Wert enthalten festlegen.
Tipp
Improve opening of big data attribute table
When working with layers with big amount of records, opening the attribute table may be slow as the dialog request all the rows in the layer. Setting the Attribute table behavior to Show features visible on map will make QGIS request only the features in the current map canvas when opening the table, allowing a quick data loading.
Note that data in this attribute table instance will be always tied to the canvas extent it was opened with, meaning that selecting Show All Features within such a table will not display new features. You can however update the set of displayed features by changing the canvas extent and selecting Show Features Visible On Map option in the attribute table.
Datenquellenbehandlung
Nach gültigen Element im Browser suchen
. Sie können zwischen ‘Erweiterung prüfen’ und ‘Dateiinhalt prüfen’ wählen.- Scan for contents of compressed files (.zip) in browser dock
. ‘No’, ‘Basic scan’ and ‘Full scan’ are possible.
Beim Öffnen nach Rasterunterlayern fragen. Einige Rasterformate unterstützen Unterlayer - sie werden Subdataset in GDAL genannt. Ein Beispiel sind netCDF-Dateien - wenn es viele netCDF-Variablen gibt interpretiert GDAL jede Variable als Subdataset. Die Option ermöglicht es Ihnen zu steuern wie mit Unterlayern umgegangen wird wenn eine Datei mit Unterlayern geöffnet wird. Sie haben die folgenden Wahlmöglichkeiten:
‘Immer’: Immer fragen (ob es Unterlayer gibt)
‘Wenn nötig’: Fragen ob Layer keine Bänder aber Unterlayer hat
‘Nie’: Nie fragen, lädt dann nichts
‘Alle laden’: Nie auffordern aber alle Unterlayer laden
- Shapefile-Kodierungsangabe ignorieren. Wenn eine Shapedatei Kodierungsinformationen enthält wird dieses von QGIS ignoriert.
- PostGIS-Layer per Doppelklick hinzufügen und zur Auswahl den erweiterten Modus verwenden
- Oracle-Layer mit Doppelklick hinzufügen und zur Auswahl den erweiterten Modus verwenden
- Ausdrücke wenn möglich serverseitig ausführen
Ausgeblendeter Browserpfad
This widget lists all the folder you chose to hide from the Browser panel. Removing a folder from the list will make it available in the Browser panel.
Rendering Settings
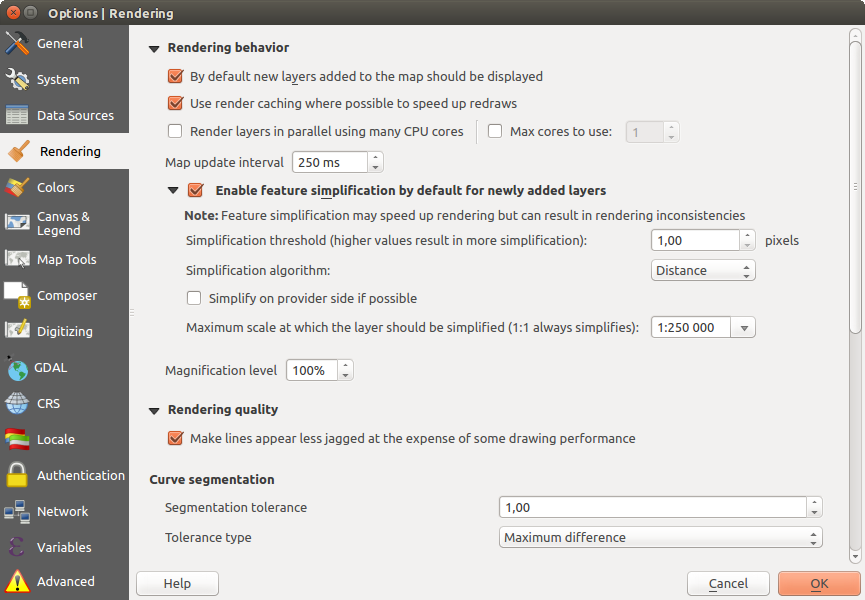
Rendering tab of Project Properties dialog
Zeichenverhalten
- By default new layers added to the map should be displayed
- Wo möglich den Darstellungscache benutzen, um das Neuzeichnen zu beschleunigen
- Layer mit vielen CPU-Kernen parallel zeichnen
- Max. zu benutzende Kerne
Kartenaktualisierungsintervall
- Geometrievereinfachung für neue Layer voreinstellen
Vereinfachungsschwelle
- Simplification algorithm: This option performs a local “on-the-fly” simplification on feature’s and speeds up geometry rendering. It doesn’t change the geometry fetched from the data providers. This is important when you have expressions that use the feature geometry (e.g. calculation of area) - it ensures that these calculations are done on the original geometry, not on the simplified one. For this purpose, QGIS provides three algorithms: ‘Distance’ (default), ‘SnapToGrid’ and ‘Visvalingam’.
- Simplify on provider side if possible: the geometries
are simplified by the provider (PostGIS, Oracle...) and unlike the
local-side simplification, geometry-based calculations may be affected
Größter Maßstab bis zu dem der Layer vereinfacht werden soll
 Magnification level (see the magnifier)
Bemerkung
Besides the global setting, feature simplification can be set for any specific layer from its Layer properties ‣ Rendering menu.
Zeichenqualität
- Linie auf Kosten der Zeichengeschwindigkeit weniger gezackt zeichnen
Curve segmentation
Segmentation tolerance: this setting controls the way circular arcs are rendered. The smaller maximum angle (between the two consecutive vertices and the curve center, in degrees) or maximum difference (distance between the segment of the two vertices and the curve line, in map units), the more straight line segments will be used during rendering.
Tolerance type: it can be ‘Maximum angle’ or ‘Maximum distance’
Raster
Mit RGB Kanalauswahl können Sie Nummer für den Roten Kanal, Grünen Kanal und Blauen Kanal festlegen.
Kontrasverbesserung
- Single band gray . A single band gray can have
‘No stretch’, ‘Stretch to MinMax’, ‘Stretch and Clip to MinMax’ and also
‘Clip to MinMax’.
- Multi band color (byte/band) . Options are ‘No stretch’,
‘Stretch to MinMax’, ‘Stretch and Clip to MinMax’ and ‘Clip to MinMax’.
- Multi band color (>byte/band) . Options are ‘No stretch’,
‘Stretch to MinMax’, ‘Stretch and Clip to MinMax’ and ‘Clip to MinMax’.
- Limits (minimum/maximum) . Options are
‘Cumulative pixel count cut’, ‘Minimum/Maximum’, ‘Mean +/- standard deviation’.
Kommulative Pixelanzahl-Schnittgrenzen
Standardabweichungsfaktor
Fehlersuche
- Map canvas refresh
Colors Settings
This menu allows you to add some custom color that you can find in each color dialog window of the renderers. You will see a set of predefined colors in the tab: you can delete or edit all of them. Moreover you can add the color you want and perform some copy and paste operations. Finally you can export the color set as a gpl file or import them.
Canvas and Legend Settings
Default map appearance (overridden by project properties)
- Define a Selection color and a Background color.
Layer legend
- Double click action in legend . You can either
‘Open layer properties’, ‘Open attribute table’ or ‘Open layer styling dock’
with the double click.
- The following Legend item styles are possible:
- Capitalise layer names
- Bold layer names
- Bold group names
- Display classification attribute names
- Create raster icons (may be slow)
- you can also set the WMS getLegendGraphic Resolution
Map tools Settings
This tab offers some options regarding the behavior of the Identify tool.
- Search radius for identifying and displaying map tips is a tolerance distance within which the identify tool will depict results as long as you click within this tolerance.
- Highlight color allows you to choose with which color should features being identified be highlighted.
Puffer, legt eine Pufferdistanz, die durch die Umrisslinie der Hervorhebung dargestellt wird, fest.
Minimalbreite, legt fest wie dick die Umrisslinie eines hervorgehobenen Objektes sein soll.
Messwerkzeug
Definieren Sie Gummibandfarbe für das Meßwerkzeug
Definieren Sie Dezimalstellen
- Keep base unit nicht automatisch große Zahle umzuwandeln (z. B. Meter zu Kilometer)
- Preferred distance units (‘Meters’, ‘Kilometers’, ‘Feet’,
‘Yards’, ‘Miles’, ‘Nautical Miles’, ‘Degrees’ or ‘Map Units’ )
- Preferred area units (‘Square meters’, ‘Square
kilometers’, ‘Square feet’, ‘Square yards’, ‘Square miles’, ‘Hectares’,
‘Acres’, ‘Square nautical miles’, ‘Square degrees” or ‘Map Units’)
- Preferred angle units (‘Degrees’, ‘Radians’, ‘Gon/gradians’,
‘Minutes of arc’, ‘Seconds of arc’ or ‘Turns/revolutions’)
Verschieben und Zoomen
- Define a Zoom factor for zoom tools or wheel mouse
Vordefinierte Maßstäbe
Hier können Sie eine Liste von vordefinierten Skalen finden. Mit dem  und
und  Knopf fügen Sie personalisierte hinzu oder löschen diese. Sie können auch Skalen aus/zu einer .XML Datei exportieren/importieren. Beachten Sie, dass Sie immer noch die Möglichkeit haben, um die Änderungen zu entfernen und auf die vordefinierte Liste zurückzusetzen.
Composer Settings
Zusammenstellungsvoreinstellungen
You can define the Default font used within the print composer.
Gitterdarstellung
Definieren Sie den Gitterstil
(‘Ausgefüllt’, ‘Punkte’, ‘Kreuze’)Definieren Sie Gitterfarbe
Gitter- und Führungsvoreinstellungen
Definieren Sie Zwischenräume
- Define the Grid offset for x and y
Legen Sie die Fangtoleranz
fest
Composer Paths
- Define Path(s) to search for extra print templates: a list of folders with custom composer templates to use while creating new one.
Digitizing Settings
This tab helps you configure general settings when editing vector layer (attributes and geometry).
Objekterzeugung
- Suppress attribute form pop-up after feature creation
- Reuse last entered attribute values
Geometrien prüfen. Das Bearbeiten komplexer Linien/Polygone mit vielen Stützpunkten kann zu einer erheblichen Verlangsamung der Darstellung führen. Das liegt an den Standard-Validierungsverfahren, die viel Zeit benötigen. Um die Darstellung zu beschleunigen ist es möglich die Geometrieüberprüfung von GEOS (von GEOS 3.3.an) zu wählen oder die Validierung ganz auszuschalten. Die GEOS Geometrieüberprüfung ist viel schneller, aber der Nachteil ist dass nur das erste Geometrieproblem gemeldet wird.
Gummiband
- Define Rubberband Line width, Line color and Fill color
- Don’t update rubberband during node editing
Objektfang
- Open snapping options in a dock window (QGIS restart required)
- Define Default snap mode (‘To vertex’, ‘To segment’,
‘To vertex and segment’, ‘Off’)
Definieren Sie die Voreingestellte Fangtoleranz in Karteneinheiten oder Pixeln
Definieren Sie den Suchradius für die Stützpunktbearbeitung in Karteneinheiten oder Pixeln.
Stützpunktmarken
- Markierungen nur für gewählte Objekte anzeigen
Legen Sie für die Stützpunktmarken den Markierungsstil
(‘Kreuz’ (standard), ‘Teiltransparenter Kreis’ oder ‘Keine’) festDefinieren Sie die Markierungsgröße für die Stützpunktmarken
Werkzeug zum Linien versetzen
Die nächsten 3 Optionen beziehen sich auf das  Linie versetzen Werkzeug in Erweiterte Digitalisierung. Durch die verschiedenen Einstellungen ist es möglich die Form des Linienversatzes zu beeinflussen. Diese Optionen sind von GEOS 3.3 an möglich.
- Join style: ‘Round’, ‘Mitre’ or ‘Bevel’
Quadrantensegmente
Eckengrenze
GDAL Settings
GDAL is a data exchange library for raster files. In this tab, you can Edit create options and Edit Pyramids Options of the raster formats. You can define which GDAL driver is to be used for a raster format, as in some cases more than one GDAL driver is available.
CRS Settings
Default CRS for new projects
 Don’t enable ‘on the fly’ reprojection
- Automatically enable ‘on the fly’ reprojection if
layers have different CRS
- Enable ‘on the fly’ reprojection by default
- Select a CRS and Always start new projects with this CRS
KBS für neue Layer
Der zweite Bereich ermöglicht es, Voreinstellungen vorzunehmen, wenn ein neuer Layer erzeugt wird oder ein Layer geladen wird, der keine KBS Information besitzt.
- Prompt for CRS
- Use project CRS
- Use default CRS
Datumtransformationsvorgaben
- Ask for datum transformation when no default is defined
With the ‘on-the-fly’ CRS transformation enabled and the above option checked, adding layers of different CRS opens the Select datum transformations dialog. This offers you to select the most appropriate transformation settings. Validating this dialog with the ‘Remember selection’ option checked populates the table under CRS ‣ Default datum transformations with information about ‘Source CRS’ and ‘Destination CRS’ as well as ‘Source datum transform’ and ‘Destination datum transform’. From now, QGIS automatically uses the selected datum transformation for further transformation between these two CRSs until you
remove it from the list.You can use the
button to add a datum transformation if you know
its parameters (source and destination ellipsoids and the numbers from the
transformation table). You then need to manually enter each setting.
Bemerkung
For more information on how QGIS handles layers projection, please read the dedicated section at Arbeiten mit Projektionen.
Locale Settings
- Override system locale and Locale to use instead
- Information about active system locale
Authentication Settings
In dem Authentifikation Reiter können Sie Authentifikationskonfigurationen vornehmen und PKI Zertifikate verwalten. Für mehr Details siehe Authentifizierungssystem.
Network Tab
Allgemein
WMS Suchadresse - Standard ist http://geopole.org/wms/search?search=%1&type=rss
Definieren Sie Zeitüberschreitung für Netzwerkanfragen (ms) - Standard ist 60000
- Define Default expiration period for WMS Capabilities (hours) - default is 24
Definieren Sie Verfallszeitraumvorgabe für WMS-C/WMTS Kacheln (Stunden) - Standard ist 24
- Define Max retry in case of tile or feature request errors
Definieren Sie User-Agent
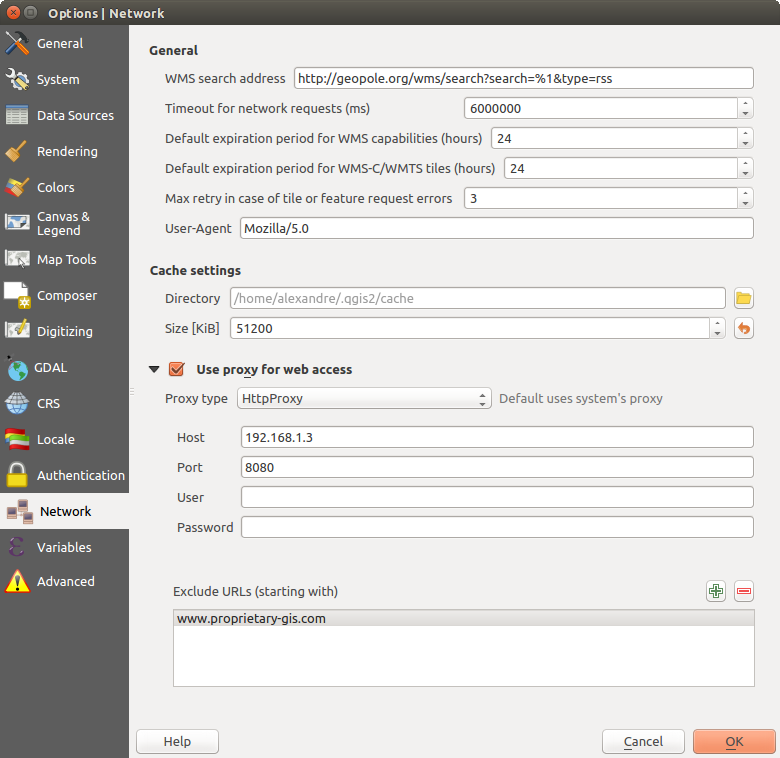
Proxy-Einstellungen in QGIS
Cache-Einstellungen
Define the Directory and a Size for the cache.
- Use proxy for web access and define ‘Host’, ‘Port’, ‘User’,
and ‘Password’.
- Set the Proxy type according to your needs.
- Default Proxy: Proxy is determined based on the application proxy set using
Socks5Proxy ‣: Proxy für jede Art von Verbindung. Unterstützt TCP, UDP, Bindung an einen Port (eingehende Verbindungen) und Authentifizierung.
HttpProxy ‣: Umgesetzt mit dem “CONNECT”-Befehl, unterstützt nur ausgehende TCP-Verbindungen und Authentifizierung.
HttpCachingProxy:Umgesetzt mit normalen HTTP Befehlen ist dies nur im Zusammenhang mit HTTP Befehlen sinnvoll einzusetzen.
FtpCachingProxy: Mit einem FTP-Proxy umgesetzt ist dies nur sinnvoll im Zusammenhang mit FTP-Anforderungen anzuwenden
Das Ausschließen von URLs kann in das Textfenster unter den Proxyeinstellungen eingetragen werden (siehe Figure_Network_Tab).
If you need more detailed information about the different proxy settings, please refer to the manual of the underlying QT library documentation at http://doc.qt.io/qt-4.8/qnetworkproxy.html#ProxyType-enum
Tipp
Proxy richtig anwenden
Using proxies can sometimes be tricky. It is useful to proceed by ‘trial and error’ with the above proxy types, to check if they succeed in your case.
Variables Settings
The Variables tab lists all the variables available at the global-level.
It also allows the user to manage global-level variables. Click the
button to add a new custom global-level variable. Likewise, select a custom
global-level variable from the list and click the button to remove
it.
More information about variables in the Variables section.
Advanced Settings
Depending on your OS, all the settings related to QGIS (UI, tools, data providers, default values, plugins options...) are saved:
 in a text file: $HOME/.config/QGIS/QGIS2.conf
 in the properties list file: $HOME/Library/Preferences/org.qgis.qgis.plist
 in the registry under: HKEY\CURRENT_USER\Software\QGIS\qgis
The Advanced tab offers you in a single place, regardless your OS, means to manage these settings through the Advanced Settings Editor. After you promise to be careful, the widget is populated with a tree of all QGIS settings, which you can directly edit.
Warnung
Avoid using the Advanced tab settings blindly
Be careful while modifying items in this dialog given that changes are automatically applied. Doing changes without knowledge can break your QGIS installation in various ways.
Projekteigenschaften
In the properties window for the project under Project ‣
Project Properties (or  Settings ‣ Project Properties),
you can set project-specific options.
Settings ‣ Project Properties),
you can set project-specific options.
The project-specific options overwrite their equivalent in the options described above.
In the General tab, the general settings let you:
einen Titel für das Projekt hinter dem Projektpfad vergeben
die Farbe auswählen, die markierte Objekte haben, wenn sie ausgewählt sind
die Hintergrundfarbe wählen: die Farbe für den Kartenhintergrund
einstellen, ob der Pfad zu den Layern des Projekts als absolute (voll) oder als relative zu der Projektdatei gespeichert werden soll. Sie bevorzugen wahrscheinlich relative Pfade, wenn Layer und Projektdatei bewegt werden oder geteilt oder wenn Sie von Computern auf verschiedenen Plattformen auf das Projekt zugreifen wollen.
wählen Sie Artefakte bei der Darstellung von Kartenkacheln vermeiden. Beachten Sie, dass diese Option zu Leistungseinbußen führen kann.
Calculating areas and distances is a common need in GIS. However, these values are really tied to the underlying projection settings. The Measurements frame lets you control these parameters. You can indeed choose:
- the ellipsoid to use: it can be an existing one, a custom one (you’ll need to set values of the semi-major and semi-minor axis) or None/Planimetric.
Die Einheiten für Entfernungsmessung für Länge und Umfang und die Einheiten für Flächenmessung. Diese Einstellungen, die standardmäßig über die festgelegten Einheiten in den QGIS Optionen definiert sind, werden dann aber überschrieben für das aktuelle Projekt, werden eingesetzt in:
Attributtabellen Feld mit Aktualisierungsleiste
Feldrechner Berechnungen
Abfragewerkzeug abgeleitet von Länge, Umfang und Flächenwerten
Standardeinheiten gezeigt im Messen Dialog
The Coordinate display allows you to choose and customize the format of units to use to display the mouse coordinate in the status bar and the derived coordinates shown via the identify tool.
Finally, you can define a project scale list, which overrides the global predefined scales.
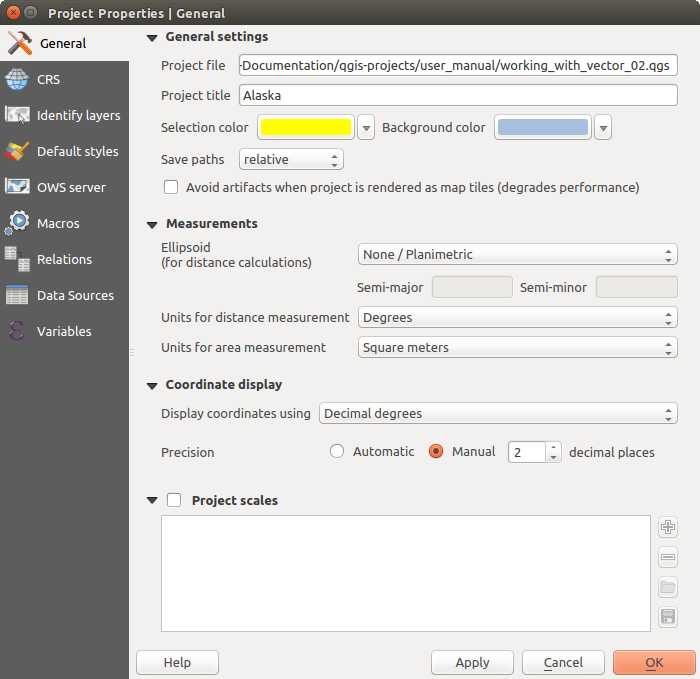
Allgemein-Reiter des Projekteigenschaften Dialogs
The CRS tab enables you to choose the Coordinate Reference System for this project, and to enable on-the-fly re-projection of raster and vector layers when displaying layers from a different CRS. For more information on projection’s handling in QGIS, please read Arbeiten mit Projektionen section.
With the Identify layers tab, you set (or disable) which layers will respond to the identify tool. By default, layers are set queryable.
You can also set whether a layer should appear as read-only, meaning that it can not be edited by the user, regardless of the data provider’s capabilities. Although this is a weak protection, it remains a quick and handy configuration to avoid end-users modifying data when working with file-based layers.
The Default Styles tab lets you control how new layers will be drawn when they do not have an existing .qml style defined. You can also set the default transparency level for new layers and whether symbols should have random colors assigned to them. There is also an additional section where you can define specific colors for the running project. You can find the added colors in the drop down menu of the color dialog window present in each renderer.
The tab OWS Server allows you to configure your project in order to publish it online. Here you can define information about the QGIS Server WMS and WFS capabilities, extent and CRS restrictions. More information available in section Prepare a project to serve and subsequent.
The Macros tab is used to edit Python macros for projects. Currently, only three macros are available: openProject(), saveProject() and closeProject().

Makroeinstellungen in QGIS
- The Relations tab is used to define 1:n relations. The relations are defined in the project properties dialog. Once relations exist for a layer, a new user interface element in the form view (e.g. when identifying a feature and opening its form) will list the related entities. This provides a powerful way to express e.g. the inspection history on a length of pipeline or road segment. You can find out more about 1:n relations support in Section Creating one or many to many relations.
- In the Data Sources tab, you can:
- Evaluate default values on provider side: When adding
new features in a PostGreSQL table, fields with default value constraint are
evaluated and populated at the form opening, and not at the commit moment.
This means that instead of an expression like nextval('serial'), the field
in the Add Feature form will display expected value (e.g., 25).
- Automatically create transaction groups where possible:
When this mode is turned on, all
(postgres) layers from the same database are synchronised in their edit state,
i.e. when one layer is put into edit state, all are, when one layer is committed
or one layer is rolled back, so are the others. Also, instead of buffering edit
changes locally, they are directly sent to a transaction in the database which
gets committed when the user clicks save layer.
Note that you can (de)activate this option only if no layer is being edited
in the project.
- The Variables tab lists all the variables available at
the project’s level (which includes all global variables). Besides, it
also allows the user to manage project-level variables. Click the
button to add a new custom project-level variable. Likewise, select a custom
project-level variable from the list and click the button to
remove it.
More information on variables usage in the General Tools
Variables section.
Anpassung
The customization dialog lets you (de)activate almost every element in the QGIS user interface. This can be very useful if you want to provide your end-users with a ‘light’ version of QGIS, containing only the icons, menus or panels they need.
Bemerkung
Bevor Ihre Änderungen übernommen werden, müssen Sie QGIS neu starten.
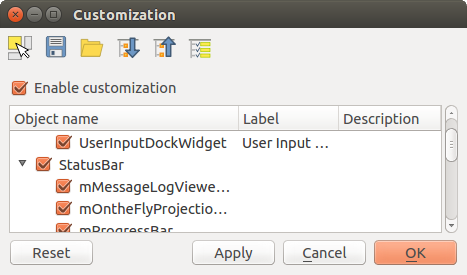
Der Anpassung Dialog
Die Anpassung aktivieren Checkbox anzuklicken ist der erste Schritt, zur QGIS Anpassung. Dies aktiviert die Werkzeugleiste und das Widget-Panel, hier können Sie einige QGIS Elemente unsichtbar schalten.
Die konfigurierbaren Elemente können sein:
ein Menü oder einige ihrer Untermenüs von dem Menüleiste
das komplette Panel (siehe Bedienfelder und Werkzeugkästen)
die Statusleiste beschrieben in Statusleiste oder einige ihrer Elemente
eine Werkzeugleiste: die komplette oder einige ihrer Icons
oder irgendein Widget aus irgendeinem QGIS Dialog: Beschriftung, Knöpfe, Komboboxen...
Mit  Umschalten um Bedienelemente der Hauptapplikation zu fangen können Sie auf Elemente im QGIS Interface klicken, die Sie verstecken wollen und QGIS deaktiviert automatisch den entsprechenden Eintrag in dem Anpassung Dialog.
Once you setup your configuration, click [Apply] or [Ok] to validate your changes. This configuration becomes the one used by default by QGIS at the next startup.
Die Modifikationen können auch in einer .ini Datei gespeichert werden unter Verwendung des  Als Datei speichern Knopfs. Dies ist eine praktische Möglichkeit, eine gemeinsame QGIS Schnittstelle zwischen mehreren Benutzern zu teilen. Klicken Sie einfach auf
  Laden von Datei von dem Zielcomputer aus, um die``.ini`` Datei zu importieren. Sie können auch command line tools starten und verschiedene Einstellungen für verschiedene Anwendungsfälle speichern.
Tipp
Voreingestelltes QGIS einfach wiederherstellen
Die erste QGIS GUI-Konfiguration kann durch eine der Methoden unten wiederhergestellt werden:
deaktivieren Sie
Anpassung aktivieren im Anpassungsdialog oder klicken Sie  Alle überprüfen
- pressing the [Reset] button in the QSettings frame under Settings ‣ Options menu, System tab
starte QGIS an einer Eingabeaufforderung mit der folgenden Befehlszeile qgis --customization
- setting to false the value of UI ‣ Customization ‣ Enabled variable under Settings ‣ Options menu, Advanced tab (see the warning).
In den meisten Fällen müssen Sie QGIS neu starten, damit die Änderungen angewendet werden.
Keyboard shortcuts
QGIS provides default keyboard shortcuts for many features. You can find them in section Menüleiste. Additionally, the menu option Settings ‣ Configure Shortcuts... allows you to change the default keyboard shortcuts and add new keyboard shortcuts to QGIS features.
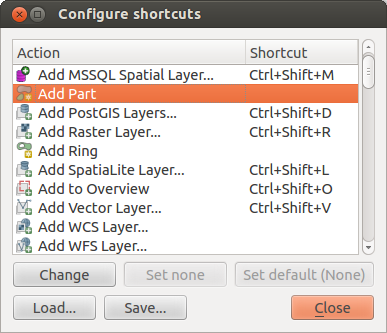
Define shortcut options
Configuration is very simple. Just select a feature from the list and click on :
- [Change] and press the new combination you want to assign as new shortcut
- [Set none] to clear any assigned shortcut
- or [Set default] to backup the shortcut to its original and default value.
Proceed as above for any other tools you wish to customize. Once you have finished your configuration, simply [Close] the dialog to have your changes applied. You can also [Save] the changes as an .XML file and [Load] them into another QGIS installation.