Important
La traduction est le fruit d’un effort communautaire auquel vous pouvez vous joindre. Cette page est actuellement traduite à 35.00%.
13.2. Analyse Raster
13.2.1. Calculatrice Raster
La du menu vous permet d’effectuer des calculs sur la base des valeurs des pixels d’un raster existant (voir Fig. 13.33). Le résultat est écrit dans un nouveau raster dans un des formats gérés par GDAL.
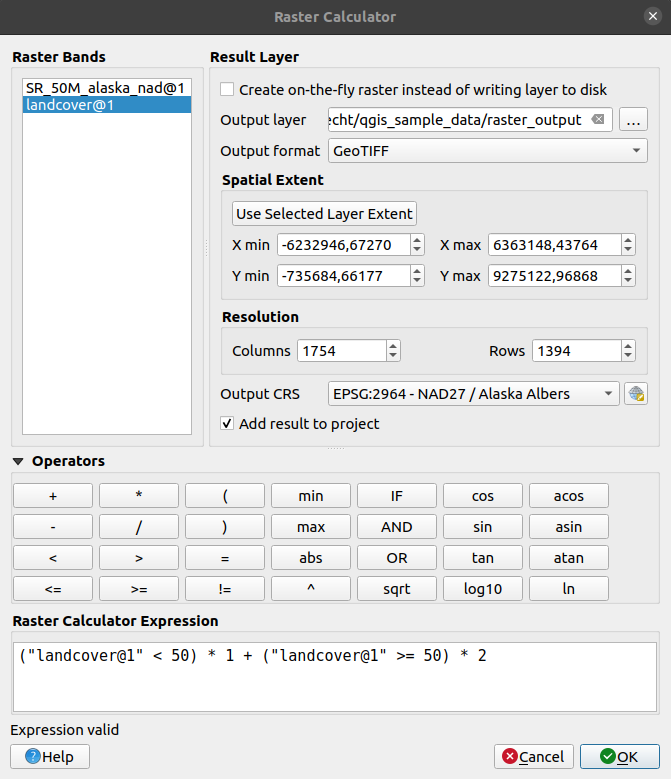
Fig. 13.33 Calculatrice Raster
The Raster bands list contains all loaded raster layers that can be used. To add a raster to the raster calculator expression field, double click its name in the Fields list. You can then use the operators to construct calculation expressions, or you can just type them into the box.
In the Result layer section, you will need to define an output layer. You can:
 Create on-the-fly raster instead of writing layer to disk:
If unchecked, the output is stored on the disk as a new plain file. An Output layer path and an Output format are required.
If checked, a virtual raster layer, i.e. a raster layer defined by its URI and whose pixels are calculated on-the-fly, is created. It’s not a new file on disk; the virtual layer is still connected to the rasters used in the calculation meaning that deleting or moving these rasters would break it. A Layer name can be provided, otherwise the calculation expression is used as such. Removing the virtual layer from the project deletes it, and it can be made persistent in file using the layer contextual menu.
Define the Spatial extent of the calculation using the extent selector widget.
Set the Resolution of the layer using columns and rows number. If the input layer has a different resolution, the values will be resampled with the nearest neighbor algorithm.
Enable the
Create Options to define additional raster creation options.
These options let you control how the output file is structured and compressed,
including format, compression method, and other driver-specific settings.
See more at Raster driver options.With the
Add result to project checkbox, the result layer
will automatically be added to the legend area and can be visualized.
Checked by default for virtual rasters.
The Operators section contains all available operators. To add an operator
to the raster calculator expression box, click the appropriate button. Mathematical
calculations (+, -, *, … ) and trigonometric functions (sin,
cos, tan, … ) are available. Conditional expressions (=, !=,
<, >=, … ) return either 0 for false or 1 for true, and therefore can be
used with other operators and functions.
Voir aussi
Calculatrice raster and Raster calculator (virtual) algorithms
13.2.1.1. Raster calculator expression
The dialog
The Raster calculator expression dialog provides means to write expressions for pixels calculations between a set of raster layers.
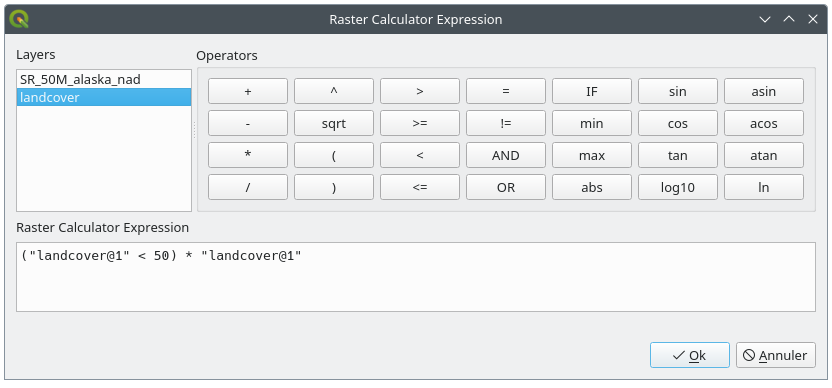
Fig. 13.34 Raster Expression Calculator
Layers: Shows the list of all raster layers loaded in the legend. These can be used to fill the expression box (double click to add). Raster layers are referred by their name and the number of the band:
layer_name@band_number. For instance, the first band from a layer namedDEMwill be referred asDEM@1.Operators: contains a number of calculation operators for pixels manipulation:
Arithmetical:
+,-,*,sqrt,abs,ln, …Trigonometric:
sin,cos,tan, …Comparison:
=,!=,<,>=, …Logical:
IF,AND,OR,(,)Statistical:
min,max
To add an operator to the raster calculator expression box, click the appropriate button.
Raster calculator expression is the area in which the expression is composed
Exemples
Conversion en pieds de données d’élévation en mètres
Pour créer un raster d’élévation en pieds à partir d’un raster en mètres, vous devez utiliser le facteur de conversion 3,28. La formule est la suivante :
"elevation@1" * 3.28
Utilisation d’un masque
Si vous souhaitez masquer certaines zones d’un raster, par exemple si vous vous intéressez uniquement aux altitudes supérieures à 0, vous pouvez utiliser la formule suivante qui crée un masque et l’applique au raster en une seule étape.
("elevation@1" >= 0) * "elevation@1"
En d’autres termes, pour tous les pixels supérieurs ou égal à 0, l’expression conditionnelle renvoie 1, ce qui conserve la valeur originelle en la multipliant par 1. Sinon, l’expression conditionnelle renvoie 0, ce qui remplace la valeur originelle par 0. Ceci permet de créer le masque à la volée.
Classify a Raster
Si vous souhaitez classer un raster, par exemple en deux classes d’altitude, vous pouvez utiliser la formule suivante pour créer un raster contenant deux valeurs, 1 et 2, en une seule étape :
("elevation@1" < 50) * 1 + ("elevation@1" >= 50) * 2
En d’autres termes, les pixels de valeur inférieure à 50, ils prennent la valeur 1. Pour tous les pixels supérieurs ou égal à 50, ils prennent la valeur 2.
Or you can use the IF operator.
if ( elevation@1 < 50 , 1 , 2 )