Důležité
Translation is a community effort you can join. This page is currently translated at 21.88%.
4. Pokyny pro překlad
This manual is aiming to help the translator.
First, it explains how you can join the translation team.
Then the general process of how technically a translation is done is explained.
Later the translation is explained from an actual English .rst document that is translated to Dutch.
Finally a summary of rules of translation is given.
Poznámka
Although these guidelines focus on QGIS documentation, the methods and the rules described below are also applicable to QGIS applications.
4.1. Becoming a translator
The QGIS project is always looking for people who are willing to invest some more time translating QGIS into a foreign language - even perhaps to coordinate the translation effort.
We are trying to improve our project management process and spread the load more evenly between people who each have a specific area of responsibility, so any contribution you have to make will be greatly appreciated.
If you would like to nominate yourself as a coordinator for a new language please go ahead. If more than one person nominate themselves as coordinator for the same language, please contact each other and resolve how you will manage your efforts.
4.1.1. Transifex
The web-based translating platform Transifex is used for all QGIS translations: the desktop application itself (or GUI) and the documentation. So the first thing you need is an account to login and get started.
4.1.2. Join a Project
You can explore available projects we translate, identify their target languages with various statistics:
QGIS Desktop for all the pieces of text available in QGIS apps (QGIS Desktop and QGIS Server),
QGIS Documentation for the official LTR documentation
Click on the project you would like to help translate
Click on JOIN THIS PROJECT on the right side. You will be prompted to sign up.
Create your account or connect using a third-party platform account. Verify your account by the link in the email you will receive.
Login
You then get a popup to select which language you want to help translate to. Please, note that we try to make the process as simple as possible and only mention target languages, regardless of the country parameter (e.g.
French (fr)and NOTFrench (France) (fr_FR)). Only if there are notable differences in the languages (e.g. portuguese in Portugal vs Brazil) we may allow different versions.Search your target language, i.e the language you wish to help translate QGIS into, NOT necessarily all the languages you can speak:
If it is marked as
already addedthen select it and press Join Project.If it is not marked as already added, select it and press Request language. Keep in mind that translating an entire project will take days of work, if not weeks! Again, and sorry to repeat, it is not about selecting ALL the languages you can speak.
Now you will need to wait for the language coordinator or the project maintainers to process your request. You will be notified by email when your request has been accepted. If your request has no answer for about a week, please consider writing to your language coordinator in Transifex or the QGIS Translators mailing list.
You can also join any of the other QGIS projects and help everywhere too.
4.1.3. Translate
Once your request is accepted, you are able to translate any text in the project(s) you’ve chosen. Simply click on your language, select the chapter you want to translate and click on Translate. Easy, right?
In order to help you make good translation, some instructions are provided below. We strongly recommend you to read them.
Tip
Quick access to translatable files in Transifex
If you find a wrong or missing translation in the current documentation,
you can use the Translate page link in the bottom left drop-down menu of the page
to reach it sources in Transifex and perform any update you wish to.
4.2. Translation process
QGIS Documentation is written in English with .rst files.
In order to provide translations:
A prebuild script creates translation files named
.pofiles for the English language in the folder/QGIS-Documentation/locale/en.The sentences in the
.pofiles are pushed to the Transifex web platform, and made available for translators who can begin to translate from English to their language with the editor.When a file is translated at 100%, the translated strings are automatically pulled back to the documentation repository, under
/QGIS-Documentation/locale/<language>.At the next build of the documentation (which occurs at least once a day – see time at the bottom of the page), a script reuses the sentences to create translated output.
For files not fully translated, a script pulls every two weeks translated strings from Transifex to Github and these are as well published at the next build.
Whenever an
.rstfile is updated, the English.pofile is updated and the changes are pushed to the corresponding file in Transifex. This means that when a new paragraph is added to an.rstdocument that was already translated, only the new/updated sentences are added to the translated.pofile and needs to be translated.
Poznámka
Translating QGIS Desktop specificities
The main difference with translating QGIS applications is that instead of .po files,
all the translatable strings in the .py, .cpp, .yaml files
that shape a particular version of the application are pushed to and pulled from Transifex
as a single .ts file (e.g. qgis-application/qgis_en.ts (branch release-3_30) ).
Translations are pulled to Github in development branch (daily),
and at release time (for every released versions).
Two different tools are currently used to do translations in QGIS:
The Transifex web platform, the easiest and recommended way to translate QGIS, transparently does the process described above and pulls all the translatable texts in one place for the translator. Just pick the files you want and translate. Translated files are stored in the platform until another release is pushed.
Qt Linguist, a Qt development tool, requires the translator to pull locally the
.po(or.ts) files from the source code, translate and then push back.
Note that whatever tool you choose, rules of translations are the same.
4.3. Translate a file
K vysvětlení jak překlad pracuje, budeme používat plugin teplotní mapy. V tomto příkladě budeme překládat z Angličtiny do Nizozemštiny ale to bude prakticky o samé pro další dokumenty ve všech jazycích.
The source of the document can be found here:
QGIS-Documentation/source/docs/user_manual/plugins/plugins_heatmap.rst
A proč jsem si zvolil právě tento dokument?
It includes images, captions, headers, references and replacements.
Napsal jsem to tak jednoduše abych to mohl přeložit ;-)
The build process has created the English .po file which can be found here:
QGIS-Documentation/locale/en/LC_MESSAGES/docs/user_manual/plugins/plugins_heatmap.po
The equivalent Dutch .po file (basically a copy) can be found here:
QGIS-Documentation/locale/nl/LC_MESSAGES/docs/user_manual/plugins/plugins_heatmap.po
Along this file you will see a tiny .mo file which indicates that it
does not hold any translations yet.
4.3.1. Translation in Transifex
In order to translate using Transifex, you need to:
Once you are part of a language team, click on the corresponding project (in this case
QGIS Documentation). A list of available languages with their ratio of translation is displayed.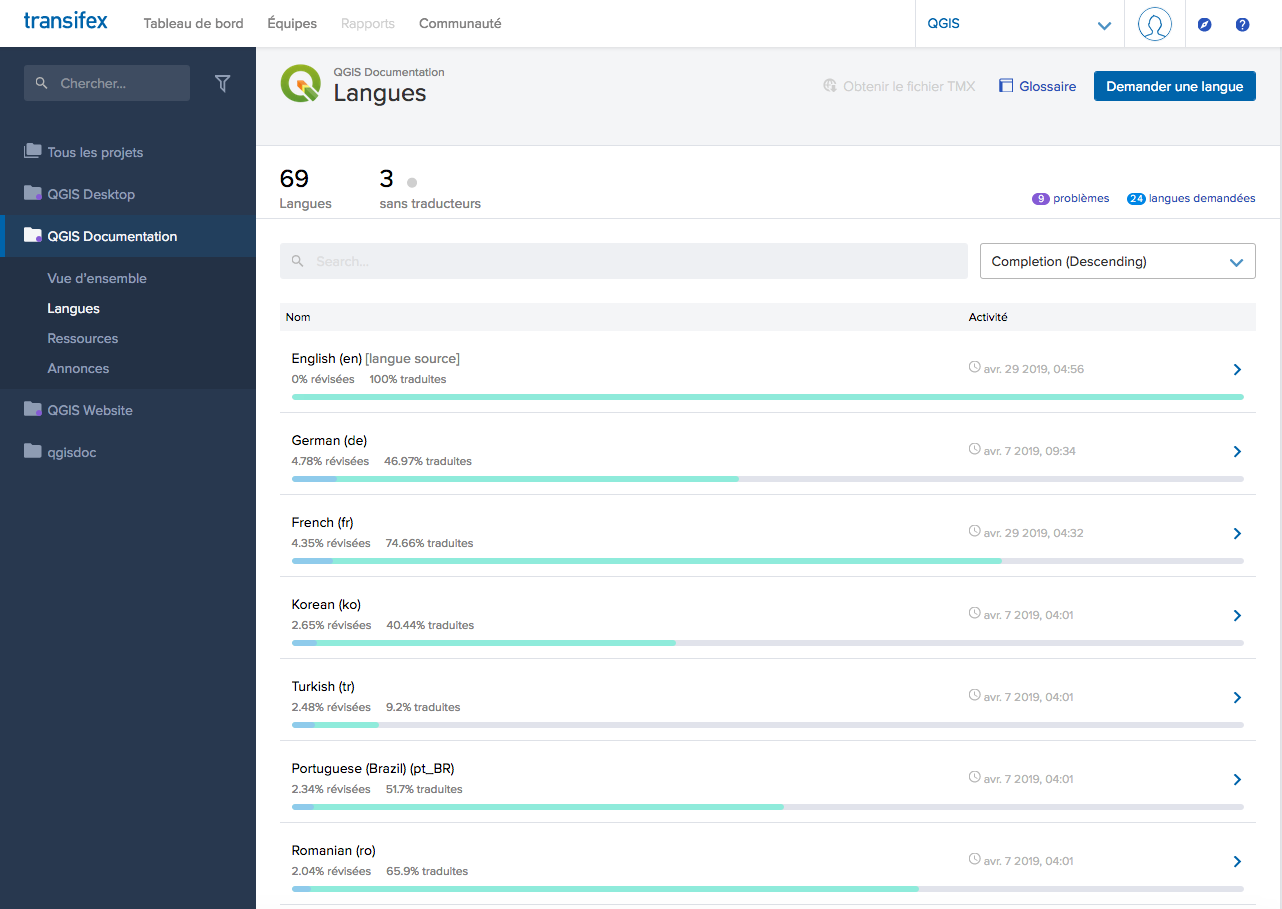
Obr. 4.23 Select language for translation in the Transifex menu
Hover over your language and click either:
View resources: translatable
.pofiles with their ratio of translation, number of strings and some more metadata are now displayed.or Translate: opens the interface of translation with all the available
.pofiles
Identify the file you’d like to translate (in our case we are looking for the
docs_user-manual_plugins_plugins-heatmap, the heatmap plugin file) or any unfinished file and click on it: strings in the files are loaded and you can use the interface to filter, translate, suggest translation…Tip
Clicking the
Translate pagelink in the bottom left drop-down menu of a page brings you directly to its corresponding translation page in Transifex.All you need to do is select each text and translate following the guidelines.
For further information on the use of Transifex Web Editor, see https://help.transifex.com/en/articles/6318216-translating-with-the-web-editor.
4.3.2. Překlad v QT Linguistu
With Qt Linguist, you need to:
manually grab the
.poor.tsfile(s). This can be achieved by downloading the file(s) either from Transifex platform or from thelocale/$languagefolder of the source repository (in GitHub),proceed to the translation locally
upload the modified files to their sources (Transifex or GitHub).
While downloading and uploading translatable files can be done with Transifex, it’s not advised to use this process. Since there’s no versioning system on Transifex, the file you upload will simply replace the existing one and potentially overwrite any modification made by others on the platform in the meantime.
When you open the file in Qt Linguist for the first time you will see the following dialog:
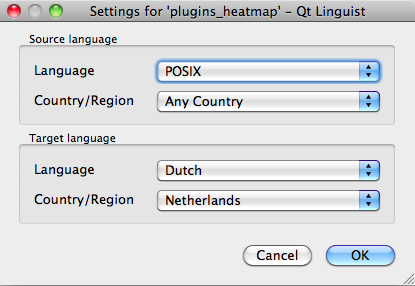
Obr. 4.24 Select language for translation in linguist menu
Cílový jazyk by měl být vyplněn správně. Zdroj jazyku může být ponechán jen jako s jazykem POSIX a země/oblasti kterékoliv země.
When you press the OK button Qt Linguist is filled with sentences and you can start translating, see Obr. 4.25.
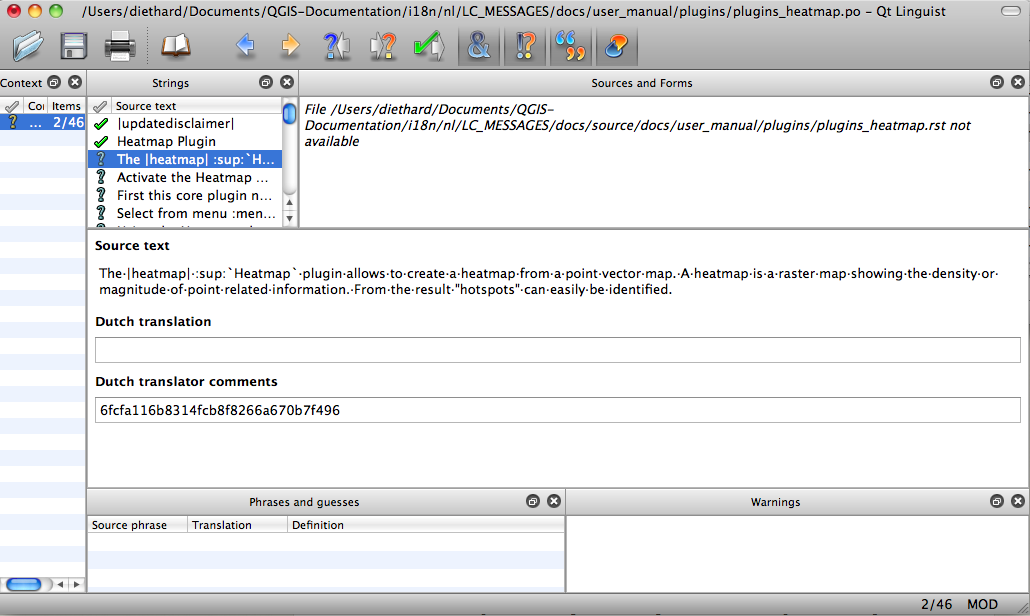
Obr. 4.25 Translate using the linguist menu
V menu uvidíte následující tlačítka, které vyhovují k použití.
 The Translation Done Next button, is the most important
button. If the item needs translation, you enter a translation in the text
field, then hit this button. If the item does not need translation just leave the
text field for translation empty and also hit this button which indicates the
item is done and you continue with the next item.
The Translation Done Next button, is the most important
button. If the item needs translation, you enter a translation in the text
field, then hit this button. If the item does not need translation just leave the
text field for translation empty and also hit this button which indicates the
item is done and you continue with the next item. Předchozí „Goto Previous“ btlačítko, může být použit pro přechod na předchozí položku překladu.
|linguist_pnext| Další „Goto Next“ btlačítko, může být použit pro přechod na následující položku překladu.
 Tlačítko „Next Todo“, skočí do prvního překladu položky, které ještě potřebuje překlad. Vhodné je, pokud byl původní dokument změněn, několik nových/změněných vět potřebuje být přeloženo
 The Previous Todo button, searches backward and
jumps to the first translation item it finds that still needs a translation.
The Previous Todo button, searches backward and
jumps to the first translation item it finds that still needs a translation.
For further information on the use of Qt Linguist, see https://doc.qt.io/archives/qt-5.15/linguist-translators.html
Varování
If you want to download content to translate from the source
repository, never do this in the master branch. For translations
there are always translation branches available, once a document is fully
updated in English for a certain version. As an example, to translate
the manual of QGIS 2.8, you have to use the manual_en_v2.8 branch.
4.3.3. Překlad manuálu
Nyní přejdeme k překladu plugin_heatmap manuálu!
Translating most of the sentences should be straightforward. During this translation session I will point out which parts (rst statements) need special translation.
Below we see an interesting sentence to translate:
The |heatmap| :sup:`Heatmap` plugin allows to create a heatmap from a
point vector map. A heatmap is a raster map showing the density or
magnitude of point related information. From the result "hotspots" can
easily be identified.
Tato věta obsahuje dvě rst příkazy:
„|teplotní mapa|“ slova mezi „|“ jsou záměny a neměly by být nikdy přeloženy! To bude nahrazena ikonou teplotního pluginu mapy!
:sup:`Heatmap`, the:sup:statement is a superposition statement and prints the following text a bit higher. This is used to show the popup texts that appear when you hover above the toolbar item and this may be different when it is actually translated in the QGIS application. In the Dutch case it is not!
Všechny ostatní prázdné texty v této větě můžou být přeloženy!
The next translation item contains the :ref: statement that is
commonly used to refer to another section somewhere in the manual! The text
following a :ref: statement should never be changed because it is a unique
identifier!
First this core plugin needs to be activated using the Plugin Manager
(see Section :ref:`load_core_plugin`). After activation the heatmap icon
|heatmap| can be found in the Raster Toolbar.
In this case load_core_plugin is a unique reference identifier placed before
an rst item that has a caption. The ref statement will be replaced with the text
of the header and turned into a hyperlink. When the header this reference is
referring to is translated, all references to this header will be automatically
translated as well.
Další bod obsahuje rst-tag :menuselection: následovaný textem, který se ve skutečnosti zobrazí v nabídce v aplikaci QGIS, to může být přeloženo v žádosti, a proto by mělo být změněno, pokud se jedná o tento případ.
Select from menu :menuselection:`View --> Toolbars --> Raster` to activate
the Raster Toolbar when it is not yet activated.
Výše uvedená položka „Zobrazit ->“ je vlastně přeložena do „Beeld ->“, protože se jedná o překlad v nizozemském aplikaci QGIS.
Trochu dále se setkáváme s následující složitými překlady:
The |heatmap| :sup:`Heatmap` tool button starts the Dialog of the Heatmap
plugin (see :numref:`figure_heatmap_settings`).
It holds a reference to a figure figure_heatmap_settings_, and like a reference
to a section this reference should not be changed!! The reference definition
from the rst-document is not included in the .po file and can therefore
not be changed. This means the reference to figures can not be translated. When
HTML is created you will see figure_heatmap_settings. When a PDF document is
created figure_heatmap_settings_ is replaced with a figure number.
Další položka překladu s rst atributy je následující položka:
**Input Point dialog**: Provides a selection of loaded point vector maps.
Do not remove the stars in above line. It will print the text it holds in bold. The text itself is often text included in the dialog itself and may well be translated in the application.
Následující překlad položky zahrnuje „.guilabel:“ rst značku.
When the |checkbox| :guilabel:`Advanced` checkbox is checked it will
give access to additional advanced options.
The text Advanced of the guilabel tag may well be translated in the QGIS
application and probably needs to be changed!
The following translation item contains ``airports``. The quotes are used to give the text another text font. In this case it is a literal value and does not need translation.
For the following example, we will use the ``airports`` vector point
layer from the QGIS sample dataset (see :ref:`label_sampledata`).
Another excellent QGIS tutorial on making heatmaps can be found on
`https://www.qgistutorials.com
<https://www.qgistutorials.com/en/docs/creating_heatmaps.html>`_.
This item also includes a hyperlink with an url and an external presentation.
The url should of course be left intact, you are allowed to change the external
text https://www.qgistutorials.com which is visible by the reader. Never
remove the underscore at the end of the hyperlink which forms an essential
part of it!!
4.3.4. Výsledné pravidla pro překlad
Do not change text between two
|characters like|logo|,|checkbox|,|label|,|selectString|,|addLayer|,… These are special tags used to replace imagesDo not change references that start with roles like
:ref:,:file:,:numref:unless they include a title. In that case, you can translate the title but keep unchanged the link (i.e., the text between<and>)Tip
When a title is provided for a reference, Transifex may display a number in the English source text in replacement of the link part. Click on the number in the source text to add the reference link next to the title being translated.
Do not change references that end with an underscore like
figure_labels_1_Do not change the url in hyperlinks, but you may change the external description. Leave the underscore at the end of the hyperlink, without additional spacing (
>`_)Change the text inside quotes following
:index:,:sup:,:guilabel:and:menuselection:tags. Check if/how it is translated in the QGIS Application. Do not change the tag itself.Text between double stars and double quotes often indicate values or fieldnames, sometimes they need translation sometimes not.
Be aware to use exactly the same (number of) special characters of the source text such as
`,``,*,**,::. These contribute to the cosmetics of the information providedDo not begin nor end the text hold by special characters or tags with a space
Do not end the translated strings with a new paragraph, otherwise the text will not be translated during the html generation.
Držte výše uvedená pravidla a přeložený dokument bude vypadat dobře!
For any question, please contact the QGIS Community Team or the QGIS Translation Team.