A conversão entre formatos matriciais e vetoriais permite fazer uso dos dados de ambos, quando se resolve um problema SIG, bem como utilizar os vários métodos de análise, únicos a estes dois formatos de dados geográficos. Isto aumenta a flexibilidade que se tem considerando fontes de dados e métodos de processamento para resolver um problema SIG.
Para combinar uma análise matricial e vetorial, precisa de converter um tipo de dados para o outro. Vamos converter o resultado matricial, da lição anterior, para um vetor.
O objetivo para esta lição: Obter o resultado matricial num vetorial que pode ser utilizado para completar a análise.
8.1.1. Follow Along: A Ferramenta Raster para Vector
Abra o mapa do último módulo, raster_analysis.qgs. Aí deve estar o ficheiro all_conditions_simple.tif calculado no exercício anterior.
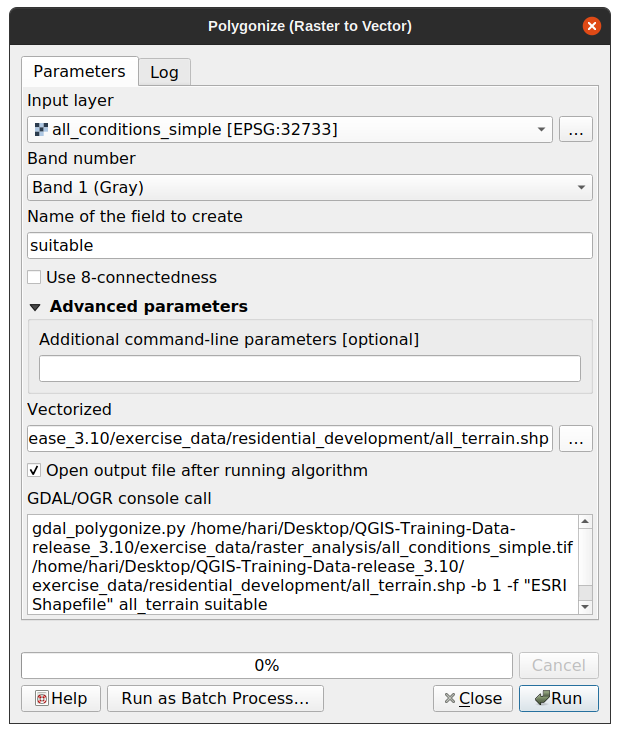
Clique em Raster ► Conversão ► Vetorizar (Raster to Vector). A caixa de diálogo aparecerá.
Configure-o assim:
Change the field name (describing the values of the raster) to
suitable.
Save the layer under exercise_data/residential_development
as all_terrain.shp.
Now you have a vector file which contains all the values of the raster, but
the only areas you’re interested in are those that are suitable; i.e., those
polygons where the value of suitable is 1. You can change the
style of this layer if you want to have a clearer visualization of it.
Create a new vector file that contains only the polygons where
suitable has the value of 1.
Save the new file under exercise_data/residential_development/ as
suitable_terrain.shp.
Answer
Open the Query Builder by right-clicking on the
all_terrain layer in the Layers panel, and selecting
the Properties ► Source tab.
Then build the query "suitable"=1.
Click OK to filter out all the polygons where this condition
isn’t met. When viewed over the original raster, the areas should overlap
perfectly:
You can save this layer by right-clicking on the all_terrain
layer in the Layers panel and choosing Save As…,
then continue as per the instructions.
8.1.3. Follow Along: A ferramenta Vector para Raster
Although unnecessary for our current problem, it’s useful to know about the
opposite conversion from the one performed above. Convert to raster the
suitable_terrain.shp vector file you just created in previous step.
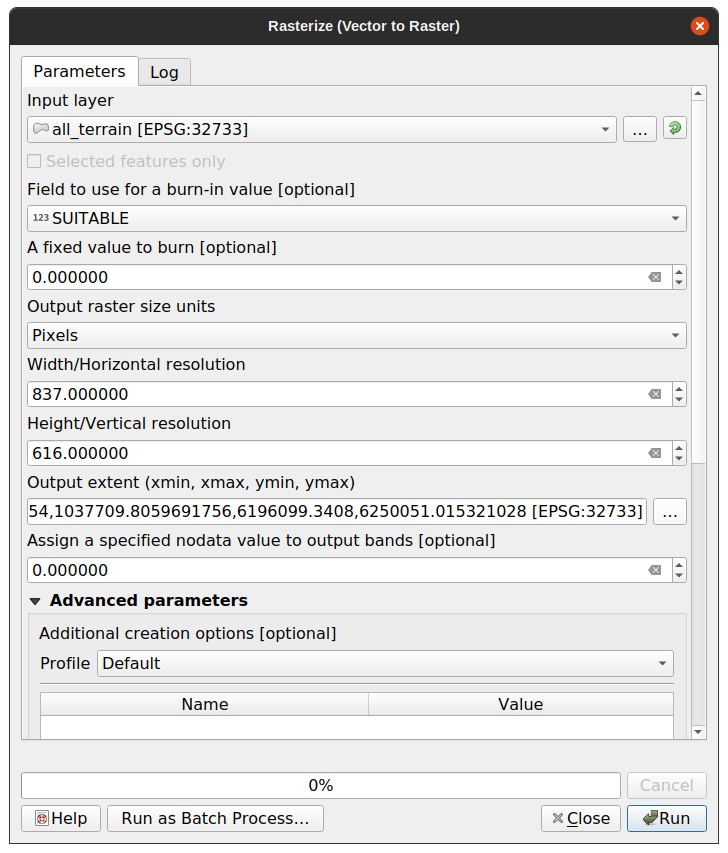
Clique em Raster ► Conversão ► Rasterizar (Vector para Raster) para iniciar esta ferramenta, depois configure-a como indicado na seguinte captura de ecrã:
Input layer is all_terrain.
Field name is suitable.
Output raster size units is Pixels.
Width and Height are 837 and 661,
respectively.
Get the Output extent from the all_terrain layer.
Set output file Rasterized to
exercise_data/residential_development/raster_conversion.tif.
Nota
O tamanho da imagem de saída é definido aqui para ser igual ao da imagem original que foi vetorizada. Para ver as dimensões de uma imagem, abra os seus metadados (no separador Metadados em :guilabel:`Propriedades da camada).
Clique em OK na caixa de diálogo para iniciar o processo de conversão.
Quando estiver completo, avalie o seu sucesso comparando o novo dado matricial com o original. Eles devem corresponder, exatamente, pixel por pixel.
Agora que temos os resultados da análise do relevo disponíveis em formato vetorial, podem ser utilizados para resolver o problema de quais os edifícios que devem ser considerados para o desenvolvimento residencial.
 Follow Along: A Ferramenta Raster para Vector