2. 시작하기
2.1. 데비안 기반 시스템에 설치하기
데비안 기반 (우분투 및 파생판 포함) 시스템 상에서 작동에 필요한 최소한의 환경 설정으로 설치하는 방법을 짧고 간단하게 설명할 것입니다. 하지만, 다른 많은 리눅스 배포판과 운영 체제도 QGIS 서버 패키지를 제공하고 있습니다.
참고
우분투에서는 운영자(admin) 권한이 필요한 명령어 앞에 sudo 를 추가하면 일반 사용자도 설치할 수 있습니다. 데비안에서는 sudo 를 추가할 필요없는 운영자(root)로 작업하면 됩니다.
데비안 기반 시스템에 QGIS 서버를 설치하기 위해 공식 QGIS 저장소를 추가하기 위한 요구 사항 및 각 단계는 QGIS 설치관리자 페이지 를 참고하십시오. 적어도 최신 장기 지원 버전(Long Term Release) 정도는 설치해야 할 겁니다.
대상 버전의 저장소를 환경설정하고 QGIS 서버를 설치하고 나면, 다음과 같은 방법으로 제대로 설치됐는지 테스트할 수 있습니다:
/usr/lib/cgi-bin/qgis_mapserv.fcgi
다음과 같이 출력됐다면, 서버가 정확히 설치된 것입니다.
참고
qgis_mapserv.fcgi 를 실행했을 때 QGIS 버전에 따라 살짝 다른 내용이 출력될 수도 있습니다.
QFSFileEngine::open: No file name specified
Warning 1: Unable to find driver ECW to unload from GDAL_SKIP environment variable.
Warning 1: Unable to find driver ECW to unload from GDAL_SKIP environment variable.
Warning 1: Unable to find driver JP2ECW to unload from GDAL_SKIP environment variable.
Warning 1: Unable to find driver ECW to unload from GDAL_SKIP environment variable.
Warning 1: Unable to find driver JP2ECW to unload from GDAL_SKIP environment variable.
Content-Length: 206
Content-Type: text/xml; charset=utf-8

<ServiceExceptionReport version="1.3.0" xmlns="https://www.opengis.net/ogc">
 <ServiceException code="Service configuration error">Service unknown or unsupported</ServiceException>
</ServiceExceptionReport>
참고
다음 화면에 보이듯이, QGIS가 Status 400 코드를 출력합니다. 이는 활성화된 HTTP 세션이 없기 때문에 요청이 실패했다는 것을 정확하게 식별한 것입니다. 이 코드는 버그가 아니며, 서버가 제대로 동작하고 있다는 것을 의미합니다.
Application path not initialized
Application path not initialized
Warning 1: Unable to find driver ECW to unload from GDAL_SKIP environment variable.
Warning 1: Unable to find driver ECW to unload from GDAL_SKIP environment variable.
Warning 1: Unable to find driver JP2ECW to unload from GDAL_SKIP environment variable.
"Loading native module /usr/lib/qgis/server/libdummy.so"
"Loading native module /usr/lib/qgis/server/liblandingpage.so"
"Loading native module /usr/lib/qgis/server/libwcs.so"
"Loading native module /usr/lib/qgis/server/libwfs.so"
"Loading native module /usr/lib/qgis/server/libwfs3.so"
"Loading native module /usr/lib/qgis/server/libwms.so"
"Loading native module /usr/lib/qgis/server/libwmts.so"
QFSFileEngine::open: No file name specified
Content-Length: 102
Content-Type: application/json
Server:  QGIS FCGI server - QGIS version 3.16.6-Hannover
Status:  400
[{"code":"Bad request error","description":"Requested URI does not match any registered API handler"}]
예시 프로젝트를 추가해봅시다. 사용자 데이터를 사용해도 되고, 또는 예제 데이터 를 사용해도 됩니다.
mkdir /home/qgis/projects/
cd /home/qgis/projects/
wget https://github.com/qgis/QGIS-Training-Data/archive/release_3.16.zip
unzip release_3.16.zip
mv QGIS-Training-Data-release_3.16/exercise_data/qgis-server-tutorial-data/world.qgs .
mv QGIS-Training-Data-release_3.16/exercise_data/qgis-server-tutorial-data/naturalearth.sqlite .
물론 사용자가 선호하는 GIS 소프트웨어로 이 파일을 열고 환경 설정 및 사용할 수 있는 데이터를 살펴봐도 좋습니다.
QGIS 서버를 제대로 실행하려면 HTTP 웹서버가 필요합니다. Apache 또는 NGINX 를 추천합니다.
2.1.1. 아파치 HTTP 서버
참고
다음 예시에서, qgis.demo 를 사용자 서버의 명칭 또는 IP 주소로 대체해주십시오.
아파치와 mod_fcgid 를 설치하십시오.
apt install apache2 libapache2-mod-fcgid
사용자의 기본 웹사이트에서 QGIS 서버를 실행하거나, 이번 예시만을 위해 가상 호스트를 다음과 같이 환경 설정할 수 있습니다.
/etc/apache2/sites-available 디렉터리에 다음 내용을 가진 qgis.demo.conf 라는 파일을 생성해봅시다:
<VirtualHost *:80>
  ServerAdmin webmaster@localhost
  ServerName qgis.demo

  DocumentRoot /var/www/html

  # Apache logs (different than QGIS Server log)
  ErrorLog ${APACHE_LOG_DIR}/qgis.demo.error.log
  CustomLog ${APACHE_LOG_DIR}/qgis.demo.access.log combined

  # Longer timeout for WPS... default = 40
  FcgidIOTimeout 120

  FcgidInitialEnv LC_ALL "en_US.UTF-8"
  FcgidInitialEnv PYTHONIOENCODING UTF-8
  FcgidInitialEnv LANG "en_US.UTF-8"

  # QGIS log
  FcgidInitialEnv QGIS_SERVER_LOG_STDERR 1
  FcgidInitialEnv QGIS_SERVER_LOG_LEVEL 0

  # default QGIS project
  SetEnv QGIS_PROJECT_FILE /home/qgis/projects/world.qgs

  # QGIS_AUTH_DB_DIR_PATH must lead to a directory writeable by the Server's FCGI process user
  FcgidInitialEnv QGIS_AUTH_DB_DIR_PATH "/home/qgis/qgisserverdb/"
  FcgidInitialEnv QGIS_AUTH_PASSWORD_FILE "/home/qgis/qgisserverdb/qgis-auth.db"

  # Set pg access via pg_service file
  SetEnv PGSERVICEFILE /home/qgis/.pg_service.conf
  FcgidInitialEnv PGPASSFILE "/home/qgis/.pgpass"

  # if qgis-server is installed from packages in debian based distros this is usually /usr/lib/cgi-bin/
  # run "locate qgis_mapserv.fcgi" if you don't know where qgis_mapserv.fcgi is
  ScriptAlias /cgi-bin/ /usr/lib/cgi-bin/
  <Directory "/usr/lib/cgi-bin/">
    AllowOverride None
    Options +ExecCGI -MultiViews -SymLinksIfOwnerMatch
    Order allow,deny
    Allow from all
    Require all granted
  </Directory>

 <IfModule mod_fcgid.c>
 FcgidMaxRequestLen 26214400
 FcgidConnectTimeout 60
 </IfModule>

</VirtualHost>
더 읽어볼 거리:
다음 명령어를 실행한 다음, 위에 있는 내용을 붙여넣고 저장하면 리눅스 데스크탑 시스템에서 가상 호스트 환경 설정을 할 수 있습니다:
nano /etc/apache2/sites-available/qgis.demo.conf
참고
서버 환경 변수 절에서 몇몇 환경 설정 옵션들을 설명하고 있습니다.
이제 QGIS 서버 로그 및 인증 데이터베이스를 저장할 디렉터리를 생성해봅시다:
mkdir -p /var/log/qgis/
chown www-data:www-data /var/log/qgis
mkdir -p /home/qgis/qgisserverdb
chown www-data:www-data /home/qgis/qgisserverdb
참고
데비안 기반 시스템에서는 www-data 가 아파치 사용자이며, 아파치가 앞에서 말한 위치 또는 파일에 접근할 권한을 가져야 합니다. chown www-data... 명령어로 www-data 에게 해당하는 디렉터리와 파일의 권한을 줍니다.
이제 가상 호스트 를 활성화할 수 있습니다. 또 아직 활성화되지 않았다면 fcgid 모드도 활성화할 수 있습니다.
a2enmod fcgid
a2ensite qgis.demo
이제 아파치를 재시작해서 새 환경 설정을 적용하십시오:
systemctl restart apache2
이제 아파치가 http://qgis.demo 에 요청에 대한 응답을 해야 한다는 사실을 알게 됐으니, 아파치가 qgis.demo 가 어디 있는지 알게 하기 위해 클라이언트 시스템을 설정해줘야 합니다. hosts 에 127.0.0.1 qgis.demo 한 줄을 추가하면 됩니다. sh -c "echo '127.0.0.1 qgis.demo' >> /etc/hosts" 명령어로 처리할 수 있습니다. 이때 127.0.0.1 을 사용자 서버 IP로 치환하십시오.
참고
qgis.demo.conf 와 /etc/hosts 두 파일 모두 환경 설정돼 있어야 사용자 설정이 작동한다는 사실을 기억하십시오. 네트워크 상에 있는 다른 클라이언트(예: 윈도우 또는 맥OS 컴퓨터)에서 사용자의 QGIS 서버에 접근할 수 있는지 점검하려면 다른 클라이언트의 /etc/hosts 파일을 찾아 myhost 이름을 서버의 네트워크 IP를 가리키도록 변경하십시오. (127.0.0.1 는 로컬 IP이기 때문에 오직 로컬 컴퓨터에서만 접근할 수 있습니다.) *닉스 컴퓨터의 hosts 파일은 /etc 디렉터리에 있으며, 윈도우에서는 C:\Windows\System32\drivers\etc 에 있습니다. 윈도우 컴퓨터의 경우 호스트 파일을 열기 전에 사용자 텍스트 편집기를 관리자 권한으로 실행해야 합니다.
이제 QGIS 서버가 http://qgis.demo 주소에서 실행되고 있습니다. 이를 점검하려면 웹브라우저에 다음과 같은 간단한 예시를 입력하십시오:
http://qgis.demo/cgi-bin/qgis_mapserv.fcgi?SERVICE=WMS&VERSION=1.3.0&REQUEST=GetCapabilities
2.1.2. 엔진X HTTP 서버
참고
다음 예시에서, qgis.demo 를 사용자 서버의 명칭 또는 IP 주소로 대체해주십시오.
QGIS 서버를 엔진X 로 실행할 수도 있습니다. 아파치와는 달리, 엔진X(NGINX)는 FastCGI 프로세스를 자동으로 스폰(spawn)하지 않습니다. 다른 무언가로 FastCGI 프로세스를 시작시켜야 합니다.
엔진X를 설치하십시오:
apt install nginx
첫 번째 옵션으로, QGIS 서버 프로세스를 시동하고 관리하는 spawn-fcgi 또는 fcgiwrap 을 사용할 수 있습니다. 둘 다 공식 데비안 패키지가 있습니다. 현재 실행중인 X 서버가 없는데 예를 들어 인쇄 등을 해야 하는 경우, Xvfb 를 사용할 수 있습니다.
또다른 옵션은 systemd 에 의존하는 것입니다. ‘systemd’ 란 오늘날 대부분의 리눅스 배포판이 사용하는 GNU/Linux 용 init 시스템입니다. 이 방법의 장점 가운데 하나는 다른 요소 또는 프로세스가 필요없다는 점입니다. ‘systemd’ 은 단순하면서도 신뢰성이 높고 생산 배치(production deployment)에 효율적이라고 여겨지고 있습니다.
엔진X 환경 설정
앞의 환경 설정에서 쓰인 include fastcgi_params; 가 중요한데, /etc/nginx/fastcgi_params 에서 파라미터를 추가하기 때문입니다:
fastcgi_param  QUERY_STRING       $query_string;
fastcgi_param  REQUEST_METHOD     $request_method;
fastcgi_param  CONTENT_TYPE       $content_type;
fastcgi_param  CONTENT_LENGTH     $content_length;

fastcgi_param  SCRIPT_NAME        $fastcgi_script_name;
fastcgi_param  REQUEST_URI        $request_uri;
fastcgi_param  DOCUMENT_URI       $document_uri;
fastcgi_param  DOCUMENT_ROOT      $document_root;
fastcgi_param  SERVER_PROTOCOL    $server_protocol;
fastcgi_param  REQUEST_SCHEME     $scheme;
fastcgi_param  HTTPS              $https if_not_empty;

fastcgi_param  GATEWAY_INTERFACE  CGI/1.1;
fastcgi_param  SERVER_SOFTWARE    nginx/$nginx_version;

fastcgi_param  REMOTE_ADDR        $remote_addr;
fastcgi_param  REMOTE_PORT        $remote_port;
fastcgi_param  SERVER_ADDR        $server_addr;
fastcgi_param  SERVER_PORT        $server_port;
fastcgi_param  SERVER_NAME        $server_name;

# PHP only, required if PHP was built with --enable-force-cgi-redirect
fastcgi_param  REDIRECT_STATUS    200;
이에 더해, QGIS 서버 환경을 설정하는 데 몇몇 환경 변수 도 사용할 수 있습니다. 엔진X 환경 설정 파일 /etc/nginx/nginx.conf 에서 이런 변수들을 정의하기 위해 다음과 같이 fastcgi_param 을 사용해야 합니다:
location /qgisserver {
     gzip           off;
     include        fastcgi_params;
     fastcgi_param  QGIS_SERVER_LOG_STDERR  1;
     fastcgi_param  QGIS_SERVER_LOG_LEVEL   0;
     fastcgi_pass   unix:/var/run/qgisserver.socket;
 }
FastCGI 래퍼
경고
fcgiwrap 설정 작업이 spawn-fcgi 보다 쉽습니다. ‘fcgiwrap’ 이 이미 systemd 서비스에 포함돼 있기 때문입니다. 그러나 동시에 ‘spawn-fcgi’ 보다 훨씬 느린 솔루션이 되고 맙니다. ‘fcgiwrap’ 을 사용하면 각 요청마다 새 QGIS 서버 프로세스를 생성합니다. 다시 말해 각 요청마다 QGIS 프로젝트 파일을 읽고 파싱하는 일을 포함하는 QGIS 서버 초기화 프로세스를 반복한다는 뜻입니다. ‘spawn-fcgi’ 를 사용하면 각 요청들 사이에 QGIS 서버 프로세스가 살아 있기 때문에 훨씬 나은 성능을 보여줍니다. 따라서 생산 활용(production use) 관점에서는 ‘spawn-fcgi’ 를 추천합니다.
spawn-fcgi
spawn-fcgi 를 사용하고 싶다면, 첫 단계로 해당 패키지를 설치해야 합니다:
apt install spawn-fcgi
그 다음 사용자의 엔진X 서버 환경 설정에 다음 블록을 추가하십시오:
location /qgisserver {
    gzip           off;
    include        fastcgi_params;
    fastcgi_pass   unix:/var/run/qgisserver.socket;
}
그리고 엔진X를 재시작해서 새 환경 설정을 적용하십시오:
systemctl restart nginx
마지막으로, ‘spawn-fcgi’ 용 기본 서비스 파일이 없다는 점을 고려해서 사용자 터미널에서 QGIS 서버를 직접 시작해야 합니다:
spawn-fcgi -s /var/run/qgisserver.socket \
                -U www-data -G www-data -n \
                /usr/lib/cgi-bin/qgis_mapserv.fcgi
이제 QGIS 서버가 http://qgis.demo/qgisserver 주소에서 실행되고 있습니다.
참고
‘spawn-fcgi’ 를 사용하는 경우, 서버 실행 전에 환경 변수를 직접 정의할 수도 있습니다. 예: export QGIS_SERVER_LOG_STDERR=1
물론 부팅 시 또는 원하는 때에 QGIS 서버를 실행하기 위한 init 스크립트를 추가할 수도 있습니다. 예를 들어 systemd 를 사용하는 경우, /etc/systemd/system/qgis-server.service 파일을 다음 내용으로 편집하십시오:
[Unit]
Description=QGIS server
After=network.target

[Service]
;; set env var as needed
;Environment="LANG=en_EN.UTF-8"
;Environment="QGIS_SERVER_PARALLEL_RENDERING=1"
;Environment="QGIS_SERVER_MAX_THREADS=12"
;Environment="QGIS_SERVER_LOG_LEVEL=0"
;Environment="QGIS_SERVER_LOG_STDERR=1"
;; or use a file:
;EnvironmentFile=/etc/qgis-server/env

ExecStart=spawn-fcgi -s /var/run/qgisserver.socket -U www-data -G www-data -n /usr/lib/cgi-bin/qgis_mapserv.fcgi

[Install]
WantedBy=multi-user.target
그리고 서비스를 활성화하고 실행합니다:
systemctl enable --now qgis-server
경고
위의 명령어는 spawn-fcgi가 단 하나의 QGIS 서버 프로세스만 스폰하도록 합니다.
fcgiwrap
fcgiwrap 설정은 spawn-fcgi 보다 훨씬 쉽지만 훨씬 느리기도 합니다. 먼저 해당 패키지를 설치해야 합니다:
apt install fcgiwrap
그 다음 사용자의 엔진X 서버 환경 설정에 다음 블록을 추가하십시오:
1  location /qgisserver {
2      gzip           off;
3      include        fastcgi_params;
4      fastcgi_pass   unix:/var/run/fcgiwrap.socket;
5      fastcgi_param  SCRIPT_FILENAME /usr/lib/cgi-bin/qgis_mapserv.fcgi;
6  }
마지막으로, 엔진X를 재시작해서 새 환경 설정을 적용하십시오:
systemctl restart nginx
systemctl restart fcgiwrap
이제 QGIS 서버가 http://qgis.demo/qgisserver 주소에서 실행되고 있습니다.
systemd
QGIS 서버를 완전히 활용하려면, 그 중에서도 인쇄 작업을 하려면 X 서버를 실행해야 합니다. 이미 실행중인 X 서버가 있다면, systemd 서비스를 사용할 수 있습니다.
QGIS 서버를 시작하기 위한 이 방법은 2개의 systemd 단위에 의존합니다:
QGIS 서버 소켓 단위 는 엔진X가 QGIS 서버를 실행하고 서버와 통신하는 데 사용하는 파일 시스템 소켓을 정의하고 생성합니다. 소켓 단위 환경 설정에 Accept=false 를 추가해야 하는데, accept() 시스템 호출을 호출하면 서비스 단위가 생성한 프로세스로 위임한다는 의미입니다. 이 설정은 /etc/systemd/system/qgis-server@.socket 파일에 실제 템플릿으로 저장돼 있습니다:
[Unit]
Description=QGIS Server Listen Socket (instance %i)

[Socket]
Accept=false
ListenStream=/var/run/qgis-server-%i.sock
SocketUser=www-data
SocketGroup=www-data
SocketMode=0600

[Install]
WantedBy=sockets.target
이제 소켓을 활성화하고 실행합니다:
for i in 1 2 3 4; do systemctl enable --now qgis-server@$i.socket; done
QGIS 서버 서비스 단위 는 QGIS 서버 프로세스를 정의하고 실행합니다. 중요한 점은 서비스 프로세스의 표준 입력이 소켓 단위가 정의한 소켓과 연결돼 있다는 점입니다. /etc/systemd/system/qgis-server@.service 파일에 있는 서비스 단위 환경 설정에 이 사실을 StandardInput=socket 을 사용해서 설정해주어야 합니다:
[Unit]
Description=QGIS Server Service (instance %i)

[Service]
User=www-data
Group=www-data
StandardOutput=null
StandardError=journal
StandardInput=socket
ExecStart=/usr/lib/cgi-bin/qgis_mapserv.fcgi
EnvironmentFile=/etc/qgis-server/env

[Install]
WantedBy=multi-user.target
참고
QGIS 서버의 환경 변수 는 별개의 /etc/qgis-server/env 파일에 정의돼 있습니다. 다음처럼 보일 것입니다:
QGIS_PROJECT_FILE=/etc/qgis/myproject.qgs
QGIS_SERVER_LOG_STDERR=1
QGIS_SERVER_LOG_LEVEL=3
이제 소켓 서비스를 실행합니다:
for i in 1 2 3 4; do systemctl enable --now qgis-server@$i.service; done
마지막으로 이 설정을 위한 엔진X HTTP 서버 환경 설정을 추가하십시오:
upstream qgis-server_backend {
   server unix:/var/run/qgis-server-1.sock;
   server unix:/var/run/qgis-server-2.sock;
   server unix:/var/run/qgis-server-3.sock;
   server unix:/var/run/qgis-server-4.sock;
}

server {
   …

   location /qgis-server {
       gzip off;
       include fastcgi_params;
       fastcgi_pass qgis-server_backend;
   }
}
이제 엔진X를 재시작해서 새 환경 설정을 적용하십시오:
systemctl restart nginx
예제 를 공유해준 오슬란디아(Oslandia)에 감사드립니다.
2.1.3. Xvfb
QGIS 서버를 완전히 활용하려면, 그 중에서도 인쇄 작업을 하려면 X 서버를 실행해야 합니다. 보통 서버에 X 서버 설치를 권장하지 않기 때문에, 가상 X 환경을 보유하기 위해 Xvfb 를 사용해야 할 수도 있습니다.
서버가 X11 그래픽 환경에서 실행중이라면 Xvfb를 설치할 필요가 없습니다. https://www.itopen.it/qgis-server-setup-notes/ 에서 더 자세한 내용을 찾을 수 있습니다.
패키지를 설치하려면:
apt install xvfb
다음 내용을 가진 /etc/systemd/system/xvfb.service 파일을 생성하십시오:
[Unit]
Description=X Virtual Frame Buffer Service
After=network.target

[Service]
ExecStart=/usr/bin/Xvfb :99 -screen 0 1024x768x24 -ac +extension GLX +render -noreset

[Install]
WantedBy=multi-user.target
xvfb.service 를 활성화하고 실행한 다음 상태를 점검합니다:
systemctl enable --now xvfb.service
systemctl status xvfb.service
그 다음 사용자의 HTTP 서버에 따라 DISPLAY 파라미터를 사용해야 하거나 또는 xvfb-run 을 직접 실행해야 합니다.
아파치 환경
아파치 HTTP 서버를 사용중이라면 DISPLAY 파라미터를 환경 설정할 수 있습니다.
아파치를 사용하는 경우 그냥 사용자의 FastCGI 환경 설정에 추가하면 됩니다(앞의 설명 참조):
FcgidInitialEnv DISPLAY ":99"
이제 아파치를 재시작해서 새 환경 설정을 적용하십시오:
systemctl restart apache2
엔진X 환경
엔진X HTTP 서버를 사용중이라면 xvfb-run 을 직접 사용하거나 DISPLAY* 파라미터를 환경 설정할 수 있습니다.
spawn-fcgi를 사용하는 경우
xvfb-run을 실행합니다:xvfb-run /usr/bin/spawn-fcgi -f /usr/lib/cgi-bin/qgis_mapserv.fcgi \ -s /tmp/qgisserver.socket \ -G www-data -U www-data -n
파라미터를 사용하는 경우 HTTP 서버 환경 설정에 DISPLAY 환경 변수를 추가합니다.
fastcgi_param DISPLAY ":99";
2.2. 윈도우에 설치하기
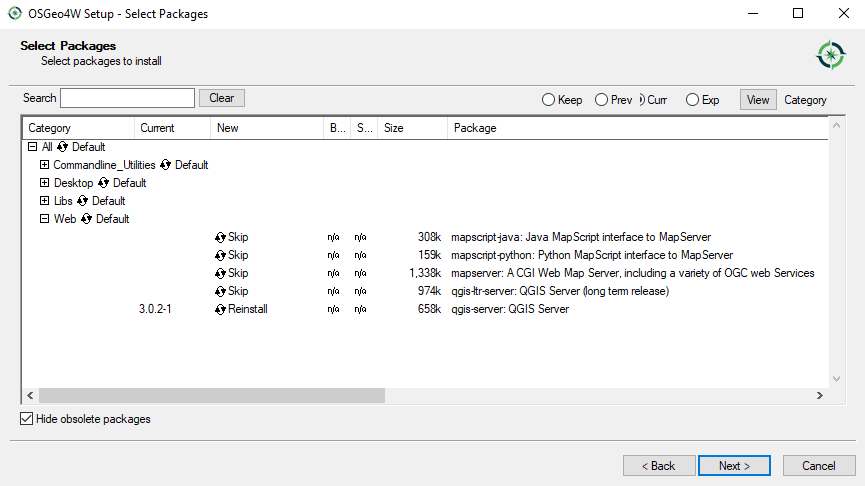
윈도우 시스템에도 QGIS 서버를 설치할 수 있습니다. OSGeo4W 네트워크 설치관리자 64bit 버전(https://qgis.org/en/site/forusers/download.html)에 QGIS 서버 패키지가 있긴 하지만, 아파치 (또는 다른 웹서버) 패키지는 없기 때문에, 다른 방법으로 웹서버를 설치해야만 합니다.
다음과 같은 간단한 과정을 거치면 됩니다:
윈도우용 XAMPP 설치 관리자 를 다운로드해서 아파치를 설치하십시오.
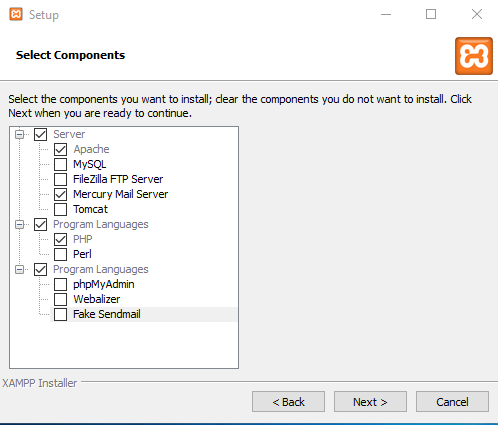
OSGeo4W 설치 관리자를 다운로드하고, “고급 설치(Advanced Install)” 옵션을 따라 QGIS 데스크톱과 QGIS 서버 패키지를 모두 설치하십시오.
텍스트 편집기에서
httpd.conf(기본 설치 경로를 사용했다면C:\xampp\apache\conf\httpd.conf에 있습니다) 파일을 열어 다음과 같이 수정하십시오:다음 내용을:
ScriptAlias /cgi-bin/ "C:/xampp/cgi-bin/"
다음으로:
ScriptAlias /cgi-bin/ "C:/OSGeo4W64/apps/qgis/bin/"
다음 내용을:
<Directory "C:/xampp/cgi-bin">
    AllowOverride None
    Options None
    Require all granted
</Directory>
다음으로:
<Directory "C:/OSGeo4W64/apps/qgis/bin">
    SetHandler cgi-script
    AllowOverride None
    Options ExecCGI
    Order allow,deny
    Allow from all
    Require all granted
</Directory>
다음 내용을:
AddHandler cgi-script .cgi .pl .asp
다음으로:
AddHandler cgi-script .cgi .pl .asp .exe
그리고
httpd.conf파일 마지막에 다음 내용을 추가하십시오:SetEnv GDAL_DATA "C:\OSGeo4W64\share\gdal" SetEnv QGIS_AUTH_DB_DIR_PATH "C:\OSGeo4W64\apps\qgis\resources" SetEnv PYTHONHOME "C:\OSGeo4W64\apps\Python37" SetEnv PATH "C:\OSGeo4W64\bin;C:\OSGeo4W64\apps\qgis\bin;C:\OSGeo4W64\apps\Qt5\bin;C:\WINDOWS\system32;C:\WINDOWS;C:\WINDOWS\System32\Wbem" SetEnv QGIS_PREFIX_PATH "C:\OSGeo4W64\apps\qgis" SetEnv QT_PLUGIN_PATH "C:\OSGeo4W64\apps\qgis\qtplugins;C:\OSGeo4W64\apps\Qt5\plugins"
XAMPP 컨트롤 패널에서 아파치 웹 서버를 재시작한 다음 웹 브라우저 창을 열어 QGIS 서버에
GetCapabilities요청을 점검하십시오.http://qgis.demo/cgi-bin/qgis_mapserv.fcgi.exe?SERVICE=WMS&VERSION=1.3.0&REQUEST=GetCapabilities
2.3. 프로젝트를 서비스하기
이제 QGIS 서버를 설치하고 실행했으니, 사용만 하면 됩니다.
당연히, 작업할 QGIS 프로젝트가 필요합니다. 물론 연락처 정보를 정의하고 좌표계에 몇몇 제약 조건을 확실히 하거나 일부 레이어를 제외하는 등 사용자 프로젝트 전체를 사용자 지정할 수 있습니다. 이 작업에 대해 사용자가 알아야 할 모든 것은 다음 사용자 프로젝트 환경 설정하기 에서 설명하고 있습니다.
그러나 지금 단계에서는 앞에서 설명한 대로 사전에 다운로드한, 환경 설정을 완료한 /home/qgis/projects/world.qgs 파일을 통해 간단한 프로젝트를 이용하겠습니다.
이 프로젝트 파일을 열고 레이어를 살펴보면, 현재 사용 가능한 레이어가 4개 있습니다:
‘airports’
‘places’
‘countries’
‘countries_shapeburst’
서버에 요청하는 방법에 대해 지금 전부 이해할 필요는 없습니다. 그러나 QGIS 서버에서 이 레이어들 가운데 몇 개를 받아올 수도 있습니다. 사용자의 웹 브라우저에 다음과 같이 입력하면 ‘countries’ 레이어를 받아올 수 있습니다.
http://qgis.demo/qgisserver?
  MAP=/home/qgis/projects/world.qgs&
  LAYERS=countries&
  SERVICE=WMS&
  VERSION=1.3.0&
  REQUEST=GetMap&
  CRS=EPSG:4326&
  WIDTH=400&
  HEIGHT=200&
  BBOX=-90,-180,90,180
웹 브라우저에 다음 이미지가 표시된다면, QGIS 서버가 바르게 실행되고 있다는 의미입니다:

그림 2.1 기본 GetMap 요청에 대한 서버의 응답
MAP 파라미터를 지정하는 대신 프로젝트가 기본으로 사용할 QGIS_PROJECT_FILE 환경 변수를 정의해야 할 수도 있다는 사실을 기억하십시오. (환경 변수 를 참조하세요.)
예를 들어 ‘spawn-fcgi’ 의 경우:
export QGIS_PROJECT_FILE=/home/qgis/projects/world.qgs
spawn-fcgi -f /usr/lib/bin/cgi-bin/qgis_mapserv.fcgi \
           -s /var/run/qgisserver.socket \
           -U www-data -G www-data -n
2.4. 사용자 프로젝트 환경 설정하기
WMS, WFS 또는 WCS를 서비스하는 새 QGIS 서버를 생성하려면, 몇몇 데이터를 보유한 QGIS 프로젝트 파일을 생성하거나 사용자의 현재 프로젝트 가운데 하나를 사용해야 합니다. QGIS 에서 – 아직 정의하지 않은 경우 – 레이어의 색상 및 스타일과 프로젝트 좌표계를 정의하십시오.
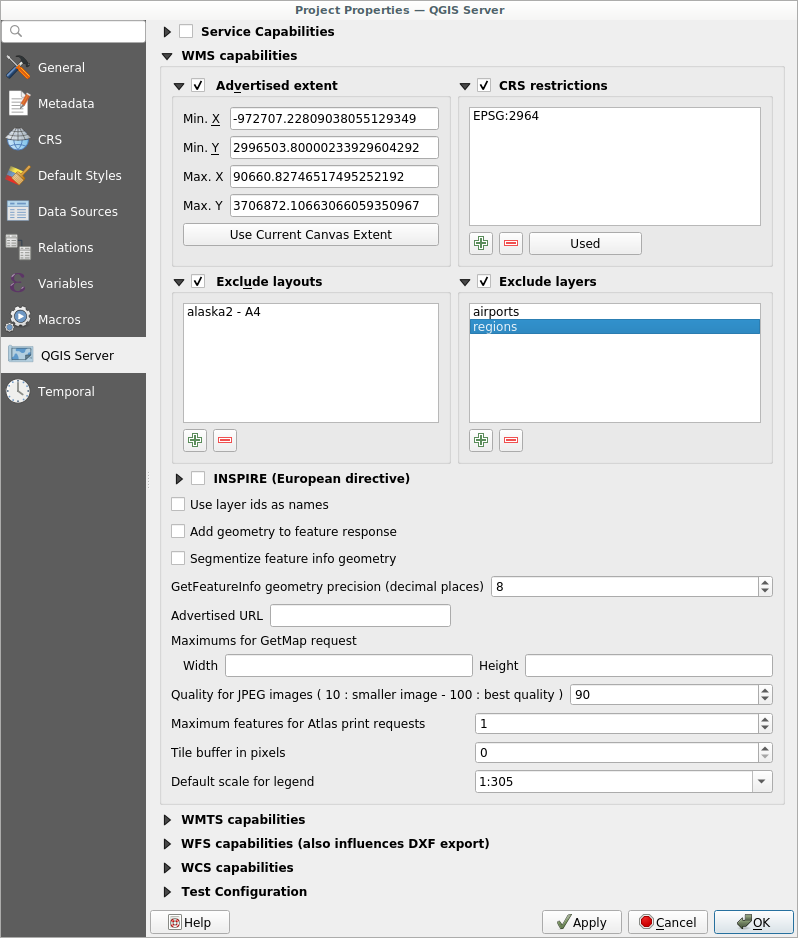
그림 2.2 WMS/WFS/WCS를 서비스하는 QGIS 서버 프로젝트 정의하기
그 다음, QGIS Server menu of the 대화창의 OWS Service 탭에 있는 Service Capabilities 부분 밑에 있는 여러 란에 OWS 관련 정보를 입력하십시오. 이 정보는 WMS, WFS 또는 WCS 의 GetCapabilities 응답에 나타날 것입니다.  Service capabilities 옵션을 활성화하지 않은 경우, QGIS 서버는
 cgi-bin 폴더에 있는 wms_metadata.xml 파일 안에 있는 정보를 사용할 것입니다.
2.4.1. WMS 성능
WMS capabilities 부분에서, Advertised extent 밑에 있는 여러 란에 최소 및 최대 X/Y 값을 입력해서 WMS 의 GetCapabilities 응답에 선언된 범위를 정의할 수 있습니다. Use Current Canvas Extent 버튼을 클릭하면 이 값들을 QGIS 맵 캔버스에 현재 표시된 범위로 설정합니다. CRS restrictions 옵션을 활성화하면, QGIS 서버가 맵을 렌더링하는 데 어떤 좌표계를 사용할지를 제약할 수 있습니다. 제안된 좌표계를 제약하는 편이 좋습니다. WMS 의 GetCapabilities 응답의 용량을 줄여주기 때문입니다. 해당 옵션 아래 있는  아이콘을 클릭해서 좌표계 선택기에서 좌표계를 선택할 수 있고, 또는 Used 버튼을 클릭해서 목록에 QGIS 프로젝트에서 사용된 적이 있는 좌표계들을 추가할 수도 있습니다.
사용자 프로젝트에 인쇄 조판을 정의했다면, GetProjectSettings 응답에 인쇄 조판 목록이 들어 있을 것입니다. GetPrint 요청이 이 정보를 이용, 인쇄 조판기의 조판 가운데 하나를 템플릿으로 사용해서 인쇄할 수 있습니다. 이 기능은 WMS 1.3.0 사양에 대응하는 QGIS 전용 확장 기능입니다. WMS가 게시하는 인쇄 조판 가운데 하나라도 제외하고 싶다면, Exclude layouts 옵션을 활성화한 다음 그 아래 있는 아이콘을 클릭하십시오. 그러면 Select print layout 대화창이 열리는데, 이 대화창에서 인쇄 조판을 선택해서 제외될 조판 목록에 추가할 수 있습니다.
WMS가 게시하는 레이어 가운데 어떤 레이어 또는 레이어 그룹을 제외하고 싶다면, Exclude Layers 옵션을 활성화한 다음 그 아래 있는 아이콘을 클릭하십시오. 그러면 Select restricted layers and groups 대화창이 열리는데, 이 대화창에서 게시하고 싶지 않은 레이어 및 레이어 그룹을 선택할 수 있습니다. 여러 항목을 한꺼번에 선택하고 싶다면 Shift 또는 Ctrl 키를 함께 사용하십시오. 필요하지 않은 레이어를 게시되는 레이어에서 제외시키는 편이 좋습니다. WMS GetCapabilities 응답의 용량을 줄여 클라이언트 쪽의 불러오기 시간을 단축시킬 수 있기 때문입니다.
Use layer ids as name 옵션을 체크하면, GetCapabilities 응답 또는 GetMap LAYERS 파라미터에서 레이어를 참조하는 데 레이어 ID를 사용할 것입니다. 체크하지 않으면, 레이어명 또는 단축명이 정의된 경우 (QGIS 서버 속성 참조) 그 이름을 사용합니다.
요청한 GetFeatureInfo 를 평문 텍스트, XML 및 GML로 받을 수 있습니다.
원하는 경우 Add geometry to feature response 옵션을 활성화할 수 있습니다. 이 옵션은 GetFeatureInfo 응답에 각 피처의 경계 상자를 포함시킬 것입니다. WITH_GEOMETRY 파라미터도 참조하세요.
원호(circular arc) 도형을 표시하지 못 하는 웹 클라이언트가 많이 있기 때문에, GetFeatureInfo 응답으로 클라이언트에 도형을 전송하기 전에 도형을 선분화시키는 옵션이 있습니다. 이 옵션으로 이런 클라이언트라도 피처의 도형을 (예를 들어 피처를 강조하기 위해) 표시하게 할 수 있습니다. 이 옵션을 활성화하려면 Segmentize feature info geometry 를 체크해야 합니다.
GetFeatureInfo geometry precision 옵션을 사용해서 GetFeatureInfo 도형의 정밀도도 설정할 수 있습니다. 완전한 정밀도가 필요하지 않은 경우, 이 옵션으로 대역폭을 절약할 수 있습니다.
QGIS 서버가 WMS GetCapabilities 응답 안에 특정한 요청 URL을 선언하기를 바란다면, Advertised URL 란에 그에 해당하는 URL을 입력하십시오.
또한 Maximums for GetMap request 밑에 있는 란에 각각 최대 너비 및 높이를 입력해서 GetMap 요청이 반환하는 맵의 최대 크기를 제한할 수도 있습니다.
Quality for JPEG images 인자를 변경할 수 있습니다. 품질 인자의 범위가 0부터 100 사이여야만 합니다. 0을 지정하면 최대 압축이고, 100을 지정하면 압축하지 않음입니다.
Maximum features for Atlas print requests 필드를 설정하면 요청 한 번으로 인쇄할 수 있는 지도책 객체의 개수 제한을 변경할 수 있습니다.
QGIS 서버를 타일 모드로 (TILED 파라미터 참조) 사용하는 경우, Tile buffer in pixels 를 설정할 수 있습니다. 사용자의 QGIS 프로젝트에서 가장 큰 심볼의 크기 또는 가장 넓은 라인의 너비에 해당하는 값을 권장합니다.
사용자 레이어 가운데 하나가 맵 도움말 표시 를 이용하고 있는 경우 (예: 표현식을 사용해서 텍스트를 표시하는 경우) GetFeatureInfo 출력물 안에 이 정보가 들어 있을 것입니다. 레이어가 값 맵(개념 매핑)을 이용하고 있다면, 이 정보도 GetFeatureInfo 출력물 안에 들어 있을 것입니다.
2.4.2. WFS 능력
WFS capabilities 부분에서 사용자가 WFS로 게시하려는 레이어를 선택할 수 있고, 해당 레이어를 업데이트, 삽입 및 삭제할 수 있는지 설정할 수 있습니다. WFS capabilities 부분의 Advertised URL 란에 URL을 입력한다면, QGIS 서버가 WFS GetCapabilities 응답에 이 특정 URL을 선언할 것입니다.
2.4.3. WCS 능력
WCS capabilities 부분에서 사용자가 WCS로 게시하려는 레이어를 선택할 수 있습니다. WCS capabilities 부분의 Advertised URL 란에 URL을 입력한다면, QGIS 서버가 WCS GetCapabilities 응답에 이 특정 URL을 선언할 것입니다.
2.4.4. 사용자 OWS를 미세 조정하기
벡터 레이어의 경우, 대화창의 Fields 메뉴에서 각 속성을 게시할 것인지 여부를 정의할 수 있습니다. 기본적으로, 사용자의 WMS 및 WFS는 모든 속성을 게시합니다. 특정 속성을 게시하고 싶지 않은 경우, WMS 또는 WFS 열에서 해당하는 체크박스를 체크 해제하십시오.
프로젝트 파일에 텍스트 주석 또는 SVG 주석을 추가해서 사용자의 WMS가 생성한 맵 위에 워터마크를 중첩시킬 수 있습니다. 주석 생성에 대한 지침은 주석 도구 를 참조하세요. WMS 출력물 위에 주석을 워터마크로 표시하려면, Annotation text 대화창의 Fixed map position 옵션을 비활성화해야 합니다. 주석 도구 가운데 하나를 선택한 상태에서 주석을 더블클릭하면 이 옵션에 접근할 수 있습니다. SVG 주석의 경우, 대화창의 General 메뉴에서 프로젝트가 절대 경로를 저장하도록 설정하거나 또는 SVG 이미지의 경로를 직접 수정해서 유효한 상대 경로를 나타내도록 해야 합니다.
2.5. 외부 소프트웨어와의 통합
QGIS 서버는 WMS, WFS 등등 같은 표준 OGC 웹 서비스를 제공하기 때문에, 수많은 종단 사용자 도구가 이를 이용할 수 있습니다.
2.5.1. QGIS 데스크탑과의 통합
QGIS 서버가 맵 서버라면 QGIS 데스크탑은 맵 설계자입니다. QGIS 서버가 맵 또는 QGIS 프로젝트를 OGC 표준을 제공하기 위해 서비스할 것입니다. 이런 QGIS 프로젝트는 파일 또는 데이터베이스의 항목 (QGIS 데스크탑에서 사용) 가운데 하나일 수 있습니다.
여기에 더해, QGIS 서버가 사용하는 프로젝트를 새로고침하려면 전용 업데이트 워크플로를 (예: 프로젝트 파일을 서버 위치에 복사해넣고 QGIS 서버를 재시작한다는지) 설정해야만 합니다. 지금은 아직 (메시지 큐 서비스를 통해 서버를 다시 불러오는) 자동화 프로세스가 구현되지 않았습니다.
2.5.2. MapProxy와의 통합
MapProxy 는 타일 캐시 서버로 모든 WMS/WMTS 맵 서버를 읽고 서비스할 수 있기 때문에, QGIS 서버 웹 서비스에 직접 연결해서 사용자 경험을 향상시킬 수 있습니다.
2.5.3. QWC2와의 통합
QWC2 는 QGIS 서버 전용의 응답형 웹 응용 프로그램입니다. 레이어 선택, 객체 정보 등등 고도로 사용자 지정된 맵 뷰어를 작성할 수 있게 해줍니다. 여기에 인증 또는 인쇄 서비스와 같은 많은 플러그인을 사용할 수 있는데, 이 저장소 에서 전체 목록을 볼 수 있습니다.