16.4. プラグインを書いてデバッグするためのIDE設定
プログラマには皆それぞれ自分の好みのIDE /テキストエディタがありますが、ここに人気のIDEを設定し、QGISの Pythonプラグインを書いたりデバッグするためのいくつかの推奨事項があります。
16.4.1. Useful plugins for writing Python plugins
Some plugins are convenient when writing Python plugins. From , install:
Plugin reloader: This will let you reload a plugin and pull new changes without restarting QGIS.
First Aid: This will add a Python console and local debugger to inspect variables when an exception is raised from a plugin.
警告
Despite our constant efforts, information beyond this line may not be updated for QGIS 3. Refer to https://qgis.org/pyqgis/master for the python API documentation or, give a hand to update the chapters you know about. Thanks.
16.4.2. A note on configuring your IDE on Linux and Windows
On Linux, all that usually needs to be done is to add the QGIS library locations
to the user's PYTHONPATH environment variable. Under most distributions,
this can be done by editing ~/.bashrc or ~/.bash-profile with
the following line (tested on OpenSUSE Tumbleweed):
export PYTHONPATH="$PYTHONPATH:/usr/share/qgis/python/plugins:/usr/share/qgis/python"
Save the file and implement the environment settings by using the following shell command:
source ~/.bashrc
On Windows, you need to make sure that you have the same environment settings and use the same libraries and interpreter as QGIS. The fastest way to do this is to modify the startup batch file of QGIS.
OSGeo4Wインストーラを使用した場合はOSGeo4Wインストールの bin フォルダの下にこれを見つけることができます。 C:\OSGeo4W\bin\qgis-unstable.bat のようなものを探してください。
16.4.3. Debugging using Pyscripter IDE (Windows)
For using Pyscripter IDE, here's what you have to do:
Make a copy of
qgis-unstable.batand rename itpyscripter.bat.Open it in an editor. And remove the last line, the one that starts QGIS.
Add a line that points to your Pyscripter executable and add the command line argument that sets the version of Python to be used
さらに、QGISが使用するPythonのDLLをPyscripterが見つけられるフォルダを指す引数を追加します。これはOSGeoWインストールのbinフォルダの下に見つけることができます
@echo off
SET OSGEO4W_ROOT=C:\OSGeo4W
call "%OSGEO4W_ROOT%"\bin\o4w_env.bat
call "%OSGEO4W_ROOT%"\bin\gdal16.bat
@echo off
path %PATH%;%GISBASE%\bin
Start C:\pyscripter\pyscripter.exe --python25 --pythondllpath=C:\OSGeo4W\bin
Now when you double click this batch file it will start Pyscripter, with the correct path.
More popular than Pyscripter, Eclipse is a common choice among developers. In the following section, we will be explaining how to configure it for developing and testing plugins.
16.4.4. Debugging using Eclipse and PyDev
16.4.4.1. インストール
To use Eclipse, make sure you have installed the following
QGIS 2.x
You may also want to install Remote Debug, a QGIS plugin. At the moment it's still experimental so enable
 Experimental plugins
under
beforehand.
Experimental plugins
under
beforehand.
To prepare your environment for using Eclipse in Windows, you should also create a batch file and use it to start Eclipse:
Locate the folder where
qgis_core.dllresides in. Normally this isC:\OSGeo4W\apps\qgis\bin, but if you compiled your own QGIS application this is in your build folder inoutput/bin/RelWithDebInfoLocate your
eclipse.exeexecutable.Create the following script and use this to start eclipse when developing QGIS plugins.
call "C:\OSGeo4W\bin\o4w_env.bat"
set PATH=%PATH%;C:\path\to\your\qgis_core.dll\parent\folder
start /B C:\path\to\your\eclipse.exe
16.4.4.2. Eclipseをセットアップする
Eclipseで、新しいプロジェクトを作成します。 一般的なプロジェクト を選択しておいて本当のソースを後でリンクできるので、このプロジェクトをどこに配置するかは実際は問題になりません。
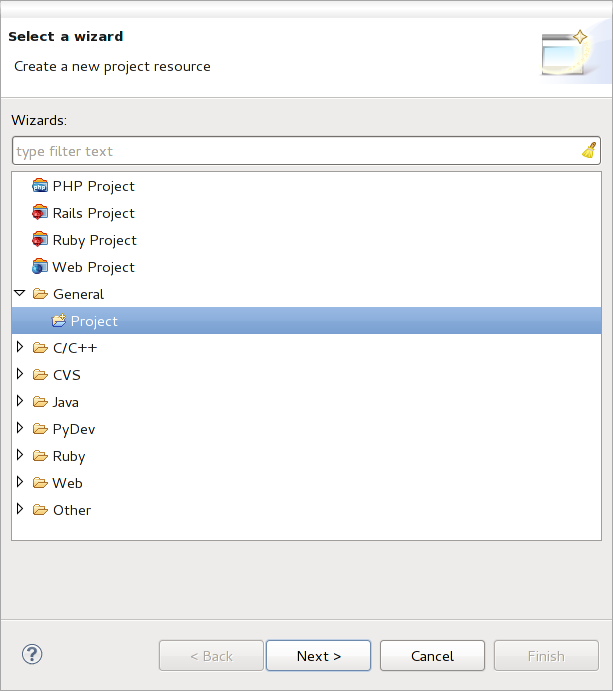
図 16.10 Eclipse project
Right-click your new project and choose .
詳細 をクリックし、 別の場所に リンク(リンクフォルダ) を選択します。すでにデバッグしたいソースがある場合はこれらを選択してください。そうでない場合は、すでに説明したようにフォルダを作成してください。
するとビュー プロジェクトエクスプローラ で、ソースツリーがポップアップしますので、コードでの作業を開始できます。すでに利用可能な構文の強調表示や他のすべての強力なIDEツールが使用できるようになっています。
16.4.4.3. Configuring the debugger
To get the debugger working:
Switch to the Debug perspective in Eclipse ().
start the PyDev debug server by choosing .
EclipseはQGISからデバッグサーバーへの接続を待っています。QGISがデバッグサーバーに接続すると、Pythonスクリプトを制御できます。それはまさに私たちが Remote Debug プラグインをインストールしたものです。だからまだ起動していなければQGISを起動し、バグのシンボルをクリックしてください。
ここでブレークポイントを設定できます。コードがそこに達すると実行は停止し、プラグインの現在の状態を検査できます。(ブレークポイントは下の画像の緑色の点です。ブレークポイントを設定したい行の左空白でダブルクリックすることで設定します)。
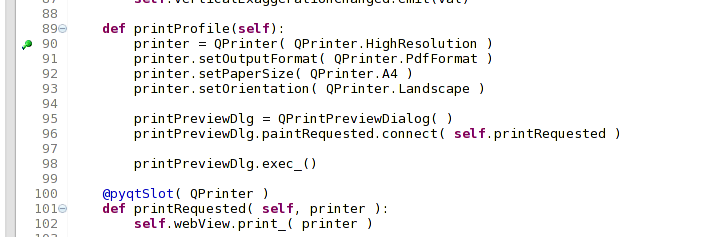
図 16.11 ブレークポイント
今利用できる非常に興味深いものはデバッグコンソールです。先に進む前に、現在実行がブレークポイントで停止していることを確認してください。
Open the Console view (). It will show the Debug Server console which is not very interesting. But there is a button Open Console which lets you change to a more interesting PyDev Debug Console.
Click the arrow next to the Open Console button and choose PyDev Console. A window opens up to ask you which console you want to start.
Choose PyDev Debug Console. In case its greyed out and tells you to Start the debugger and select the valid frame, make sure that you've got the remote debugger attached and are currently on a breakpoint.

図 16.12 PyDev Debug Console
You have now an interactive console which lets you test any commands from within the current context. You can manipulate variables or make API calls or whatever you like.
ちなみに
ちょっと面倒なのですが、コマンドを入力するたびコンソールはデバッグサーバーに戻ります。この動作を停止するには、デバッグサーバーページで Pin Console ボタンをクリックしますが、少なくとも現在のデバッグセッションではこの決定は記憶されます。
16.4.4.4. EclipseにAPIを理解させる
非常に便利な機能は、Eclipseが実際にQGISのAPIについてわかっているようにすることです。これにより、タイプミスがないかコードを確認できます。これだけでなく、EclipseでのインポートからAPI呼び出しへ自動入力する支援を可能にします。
これを行うため、EclipseではQGISライブラリファイルを解析し、そこにすべての情報を取得します。しなければならないことは、どこのライブラリを検索するかをEclipseに伝えることだけです。
をクリック。
ウィンドウの上部と下部にいくつかのタブで設定済みのPythonインタプリタ(現在QGISのためのpython2.7)が表示されます。私たちにとって興味深いタブは、 ライブラリ および 強制ビルトイン です。
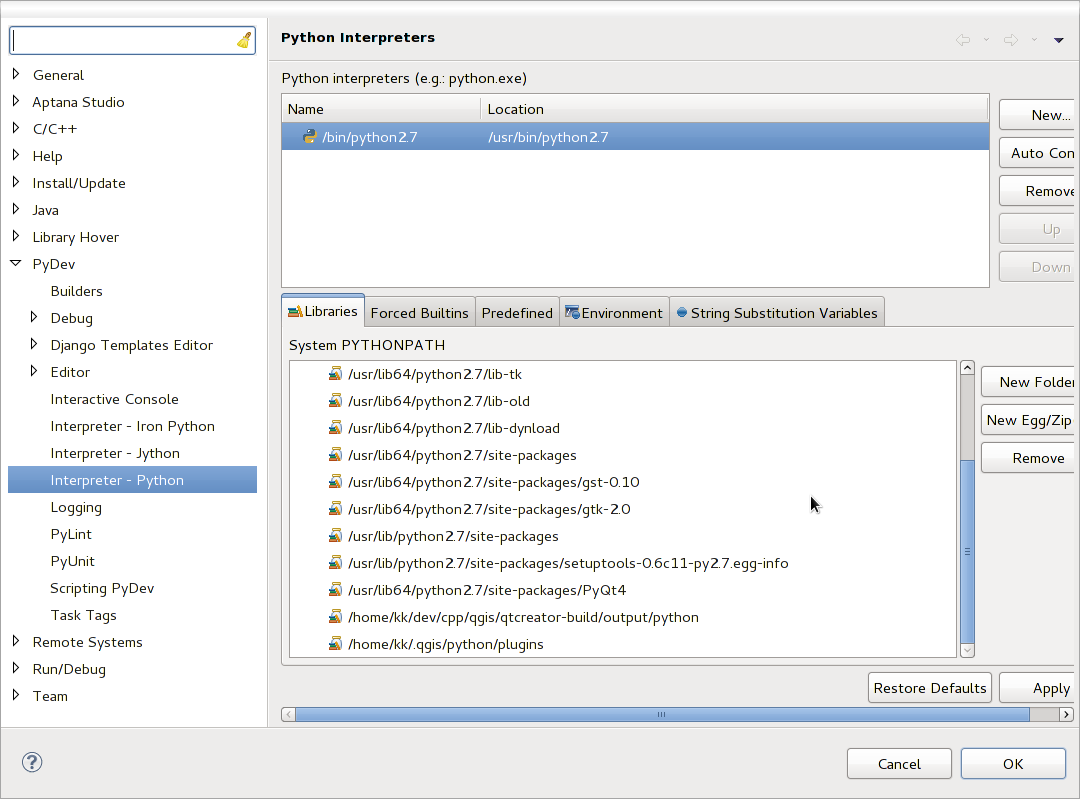
図 16.13 PyDev Debug Console
First open the Libraries tab.
Add a New Folder and choose the python folder of your QGIS installation. If you do not know where this folder is (it's not the plugins folder):
Open QGIS
Start a python console
Enter
qgisand press Enter. It will show you which QGIS module it uses and its path.
Strip the trailing
/qgis/__init__.pycfrom this path and you've got the path you are looking for.
You should also add your plugins folder here (it is in
python/pluginsunder the user profile folder).Next jump to the Forced Builtins tab, click on New... and enter
qgis. This will make Eclipse parse the QGIS API. You probably also want Eclipse to know about the PyQt API. Therefore also add PyQt as forced builtin. That should probably already be present in your libraries tab.Click OK and you're done.
注釈
Every time the QGIS API changes (e.g. if you're compiling QGIS master and the SIP file changed), you should go back to this page and simply click Apply. This will let Eclipse parse all the libraries again.
16.4.5. Debugging with PyCharm on Ubuntu with a compiled QGIS
PyCharm is an IDE for Python developed by JetBrains. There is a free version called Community Edition and a paid one called Professional. You can download PyCharm on the website: https://www.jetbrains.com/pycharm/download
We are assuming that you have compiled QGIS on Ubuntu with the given
build directory ~/dev/qgis/build/master. It's not compulsory to have
a self compiled QGIS, but only this has been tested. Paths must be adapted.
In PyCharm, in your Project Properties, Project Interpreter, we are going to create a Python Virtual environment called
QGIS.Click the small gear and then Add.
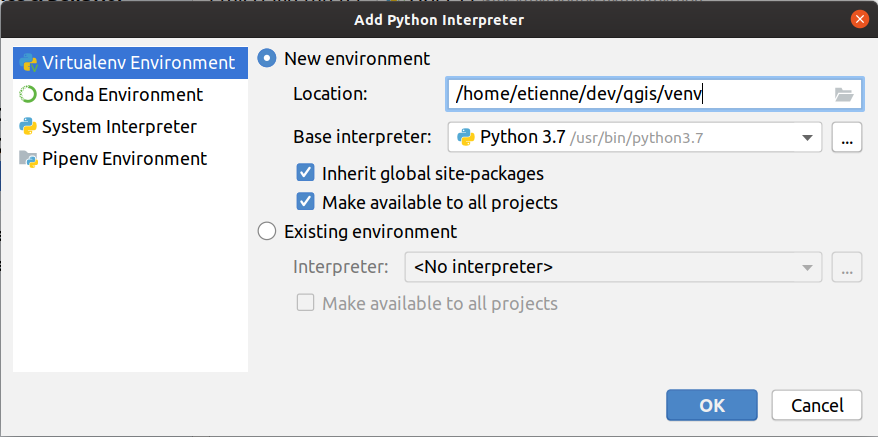
Select Virtualenv environment.
Select a generic location for all your Python projects such as
~/dev/qgis/venvbecause we will use this Python interpreter for all our plugins.Choose a Python 3 base interpreter available on your system and check the next two options Inherit global site-packages and Make available to all projects.
Click OK, come back on the small gear and click Show all.
In the new window, select your new interpreter
QGISand click the last icon in the vertical menu Show paths for the selected interpreter.Finally, add the following absolute path to the list
~/dev/qgis/build/master/output/python.

Restart PyCharm and you can start using this new Python virtual environment for all your plugins.
PyCharm will be aware of the QGIS API and also of the PyQt API if you use Qt
provided by QGIS like from qgis.PyQt.QtCore import QDir.
The autocompletion should work and PyCharm can inspect your code.
In the professional version of PyCharm, remote debugging is working well. For the Community edition, remote debugging is not available. You can only have access to a local debugger, meaning that the code must run inside PyCharm (as script or unittest), not in QGIS itself. For Python code running in QGIS, you might use the First Aid plugin mentioned above.
16.4.6. PDBを利用してデバッグする
If you do not use an IDE such as Eclipse or PyCharm, you can debug using PDB, following these steps.
First add this code in the spot where you would like to debug
# Use pdb for debugging
import pdb
# also import pyqtRemoveInputHook
from qgis.PyQt.QtCore import pyqtRemoveInputHook
# These lines allow you to set a breakpoint in the app
pyqtRemoveInputHook()
pdb.set_trace()
Then run QGIS from the command line.
On Linux do:
$ ./Qgis
On macOS do:
$ /Applications/Qgis.app/Contents/MacOS/Qgis
And when the application hits your breakpoint you can type in the console!
- TODO:
Add testing information