24.2.4. Geometry Checker Plugin
Geometry Checker is a powerful core plugin to check and fix the geometry
validity of a layer. It is available from the
menu ( ).
).
24.2.4.1. Configuring the checks
The Check Geometries dialog shows different grouped settings in the first tab (Setup):
Input vector layers: to select the layers to check. A
 Only selected features checkbox can be used to restrict the
checking to the geometries of the selected features.
Only selected features checkbox can be used to restrict the
checking to the geometries of the selected features.Allowed geometry types: to allow only some geometry types like point, multipoint, line, multiline, polygon and multipolygon.
Geometry validity: depending on geometry types, the user can choose
Self intersections,
Duplicate nodes, Self contacts and
Polygon with less than 3 nodes.Geometry properties: depending on geometry types, the user can choose
Polygons and multipolygons may not contain any
holes, Multipart objects must consist of more than one
part and Lines must not have dangles.Geometry conditions: user can add some condition to validate the geometries with a minimal segment length, a minimum angle between segment, a minimal polygon area and sliver polygons detection.
Topology checks: depending on geometry types, the user can choose
Checks for duplicates, Checks
for features within other features, Checks for
overlaps smaller than  , Checks
for gaps smaller than , Points
must be covered by lines, Points must properly lie
inside a polygon, Lines must not intersect any other
lines, Lines must not intersect with features of
layer
, Checks
for gaps smaller than , Points
must be covered by lines, Points must properly lie
inside a polygon, Lines must not intersect any other
lines, Lines must not intersect with features of
layer  , Polygons must follow boundaries
of layer .
, Polygons must follow boundaries
of layer .Tolerance: you can define the tolerance of the check in map layer units.
Output vector layer gives the choice to the user how get the result between modify the current layer and create a new layer.
When you are happy with the configuration, you can click on the Run button.
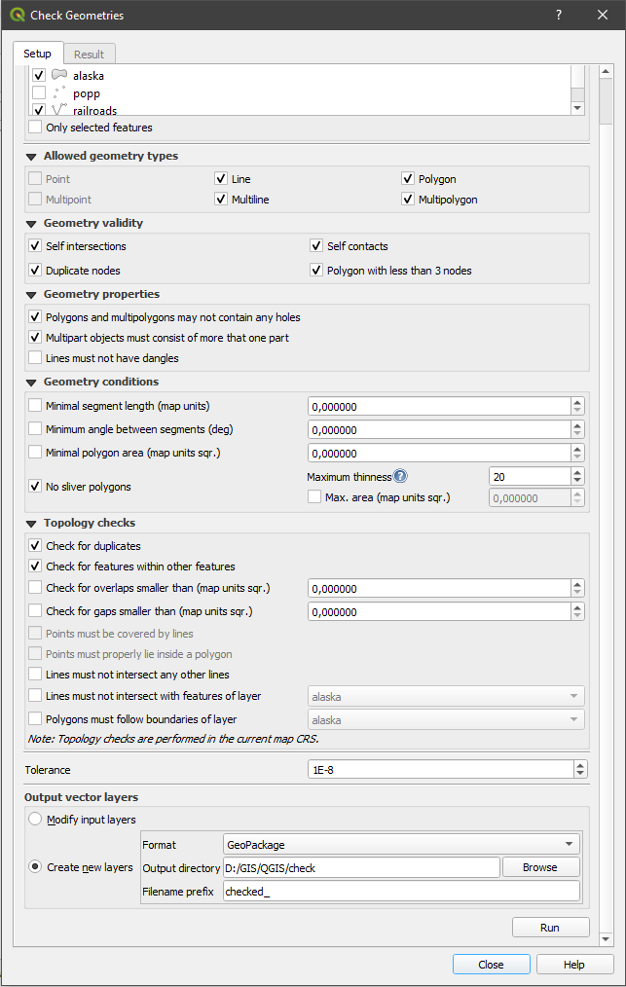
Fig. 24.17 The Geometry Checker Plugin
The Geometry Checker Plugin can find the following errors:
Self intersections: a polygon with a self intersection;
Duplicate nodes: two duplicates nodes in a segment;
Holes: hole in a polygon;
Segment length: a segment length lower than a threshold;
Minimum angle: two segments with an angle lower than a threshold;
Minimum area: polygon area lower than a threshold;
Silver polygon: this error come from very small polygon (with small area) with a large perimeter;
Duplicates features;
Feature within feature;
Overlaps: polygon overlapping;
Gaps: gaps between polygons.
The following figure shows the different checks made by the plugin.
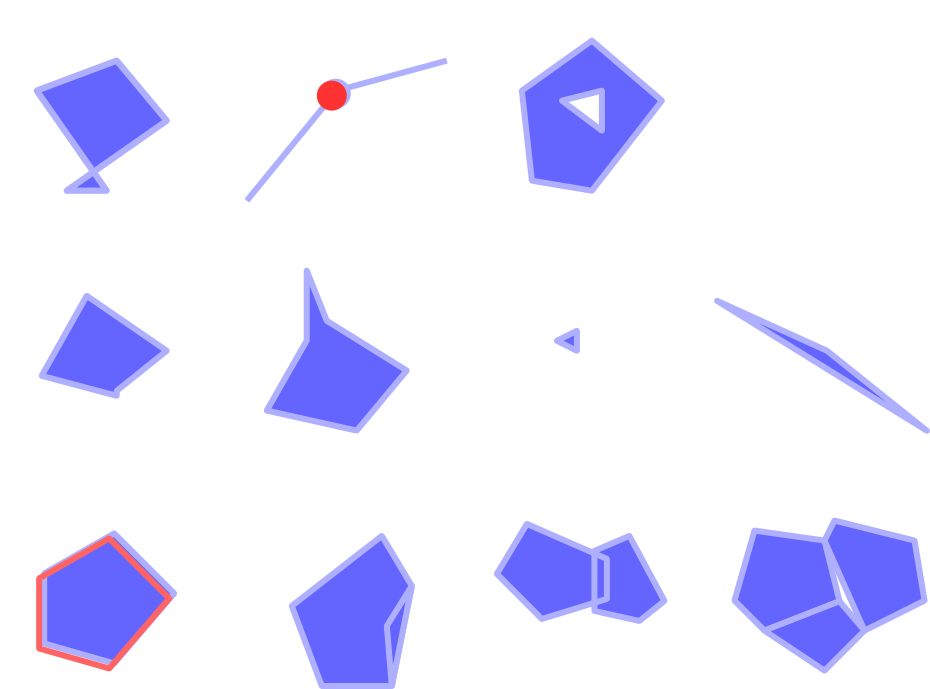
Fig. 24.18 Some checks supported by the plugin
24.2.4.2. Analysing the results
The results appear in the second tab (Result) and as an overview
layer of the errors in the canvas (its name has the default prefix
checked_).
A table lists the Geometry check result with one error per row and
columns containing: the layer name, an ID, the error type, then the coordinates
of the error, a value (depending on the type of the error) and finally the
resolution column which indicates the resolution of the error.
At the bottom of this table, you can Export the error into different file
formats. You also have a counter with the number of total errors and fixed ones.
You can select a row to see the location of the error. You can change this
behavior by selecting another action between  Error
(default),
Error
(default),  Feature,
Don’t move, and Highlight contour of selected
features.
Feature,
Don’t move, and Highlight contour of selected
features.
Below the zoom action when clicking on the table row, you can:
 Show selected features in attribute table;
 Fix selected errors using default resolution;
- Fix selected errors, prompt for resolution method.
You will see a window to choose the resolution’s method among which:
Merge with neighboring polygon with longest shared edge;
Merge with neighboring polygon with largest area;
Merge with neighboring polygon with identical attribute value, if any, or leave as is;
Delete feature;
No action.
Tip
Fix multiple errors
You can fix multiple errors by selecting more than one row in the table with the CTRL + click action.
The default action can be changed with the last icon  Error
resolution settings For some type of errors, you can change the default action
between some specific action or No action.
Error
resolution settings For some type of errors, you can change the default action
between some specific action or No action.
Finally, you can choose which attribute to use when merging features by attribute value.