Importante
A tradução é um esforço comunitário você pode contribuir. Esta página está atualmente traduzida em 42.31%.
14.2. Lesson: Georeferencing a Map
Una tarea forestal común sería la acutalización de información de un área forestal. Es posible que la información anterior para esa área date de muchos años atrás y fuera tomada analógicamente (es decir, en papel) o puede que fuera digitalizada pero todo lo que queda sea la versión en papel del área inventariada.
Segúramente querrás utilizar esa información en tu SIG para, por ejemplo, comparar con los inventarios posteriores. Esto implica que necesitarás digitalizar la información a mano en tu software SIG. Pero antes de que puedas empezar a digitalizar, hay un importante primer paso para hacer, escanear y georreferenciar tu mapa de papel.
El objetivo de esta lección: Aprender a usar la herramienta de Georreferenciación en QGIS.
14.2.1. ★☆☆ Scan the map
La primera tarea que deberás hacer es escanear tu mapa, si el mapa es demasiado grande, puedes escanearlo en partes diferentes pero teniendo en cuenta que tendrás que repetir las tareas de preprocesado y georreferenciación para cada parte. Así que si es posible, escanea el mapa en el menor número de partes posible.
Si vas a utilizar diferentes mapas al proporcionado en este manual, utiliza tu propio escaner para escanear el mapa como un archivo de imagen, una resolución de 300 DPI funcionará. Si tu mapa tiene colores, escanea la imagen en color para luego utilizar esos colores para separar la información de tu mapa en diferentes capas (por ejemplo, masas forestales, curvas de nivel, calles…).
For this exercise you will use a previously scanned map, you can find it as
rautjarvi_map.tif in the data folder exercise_data/forestry
14.2.2. ★☆☆ Follow Along: Georeferencing the scanned map
Open QGIS and set the project’s CRS to
EPSG:3067 - ETRS89 / TM35FIN(E,N)in , which is the currently used CRS in Finland.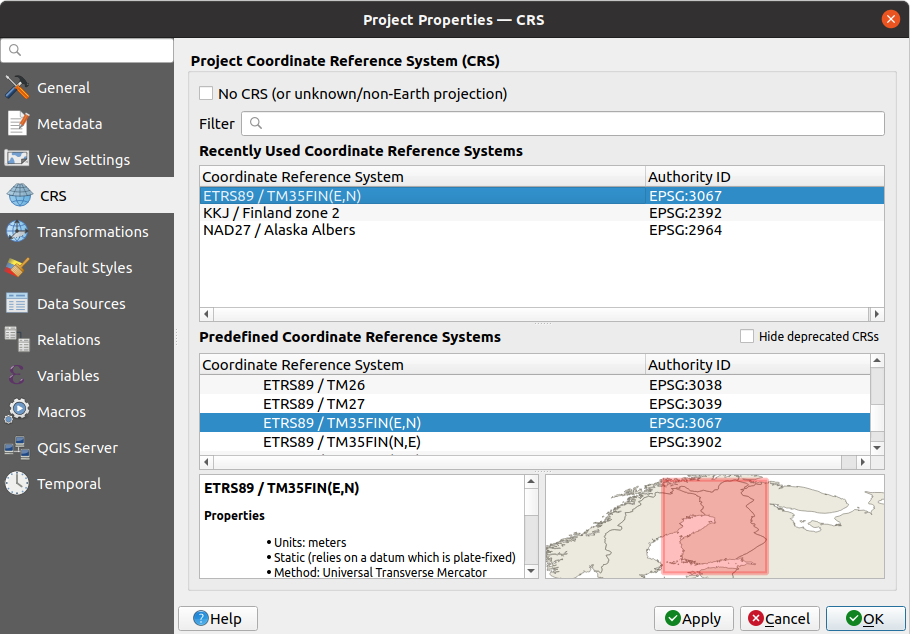
Save the QGIS project as
map_digitizing.qgs.
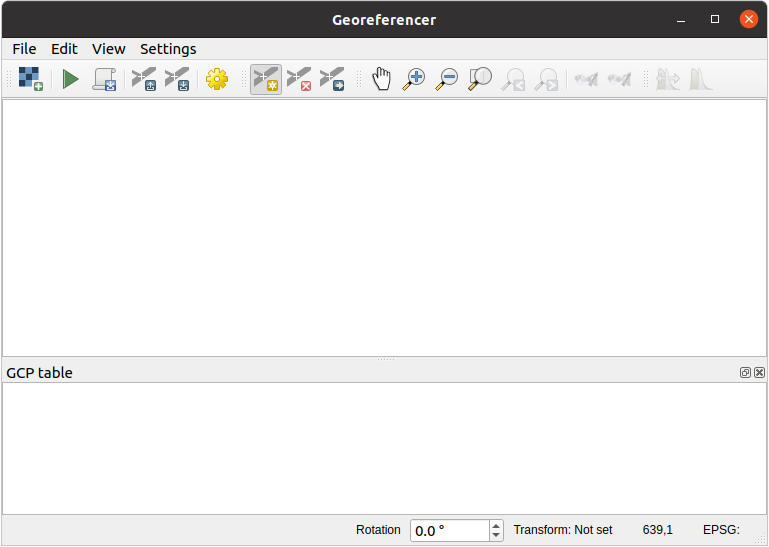
You will use the georeferencing tool from QGIS named Georeferencer. To georeference the map:
Open the georeference tool,
 .
.
Add the map image file,
rautjarvi_map.tif, as the image to georeference, .Haz clic en Aceptar.
Acontinuación deberás definir los ajustes de transformación para georreferenciar el mapa:
Abre .
Set the Transformation type to
Linearand the Resampling method toNearest neighbour.Press the
 Select CRS button next to
the Target SRS option and select the
Select CRS button next to
the Target SRS option and select the EPSG:2392 - KKJ / Finland zone 2CRS; it is the CRS that was used in Finland back in 1994 when this map was created.Click the icon next to the Output raster box, go to the folder and create the folder
exercise_data\forestry\digitizingand name the file asrautjarvi_georef.tif.Check
 Load in QGIS when done
Deixar o restante dos parâmetros como padrão.
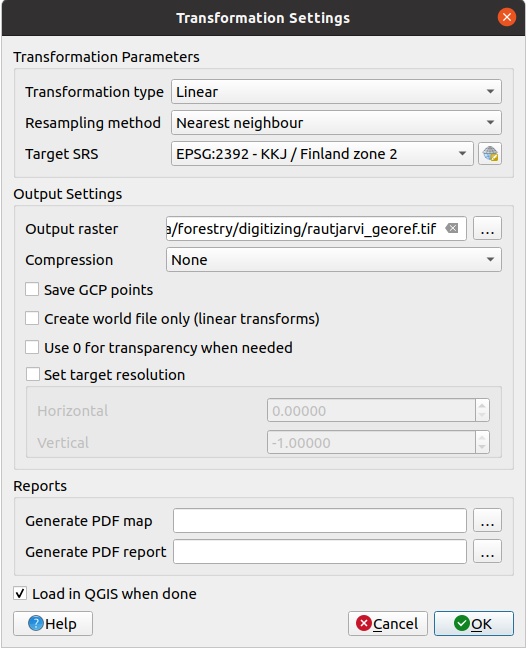
Haz clic en Aceptar.
The map contains several cross-hairs marking the coordinates in the map, we will use those to georeference this image. You can use the zooming and panning tools as you usually do in QGIS to inspect the image in the Georeferencer’s window.
Zoom in to the left lower corner of the map and note that there is a cross-hair with a coordinate pair, X and Y, that as mentioned before are in
KKJ / Finland
zone 2
CRS. You will use this point as the first ground control point for the georeferencing your map.Selecciona la herramienta Add point y haz clic en la intersección de la cruz (desplázate y haz zoom como necesites).
In the Enter map coordinates dialogue write the coordinates that appear in the map (X: 2557000 and Y: 6786000) and their CRS (
EPSG:2392 - KKJ / Finland zone 2)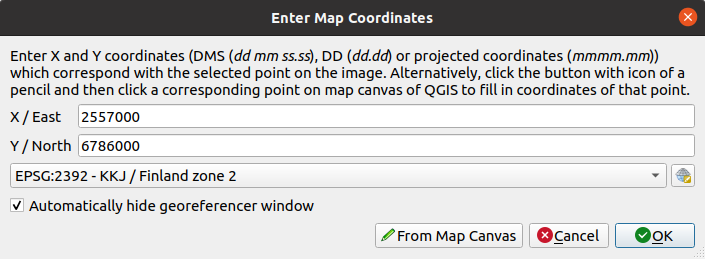
Haz clic en Aceptar.
La primera coordenada de la georreferenciación ya está lista.
Look for other black cross-hairs in the image, they are separated 1000 meters from each other both in North and East direction. You should be able to calculate the coordinates of those points in relation to the first one.
Zoom out in the image and move to the right or the top until you find other cross-hair, and estimate how many kilometres you have moved. Try to get ground control points as far from each other as possible.
Digitize at least three more ground control points in the same way you did the first one. You should end up with something similar to this:
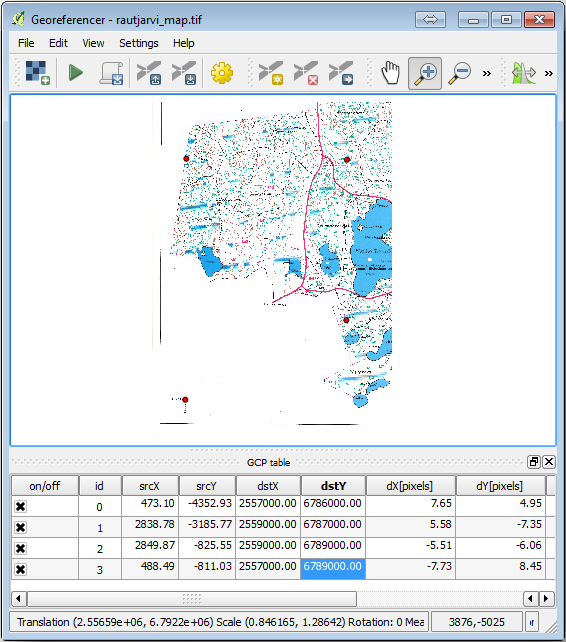
With already three digitized ground control points you will be able to see the georeferencing error as a red line coming out of the points. The error in pixels can be seen also in the GCP table in the dX[pixels] and dY[pixels] columns. The error in pixels should not be higher than 10 pixels. If it is, you should review the points you have digitized and the coordinates you have entered to find what the problem is. You can use the image above as a guide.
Quando estiver satisfeito com seus pontos de controle, você poderá salvá-los para uso posterior:
Go to .
In the folder
exercise_data\forestry\digitizing, name the filerautjarvi_map.tif.points.
Por fim, georreferencie seu mapa:
Go to .
Note that you named the file already as
rautjarvi_georef.tifwhen you edited the Georeferencer settings.Now you can see the map in QGIS project as a georeferenced raster. Note that the raster seems to be slightly rotated, but that is simply because the data is in
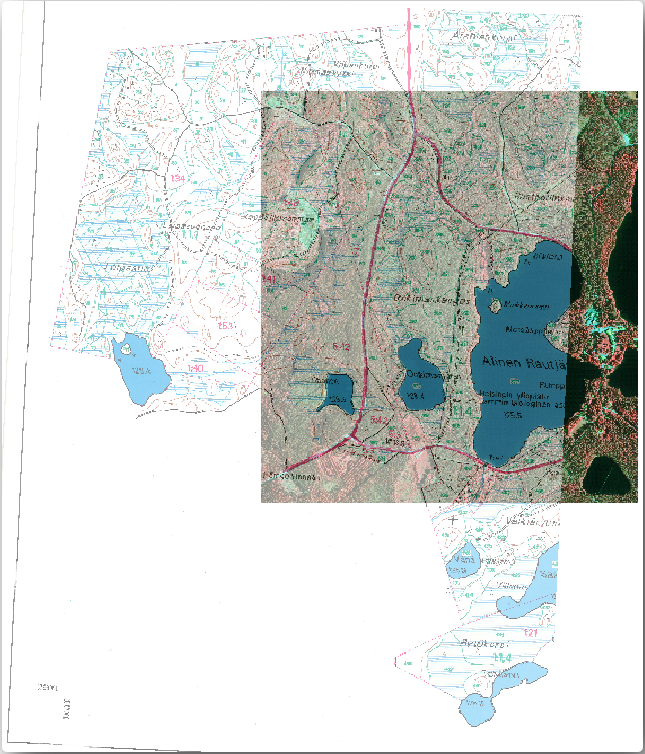
KKJ / Finland zone 2and your project is inETRS89 / TM35FIN(E,N).To check that your data is properly georeferenced, you can
Open the aerial image in the
exercise_data\forestryfolder, namedrautjarvi_aerial.tif.Your map and this image should match quite well: set the map transparency to 50% and compare it to the aerial image.
Guarda los cambios en tu proyecto QGIS, continuarás desde este punto en la siguiente lección.
14.2.3. In Conclusion
Agora você georreferenciou um mapa em papel, possibilitando usá-lo como uma camada de mapa no QGIS.
14.2.4. What’s Next?
Na próxima lição, você digitalizará a floresta em seu mapa como polígonos e adicionará os dados do inventário a eles.