高度な構成
ログを作成する
To log requests sent to the server, set the following environment variables:
QGIS_SERVER_LOG_FILE: Specify path and filename. Make sure that the server has proper permissions for writing to file. File should be created automatically, just send some requests to server. If it’s not there, check permissions.
QGIS_SERVER_LOG_LEVEL: Specify desired log level. Available values are:
- 0 INFO (log all requests),
- 1 WARNING,
- 2 CRITICAL (log just critical errors, suitable for production purposes).
Example:
SetEnv QGIS_SERVER_LOG_FILE /var/tmp/qgislog.txt
SetEnv QGIS_SERVER_LOG_LEVEL 0
ノート
- When using Fcgid module use FcgidInitialEnv instead of SetEnv!
- Server logging is also enabled if executable is compiled in release mode.
環境変数
You can configure some aspects of QGIS server by setting environment variables. For example, to set QGIS server on Apache to use /path/to/config/QGIS/QGIS2.ini settings file, add to Apache config:
SetEnv QGIS_OPTIONS_PATH "/path/to/config/"
or, if using fcgi:
FcgidInitialEnv QGIS_OPTIONS_PATH "/path/to/config/"
This is a list of the variables supported by QGIS server:
- QGIS_OPTIONS_PATH: Specifies the path to the directory with settings. It works the same way as QGIS application –optionspath option. It is looking for settings file in <QGIS_OPTIONS_PATH>/QGIS/QGIS2.ini.
- QUERY_STRING: The query string, normally passed by the web server. This variable can be useful while testing QGIS server binary from the command line.
- QGIS_PROJECT_FILE: the .qgs project file, normally passed as a parameter in the query string, you can also set it as an environment variable (for example by using mod_rewrite Apache module).
- QGIS_SERVER_LOG_FILE: Specify path and filename. Make sure that server has proper permissions for writing to file. File should be created automatically, just send some requests to server. If it’s not there, check permissions.
- QGIS_SERVER_LOG_LEVEL: Specify desired log level. See ログを作成する
- MAX_CACHE_LAYERS: Specify the maximum number of cached layers (default: 100).
- DISPLAY: This is used to pass (fake) X server display number (needed on Unix-like systems).
- QGIS_PLUGINPATH: Useful if you are using Python plugins for the server, this sets the folder that is searched for Python plugins.
- DEFAULT_DATUM_TRANSFORM: Define datum transformations between two projections, e.g. EPSG:21781/EPSG:2056/100001/-1;EPSG:2056/EPSG:21781/-1/100001 sets the transformation between CH1903 LV03 (EPSG:21781) and CH1903 LV95 (EPSG:2056) and vice versa. You also need to place grid shift .gsb files in the directory where proj4 stores the grid shift files, e.g. in /usr/share/proj. You need to run crssync after you added new .gsb files and look up the ID in the srs.db. Look at attribute coord_op_code of table tbl_datum_transform in srs.db to find the correct entry.
レイヤー、グループ、およびプロジェクトの短い名前
要素の数は、 <Name> と <Title> の両方を有します。 名 は、マシン・ツー・マシンの通信に使用するテキスト文字列で、 タイトル は人間の利益のものです。
例えば、データセットは、説明のタイトル「最高気温」を持っているかもしれないと略称「ATMAX」を使用して要求します。ユーザーはすでにレイヤー、グループやプロジェクトのタイトルを設定できます。
OWS名はレイヤーツリーに使用される名前に基づいています。この名前は、マシン間通信のための名前よりもより人間のためのラベルです。
QGISサーバーがサポートするのは:
レイヤープロパティへの短い名前の行編集 これを変更するには、レイヤーを右クリックして、 プロパティ ‣ [メタデータ]タブ ‣ 説明 ‣ 短い名前 を選択します。
レイヤーツリーグループへのWMSデータダイアログ(短い名前、タイトル、要約)
レイヤーグループを右クリックし、 グループWMS データを設定 オプションを選択すると、次のようになります:
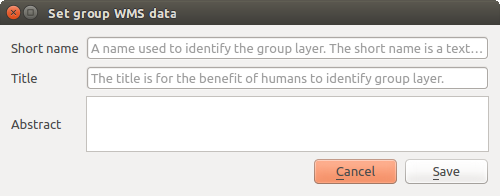
グループWMSデータダイアログを設定する
プロジェクトプロパティへの短い名前の行編集 - 静的メソッドを介して短い名前の行編集にアクセス可能な正規表現バリデータ 「^[A-Za-z][A-Za-z0-9\._-]*」 を追加します
静的メソッドを介して短い名前のラインエディットにアクセス可能な正規表現のバリデータ 「^[A-ZA-z][A-ZA-Z0-9\._-]*」 を追加します
プロジェクトのプロパティ ‣ OWSサーバー ‣ サービスの機能 ‣ 短い名前 の順に選択すると、プロジェクトルートの短い名前を選択できます。
fullProjectSettings に TreeName 要素を追加
短い名前がレイヤー、グループやプロジェクトのために設定されている場合には、レイヤー名としてQGISサーバーによって使用されます。
サービスファイルへの接続
PostgreSQLのサービス・ファイルのApacheが認識できるようにするために( PGサービスファイル セクションを参照) *.conf ファイルのようなを見て、確認する必要があり:
SetEnv PGSERVICEFILE /home/web/.pg_service.conf

<Directory "/home/web/apps2/bin/">
  AllowOverride None
.....
お使いのLinuxサーバーにフォントを追加
他のマシン上のデフォルトでは存在しないかもしれないフォントを指すQGISプロジェクトを使用するかもしれないことに注意してください。これは、プロジェクトを共有する場合(フォントがターゲットマシン上に存在しない場合)、それは他のマシン上で異なって見える可能性があることを意味します。
これが起こらないようにするために、単にターゲットマシン上で不足しているフォントをインストールする必要があります。デスクトップシステム上でこれを行うのは通常は自明です(フォントをダブルクリック)。
Linuxに対しては、デスクトップ環境をインストールしていない(または、コマンドラインを好む)場合、する必要があります:
Debianのベースのシステム:
$ sudo su
$ mkdir -p /usr/local/share/fonts/truetype/myfonts && cd /usr/local/share/fonts/truetype/myfonts

# copy the fonts from their location
$ cp /fonts_location/* .

$ chown root *
$ cd .. && fc-cache -f -v
Fedoraのベースのシステム:
$ sudo su
$ mkdir /usr/share/fonts/myfonts && cd /usr/share/fonts/myfonts

# copy the fonts from their location
$ cp /fonts_location/* .

$ chown root *
$ cd .. && fc-cache -f -v