` `
ライブGPS追跡
To activate live GPS tracking in QGIS, you need to select Settings ‣ Panels
 GPS information. You will get a new docked window on the
left side of the canvas.
GPS information. You will get a new docked window on the
left side of the canvas.
GPS追跡ウィンドウでは4つの表示可能なスクリーンがあります:
 GPS position coordinates and an interface for manually entering
vertices and features
GPS position coordinates and an interface for manually entering
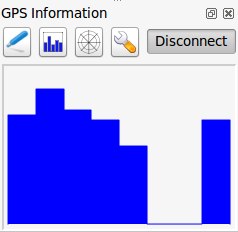
vertices and features 衛星接続のGPS信号強度
 GPS polar screen showing number and polar position of
satellites
GPS polar screen showing number and polar position of
satellites GPSオプション画面( figure_gps_options を参照)
With a plugged-in GPS receiver (has to be supported by your operating system), a simple click on [Connect] connects the GPS to QGIS. A second click (now on [Disconnect]) disconnects the GPS receiver from your computer. For GNU/Linux, gpsd support is integrated to support connection to most GPS receivers. Therefore, you first have to configure gpsd properly to connect QGIS to it.
警告
キャンバスに自分の位置を記録したい場合は、最初に新しいベクターレイヤーを作成し、トラックを記録できるようにステータスを編集可能に切り替えなければいけません。
位置と追加属性
If the GPS is receiving signals from satellites, you will
see your position in latitude, longitude and altitude together with additional
attributes.

GPS追跡位置と追加属性
GPS polar window
If you want to know where in the sky all the connected
satellites are, you have to switch to the polar screen. You can also see the
ID numbers of the satellites you are receiving signals from.
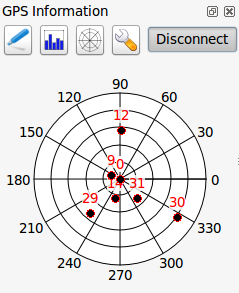
GPS tracking polar window
GPS オプション
接続の問題の場合は、切り替えできます:
 自動検出
自動検出 内部的
内部的- シリアルデバイス
- gpsd (GPSが接続されるホスト、ポートおよびデバイスを選択)
A click on [Connect] again initiates the connection to the GPS receiver.
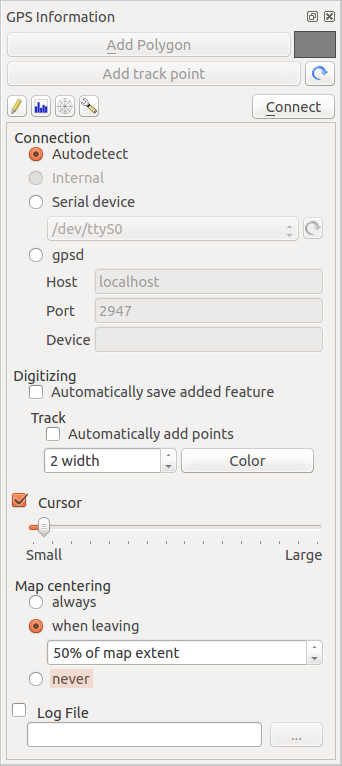
GPS追跡オプションウィンドウ
編集モードになっている場合 追加された地物を自動的に保存する オプションを有効にすることができます. また 自動的に点を追加する オプションを有効にして地図キャンパスに指定した幅と色で点を追加できます.
カーソル チェックボックスを有効にすると、スライダー  を使用してキャンバス上でカーソルを小さくしたり大きくしたりできます。
地図centering を有効にすると、キャンバスが更新される方法を決定できます。これには「つねに」、「去り際」記録座標がキャンバスの外に移動を開始した場合、または「しない」地図範囲を維持する、があります。
最後に ログファイル を有効にして、GPS追跡で記録されたログメッセージを書き込むファイルのパスを指定できます。
If you want to set a feature manually, you have to go back to
Position and click on [Add Point] or [Add track point].
ライブトラッキングのBluetooth GPS への接続
QGISを使用すると、フィールドデータ収集用のBluetooth GPSを接続できます。このタスクを実行するには、GPS、BluetoothデバイスとコンピュータのBluetooth受信機が必要です。
最初にあなたのGPSデバイスが認識され、コンピュータにペアリングさせる必要があります。 GPSをオンにし、あなたの通知領域にBluetoothアイコンに移動し、新しいデバイスを検索します。
On the right side of the Device selection mask make sure that all devices are selected so your GPS unit will probably appear among those available. In the next step a serial connection service should be available, select it and click on [Configure] button.
Bluetoothの特性によって生じた、GPS接続に割り当てられたCOMポートの番号を覚えておいてください。
GPSが認識された後、接続のためのペアリングを行います。通常、認証コードは 0000 です。
Now open GPS information panel and switch to GPS
options screen. Select the COM port assigned to the GPS connection and click
the [Connect]. After a while a cursor indicating your position should
appear.
QGISがGPSデータを受信できない場合は、GPSデバイスを再起動して5〜10秒ほど待ってから、再度接続を試みてください。通常、このソリューションで対応できます。再び接続エラーを受信した場合、同じGPSユニットと対になった別のBluetooth受信機が近くにないことを確認してください。
GPSMAP 60cs を使用する
MS Windows
Easiest way to make it work is to use a middleware (freeware, not open) called GPSGate.
Launch the program, make it scan for GPS devices (works for both USB and BT
ones) and then in QGIS just click [Connect] in the Live tracking panel
using the Autodetect mode.
Ubuntu/Mint GNU/Linux
Windowsにとって簡単な手段は中間にサーバーを使うことであり、この場合はGPSDで、このため、
sudo apt-get install gpsd
それから garmin_gps カーネルモジュールを読み込みます
sudo modprobe garmin_gps
そして、GPS ユニットを接続します。接続したら、 dmesg を使って、GPSユニットが実際に使っているデバイス (たとえば /dev/ttyUSB0 ) を確認します。これで gpsd を起動することができるようになりました。
gpsd /dev/ttyUSB0
最終的にQGIS ライブ追跡ツールで接続します。
BTGP-38KM データロガー (Bluetoothのみ)を使用する
GPSD (Linux) またはGPSGate (Windows) を使うと手間が省略できます。
BlueMax GPS-4044 データロガー (BT とUSB両方)を使用する
MS Windows
ライブ追跡はUSBとBTモードのどちらでも動作します、単にGPSGateを使用、あるいはそれなしでも、 自動検出 モードを使用するか、またはツールに右ポートを指してください。
Ubuntu/Mint GNU/Linux
USB
ライブ追跡はGPSDありでも動作しますし
gpsd /dev/ttyACM3
またはそれなしでも、直接デバイス(例えば /dev/ttyACM3 )にQGISライブ追跡ツールを接続することによって動作します。
Bluetooth
ライブ追跡はGPSDありでも動作しますし
gpsd /dev/rfcomm0
またはそれなしでも、直接デバイス(例えば /dev/rfcomm0 )にQGISライブ追跡ツールを接続することによって動作します。