` `
Writing new Processing algorithms as python scripts
You can create your own algorithms by writing the corresponding Python code and adding a few extra lines to supply additional information needed to define the semantics of the algorithm. You can find a Create new script menu under the Tools group in the Script algorithms block of the toolbox. Double-click on it to open the script edition dialog. That’s where you should type your code. Saving the script from there in the scripts folder (the default one when you open the save file dialog), with .py extension, will automatically create the corresponding algorithm.
The name of the algorithm (the one you will see in the toolbox) is created from the filename, removing its extension and replacing underscores with blank spaces.
Let’s have the following code, which calculates the Topographic Wetness Index (TWI) directly from a DEM
##dem=raster
##twi=output raster
ret_slope = processing.runalg("saga:slopeaspectcurvature", dem, 0, None,
                None, None, None, None)
ret_area = processing.runalg("saga:catchmentarea", dem,
                0, False, False, False, False, None, None, None, None, None)
processing.runalg("saga:topographicwetnessindextwi, ret_slope['SLOPE'],
                ret_area['AREA'], None, 1, 0, twi)
As you can see, it involves 3 algorithms, all of them coming from SAGA. The last one of them calculates the TWI, but it needs a slope layer and a flow accumulation layer. We do not have these, but since we have the DEM, we can calculate them by calling the corresponding SAGA algorithms.
The part of the code where this processing takes place is not difficult to understand if you have read the previous chapter. The first lines, however, need some additional explanation. They provide the information that is needed to turn your code into an algorithm that can be run from any of the GUI components, like the toolbox or the graphical modeler.
These lines start with a double Python comment symbol (##) and have the following structure
[parameter_name]=[parameter_type] [optional_values]
Here is a list of all the parameter types that are supported in processing scripts, their syntax and some examples.
- raster. A raster layer
- vector. A vector layer
- table. A table
- number. A numerical value. A default value must be provided. For instance, depth=number 2.4
- string. A text string. As in the case of numerical values, a default value must be added. For instance, name=string Victor
- longstring. Same as string, but a larger text box will be shown, so it is better suited for long strings, such as for a script expecting a small code snippet.
- boolean. A boolean value. Add True or False after it to set the default value. For example, verbose=boolean True.
- multiple raster. A set of input raster layers.
- multiple vector. A set of input vector layers.
- field. A field in the attributes table of a vector layer. The name of the layer has to be added after the field tag. For instance, if you have declared a vector input with mylayer=vector, you could use myfield=field mylayer to add a field from that layer as parameter.
- extent. A spatial extent defined by xmin, xmax, ymin, ymax
- folder. A folder
- file. A filename
- crs. A Coordinate Reference System
- selection. A dropdown menu that allows the user to select from a pre-populated list. For example units=selection sq_km;sq_miles;sq_degrees
- name. Name of the script. This will be displayed as the algorithm name in the processing toolbox. For example My Algorithm Name=name
- group. Folder name where the script will appear in the Processing Toolbox. For Example, adding Utils=groups will put the script within a Utils folder within Scripts.
The parameter name is the name that will be shown to the user when executing the algorithm, and also the variable name to use in the script code. The value entered by the user for that parameter will be assigned to a variable with that name.
When showing the name of the parameter to the user, the name will be edited to improve its appearance, replacing underscores with spaces. So, for instance, if you want the user to see a parameter named A numerical value, you can use the variable name A_numerical_value.
Layers and tables values are strings containing the filepath of the corresponding object. To turn them into a QGIS object, you can use the processing.getObjectFromUri() function. Multiple inputs also have a string value, which contains the filepaths to all selected objects, separated by semicolons (;).
Outputs are defined in a similar manner, using the following tags:
- output raster
- output vector
- output table
- output html
- output file
- output number
- output string
- output extent
The value assigned to the output variables is always a string with a filepath. It will correspond to a temporary filepath in case the user has not entered any output filename.
In addition to the tags for parameters and outputs, you can also define the group under which the algorithm will be shown, using the group tag.
The last tag that you can use in your script header is ##nomodeler. Use that when you do not want your algorithm to be shown in the modeler window. This should be used for algorithms that do not have a clear syntax (for instance, if the number of layers to be created is not known in advance, at design time), which make them unsuitable for the graphical modeler
アルゴリズムによって作成されたデータを扱う
When you declare an output representing a layer (raster, vector or table), the algorithm will try to add it to QGIS once it is finished. That is the reason why, although the runalg() method does not load the layers it produces, the final TWI layer will be loaded, since it is saved to the file entered by the user, which is the value of the corresponding output.
Do not use the load() method in your script algorithms, but just when working with the console line. If a layer is created as output of an algorithm, it should be declared as such. Otherwise, you will not be able to properly use the algorithm in the modeler, since its syntax (as defined by the tags explained above) will not match what the algorithm really creates.
Hidden outputs (numbers and strings) do not have a value. Instead, it is you who has to assign a value to them. To do so, just set the value of a variable with the name you used to declare that output. For instance, if you have used this declaration,
##average=output number
the following line will set the value of the output to 5:
average = 5
ユーザーとやりとりする
If your algorithm takes a long time to process, it is a good idea to inform the user. You have a global named progress available, with two available methods: setText(text) and setPercentage(percent) to modify the progress text and the progress bar.
If you have to provide some information to the user, not related to the progress of the algorithm, you can use the setInfo(text) method, also from the progress object.
If your script has some problem, the correct way of propagating it is to raise an exception of type GeoAlgorithmExecutionException(). You can pass a message as argument to the constructor of the exception. Processing will take care of handling it and communicating with the user, depending on where the algorithm is being executed from (toolbox, modeler, Python console...)
スクリプトの文書を作成する
As in the case of models, you can create additional documentation for your script, to explain what they do and how to use them. In the script editing dialog you will find a [Edit script help] button. Click on it and it will take you to the help editing dialog. Check the chapter about the graphical modeler to find out more about this dialog and how to use it.
Help files are saved in the same folder as the script itself, adding the .help extension to the filename. Note that you can edit your script’s help before saving it for the first time. If you later close the script editing dialog without saving the script (i.e. you discard it), the help content you wrote will be lost. If your script was already saved and is associated with a filename, saving is done automatically.
Example scripts
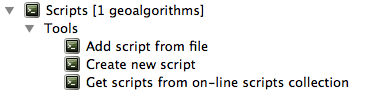
Several examples are available in the on-line collection of scripts, which you can access by selecting the Get script from on-line script collection tool under the Scripts/tools entry in the toolbox.
Processing Get Script
Please, check them to see real examples of how to create algorithms using the processing framework classes. You can right-click on any script algorithm and select Edit script to edit its code or just to see it.
スクリプトアルゴリズムを書くためのベストプラクティス
Here’s a quick summary of ideas to consider when creating your script algorithms and, especially, if you want to share with other QGIS users. Following these simple rules will ensure consistency across the different Processing elements such as the toolbox, the modeler or the batch processing interface.
結果のレイヤーはロードしないでください。処理に結果を処理させ、必要であれば、レイヤーをロードしてください。
- Always declare the outputs your algorithm creates. Avoid things such as declaring one output and then using the destination filename set for that output to create a collection of them. That will break the correct semantics of the algorithm and make it impossible to use it safely in the modeler. If you have to write an algorithm like that, make sure you add the ##nomodeler tag.
- Do not show message boxes or use any GUI element from the script. If you want to communicate with the user, use the setInfo() method or throw an GeoAlgorithmExecutionException
- As a rule of thumb, do not forget that your algorithm might be executed in a context other than the Processing toolbox.
Pre- and post-execution script hooks
Scripts can also be used to set pre- and post-execution hooks that are run before and after an algorithm is run. This can be used to automate tasks that should be performed whenever an algorithm is executed.
The syntax is identical to the syntax explained above, but an additional global variable named alg is available, representing the algorithm that has just been (or is about to be) executed.
In the General group of the processing config dialog you will find two entries named Pre-execution script file and Post-execution script file where the filename of the scripts to be run in each case can be entered.