8.1. Lesson: ラスターデータで作業する
ラスターデータはベクターデータとは全く異なります。ベクターデータは頂点で構成され、そしてことによるとラインやエリアとつながる離散的な地物を有します。しかしラスターデータは画像のようなものです。それは多分現実世界のオブジェクトのさまざまな属性を表現しますが、これらのオブジェクトは個別のオブジェクトとして存在していません。むしろ、それらはさまざまに異なる色の値の画素を用いて表現されます。
このモジュールの間は、既存のGIS分析を補うためにラスターデータを使用します。
このレッスンの目標: QGISでラスターデータを操作する方法を学習します。
8.1.1.  Follow Along: ラスターデータを読み込む
Open your analysis.qgs map (which you should have created and saved during the previous module).
Deactivate all the layers except the solution and important_roads layers.
Click on the Load Raster Layer button:

The Load Raster Layer dialog will open. The data for this project is in exercise_data/raster.
- Either load them all in separately, or hold down ctrl and click on all four of them in turn, then open them at the same time.
The first thing you’ll notice is that nothing seems to be happening in your map. Are the rasters not loading? Well, there they are in the Layers list, so obviously they did load. The problem is that they’re not in the same projection. Luckily, we’ve already seen what to do in this situation.
- Select Project ‣ Project Properties in the menu:
- Select CRS tab in the menu:
- Enable “on the fly” reprojection.
- Set it to the same projection as the rest of your data (WGS 84 / UTM zone 33S).
- Click [OK].
The rasters should fit nicely:
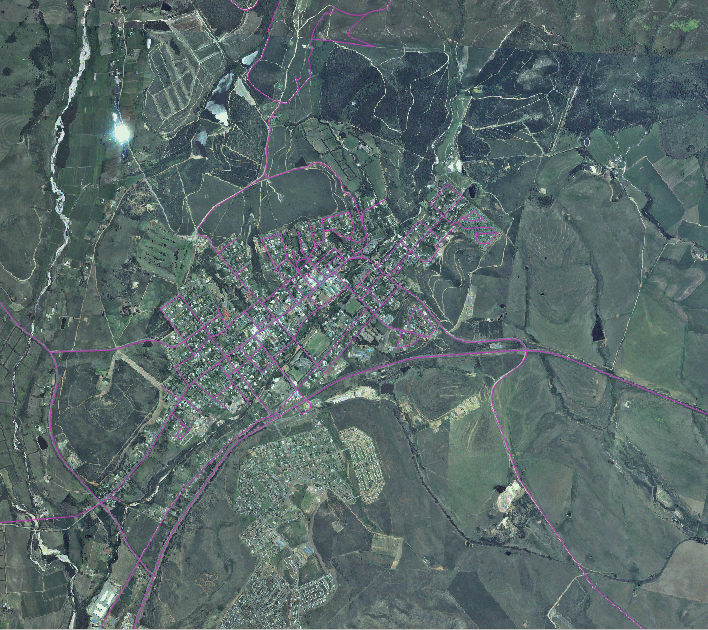
私たちの全体の研究領域をカバーする4つの航空写真があります。
8.1.2. Follow Along: 仮想ラスターの作成
これからわかるように、あなたのsolutionレイヤーは4つのすべての写真にわたっています。これが意味することはあなたは4つのラスターで作業する必要があるということです。それは理想的ではありません。1つの(コンポジット)画像に対して1つのファイルになっている方が良いと思うでしょう?
Luckily, QGIS allows you to do exactly this, and without needing to actually create a new raster file, which could take up a lot of space. Instead, you can create a Virtual Raster. This is also often called a Catalog, which explains its function. It’s not really a new raster. Rather, it’s a way to organize your existing rasters into one catalog: one file for easy access.
To make a catalog:
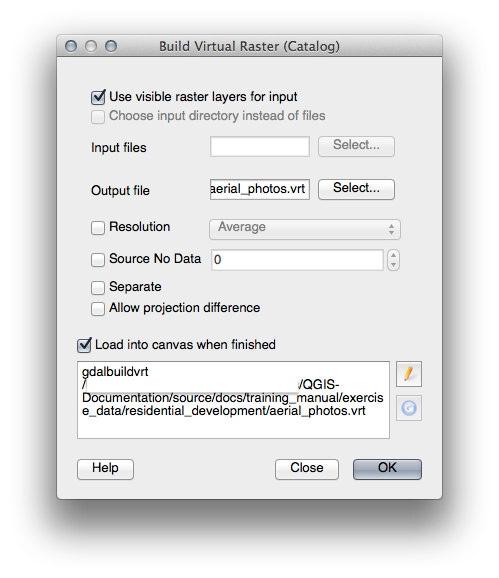
- Click on the menu item Raster ‣ Miscellaneous ‣ Build Virtual Raster (Catalog).
- In the dialog that appears, check the box next to Use visible raster layers for input.
- Enter exercise_data/residential_development as the output location.
- Enter aerial_photos.vrt as the file name.
- Check the Load into canvas when finished button.
Notice the text field below. What this dialog is actually doing is that it’s writing that text for you. It’s a long command that QGIS is going to run.
ノート
 Keep in mind that the command text is editable, so you can
customize the command further if preferred. Search online for the initial
command (in this case, gdalbuildvrt) for help on the syntax.
Keep in mind that the command text is editable, so you can
customize the command further if preferred. Search online for the initial
command (in this case, gdalbuildvrt) for help on the syntax.
- Click OK to run the command.
It may take a while to complete. When it’s done, it will tell you so with a message box.
- Click OK to chase the message away.
- Click Close on the Build Virtual Raster (Catalog) dialog. (Don’t click OK again, otherwise it’s going to start running that command again.)
- You can now remove the original four rasters from the Layers list.
- If necessary, click and drag the new aerial_photos raster catalog layer to the bottom of the Layers list so that the other activated layers become visible.
8.1.3. ラスターデータの変換
上記の方法では、カタログを使用してデータセットを仮想的にマージし、それらを「その場で」再投影できます。しかし、もし長期間使用することになるデータを用意しているならば、マージされ再投影された新しいラスターを作成する方が効率的かもしれません。はじめに用意をするのに少し時間がかかりますが、そうしておけば地図でラスターを使う際のパフォーマンスが向上します。
8.1.3.1. ラスターを再投影する
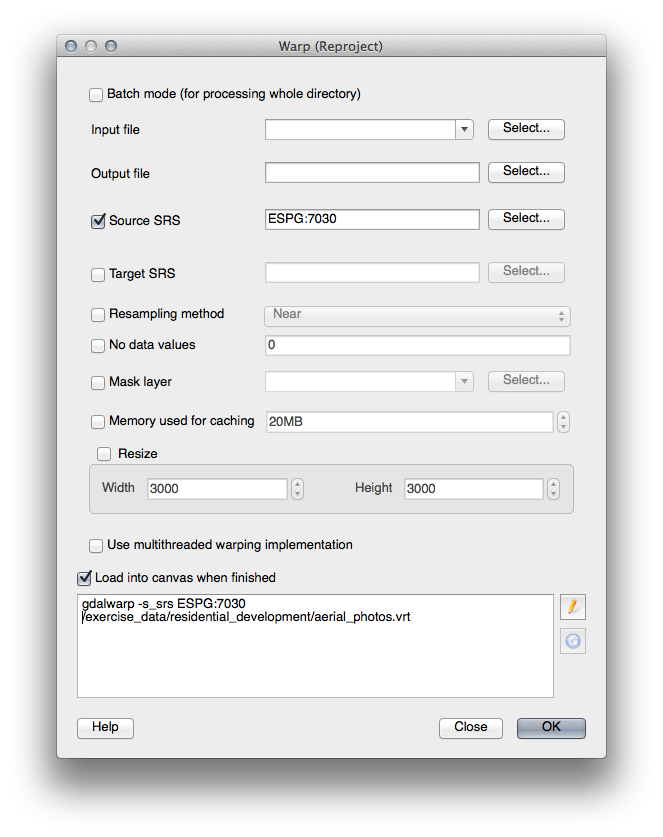
- Click on the menu item Raster ‣ Projections ‣ Warp (Reproject).
Note that this tool features a handy batch option for reprojecting the contents of whole directories. You can also reproject virtual rasters (catalogs), as well as enabling a multithreaded processing mode.
8.1.3.2. ラスターをマージする
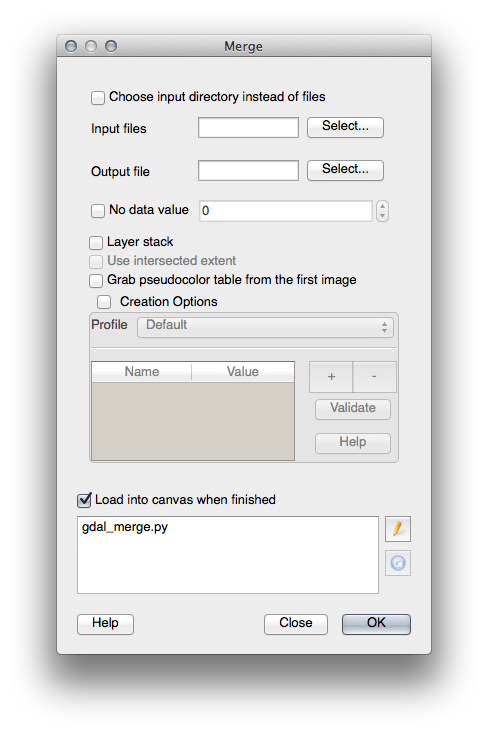
- Click on the menu item Raster ‣ Miscellaneous ‣ Merge.
You can choose to process entire directories instead of single files, giving you a very useful built-in batch processing capability. You can specify a virtual raster as input file, too, and all of the rasters that it consists of will be processed.
You can also add your own command line options using the Creation Options checkbox and list. This only applies if you have knowledge of the GDAL library’s operation.
8.1.4. In Conclusion
QGISでは既存のプロジェクトにラスターデータを入れることが簡単です。
8.1.5. What’s Next?
次は航空画像ではないラスターデータを使用して、同様にラスターの場合にシンボル化はどのように有用であるかを見ていきます。