` `
Koordinaten aufnehmen Plugin
Das Plugin Koordinaten aufnehmen ist einfach zu bedienen und erlaubt es, Koordinaten für zwei ausgewählte Koordinatenbezugssysteme (KBS) im Kartenfenster abzufragen.
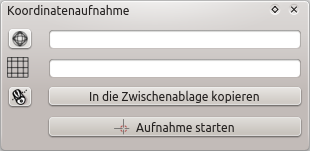
Koordinaten aufnehmen Plugin
- Start QGIS, select
 Project Properties from the
Settings (KDE, Windows) or File (Gnome, macOS) menu
and click on the Projection tab. As an alternative, you can also
click on the
Project Properties from the
Settings (KDE, Windows) or File (Gnome, macOS) menu
and click on the Projection tab. As an alternative, you can also
click on the  CRS status icon in the lower
right-hand corner of the status bar.
CRS status icon in the lower
right-hand corner of the status bar. Aktivieren Sie die Checkbox
 On-the-Fly-KBS-Transformation aktivieren und wählen Sie ein KBS
Ihrer Wahl (siehe auch Arbeiten mit Projektionen).
On-the-Fly-KBS-Transformation aktivieren und wählen Sie ein KBS
Ihrer Wahl (siehe auch Arbeiten mit Projektionen).- Activate the coordinate capture plugin in the Plugin Manager (see
Der Erweiterungen Dialog) and ensure that the dialog is visible by going to
View ‣ Panels and ensuring that
Coordinate Capture is enabled. The coordinate capture dialog
appears as shown in Figure figure_coordinate_capture. Alternatively,
you can also go to Vector ‣ Coordinate Capture and see
if Coordinate Capture is enabled.
Klicken Sie nun auf das Icon
 Klicken Sie, um das KBS zur Koordinatenanzeige auszuwählen und wählen Sie ein anderes Koordinatenbezugsystem (KBS) als eben.
- To start capturing coordinates, click on [Start capture]. You can now click anywhere on the map canvas and the plugin will show the coordinates for both of your selected CRS.
Um die Mausverfolgungs-Funktion zu starten, klicken Sie auf das Icon
 Mausverfolgung.
Sie können die ausgewählten Koordinaten auch in die Zwischenablage kopieren.