중요
번역은 여러분이 참여할 수 있는 커뮤니티 활동입니다. 이 페이지는 현재 100.00% 번역되었습니다.
14.2. 수업: 맵 지리참조시키기
일반적인 삼림관리 작업은 삼림 지역에 대한 정보를 업데이트하는 일일 것입니다. 해당 지역의 정보가 몇 년 전의 것일 수도 있고, 아날로그적으로 (즉 종이 위에) 수집되었을 수도 있으며, 또는 디지털화되었다고 해도 여러분이 접근할 수 있는 정보는 해당 목록 데이터의 하드카피 버전뿐일 수도 있습니다.
예를 들자면 아마도 이전 목록 정보와 비교하기 위해 해당 정보를 GIS에서 사용하고자 하는 경우가 대부분일 것입니다. 즉 GIS 소프트웨어를 이용해서 지금 접근할 수 있는 정보를 디지털화해야 한다는 의미입니다. 그러나 디지털화 작업을 시작하기 전에 여러분의 종이 지도를 스캔하고 지리참조시키는 아주 중요한 첫 번째 단계를 거쳐야 합니다.
이 수업의 목표: QGIS의 지리참조 도구를 사용하는 방법을 배우기.
14.2.1. ★☆☆ 지도 스캔하기
여러분이 해야 할 첫 번째 작업은 여러분의 지도를 스캔하는 일입니다. 지도가 아주 클 경우, 부분 부분을 각각 따로 스캔할 수 있지만 각 부분마다 전처리 및 지리참조 작업을 반복해야 한다는 것을 명심하십시오. 따라서 가능한 한 가장 적은 개수의 부분들로 지도를 스캔하는 것이 좋습니다.
이 교재가 제공하는 것과는 다른 지도를 사용할 예정이라면, 여러분의 스캐너를 이용하여 지도를 직접 이미지 파일로 스캔하십시오. 해상도 300 DPI 정도가 좋습니다. 여러분의 지도에 여러 색상이 쓰였다면 컬러로 스캔하십시오. 나중에 이 색상들을 사용하여 지도에서 정보를 분리, 서로 다른 레이어로 저장할 수 있습니다. (예 : 수종경계, 등고선, 도로 등등)
이 예제에서는 기존에 스캔한 맵을 사용할 것입니다. exercise_data/forestry 데이터 폴더에 있는 rautjarvi_map.tif 파일입니다.
14.2.2. ★☆☆ 따라해보세요: 스캔한 맵을 지리참조시키기
QGIS를 열고 메뉴에서 프로젝트 좌표계를
EPSG:3067 - ETRS89 / TM35FIN(E,N)으로 설정하십시오. 현재 핀란드에서 쓰이는 좌표계입니다.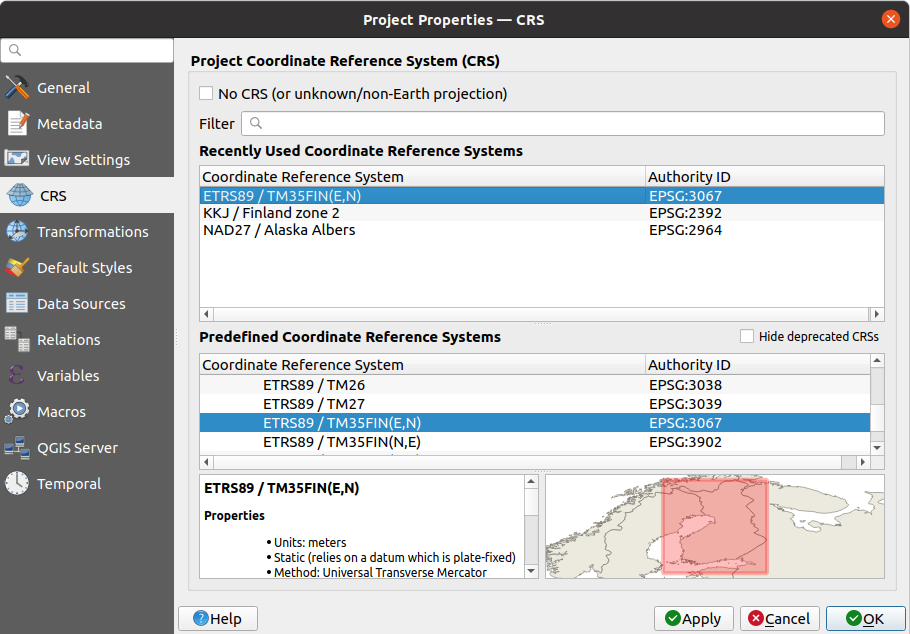
이 QGIS 프로젝트를
map_digitizing.qgs라는 이름으로 저장하십시오.
QGIS의 Georeferencer 라는 지리참조 도구를 사용할 것입니다. 맵을 지리참조시키려면:
 메뉴로 지리참조 도구를 여십시오.
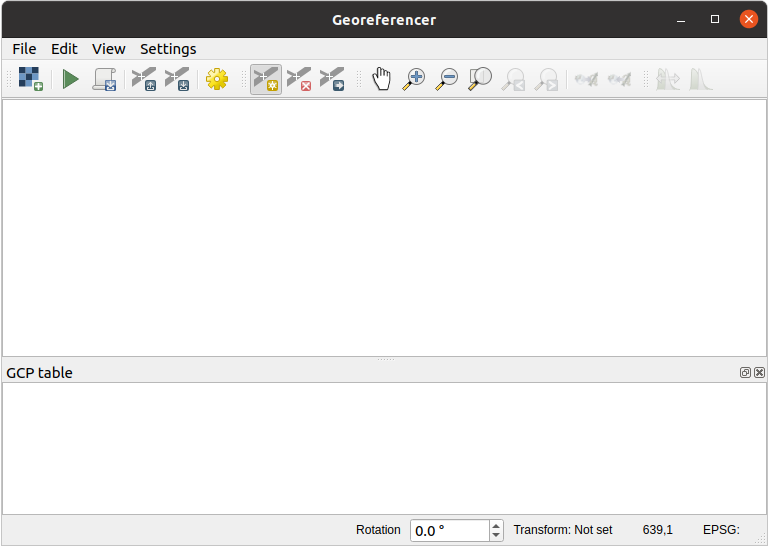
메뉴를 사용해서 지리참조시킬 이미지로
rautjarvi_map.tif맵 이미지 파일을 추가하십시오.:guilabel:`OK`를 클릭하십시오.
다음으로 맵을 지리참조시키기 위한 변환 설정을 정의해야 합니다.
메뉴를 클릭합니다.
Transformation type 을
Linear로, 그리고 Resampling method 를Nearest neighbour로 설정하십시오.Target SRS 옵션 옆에 있는
 Select CRS 버튼을 누르고
 EPSG:2392 - KKJ / Finland zone 2좌표계를 선택하십시오. 이 맵이 생성된 1994년에 핀란드에서 쓰이던 좌표계입니다.Output raster 란 옆에 있는 아이콘을 클릭한 다음, 폴더로 가서
exercise_data\forestry\digitizing폴더를 생성하고 파일 이름을rautjarvi_georef.tif라고 입력하십시오. Load in QGIS when done 을 체크하십시오.
나머지 파라미터들은 기본값으로 두십시오.
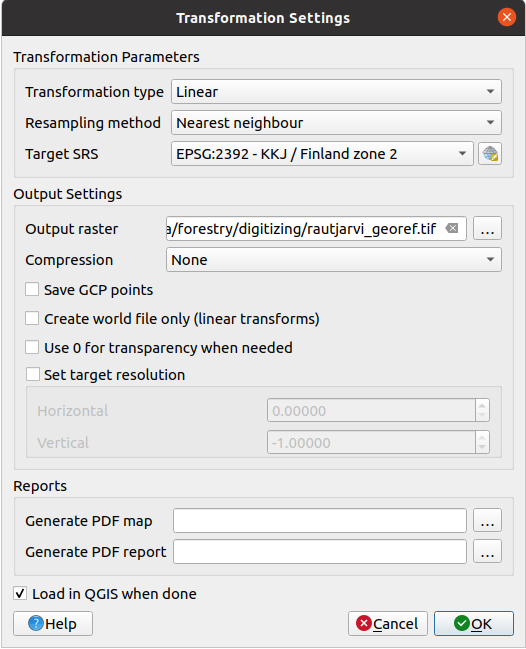
:guilabel:`OK`를 클릭하십시오.
이 맵은 좌표를 표시한 조준선(cross-hair)을 몇 개 담고 있습니다. 이 조준선들을 사용해서 이 이미지를 지리참조시킬 것입니다. 지리참조자 창에서 이미지를 검사하려면 평소대로 QGIS의 확대/축소 및 이동 도구를 사용하면 됩니다.
맵의 좌하단으로 확대해보십시오. X 및 Y 좌표쌍을 가진 조준선이 있을 겁니다. 이 좌표는 앞에서 말한 것처럼
KKJ / Finland zone 2좌표계의 좌표입니다. 여러분의 맵을 지리참조시키기 위해 이 포인트를 첫 번째 지상 기준점(Ground Control Point; GCP)으로 사용할 것입니다.Add point 도구를 사용해서 조준선의 교차점을 클릭하십시오. (필요하다면 확대/축소 및 이동 도구를 사용하십시오.)
Enter map coordinates 대화창에서 맵에 나타난 좌표와 (X는 2557000 그리고 Y는 6786000) 좌표계를 (
EPSG:2392 - KKJ / Finland zone 2) 입력하십시오.
:guilabel:`OK`를 클릭하십시오.
지리참조 작업을 위한 첫 번째 좌표가 준비됐습니다.
이미지에서 다른 검은색 조준선을 찾으십시오. 북쪽과 동쪽 방향으로 서로 1,000미터 떨어져 있습니다. 첫 번째 조준선을 기준으로 삼아 이 포인트들의 좌표를 계산할 수 있을 것입니다.
이미지를 축소한 다음 다른 조준선을 찾을 때까지 오른쪽 또는 위쪽으로 이동하십시오. 그리고 몇 킬로미터나 이동했는지 측정해보십시오. 가능한 한 서로 멀리 떨어져 있는 GCP를 찾아보도록 하십시오.
첫 번째 GCP와 동일한 방법으로 GCP를 최소한 3개 더 디지타이즈하십시오. 다음과 비슷한 결과물이 나와야 합니다:
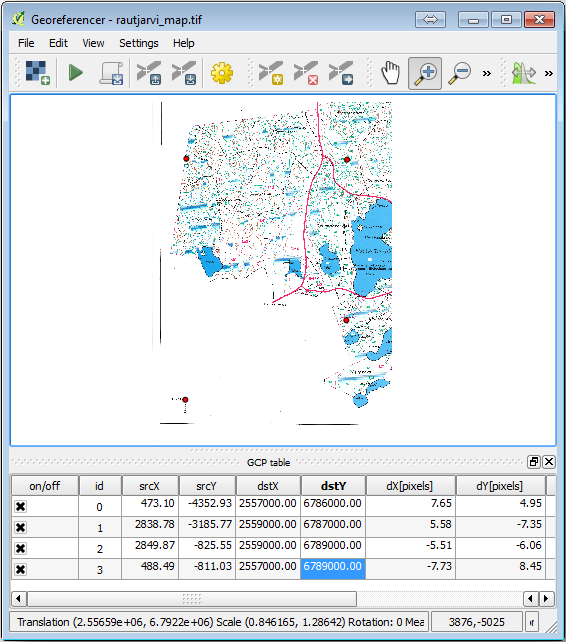
이미 디지타이즈한 GCP 3개를 살펴보면, 지리참조 오류가 포인트들에서 나온 빨간색 선으로 표시된 것을 볼 수 있을 겁니다. GCP table 에 있는 dX[pixels] 와 dY[pixels] 열에서도 오류를 픽셀 단위로 볼 수 있습니다. 이 픽셀 단위 오류가 10픽셀을 초과해서는 안 됩니다. 초과하는 경우, 여러분이 디지타이즈한 포인트들과 여러분이 입력한 좌표들을 검토해서 무엇이 문제인지 알아내야 합니다. 앞의 이미지를 참고할 수 있습니다.
여러분의 GCP에 만족한다면, 나중에 사용할 수 있도록 저장할 수 있습니다:
메뉴를 클릭하십시오.
exercise_data\forestry\digitizing폴더에rautjarvi_map.tif.points라는 파일로 저장하십시오.
마지막으로 여러분의 맵을 지리참조시키십시오:
메뉴를 클릭하십시오.
여러분이 지리참조자 설정을 편집했을 때 파일 이름을 이미
rautjarvi_georef.tif라고 지정했다는 사실을 기억하세요.이제 QGIS 프로젝트에서 맵을 지리참조된 래스터로 볼 수 있습니다. 이 래스터는 살짝 기울어져 보이는데, 왜냐하면 데이터 좌표계는
KKJ / Finland zone 2인데 프로젝트 좌표계는ETRS89 / TM35FIN(E,N)이기 때문입니다.여러분의 데이터가 제대로 지리참조되었는지 확인하려면
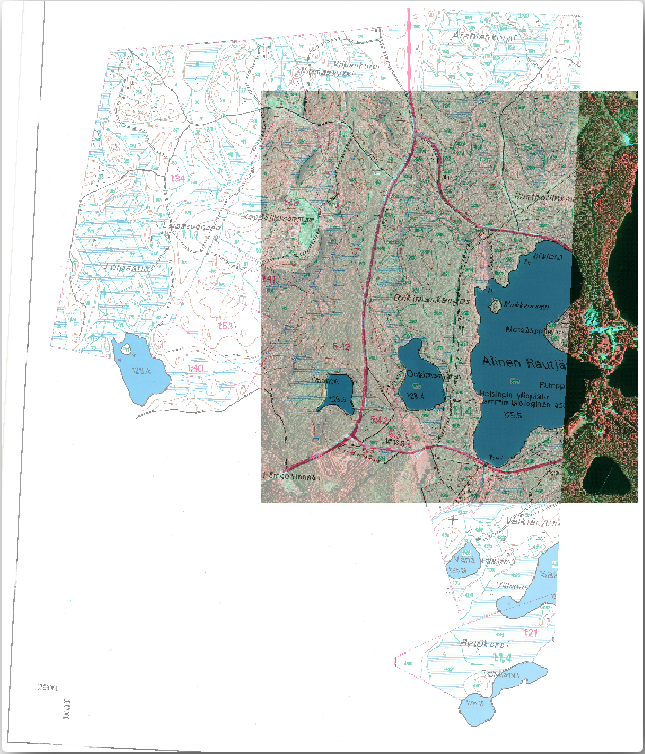
exercise_data\forestry폴더에 있는rautjarvi_aerial.tif라는 항공사진 파일을 여십시오.여러분의 맵과 이 항공사진이 잘 일치해야 합니다. 맵의 투명도를 50%로 설정해서 항공사진과 비교해보십시오.
QGIS 프로젝트에 변경 사항을 저장하십시오. 다음 수업에서도 이 프로젝트를 사용할 것입니다.
14.2.3. 결론
이제 종이 지도를 지리참조시켜서 QGIS에서 맵 레이어로 사용할 수 있습니다.
14.2.4. 다음은 무엇을 배우게 될까요?
다음 수업에서는 맵에 있는 수종 경계를 폴리곤으로 디지타이즈한 다음 현황 데이터(inventory data)를 추가할 것입니다.