Live GPS tracking
To activate live GPS tracking in QGIS, you need to select  GPS Information Panel or press Ctrl+0.
You will get a new docked window on the left side of the canvas.
GPS Information Panel or press Ctrl+0.
You will get a new docked window on the left side of the canvas.
There are four possible screens in this GPS tracking window:
 GPS position coordinates and an interface for manually entering
vertices and features
GPS position coordinates and an interface for manually entering
vertices and features GPS signal strength of satellite connections
 GPS options screen (see figure_gps_options)
With a plugged-in GPS receiver (has to be supported by your operating system), a simple click on Connect connects the GPS to QGIS. A second click (now on Disconnect) disconnects the GPS receiver from your computer. For GNU/Linux, gpsd support is integrated to support connection to most GPS receivers. Therefore, you first have to configure gpsd properly to connect QGIS to it.
Warning
If you want to record your position to the canvas, you have to create a new vector layer first and switch it to editable status to be able to record your track.
Position and additional attributes
If the GPS is receiving signals from satellites, you will
see your position in latitude, longitude and altitude together with additional
attributes.
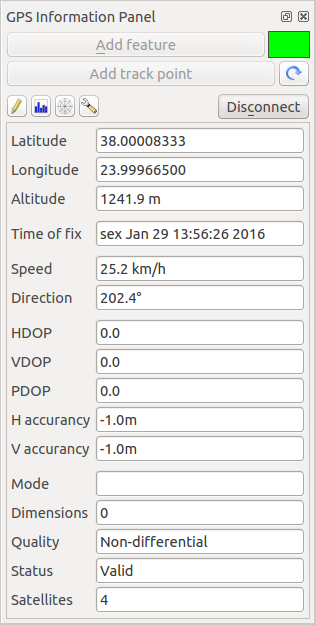
GPS tracking position and additional attributes
GPS signal strength
Here, you can see the signal strength of the satellites you
are receiving signals from.
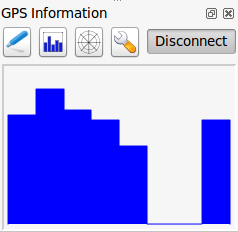
GPS tracking signal strength
GPS options
In case of connection problems, you can switch between:
 Autodetect
 Internal
- Serial device
- gpsd (selecting the Host, Port and Device your
GPS is connected to)
A click on Connect again initiates the connection to the GPS receiver.
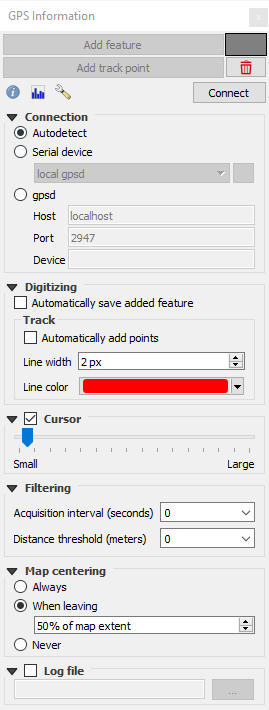
GPS tracking options window
You can activate
when you are in editing mode. Or you can activate
Automatically add points to the map canvas with a certain width
and color.
Activating Cursor, you can use a slider  to shrink
and grow the position cursor on the canvas.
to shrink
and grow the position cursor on the canvas.
You can also set an Acquisition interval (seconds) and a Distance threshold (meters) parameters to keep the cursor still active when the receiver is in static conditions.
Activating Map centering allows you to decide in which
way the canvas will be updated. This includes ‘always’, ‘when leaving’, if your
recorded coordinates start to move out of the canvas, or ‘never’, to keep map
extent.
Finally, you can activate Log file and define a path
and a file where log messages about the GPS tracking are logged.
If you want to set a feature manually, you have to go back to
Position and click on Add Point or Add Track Point.
Connect to a Bluetooth GPS for live tracking
With QGIS you can connect a Bluetooth GPS for field data collection. To perform this task you need a GPS Bluetooth device and a Bluetooth receiver on your computer.
At first you must let your GPS device be recognized and paired to the computer. Turn on the GPS, go to the Bluetooth icon on your notification area and search for a New Device.
On the right side of the Device selection mask make sure that all devices are selected so your GPS unit will probably appear among those available. In the next step a serial connection service should be available, select it and click on Configure button.
Remember the number of the COM port assigned to the GPS connection as resulting by the Bluetooth properties.
After the GPS has been recognized, make the pairing for the connection. Usually
the authorization code is 0000.
Now open GPS information panel and switch to GPS
options screen. Select the COM port assigned to the GPS connection and click
the Connect. After a while a cursor indicating your position should
appear.
If QGIS can’t receive GPS data, then you should restart your GPS device, wait 5-10 seconds then try to connect again. Usually this solution work. If you receive again a connection error make sure you don’t have another Bluetooth receiver near you, paired with the same GPS unit.
Using GPSMAP 60cs
MS Windows
Easiest way to make it work is to use a middleware (freeware, not open) called GPSGate.
Launch the program, make it scan for GPS devices (works for both USB and BT
ones) and then in QGIS just click Connect in the Live tracking panel
using the Autodetect mode.
Ubuntu/Mint GNU/Linux
As for Windows the easiest way is to use a server in the middle, in this case GPSD, so
sudo apt install gpsd
Then load the garmin_gps kernel module
sudo modprobe garmin_gps
And then connect the unit. Then check with dmesg the actual device being
used bu the unit, for example /dev/ttyUSB0. Now you can launch gpsd
gpsd /dev/ttyUSB0
And finally connect with the QGIS live tracking tool.
Using BTGP-38KM datalogger (only Bluetooth)
Using GPSD (under Linux) or GPSGate (under Windows) is effortless.
Using BlueMax GPS-4044 datalogger (both BT and USB)
MS Windows
The live tracking works for both USB and BT modes, by using GPSGate or even
without it, just use the Autodetect mode, or point
the tool the right port.
Ubuntu/Mint GNU/Linux
For USB
The live tracking works both with GPSD
gpsd /dev/ttyACM3
or without it, by connecting the QGIS live tracking tool directly to the
device (for example /dev/ttyACM3).
For Bluetooth
The live tracking works both with GPSD
gpsd /dev/rfcomm0
or without it, by connecting the QGIS live tracking tool directly to the device
(for example /dev/rfcomm0).