10.1. Lesson: WMS(Web Mapping Service)
WMS는 원격 서버에서 호스팅되는 서비스입니다. 웹사이트와 비슷하게, 서버에 연결되어 있는 한 WMS에 접근할 수 있습니다. QGIS를 사용하면 사용자의 기존 맵에 직접 WMS를 불러올 수 있습니다.
예를 들면, 플러그인에 대한 강의에서 구글에서 새 래스터 이미지를 불러올 수 있었다는 사실을 기억하실 겁니다. 하지만 그건 1회용 전송이었습니다. 한번 이미지를 다운로드하면, 바뀌지 않는다는 뜻이죠. WMS는 사용자가 맵을 이동하거나 확대/축소할 경우 자동적으로 그 뷰를 새로 고치는 라이브 서비스라는 점이 다릅니다.
이 강의의 목표: WMS를 사용하고 그 한계를 이해하기.
10.1.1.  Follow Along: WMS 레이어 불러오기
For this exercise, you can either use the basic map you made at the start of the course, or just start a new map and load some existing layers into it. For this example, we used a new map and loaded the original places, landuse and protected_areas layers and adjusted the symbology:

새 맵에 해당 레이어들을 불러오거나, 기본 맵에서 이 레이어들만 보이도록 설정하십시오.
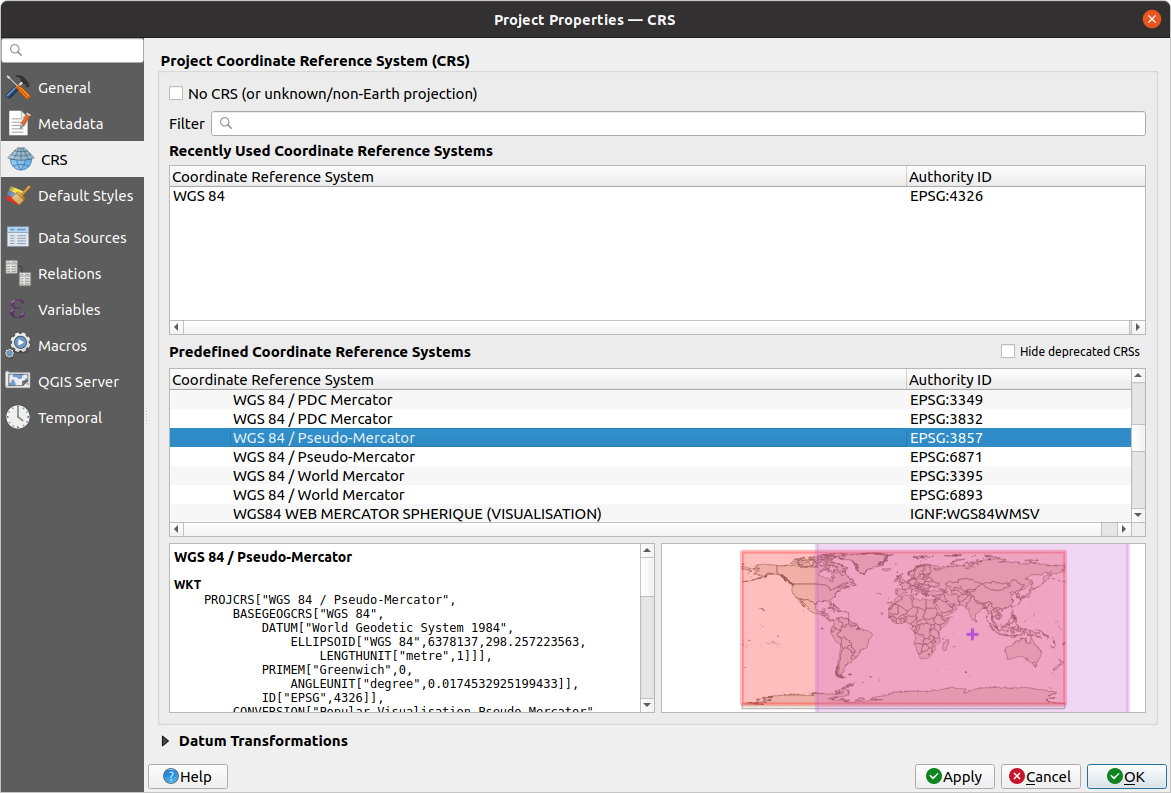
Before starting to add the WMS layer, deactivate “on the fly” projection ( tab, check No CRS (or unknown/non-Earth projection). This may cause the layers to no longer overlap properly, but don’t worry: we’ll fix that later.
To add WMS layers, click on the
 button to open the
Data Source Manager dialog and enable the
button to open the
Data Source Manager dialog and enable the  WMS/WMTS tab.
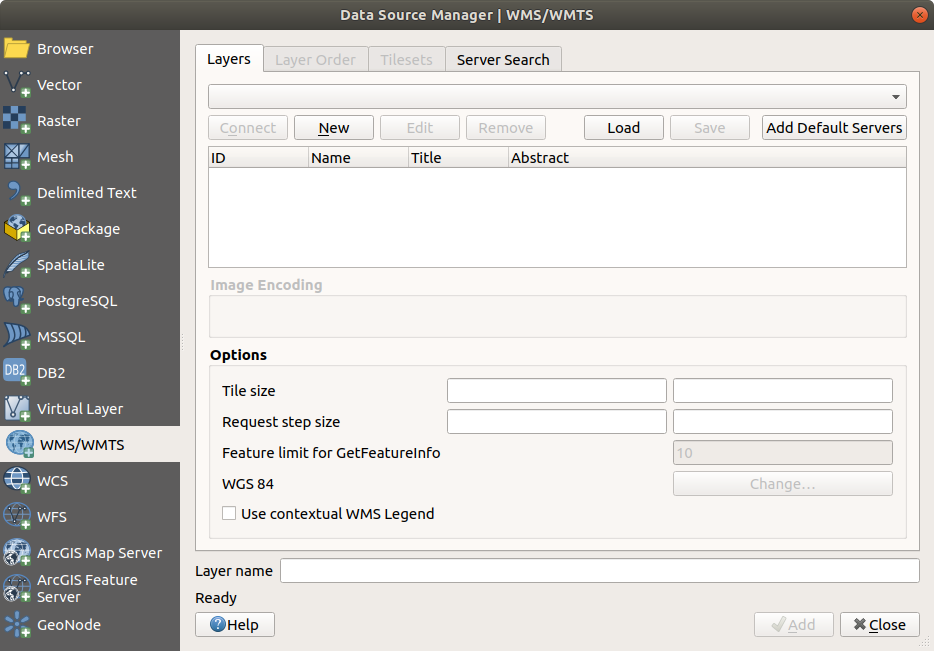
Remember how you connected to a SpatiaLite or GeoPackage database at the beginning of the course. The landuse, buildings, and roads layers are stored in a database. To use those layers, you first needed to connect to the database. Using a WMS is similar, with the exception that the layers are on a remote server.
WMS로의 새 연결을 생성하려면 New 버튼을 클릭하십시오.
You’ll need a WMS address to continue. There are several free WMS servers available on the Internet. One of these is terrestris, which makes use of the OpenStreetMap dataset.
이 WMS를 사용하려면, 현재 대화 창을 다음과 같이 설정하십시오.
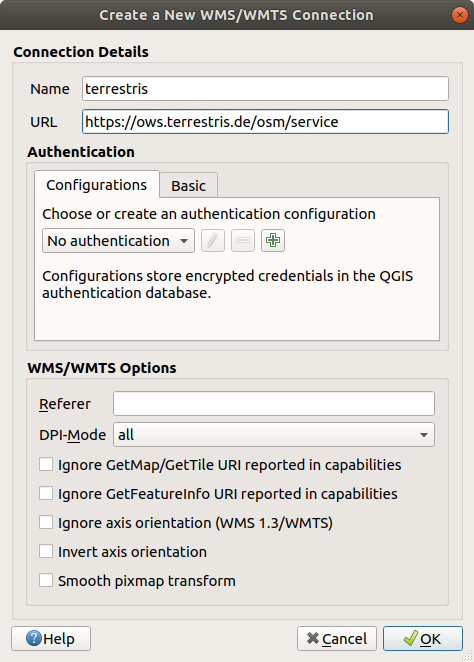
The value of the Name field should be
terrestris.The value of the URL field should be
https://ows.terrestris.de/osm/service.
OK 를 클릭하십시오. 새 WMS 서버가 목록에 나타날 것입니다.

Connect 를 클릭하십시오. 아래에 있는 목록에서 새 항목들을 볼 수 있을 것입니다.
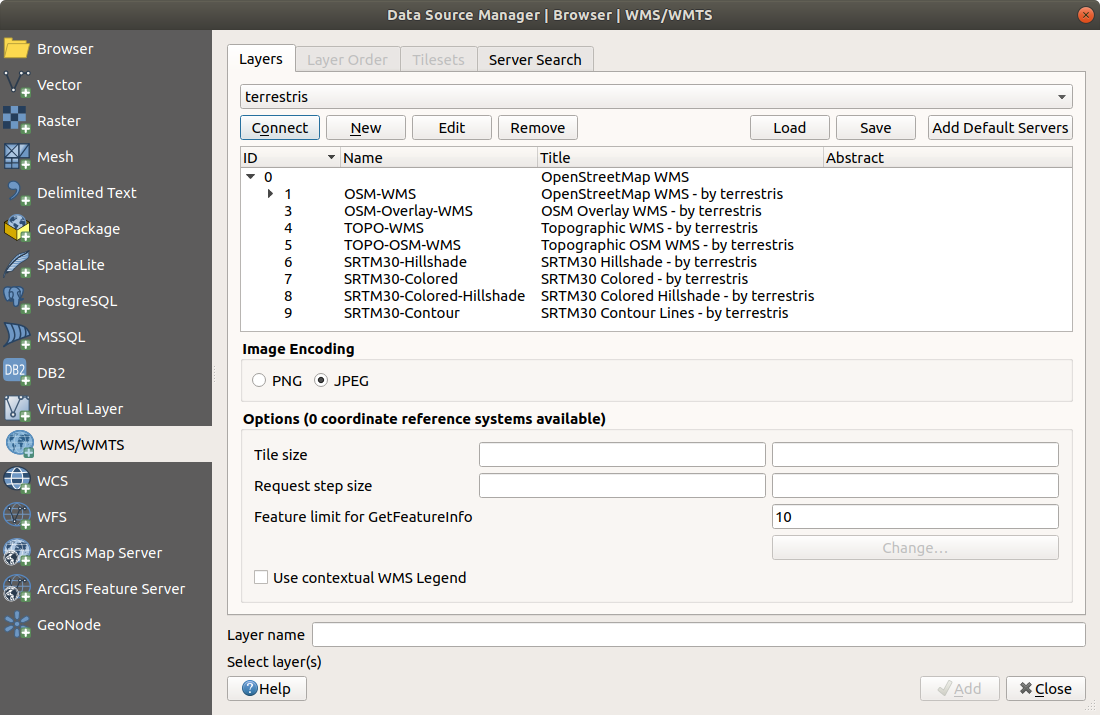
해당 WMS 서버가 호스팅하고 있는 레이어들입니다.
OSM-WMS 레이어를 한 번 클릭하십시오. 해당 레이어의 Coordinate Reference System 을 표출할 것입니다.

Since we’re not using
WGS 84for our map, let’s see all the CRSs we have to choose from.Click the Change… button. You will see a standard Coordinate Reference System Selector dialog.
투영된 CRS가 필요하므로, WGS 84 / Psuedo Mercator 를 선택합시다.
Enter the value
pseudoin the Filter field:Choose WGS 84 / Pseudo Mercator (with epsg:3857) from the list.

Click OK. The Coordinate Reference System associated with the entry has changed.
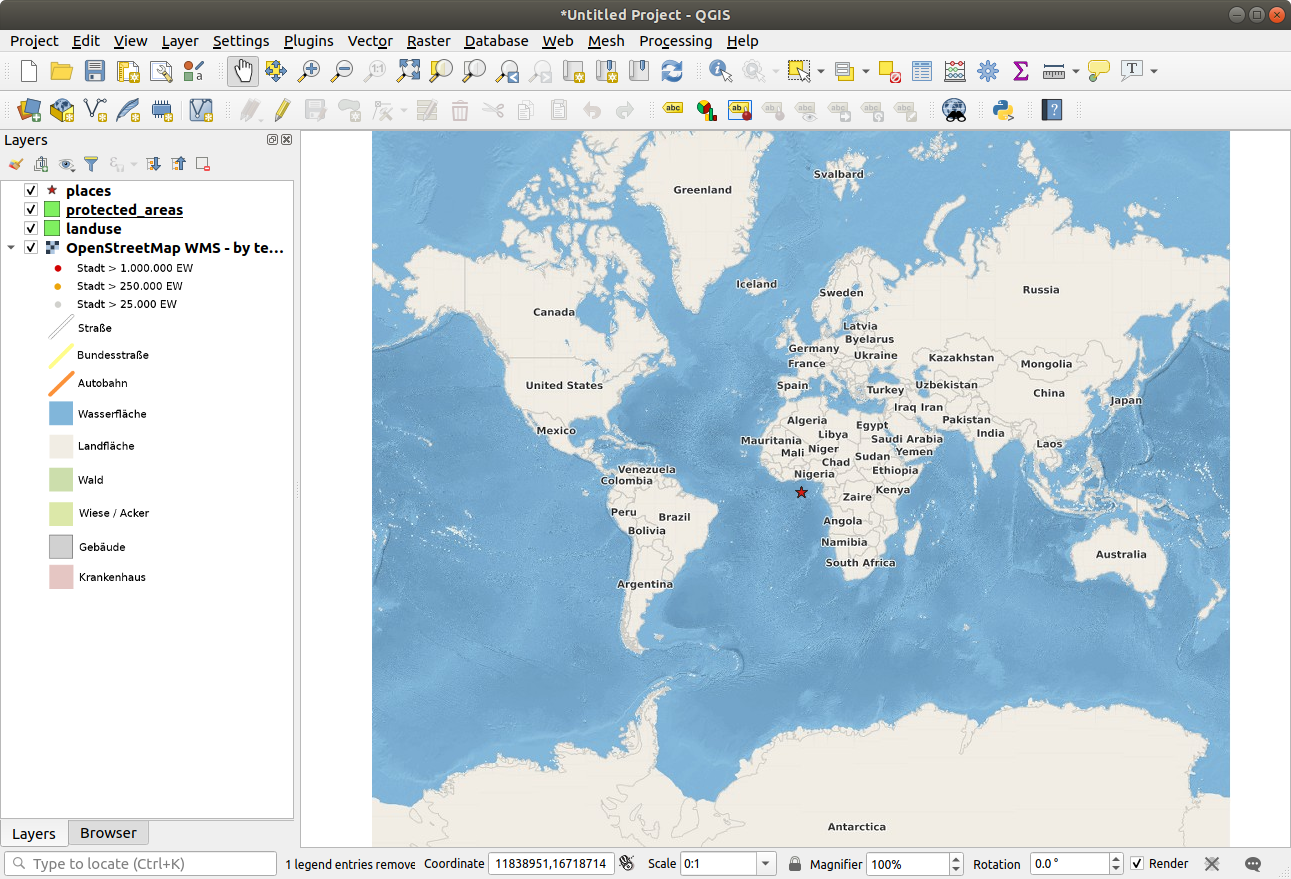
Click Add and the new layer will appear in your map as OpenStreetMap WMS - by terrestris.
Close the Data Source Manager dialog if not done automatically
In the Layers panel, click and drag it to the bottom of the list.
Zoom out in order to get a global view of the layers. You will notice that your layers aren’t located correctly (near west of Africa). This is because “on the fly” projection is disabled.
Let’s enable the reprojection again, but using the same projection as the OpenStreetMap WMS layer, which is WGS 84 / Pseudo Mercator.
Open the tab
Uncheck No CRS (or unknown/non-Earth projection)
목록에서 WGS 84 / Pseudo Mercator 를 선택합니다.
:guilabel:`OK`를 클릭하십시오.
Now right-click on one of your own layers in the Layers panel and click Zoom to layer extent. You should see the Swellendam area:

어떻게 WMS 레이어의 도로와 사용자의 도로가 겹쳐지는지 살펴보십시오. 좋은 징조군요!
WMS의 본질과 한계
지금쯤이면 이 WMS 레이어가 실제로 많은 피처들을 담고 있다는 사실을 알아차렸을 겁니다. 도로, 강, 자연 보호 구역 등을 담고 있습니다. 더우기, 벡터로 이루어져 있는 것으로 보이지만 사용자가 심볼을 변경할 수 없는 래스터 같기도 합니다. 어째서일까요?
이것이 WMS가 작동하는 방식이기 때문입니다. 마치 종이 지도처럼, 사용자는 이 맵을 이미지로 받게 됩니다. 보통은 QGIS가 맵으로 렌더링하는 벡터 레이어를 이용합니다. 그러나 WMS를 사용하면, 이 벡터 레이어들이 WMS 서버 상에 있기 때문에 레이어를 맵으로 렌더링해서 사용자에게 이미지 형식으로 맵을 전송합니다. QGIS는 이 이미지를 표출할 수 있지만 그 심볼을 변경할 수는 없습니다. 모든 작업이 서버에서 이루어지기 때문입니다.
사용자가 심볼에 대해 걱정할 필요가 없다는 점에서 몇몇 강점이 있습니다. 능숙하게 설계된 WMS라면 이미 모든 작업이 이루어져 보기 좋은 맵을 전송하기 때문입니다.
다른 한 편으로는 사용자 마음에 들지 않아도 심볼을 변경할 수 없으며, WMS 서버에서 무언가를 변경하면 사용자 맵에서도 동일하게 변경됩니다. 때때로 WMS 스타일의 맵의 일부로서가 아니라 사용자에게 벡터 레이어를 개별적으로 전송하는 WFS(Web Feature Service)를 이용하는 편이 나은 이유입니다.
하지만 WMS에 대해서는 다음 상의에서 배울 것입니다. 그 전에, terrestris WMS 서버에서 다른 WMS 레이어를 추가해봅시다.
10.1.2. Try Yourself
Hide the OSM-WSM layer in the Layers panel.
Add the “ZAF CGS 1M Bedrock Lithostratigraphy” WMS server at this URL:
http://196.33.85.22/cgi-bin/ZAF_CGS_Bedrock_Geology/wmsLoad the BEDROCKGEOLOGY layer into the map (you can also use the
button to open the Data Source Manager dialog).
Remember to check that it’s in the same
WGS 84 / World Mercator projection as the rest of your map!You might want to set its Encoding to JPEG and its Tile size option to
200by200, so that it loads faster: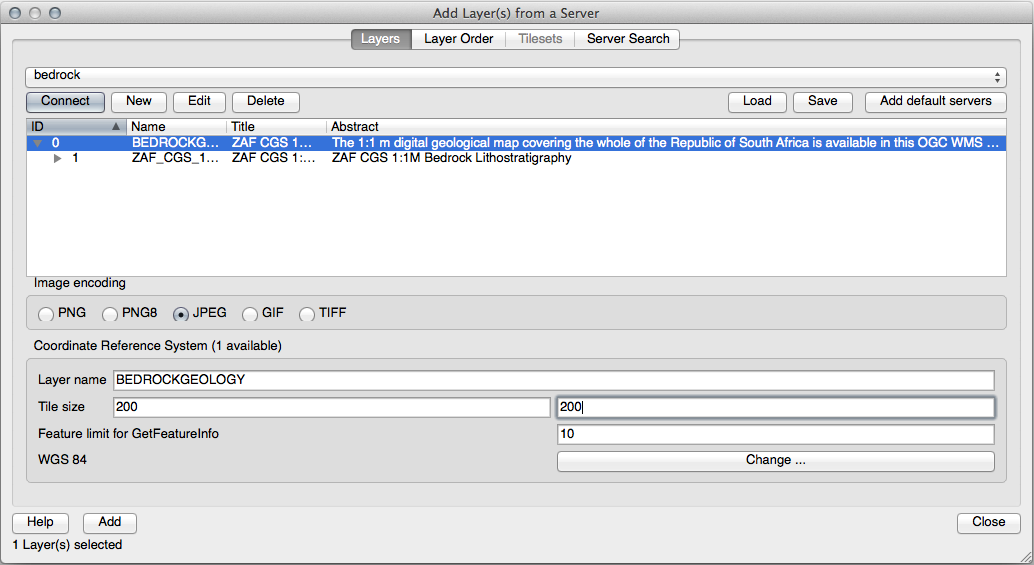
10.1.3.  Try Yourself
Hide all other WMS layers to prevent them from rendering unnecessarily in the background.
Add the “OGC” WMS server at this URL:
http://ogc.gbif.org:80/wmsbluemarble 레이어를 추가합니다.
10.1.4.  Try Yourself
WMS를 이용하는 데 어려운 점 가운데 하나는 좋은 (무료) 서버를 찾는 일입니다.
Find a new WMS at directory.spatineo.com (or elsewhere online). It must not have associated fees or restrictions, and must have coverage over the Swellendam study area.
WMS를 이용하는 데 필요한 것은 URL(그리고 어떤 형태의 설명이 있으면 좋습니다)뿐이라는 것을 기억하십시오.
10.1.5. In Conclusion
WMS를 사용하면, 고정된 맵을 사용자의 기존 맵 데이터의 배경으로 추가할 수 있습니다.
10.1.6. Further Reading
10.1.7. What’s Next?
이제 고정된 맵을 배경으로 추가해봤으니, (이전에 추가했던 다른 벡터 레이어 같은) 피처도 추가할 수 있다는 사실을 알면 기쁠 겁니다. WFS(Web Feature Service)를 이용하면 원격 서버에서 피처를 추가할 수 있습니다. 이것이 다음 강의의 주제입니다.