The code snippets on this page need the following imports if you’re outside the pyqgis console:
 1from qgis.core import (
 2    QgsMessageLog,
 3    QgsGeometry,
 4)
 5
 6from qgis.gui import (
 7    QgsMessageBar,
 8)
 9
10from qgis.PyQt.QtWidgets import (
11    QSizePolicy,
12    QPushButton,
13    QDialog,
14    QGridLayout,
15    QDialogButtonBox,
16)
13. Communicating with the user
This section shows some methods and elements that should be used to communicate with the user, in order to keep consistency in the User Interface.
13.1. Showing messages. The QgsMessageBar class
Using message boxes can be a bad idea from a user experience point of view. For showing a small info line or a warning/error messages, the QGIS message bar is usually a better option.
Using the reference to the QGIS interface object, you can show a message in the message bar with the following code
from qgis.core import Qgis
iface.messageBar().pushMessage("Error", "I'm sorry Dave, I'm afraid I can't do that", level=Qgis.Critical)
Messages(2): Error : I'm sorry Dave, I'm afraid I can't do that

Fig. 13.23 QGIS Message bar
You can set a duration to show it for a limited time
iface.messageBar().pushMessage("Ooops", "The plugin is not working as it should", level=Qgis.Critical, duration=3)
Messages(2): Ooops : The plugin is not working as it should

Fig. 13.24 QGIS Message bar with timer
The examples above show an error bar, but the level parameter can be used
to creating warning messages or info messages, using the
Qgis.MessageLevel enumeration. You can use up to 4 different levels:
Info
Warning
Critical
Success

Fig. 13.25 QGIS Message bar (info)
Widgets can be added to the message bar, like for instance a button to show more info
1def showError():
2    pass
3
4widget = iface.messageBar().createMessage("Missing Layers", "Show Me")
5button = QPushButton(widget)
6button.setText("Show Me")
7button.pressed.connect(showError)
8widget.layout().addWidget(button)
9iface.messageBar().pushWidget(widget, Qgis.Warning)
Messages(1): Missing Layers : Show Me

Fig. 13.26 QGIS Message bar with a button
You can even use a message bar in your own dialog so you don’t have to show a message box, or if it doesn’t make sense to show it in the main QGIS window
 1class MyDialog(QDialog):
 2    def __init__(self):
 3        QDialog.__init__(self)
 4        self.bar = QgsMessageBar()
 5        self.bar.setSizePolicy( QSizePolicy.Minimum, QSizePolicy.Fixed )
 6        self.setLayout(QGridLayout())
 7        self.layout().setContentsMargins(0, 0, 0, 0)
 8        self.buttonbox = QDialogButtonBox(QDialogButtonBox.Ok)
 9        self.buttonbox.accepted.connect(self.run)
10        self.layout().addWidget(self.buttonbox, 0, 0, 2, 1)
11        self.layout().addWidget(self.bar, 0, 0, 1, 1)
12    def run(self):
13        self.bar.pushMessage("Hello", "World", level=Qgis.Info)
14
15myDlg = MyDialog()
16myDlg.show()
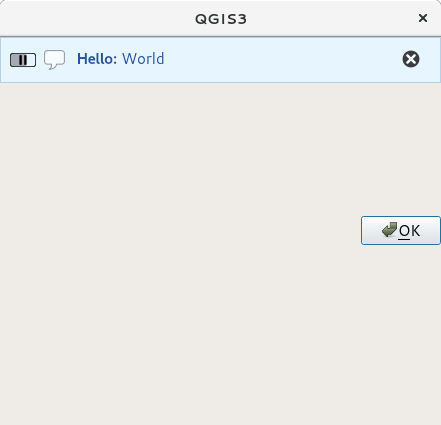
Fig. 13.27 QGIS Message bar in custom dialog
13.2. Showing progress
Progress bars can also be put in the QGIS message bar, since, as we have seen, it accepts widgets. Here is an example that you can try in the console.
 1import time
 2from qgis.PyQt.QtWidgets import QProgressBar
 3from qgis.PyQt.QtCore import *
 4progressMessageBar = iface.messageBar().createMessage("Doing something boring...")
 5progress = QProgressBar()
 6progress.setMaximum(10)
 7progress.setAlignment(Qt.AlignLeft|Qt.AlignVCenter)
 8progressMessageBar.layout().addWidget(progress)
 9iface.messageBar().pushWidget(progressMessageBar, Qgis.Info)
10
11for i in range(10):
12    time.sleep(1)
13    progress.setValue(i + 1)
14
15iface.messageBar().clearWidgets()
Messages(0): Doing something boring...
Also, you can use the built-in status bar to report progress, as in the next example:
 1vlayer = iface.activeLayer()
 2
 3count = vlayer.featureCount()
 4features = vlayer.getFeatures()
 5
 6for i, feature in enumerate(features):
 7    # do something time-consuming here
 8    print('.') # printing should give enough time to present the progress
 9
10    percent = i / float(count) * 100
11    # iface.mainWindow().statusBar().showMessage("Processed {} %".format(int(percent)))
12    iface.statusBarIface().showMessage("Processed {} %".format(int(percent)))
13
14iface.statusBarIface().clearMessage()
13.3. Logging
There are three different types of logging available in QGIS to log and save all the information about the execution of your code. Each has its specific output location. Please consider to use the correct way of logging for your purpose:
QgsMessageLogis for messages to communicate issues to the user. The output of the QgsMessageLog is shown in the Log Messages Panel.The python built in logging module is for debugging on the level of the QGIS Python API (PyQGIS). It is recommended for Python script developers that need to debug their python code, e.g. feature ids or geometries
QgsLoggeris for messages for QGIS internal debugging / developers (i.e. you suspect something is triggered by some broken code). Messages are only visible with developer versions of QGIS.
Examples for the different logging types are shown in the following sections below.
Warning
Use of the Python print statement is unsafe to do in any code which may be
multithreaded and extremely slows down the algorithm. This includes expression
functions, renderers,
symbol layers and Processing algorithms (amongst others). In these
cases you should always use the python logging module or thread safe classes
(QgsLogger
or QgsMessageLog) instead.
13.3.1. QgsMessageLog
# You can optionally pass a 'tag' and a 'level' parameters
QgsMessageLog.logMessage("Your plugin code has been executed correctly", 'MyPlugin', level=Qgis.Info)
QgsMessageLog.logMessage("Your plugin code might have some problems", level=Qgis.Warning)
QgsMessageLog.logMessage("Your plugin code has crashed!", level=Qgis.Critical)
MyPlugin(0): Your plugin code has been executed correctly
(1): Your plugin code might have some problems
(2): Your plugin code has crashed!
Note
You can see the output of the QgsMessageLog
in the Log Messages Panel
13.3.2. The python built in logging module
1import logging
2formatter = '%(asctime)s - %(name)s - %(levelname)s - %(message)s'
3logfilename=r'c:\temp\example.log'
4logging.basicConfig(filename=logfilename, level=logging.DEBUG, format=formatter)
5logging.info("This logging info text goes into the file")
6logging.debug("This logging debug text goes into the file as well")
The basicConfig method configures the basic setup of the logging. In the above code the filename, logging level and the format are defined. The filename refers to where to write the logfile to, the logging level defines what levels to output and the format defines the format in which each message is output.
2020-10-08 13:14:42,998 - root - INFO - This logging text goes into the file
2020-10-08 13:14:42,998 - root - DEBUG - This logging debug text goes into the file as well
If you want to erase the log file every time you execute your script you can do something like:
if os.path.isfile(logfilename):
    with open(logfilename, 'w') as file:
        pass
Further resources on how to use the python logging facility are available at:
Warning
Please note that without logging to a file by setting a filename the logging may be multithreaded which heavily slows down the output.