Importante
A tradução é um esforço comunitário você pode contribuir. Esta página está atualmente traduzida em 34.09%.
25.2.1. Plugin do gerenciador de banco de dados
The DB Manager Plugin is intended to be the main tool to integrate and
manage spatial database formats supported by QGIS (PostgreSQL, SpatiaLite,
GeoPackage, Oracle Spatial, Virtual layers) in one user interface.
The  DB Manager Plugin provides several features.
You can drag layers from the QGIS Browser into the DB Manager, and it
will import your layer into your spatial database.
You can drag and drop tables between spatial databases and they will
get imported.
DB Manager Plugin provides several features.
You can drag layers from the QGIS Browser into the DB Manager, and it
will import your layer into your spatial database.
You can drag and drop tables between spatial databases and they will
get imported.
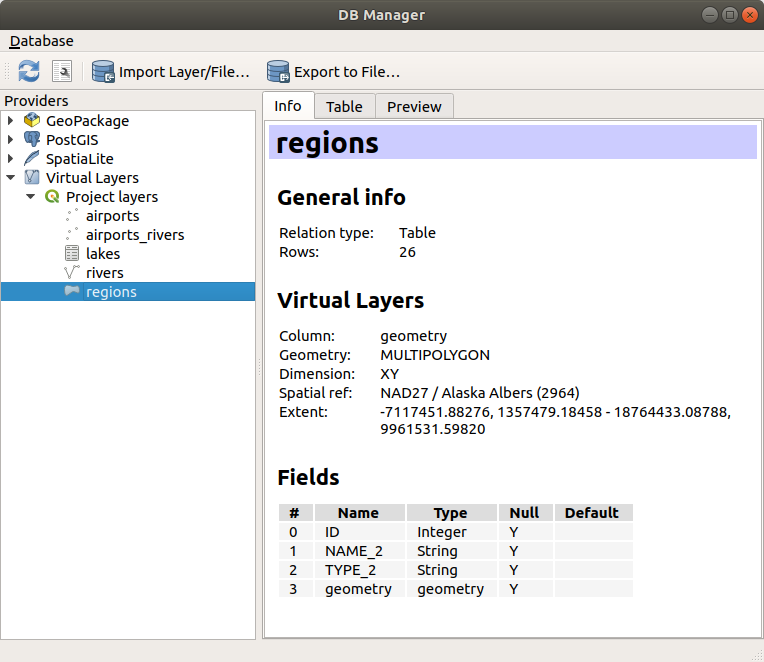
Fig. 25.4 Caixa de diálogo Gerenciador DB
The menu allows you to connect to an existing database, to start the SQL window and to exit the DB Manager Plugin. Once you are connected to an existing database, the menus (relevant for DBMSs, such as PostgreSQL) and will appear.
O menu :Seleção de menu:Esquema inclui ferramentas para criar e excluir (somente se vazios) esquemas e, se a topologia estiver disponível (por exemplo, com topologia PostGIS), para iniciar um Visualizador de Topo.
O menu : seleção de menu:Tabela permite que você crie e edite tabelas e exclua tabelas e visualizações. Também é possível esvaziar tabelas e mover tabelas entre esquemas. Você pode Executar análise de vácuo para a tabela selecionada. Vácuo recupera espaço e o disponibiliza para reutilização, e analisa atualiza estatísticas que são usadas para determinar a maneira mais eficiente de executar uma consulta. Alterar registro… permite que você adicione suporte ao alterar registro a uma tabela. Finalmente, você pode importar camada/arquivo… e Exportar para arquivo….
Nota
Usando o Gerenciador de banco de dados é possível adicionar comentários para tabelas e colunas de um Banco de Dados PostgreSQL.
A janela Provedores lista todos os bancos de dados existentes suportados pelo QGIS. Com um clique duplo, você pode se conectar ao banco de dados. Com o botão direito do mouse, você pode renomear e excluir esquemas e tabelas existentes. As tabelas também podem ser adicionadas à tela do QGIS com o menu de contexto.
Se conectado a um banco de dados, a janela principal do Gerenciador de banco de dados oferece quatro guias. A aba Info fornece informações sobre a tabela e sua geometria, bem como sobre campos, restrições e índices existentes. Ele permite que você crie um índice espacial em uma tabela selecionada. A aba Tabela mostra a tabela, e a aba Visualizar renderiza as geometrias como visualizadas. Quando você abre uma Janela SQL, ela será colocada em uma nova aba.
25.2.1.1. Trabalhando com a janela SQL
Você pode usar o Gerenciador de banco de dados para executar consultas SQL em seu banco de dados espacial. As consultas podem ser salvas e carregadas, e lá o Construtor de consultas SQL o ajudará a formular suas consultas. Você pode até mesmo visualizar a saída espacial marcando Carregar como nova camada e especificando Coluna(s) com valores exclusivos (IDs), Coluna de geometria e Nome da camada ( prefixo)». É possível destacar uma parte do SQL para executar apenas essa parte pressionando :kbd:`Ctrl+R ou clicando no botão Executar.
QGIS also adds support for the REGEXP function in some providers.
This allows users to use regular expressions in SQL filters or expressions, for example:
SELECT * FROM places WHERE name REGEXP '^A';
This returns all features where the name field starts with the letter A.
After executing your query, you can select specific cells in the result set. Use the Ctrl+C shortcut to copy the selected cells to the clipboard. The copied data is available as a formatted table. This allows you to paste the data into other applications, such as spreadsheet where it will show up as a table.
O botão Histórico de consultas armazena as últimas 20 consultas de cada banco de dados e provedor.
Clicar duas vezes em uma entrada adicionará o fragmento à janela SQL.
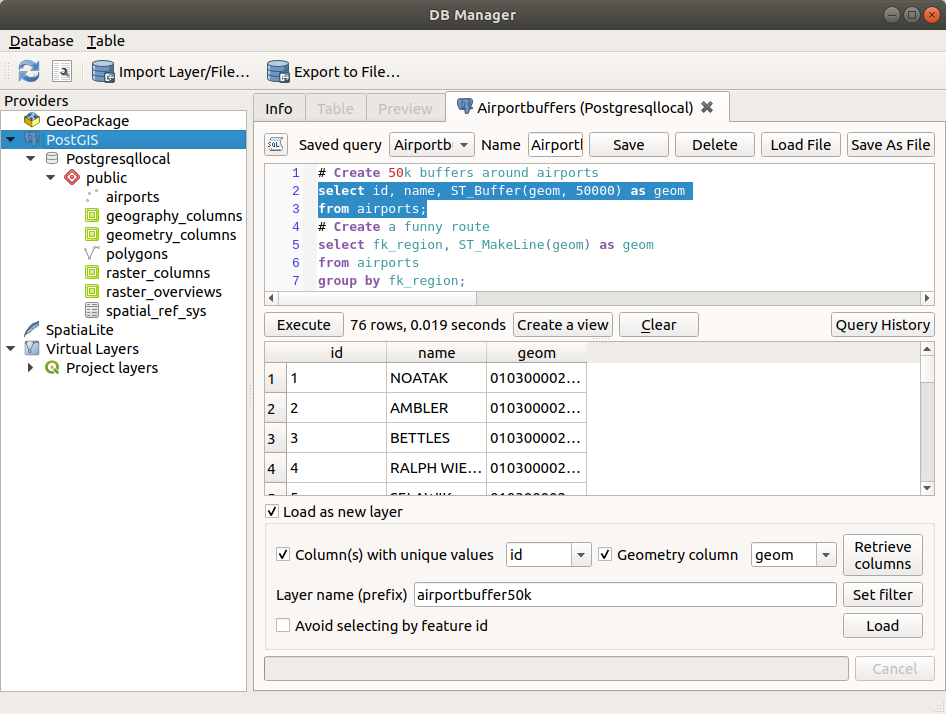
Fig. 25.5 Executando consultas SQL na janela SQL do Gerenciador de banco de dados
Nota
A Janela SQL também pode ser usada para criar Camadas Virtuais. Nesse caso, em vez de selecionar um banco de dados, selecione Camadas QGIS em Camadas Virtuais antes de abrir a janela SQL. Veja vetor_camadas_virtuais para instruções sobre a sintaxe SQL a ser usada.
25.2.1.2. Import Vector Layer
You can import layer or file into your database. Here are the parameters you can set for the import process:
Input: Select the layer or file to import. Using the dropdown menu, select from the list of loaded layers in QGIS or click on the … button to select a file from disk. Check the
 Import only selected features to import only the selected
features of the layer.
Import only selected features to import only the selected
features of the layer.Output table: Choose the Schema and provide a name for the new table.
Options: Here are some options for the import process:
- Primary key: Provide naming for the primary key field.
By default, it is named
id. - Geometry column: Provide naming for the geometry column.
By default, it is named
geom. - Source SRID: Define the SRID for the geometry column.
By default, it uses the layer’s CRS.
- Target SRID: Define the target SRID to reproject the geometries
during the import process. By default, it uses the layer’s CRS.
- Encoding: Define the encoding of the source data. By default, it uses
Automatic. It is QGIS’s automatic detection mode that attempts to guess the file’s character encoding based on available metadata or system locale. - Replace destination table (if exists): If a table with the same name already exists in the selected schema,
it will be replaced.
- Do not promote to multi-part: Geometries will be imported as single-part geometries.
- Convert field names to lower case: All field names will be converted to lower case.
- Create spatial index: A spatial index will be created on the geometry column after import.
- Comment: Add comments to table. Only available for PostgreSQL databases.

Fig. 25.6 Importing a vector layer into a spatial database using DB Manager
25.2.1.3. Export to Vector File
To export a table from your database to a vector file, select the desired Format and Save as location. Under Options, you can set the following parameters:
- Source SRID: Define the source SRID of the geometry column.
By default, it uses the layer’s CRS.
- Target SRID: Define the target SRID to reproject the geometries
during the export process. By default, it uses the layer’s CRS.
- Encoding: Define the encoding of the output data.
- Replace destination table (if exists): If a table with the same name already exists at the selected location,
it will be replaced.

Fig. 25.7 Exporting a table to a vector file using DB Manager