重要
翻訳は あなたが参加できる コミュニティの取り組みです。このページは現在 100.00% 翻訳されています。
13. ユーザーとコミュニケーションする
ヒント
pyqgisコンソールを使わない場合、このページにあるコードスニペットは次のインポートが必要です:
 1from qgis.core import (
 2    QgsMessageLog,
 3    QgsGeometry,
 4)
 5
 6from qgis.gui import (
 7    QgsMessageBar,
 8)
 9
10from qgis.PyQt.QtWidgets import (
11    QSizePolicy,
12    QPushButton,
13    QDialog,
14    QGridLayout,
15    QDialogButtonBox,
16)
このセクションでは、ユーザーインターフェイスにおいて一貫性を維持するためにユーザーとのコミュニケーション時に使うべき方法と要素をいくつか示します。
13.1. メッセージを表示する。QgsMessageBarクラス
メッセージボックスを使用するのはユーザー体験の見地からは良いアイデアではありません。警告/エラー用に小さな情報行を表示するには、たいていQGIS メッセージバーが良い選択肢です。
QGIS インターフェイスオブジェクトへの参照を利用すると、次のようなコードでメッセージバー内にメッセージを表示できます。
from qgis.core import Qgis
iface.messageBar().pushMessage("Error", "I'm sorry Dave, I'm afraid I can't do that", level=Qgis.Critical)
Messages(2): Error : I'm sorry Dave, I'm afraid I can't do that

図 13.28 QGIS メッセージバー
表示期間を設定して時間を限定することができます。
iface.messageBar().pushMessage("Ooops", "The plugin is not working as it should", level=Qgis.Critical, duration=3)
Messages(2): Ooops : The plugin is not working as it should

図 13.29 タイマー付きQGIS メッセージバー
上の例ではエラーバーを表示していますが、level パラメータは Qgis.MessageLevel 列挙型を使って警告メッセージや情報メッセージを作成することができます。最大4つのレベルを使用することができます:
Info
Warning
Critical
Success

図 13.30 QGIS メッセージバー (お知らせ)
ウィジェットは、例えば詳細情報の表示用ボタンのように、メッセージバーに追加することができます
1def showError():
2    pass
3
4widget = iface.messageBar().createMessage("Missing Layers", "Show Me")
5button = QPushButton(widget)
6button.setText("Show Me")
7button.pressed.connect(showError)
8widget.layout().addWidget(button)
9iface.messageBar().pushWidget(widget, Qgis.Warning)
Messages(1): Missing Layers : Show Me

図 13.31 ボタン付きのQGIS メッセージバー
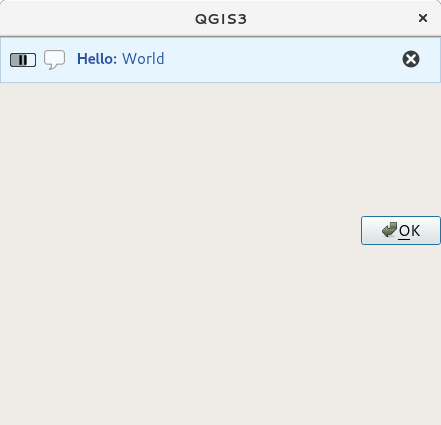
メッセージバーは自分のダイアログの中でも使えるため、メッセージボックスを表示する必要はありませんし、メインのQGISウィンドウ内に表示する意味がない時にも使えます。
 1class MyDialog(QDialog):
 2    def __init__(self):
 3        QDialog.__init__(self)
 4        self.bar = QgsMessageBar()
 5        self.bar.setSizePolicy( QSizePolicy.Minimum, QSizePolicy.Fixed )
 6        self.setLayout(QGridLayout())
 7        self.layout().setContentsMargins(0, 0, 0, 0)
 8        self.buttonbox = QDialogButtonBox(QDialogButtonBox.Ok)
 9        self.buttonbox.accepted.connect(self.run)
10        self.layout().addWidget(self.buttonbox, 0, 0, 2, 1)
11        self.layout().addWidget(self.bar, 0, 0, 1, 1)
12    def run(self):
13        self.bar.pushMessage("Hello", "World", level=Qgis.Info)
14
15myDlg = MyDialog()
16myDlg.show()

図 13.32 カスタムダイアログ内のQGIS メッセージバー
13.2. プロセスを表示する
プログレスバーはご覧のとおりウィジェットを受け入れるので、QGISメッセージバーに置くこともできます。コンソール内で試すことができる例はこちらです。
 1import time
 2from qgis.PyQt.QtWidgets import QProgressBar
 3from qgis.PyQt.QtCore import *
 4progressMessageBar = iface.messageBar().createMessage("Doing something boring...")
 5progress = QProgressBar()
 6progress.setMaximum(10)
 7progress.setAlignment(Qt.AlignLeft|Qt.AlignVCenter)
 8progressMessageBar.layout().addWidget(progress)
 9iface.messageBar().pushWidget(progressMessageBar, Qgis.Info)
10
11for i in range(10):
12    time.sleep(1)
13    progress.setValue(i + 1)
14
15iface.messageBar().clearWidgets()
Messages(0): Doing something boring...
また、次の例のように、内蔵のステータスバーを使って進捗状況を報告することもできます:
 1vlayer = iface.activeLayer()
 2
 3count = vlayer.featureCount()
 4features = vlayer.getFeatures()
 5
 6for i, feature in enumerate(features):
 7    # do something time-consuming here
 8    print('.') # printing should give enough time to present the progress
 9
10    percent = i / float(count) * 100
11    # iface.mainWindow().statusBar().showMessage("Processed {} %".format(int(percent)))
12    iface.statusBarIface().showMessage("Processed {} %".format(int(percent)))
13
14iface.statusBarIface().clearMessage()
13.3. ログ出力
QGISでは、コードの実行に関するすべての情報をログに記録して保存するために、3つの異なるタイプのロギングが利用できます。それぞれ特定の出力場所があります。あなたの目的に合ったロギングの方法を使用することを検討してください:
QgsMessageLogはユーザに問題を伝えるメッセージ向けです。QgsMessageLogの出力はログメッセージパネルに表示されます。pythonに組み込まれた logging モジュールは、QGIS Python API (PyQGIS)レベルでのデバッグ用です。Pythonスクリプト開発者が、地物IDやジオメトリなどのPythonコードをデバッグする必要がある場合にお勧めします。
QgsLoggerは、QGIS内部 のデバッグ/開発者向けのメッセージです(壊れたコードによって何かが引き起こされた疑いがある)。メッセージはQGISの開発者バージョンでのみ表示されます。
異なるロギングタイプの例を以下のセクションに示します。
警告
Python の print 文を使用することは、マルチスレッドされるコードでは安全ではなく、アルゴリズムが極端に遅くなります。これには、式関数、レンダラー、シンボルレイヤ*、プロセシングアルゴリズム (特にその他) が含まれます。このような場合、代わりにpythonの logging モジュールかスレッドセーフなクラス(QgsLogger または QgsMessageLog)を使うべきです。
13.3.1. QgsMessageLog
# You can optionally pass a 'tag' and a 'level' parameters
QgsMessageLog.logMessage("Your plugin code has been executed correctly", 'MyPlugin', level=Qgis.Info)
QgsMessageLog.logMessage("Your plugin code might have some problems", level=Qgis.Warning)
QgsMessageLog.logMessage("Your plugin code has crashed!", level=Qgis.Critical)
MyPlugin(0): Your plugin code has been executed correctly
(1): Your plugin code might have some problems
(2): Your plugin code has crashed!
注釈
QgsMessageLog の出力は、ログメッセージパネル で見ることができます
13.3.2. python内蔵のログモジュール
1import logging
2formatter = '%(asctime)s - %(name)s - %(levelname)s - %(message)s'
3logfilename=r'c:\temp\example.log'
4logging.basicConfig(filename=logfilename, level=logging.DEBUG, format=formatter)
5logging.info("This logging info text goes into the file")
6logging.debug("This logging debug text goes into the file as well")
basicConfigメソッドは、ロギングの基本的な設定を行います。上記のコードでは、ファイル名、ロギングレベル、フォーマットが定義されています。ファイル名はログファイルを書き込む場所を指し、ロギングレベルは出力するレベルを定義し、フォーマットは各メッセージが出力されるフォーマットを定義します。
2020-10-08 13:14:42,998 - root - INFO - This logging text goes into the file
2020-10-08 13:14:42,998 - root - DEBUG - This logging debug text goes into the file as well
スクリプトを実行する度にログファイルを消去したいときは次のようにします:
if os.path.isfile(logfilename):
    with open(logfilename, 'w') as file:
        pass
pythonのロギング機能の使い方に関する更なるリソースは、以下を参照してください:
警告
ファイル名を設定してファイルにロギングしないと、ロギングがマルチスレッドになり、出力が著しく遅くなる可能性があることに注意してください。