` `
좌표 캡처 플러그인
좌표 캡처 플러그인은 사용하기 쉬우며, 맵 캔버스 상의 좌표를 선택한 좌표계 2개로 표시할 수 있습니다.
좌표 캡처 플러그인
- Start QGIS, select
 Project Properties from the
Settings (KDE, Windows) or File (Gnome, macOS) menu
and click on the Projection tab. As an alternative, you can also
click on the
Project Properties from the
Settings (KDE, Windows) or File (Gnome, macOS) menu
and click on the Projection tab. As an alternative, you can also
click on the  CRS status icon in the lower
right-hand corner of the status bar.
CRS status icon in the lower
right-hand corner of the status bar.  Enable on the fly projection 체크박스를 체크한 다음 사용자가 원하는 투영좌표계를 선택하십시오. (투영 작업 도 참조하세요.)
- Activate the coordinate capture plugin in the Plugin Manager (see
플러그인 대화창) and ensure that the dialog is visible by going to
View ‣ Panels and ensuring that
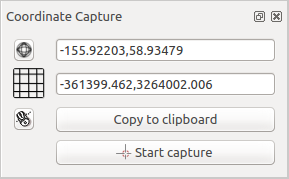
Coordinate Capture is enabled. The coordinate capture dialog
appears as shown in Figure figure_coordinate_capture. Alternatively,
you can also go to Vector ‣ Coordinate Capture and see
if Coordinate Capture is enabled.
 Click to the select the CRS to use for coordinate display 아이콘을 클릭한 다음 앞에서 선택했던 좌표계와는 다른 좌표계를 선택하십시오.
- To start capturing coordinates, click on [Start capture]. You can now click anywhere on the map canvas and the plugin will show the coordinates for both of your selected CRS.
마우스 좌표 추적 기능을 활성화하려면,
 mouse tracking 아이콘을 클릭하십시오.
선택한 좌표를 클립보드로 복사할 수도 있습니다.