GIS에서 래스터 데이터는 지표면 위 또는 아래에 있는 객체를 표현하는 개별 셀들의 매트릭스를 뜻합니다. 래스터 그리드의 각 셀은 모두 동일한 크기이며 대부분의 경우 직사각형입니다. (QGIS에서는 언제나 직사각형일 겁니다.) 전형적인 래스터 데이터는 항공사진 또는 위성 이미지와, 표고 매트릭스 같은 모델 데이터 등의 원격탐사 데이터를 포함합니다.
Unlike vector data, raster data typically do not have an associated database
record for each cell. They are geocoded by pixel resolution and the x/y
coordinate of a corner pixel of the raster layer. This allows QGIS to position
the data correctly in the map canvas.
QGIS는 GeoTIFF 같은 래스터 레이어 또는 적절한 월드 파일 내부에 있는 지리참조된 정보를 이용해서 데이터를 제대로 표시합니다.
Many of the features available in QGIS work the same, regardless the vector
data source. However, because of the differences in formats specifications
(ESRI shapefiles, MapInfo and MicroStation file formats, AutoCAD DXF, PostGIS,
SpatiaLite, DB2, Oracle Spatial and MSSQL Spatial databases, and many more),
QGIS may handle differently some of their properties.
This section describes how to work with these specificities.
주석
QGIS는 Z 그리고/또는 M 값을 보유한 [멀티]포인트, [멀티]라인, [멀티]폴리곤, CircularString, CompoundCurve, CurvePolygon, MultiCurve, MultiSurface 객체 유형을 지원합니다.
일부 드라이버가 CircularString, CompoundCurve, CurvePolygon, MultiCurve, MultiSurface 같은 일부 객체 유형을 지원하지 않는다는 사실도 알아두어야 합니다. 이 경우 QGIS가 이 유형들을 [멀티]폴리곤 객체로 변환할 것입니다.
The ESRI shapefile is still one of the most used vector file format in QGIS.
However, this file format has some limitation that some other file format have
not (like Geopackage, spatialite). Support is provided by the
OGR Simple Feature Library.
A shapefile actually consists of several files. The following three are
required:
.shp: 피처 도형을 담고 있는 파일
.dbf: dBase 서식으로 속성을 담고 있는 파일
.shx: 인덱스 파일
Shapefiles also can include a file with a .prj suffix, which contains
the projection information. While it is very useful to have a projection file,
it is not mandatory. A shapefile dataset can contain additional files. For
further details, see the ESRI technical specification at
http://www.esri.com/library/whitepapers/pdfs/shapefile.pdf.
Improving Performance for Shapefiles
To improve the performance of drawing a shapefile, you can create a spatial
index. A spatial index will improve the speed of both zooming and panning.
Spatial indexes used by QGIS have a .qix extension.
다음 단계를 통해 인덱스를 생성하십시오:
- Load a shapefile (see 탐색기 패널);
- Open the Layer Properties dialog by double-clicking on the
shapefile name in the legend or by right-clicking and choosing
from the context menu.
- In the General tab, click the [Create Spatial Index] button.
Problem loading a shape .prj file
If you load a shapefile with a .prj file and QGIS is not able to read the
coordinate reference system from that file, you will need to define the proper
projection manually within the General tab of the
Layer Properties dialog of the layer by clicking the
[Specify...] button. This is due to the fact that .prj files
often do not provide the complete projection parameters as used in QGIS and
listed in the CRS dialog.
For the same reason, if you create a new shapefile with QGIS, two different
projection files are created: a .prj file with limited projection
parameters, compatible with ESRI software, and a .qpj file, providing
the complete parameters of the used CRS. Whenever QGIS finds a .qpj
file, it will be used instead of the .prj.
Tabular data is a very common and widely used format because of its simplicity
and readability – data can be viewed and edited even in a plain text editor.
A delimited text file is an attribute table with each column separated by a
defined character and each row separated by a line break. The first row usually
contains the column names. A common type of delimited text file is a CSV
(Comma Separated Values), with each column separated by a comma.
Such data files can also contain positional information in two main forms:
- As point coordinates in separate columns
- As well-known text (WKT) representation of geometry
QGIS allows you to load a delimited text file as a layer or ordinal table. But
first check that the file meets the following requirements:
- The file must have a delimited header row of field names. This must be the
first line in the text file.
- The header row must contain field(s) with geometry definition. These field(s)
can have any name.
- The X and Y coordinates (if geometry is defined by coordinates) must be
specified as numbers. The coordinate system is not important.
문자열(텍스트)이 아닌 데이터를 CSV 파일로 저장하려면, CSVT 파일을 이용해야만 합니다. (CSVT Files 을 참조하세요.)
유효한 텍스트 파일의 예로, QGIS 예시 데이터셋(Sample Data 참조)에 들어 있는 다음 elevp.csv 표고 포인트 데이터 파일을 불러들이겠습니다:
X;Y;ELEV
-300120;7689960;13
-654360;7562040;52
1640;7512840;3
[...]
이 텍스트 파일에 대해 알아두어야 할 점은 다음과 같습니다:
이 예시 텍스트 파일은 구분자로 ; (쌍반점)을 씁니다. 어떤 문자라도 필드를 구분하는 데 쓸 수 있습니다.
첫 줄이 헤더 행입니다. X, Y 및 ELEV 필드를 담고 있습니다.
텍스트 항목을 구분하는 데 큰따옴표(")를 쓰지 않습니다.
X 좌표는 X 항목에 담겨 있습니다.
Y 좌표는 Y 항목에 담겨 있습니다.
CSV 파일을 불러올 때, 달리 지정하지 않는 이상 OGR 드라이버는 모든 필드가 (텍스트 등의) 문자열이라고 가정합니다. OGR 드라이버에 (그리고 QGIS에) 서로 다른 열들이 어떤 데이터 유형인지 알려주는 다음 CSVT 파일을 생성할 수 있습니다:
유형
|
명칭
|
예시
|
|---|
범자연수(Whole number)
|
Integer |
4 |
십진수(Decimal number)
|
Real |
3.456 |
날짜
|
Date (YYYY-MM-DD) |
2016-07-28 |
시간
|
Time (HH:MM:SS+nn) |
18:33:12+00 |
날짜&시간
|
DateTime (YYYY-MM-DD HH:MM:SS+nn) |
2016-07-28 18:33:12+00 |
CSVT 파일은 데이터 유형을 따옴표로 표현하고 쉼표 등으로 구분하는, 다음과 같은 한 줄 짜리 평문 텍스트 파일입니다:
"Integer","Real","String"
각 열의 길이(width)와 정밀도도 다음과 같이 설정할 수 있습니다:
"Integer(6)","Real(5.5)","String(22)"
이 파일은 .csv 파일과 동일한 폴더에 저장됩니다. 파일명은 CSV 파일과 동일해야 하지만, 확장자는 .csvt 를 씁니다.
You can find more information at GDAL CSV Driver.
PostGIS 레이어는 PostgreSQL 데이터베이스에 저장돼 있습니다. PostGIS의 장점은 PostGIS가 제공하는 공간 인덱스, 필터링 및 쿼리 작업 능력입니다. PostGIS를 이용하면, 선택 및 식별 같은 벡터 기능들을 QGIS에서 OGR 레이어로 작업하는 것보다 더 정확하게 작업할 수 있습니다.
참고
PostGIS 레이어
일반적으로, geometry_columns 테이블의 항목이 PostGIS 레이어를 정의합니다. QGIS는 geometry_columns 테이블에 항목이 없는 레이어를 불러올 수 있습니다. 테이블과 뷰 둘 다 말입니다. 공간 뷰를 정의하면 사용자 데이터를 가시화하는 강력한 수단을 쓸 수 있습니다. 뷰 생성에 대한 정보는 PostgreSQL 사용자 설명서를 참조하십시오.
QGIS가 PostgreSQL 레이어에 접근하는 몇몇 방법에 대해 자세히 설명하겠습니다. 대부분의 경우 QGIS는 불러올 수 있는 데이터베이스 테이블 목록을 제공할 것이며, 사용자의 요청에 따라 테이블을 불러올 것입니다. 하지만 QGIS로 PostgreSQL 테이블을 불러오는 데 문제가 있을 경우, 다음 내용을 통해 QGIS 메시지를 이해하고 PostgreSQL 테이블 또는 뷰 정의를 변경하면 QGIS가 테이블 또는 뷰를 불러올 수 있을 것입니다.
QGIS가 PostgreSQL 레이어를 불러오려면, 레이어에 유일(unique) 키로 이용할 수 있는 열이 있어야 합니다. 테이블의 경우, 일반적으로 테이블에 기본 키(primary key) 또는 유일 제약조건 열이 있어야 한다는 뜻입니다. QGIS에서 이 열은 int4(4바이트 정수) 유형이어야 합니다. CTID 열을 기본 키로 대신 쓸 수도 있습니다. 테이블에 이런 항목들이 없는 경우, OID 열을 대신 사용할 것입니다. 열을 인덱스 작업하면 성능이 향상됩니다. (PostgreSQL은 기본 키를 자동적으로 인덱스 작업한다는 사실을 기억하십시오.)
QGIS의  Select at id 체크박스는 기본적으로 활성화돼 있습니다. 이 옵션을 활성화하면 속성 없이도 ID를 얻는데, 대부분의 경우 훨씬 빠릅니다.
PostgreSQL 레이어가 뷰인 경우, 요구 사항은 동일하지만, 뷰가 언제나 기본 키 또는 유일 제약조건 열을 보유하고 있는 것은 아닙니다. QGIS에 뷰를 불러오려면 먼저 대화창에서 기본 키 항목을 (정수 유형으로) 정의해야 합니다. 뷰에 적당한 열이 없는 경우, QGIS는 레이어를 불러오지 못 합니다. 이 경우 적당한 열을 (기본 키 또는 유일 제약조건을 가진 정수 유형, 인덱스 작업 추천) 포함하도록 뷰를 변경해야 합니다.
테이블인 경우, Select at id 체크박스가 기본적으로 활성화돼 있습니다. (이 체크박스의 의미는 앞 목에서 설명했습니다.) 사용자가 대용량 뷰를 이용하는 경우 이 옵션을 비활성화하는 편이 좋습니다.
If you want to make a backup of your PostGIS database using the pg_dump and
pg_restore commands, and the default layer styles as saved by QGIS fail to
restore afterwards, you need to set the XML option to DOCUMENT and the
restore will work.
QGIS는 서버 쪽에 있는 객체를 필터링할 수 있습니다. 체크박스를 활성화하면 됩니다. 이 옵션을 활성화하면 데이터베이스로 지원하는 표현식만 전송할 것입니다. 지원하지 않는 연산자 또는 함수를 이용한 표현식은 자연스럽게 폴백(fallback)되어 로컬에서 평가될 것입니다.
Most of common data types are supported by the PostgreSQL provider: integer, float,
varchar, geometry and timestamp.
Array data types are not supported.
DB 관리자 플러그인과 shp2pgsql 및 ogr2ogr 명령어 도구를 포함하는 도구 몇 가지를 이용해서 PostgreSQL/PostGIS로 데이터를 가져올 수 있습니다.
QGIS comes with a core plugin named  DB Manager. It can
be used to load shapefiles and other data formats, and it includes support for
schemas. See section DB 관리자 플러그인 for more information.
DB Manager. It can
be used to load shapefiles and other data formats, and it includes support for
schemas. See section DB 관리자 플러그인 for more information.
PostGIS includes an utility called shp2pgsql that can be used to import
shapefiles into a PostGIS-enabled database. For example, to import a
shapefile named lakes.shp into a PostgreSQL database named
gis_data, use the following command:
shp2pgsql -s 2964 lakes.shp lakes_new | psql gis_data
이 명령어는 gis_data 데이터베이스에 lakes_new 라는 새 레이어를 생성합니다. 이 새 레이어는 SRID(Spatial Reference IDentifier) 2964를 적용받게 됩니다. 공간 참조 시스템 및 투영체에 대한 더 자세한 내용은 투영 작업 을 참조하세요.
참고
PostGIS에서 데이터셋 내보내기
Like the import tool shp2pgsql, there is also a tool to export
PostGIS datasets as shapefiles: pgsql2shp. This is shipped within
your PostGIS distribution.
shp2pgsql 및 DB 관리자 이외에, PostGIS로 지리 데이터를 불러올 수 있는 또다른 도구인 ogr2ogr 도 있습니다. 이 도구는 사용자가 GDAL을 설치할 때 함께 설치됩니다.
To import a shapefile into PostGIS, do the following:
ogr2ogr -f "PostgreSQL" PG:"dbname=postgis host=myhost.de user=postgres
password=topsecret" alaska.shp
This will import the shapefile alaska.shp into the PostGIS database
postgis using the user postgres with the password topsecret on host
server myhost.de.
PostGIS를 지원하려면 OGR을 PostgreSQL과 함께 빌드해야 한다는 사실을 기억하십시오. 함께 빌드했는지 확인하려면 ( 에서) 다음과 같이 입력해보세요:
ogrinfo --formats | grep -i post
PostgreSQL의 기본 방법인 INSERT INTO 대신 COPY 명령어를 더 선호하는 경우, 다음 명령어로 (적어도 와  에서는) 다음 환경 변수를 내보낼 수 있습니다:
ogr2ogr 도구는 shp2pgsl 처럼 공간 인덱스를 생성하지 않습니다. shapefile을 불러온 다음, (다음 성능 향상시키기 목에서 설명하는 대로) 일반적인 SQL 명령어 CREATE INDEX 를 이용해서 직접 생성해야 합니다.
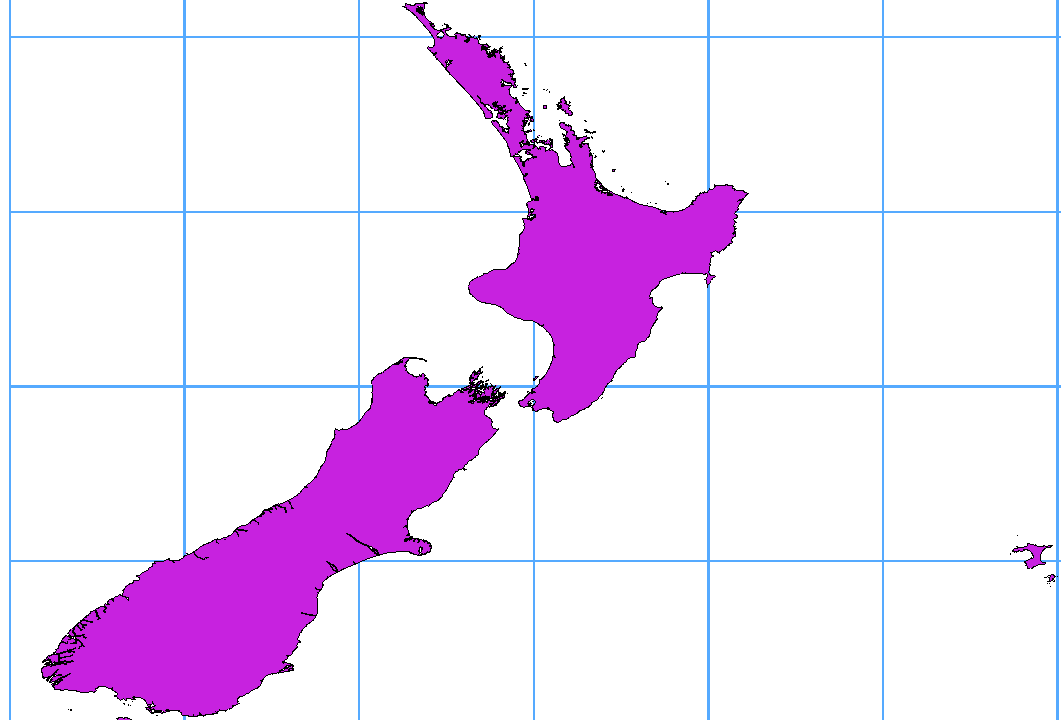
Many GIS packages don’t wrap vector maps with a geographic reference system
(lat/lon) crossing the 180 degrees longitude line
(http://postgis.refractions.net/documentation/manual-2.0/ST_Shift_Longitude.html).
As result, if we open such a map in QGIS, we will see two far, distinct locations,
that should appear near each other. In Figure_vector_crossing, the tiny point on the far
left of the map canvas (Chatham Islands) should be within the grid, to the right of the
New Zealand main islands.
PostGIS의 ST_ShiftLongitude 함수를 이용해서 경도를 변환하면 이 문제를 해결할 수 있습니다. 이 함수는 도형이 보유한 모든 객체의 모든 요소의 모든 포인트/꼭짓점을 읽은 다음 경도 좌표가 0° 미만인 경우 360° 를 더합니다. 그 결과, 경도 180° 선을 중심으로 하는 맵에 0° 에서 360° 범위로 변환된 데이터를 그리게 됩니다.
DB 관리자 플러그인 등을 이용해서 PostGIS로 데이터를 불러옵니다. (PostgreSQL로 데이터 가져오기 참조)
PostGIS 명령어 인터페이스를 통해 다음 명령어를 입력하고 실행합니다. (이 예시에서, TABLE 은 사용자 PostGIS 테이블의 실제 명칭입니다): gis_data=# update TABLE set the_geom=ST_ShiftLongitude(the_geom);
모든 작업이 제대로 됐다면, 업데이트한 피처의 개수를 확인하는 메시지를 볼 수 있을 겁니다. 그리고 나서야 맵을 불러와서 바뀐 모습(그림 경도 180° 선을 가로지르는 데이터에 ST_ShiftLongitude 함수를 적용)을 볼 수 있습니다.
If you want to save a vector layer to SpatiaLite format, you can do this by
right clicking the layer in the legend. Then, click on ,
define the name of the output file, and select ‘SpatiaLite’ as format and the CRS.
Also, you can select ‘SQLite’ as format and then add SPATIALITE=YES in the
OGR data source creation option field. This tells OGR to create a SpatiaLite
database. See also http://www.gdal.org/ogr/drv_sqlite.html.
QGIS는 SpatiaLite에서 편집할 수 있는 뷰도 지원합니다.
새 SpatiaLite 레이어를 생성하고 싶다면, 새 SpatiaLite 레이어 생성하기 를 참조해주세요.
참고
SpatiaLite 데이터 관리 플러그인
SpatiaLite 데이터 관리를 위해 QSpatiaLite, SpatiaLite 관리자, DB 관리자 같은 파이썬 플러그인 몇 가지를 이용할 수 있습니다. (핵심 플러그인인 DB 관리자를 추천합니다.) 필요한 경우 플러그인 인스톨러를 통해 플러그인을 다운로드해서 설치할 수 있습니다.
리눅스, 유닉스 및 윈도우 용 IBM DB2(DB2 LUW), z/OS 용 IBM DB2(메인프레임) 그리고 IBM DashDB 제품은 관계형 테이블 열에 공간 데이터를 저장하고 분석할 수 있습니다. QGIS 용 DB2 제공자는 이 데이터베이스에 있는 공간 데이터를 가시화하고 분석 및 수정할 수 있는 완전한 기능을 제공합니다.
DB2 z/OS KnowledgeCenter, DB2 LUW KnowledgeCenter 그리고 DB2 DashDB KnowledgeCenter 에서 이런 능력에 대한 사용자 문서를 볼 수 있습니다.
DB2 공간 능력을 작업하는 데 관한 더 자세한 정보를 알고 싶다면, IBM DeveloperWorks에 있는 DB2 Spatial Tutorial 을 확인해보세요.
DB2 제공자는 현재 윈도우 ODBC 드라이버를 통해 윈도우 환경만 지원하고 있습니다.
QGIS를 실행하는 클라이언트는 다음 중 하나를 설치해야 합니다:
- DB2 LUW
IBM 데이터 서버 드라이버 패키지
IBM 데이터 서버 클라이언트
동일한 머신 상에 있는 DB2 LUW 데이터베이스에 접근하거나 또는 DB2 LUW를 클라이언트로 이용하고 있을 경우, DB2 실행 파일 및 지원 파일들을 윈도우 경로에 포함시켜야 합니다. db2.bat 이라는 명칭을 가진 다음과 같은 배치 파일을 생성한 다음 %OSGEO4W_ROOT%/etc/ini 디렉터리로 복사/이동해 넣으면 됩니다.
@echo off
REM Point the following to where DB2 is installed
SET db2path=C:\Program Files (x86)\sqllib
REM This should usually be ok - modify if necessary
SET gskpath=C:\Program Files (x86)\ibm\gsk8
SET Path=%db2path%\BIN;%db2path%\FUNCTION;%gskpath%\lib64;%gskpath%\lib;%path%