Importante
A tradução é um esforço comunitário você pode contribuir. Esta página está atualmente traduzida em 62.26%.
23.6. A interface de processamento em lote
23.6.1. Introducción
All algorithms (including models) can be executed as a batch process. That is, they can be executed using not just a single set of inputs, but several of them, executing the algorithm as many times as needed. This is useful when processing large amounts of data, since it is not necessary to launch the algorithm many times from the toolbox.
Para executar um algoritmo como um processamento em lote, clique com o direito do mouse na caixa de ferramentas e selecione a opção Executar como processamento em lote no balão de opções que irá aparecer.
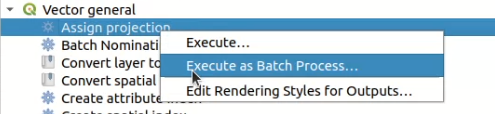
Fig. 23.31 Batch Processing from right-click
If you have the execution dialog of the algorithm open, you can also start the batch processing interface from there, clicking on the Run as batch process… button.
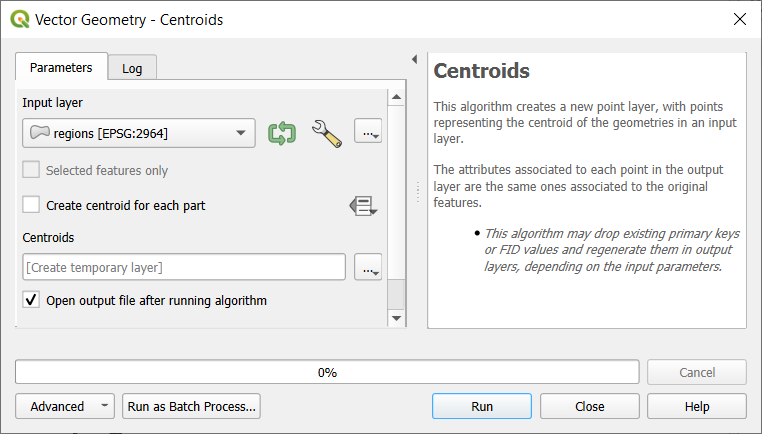
Fig. 23.32 Batch Processing From Algorithm Dialog
23.6.2. Os parâmetros da tabela
Executing a batch process is similar to performing a single execution of an algorithm. Parameter values have to be defined, but in this case we need not just a single value for each parameter, but a set of them instead, one for each time the algorithm has to be executed. Values are introduced using a table like the one shown next, where each row is an iteration and columns are the parameters of the algorithm.
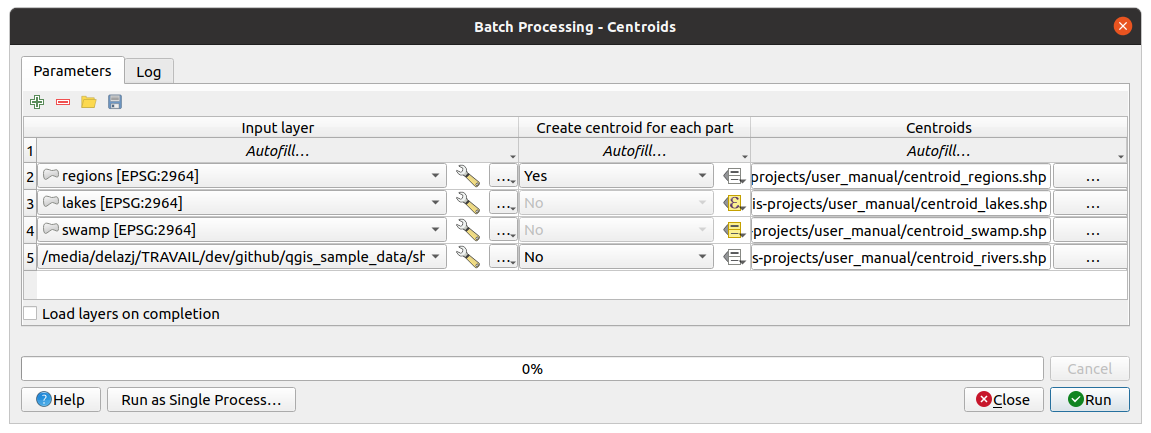
Fig. 23.33 Batch Processing
A partir da barra de ferramentas superior, você pode:
 Toggle advanced mode:
Available only when the algorithm has parameters that are marked as advanced,
this button allows to show or hide such parameters in the batch dialog.
Toggle advanced mode:
Available only when the algorithm has parameters that are marked as advanced,
this button allows to show or hide such parameters in the batch dialog.|adicionarSimbologia| Adicionar linha: adiciona uma nova entrada de processamento para configuração
 Remover linha(s): remover as linhas selecionadas da tabela. A seleção das linhas é feita clicando no número à esquerda e permite :ref:` combinação de teclado <interacting_features_table>` para seleção múltipla.
 Abrir um arquivo de configuração de processamento em lote
 Salvar a configuração de processamento em lote para um
 JSON, que pode ser executado posteriormente.
Por padrão, a tabela contém apenas duas linhas:
The first row displays in each cell an drop-down menu with options to quickly fill the cells below. Available options depend on the parameter type.
A segunda linha (assim como cada uma subsequente) representa uma única execução do algoritmo, e cada célula contém o valor de um dos parâmetros. É semelhante à caixa de diálogo de parâmetros que você vê ao executar um algoritmo da caixa de ferramentas, mas com uma disposição diferente.
Na parte inferior da tabela, você pode definir a  Carregar camadas após termino
Uma vez que o tamanho da tabela for configurado, terá de ser preenchido com os valores desejados.
23.6.3. Preenchendo os parâmetros da tabela
For most parameters, setting the value is trivial. The appropriate widget, same as in the single process dialog, is provided, allowing to just type the value, or select it from a list of possible values, depending on the parameter type. This also includes data-define widget, when compatible.
Para automatizar a definição do processamento de lote e evitar o preenchimento da tabela célula por célula, você pode querer pressionar o menu Autopreenchimento… de um parâmetro e selecionar qualquer uma das seguintes opções para substituir os valores na coluna:
guilabel:Preencher abaixo levará a entrada para o primeiro processo e será inserido em todos os outros processos.
 Calculate by Expression… will allow you
to create a new QGIS expression to use to update all existing values within
that column. Existing parameter values (including those from other columns)
are available for use inside the expression via variables.
E.g. setting the number of segments based on the buffer distance of each layer:
Calculate by Expression… will allow you
to create a new QGIS expression to use to update all existing values within
that column. Existing parameter values (including those from other columns)
are available for use inside the expression via variables.
E.g. setting the number of segments based on the buffer distance of each layer:CASE WHEN @DISTANCE > 20 THEN 12 ELSE 8 END
Add Values by Expression… will add new rows using the values from an expression which returns an array (as opposed to Calculate by Expression…, which works only on existing rows). The intended use case is to allow populating the batch dialog using complex numeric series. For example adding rows for a batch buffer using the expression
generate_series(100, 1000, 50)for distance parameter results in new rows with values 100, 150, 200, …. 1000.Ao definir um parâmetro de arquivo ou camada, mais opções são fornecidas:
Add Files by Pattern…: adds new rows to the table for files matching a File pattern in a folder to Look in. E.g.
*.shpwill add to the list all theSHPfiles in the folder. Check Search recursively to also browse sub-folders.Select Files… individually on disk
Add All Files from a Directory…
Select from Open Layers… in the active project
O parâmetro de dados de saída expõe os mesmos recursos que ao executar o algoritmo como um único processo. Dependendo do algoritmo, a saída pode ser:
ignorado, se a célula for deixada vazia
saved as a temporary layer: fill the cell with your chosen output name, select
Create Temporary Layer from the … drop-down, and remember
to tick the Load layers on completion checkbox.
For temporary layers, the value you provide will be used as the layer name.
You can use the Autofill options to construct that name.saved as a plain file (
.SHP,.GPKG,.XML,.PDF,.JPG,…): choose Select File/Folder… from the … drop-down. For plain files, you can set the path using the Autofill options exposed beforehand.E.g. use Calculate by Expression… to set output file names to complex expressions like:
'/home/me/stuff/buffer_' || left(@INPUT, 30) || '_' || @DISTANCE || '.shp'
You can also type the file path directly or use the file chooser dialog that appears when clicking on the accompanying Select File/Folder… button. Once you select the file, a new dialog is shown to allow for auto-completion of other cells in the same column (same parameter).
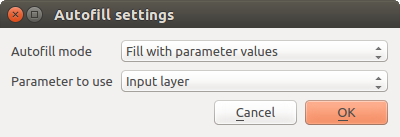
Fig. 23.34 Salvar Processamento em Lote
Se o valor padrão (Não preencher automaticamente) for selecionado, ele apenas colocará o nome de arquivo selecionado na célula selecionada da tabela de parâmetros. Se alguma das outras opções for selecionada, todas as células abaixo a selecionada será automaticamente preenchida com base em um critério definido:
Preencher com números: acrescenta um número incrementalmente ao nome do arquivo
guilabel:Preencher com valores de parâmetro: você pode selecionar um parâmetro cujo valor na mesma linha é anexado ao nome do arquivo. Isto é particularmente útil para nomear os objetos de dados de saída de acordo com os de entrada.
salvo como uma camada em um contêiner de banco de dados:
# Indicate a layer within a GeoPackage file
ogr:dbname='C:/Path/To/Geopackage.gpkg' table="New_Table" (geom)

# Use the "Calculate By Expression" to output to different layers in a GeoPackage
'ogr:dbname=\'' || @project_folder || '/Buffers.gpkg\' table="' || @INPUT || '_' || @DISTANCE || '" (geom)'
23.6.4. Executando o processo em lote
To execute the batch process once you have introduced all the necessary values, just click on Run. The Log panel is activated and displays details and steps of the execution process. Progress of the global batch task will be shown in the progress bar in the lower part of the dialog.