3.1. Lesson: Vector Attribute Data
Vector data is arguably the most common kind of data in the daily use of GIS. The vector model represents the location and shape of geographic features using points, lines and polygons (and for 3D data also surfaces and volumes), while their other properties are included as attributes (often presented as a table in QGIS).
지금까지 우리가 맵 상에서 변경했던 것들은 맵 상에 보이는 오브젝트들의 영향을 받지 않았습니다. 다시 말해 모든 토지이용구역들은 똑같이 보였고, 모든 도로들도 똑같이 보였습니다. 맵을 보는 사람들은 특정 지역에 특정 형태의 도로가 있다는 것 외에는 자기가 보고 있는 도로에 대해 아무것도 알 수 없었습니다.
그러나 GIS의 최대 강점은 맵 상에 보이는 모든 오브젝트들이 속성을 가지고 있다는 것입니다. GIS에서 맵은 단순한 그림이 아닙니다. 맵은 오브젝트들의 위치만이 아니라 그 오브젝트들에 대한 정보도 담고 있습니다.
The goal for this lesson: To learn about the structure of vector data and explore the attribute data of an object
3.1.1.  Follow Along: 레이어 속성 뷰
여러분이 작업할 데이터가 오브젝트가 어디에 위치하는지 나타낼 뿐만 아니라 어떤 오브젝트인지도 나타낸다는 사실을 알아야 합니다.
From the previous exercise, you should have the protected_areas layer
loaded in your map. If it is not loaded, then you can find the
protected_areas.shp ESRI Shapefile format dataset in directory
exercise_data/shapefile.
The polygons representing the protected areas constitute the spatial data, but we can learn more about the protected areas by exploring the attribute table.
In the Layers panel, click on the
protected_areaslayer to select it.In the menu, click the
 Open Attribute Table button (also accessible from top toolbars buttons).
This will open a new window showing the attribute table of the
Open Attribute Table button (also accessible from top toolbars buttons).
This will open a new window showing the attribute table of the protected_areaslayer.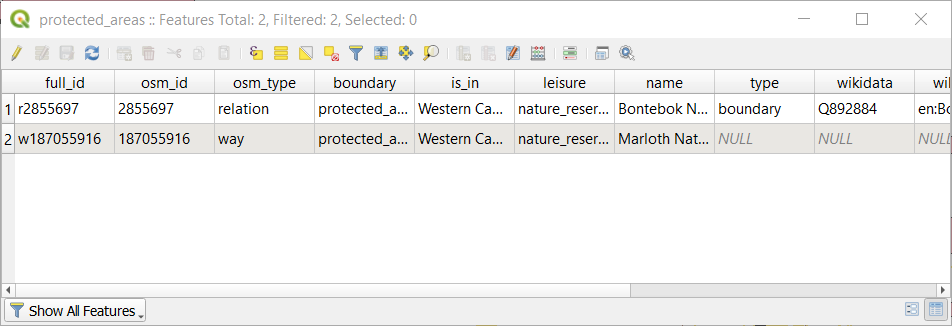
A row is called a record and is associated with a feature in the Canvas Map, such as a polygon. A column is called a field (or an attribute), and has a name that helps describe it, such as
nameorid. Values in the cells are known as attribute values. These definitions are commonly used in GIS, so it is good to become familiar with them.In the
protected_areaslayer, there are two features, which are represented by the two polygons we see on the Map Canvas.참고
In order to understand what the fields and attribute values represent, one may need to find documentation (or metadata) describing the meaning of the attribute values. This is usually available from the creator of the data set.
Next, let’s see how a record in the attribute table is linked to a polygon feature that we see on the Map Canvas.
Go back to the main QGIS window.
In the Edit –> Select menu, click on the
 Select Feature(s) button.
Make sure the
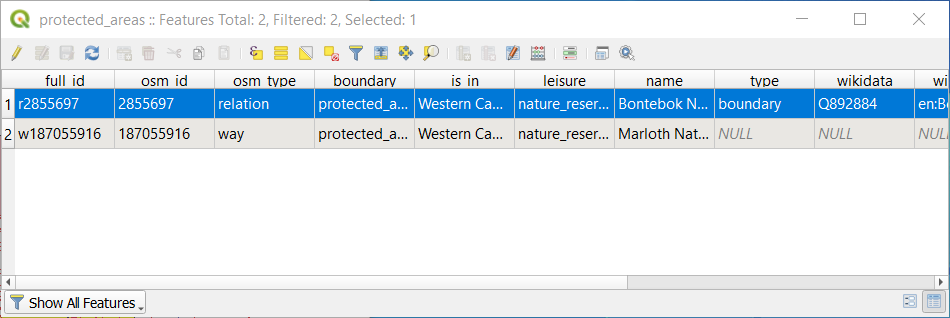
protected_areaslayer is still selected in the Layers panel.Move your mouse to the Map Canvas and left click on the smaller of the two polygons. The polygon will turn yellow indicating it is selected.

Go back to the Attribute Table window, and you should see a record (row) highlighted. These are the attribute values of the selected polygon.
You can also select a feature using the Attribute Table.
In the Attribute Table window, on the far left, click on the row number of the record that is currently not selected.
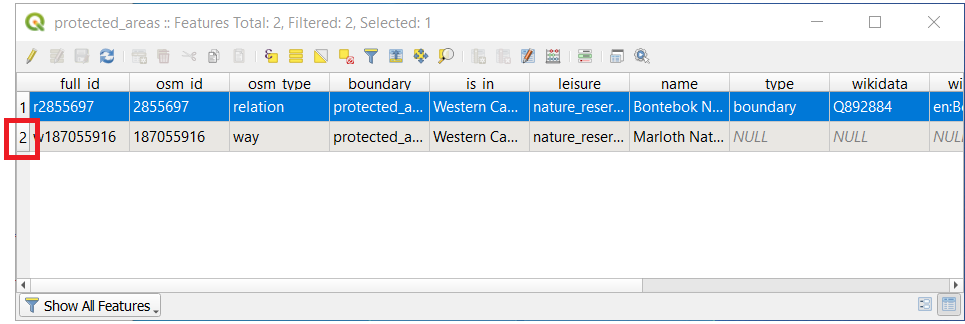
Go back to the main QGIS window and look at the Map Canvas. You should see the larger of the two polygons colored yellow.
To deselect the feature, go to the Attribute Table window and click on
 Deselect all features from the layer button.
Sometimes there are many features shown on the Map Canvas and it might be difficult to see which feature is selected from the Attribute Table. Another way to identify the location of a feature is to use the Flash Feature tool.
In the Attribute Table, right-click on any cell in the row that has the attribute value
r2855697for the fieldfull_id.In the context menu, click on Flash Feature and watch the Map Canvas.
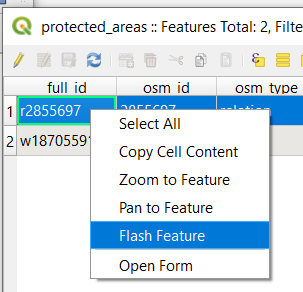
You should see the polygon flash red a few times. If you missed it, try it again.
Another useful tool is the Zoom to Feature tool, that tells QGIS to zoom to the feature of interest.
In the Attribute Table, right-click on any cell in the row that has the attribute value
r2855697for the fieldfull_id.In the context menu, click on Zoom to Feature

Look at the Map Canvas. The polygon should now occupy the extent of the Map Canvas area.
이제 속성 테이블을 닫으십시오.
3.1.2. Try Yourself Exploring Vector Data Attributes
How many fields are available in the rivers layer?
Tell us a bit about the
townplaces in your dataset.Open the attribute table for the places layer. Which field would be the most useful to represent in label form, and why?
Answer
There should be 9 fields in the rivers layer:
Select the layer in the Layers panel.
Right-click and choose Open Attribute Table, or press the
button on the Attributes Toolbar
(it can be enabled from menu).Count the number of columns.
A quicker approach could be to double-click the rivers layer, open the tab, where you will find a numbered list of the table’s fields.
Information about towns is available in the places layer. Open its attribute table as you did with the rivers layer: there are two features whose place attribute is set to
town: Swellendam and Buffeljagsrivier. You can add comment on other fields from these two records, if you like.The
namefield is the most useful to show as labels. This is because all its values are unique for every object and are very unlikely to contain NULL values. If your data contains some NULL values, do not worry as long as most of your places have names.
3.1.3. In Conclusion
이제 여러분이 사용하는 데이터 안에 실제로 뭐가 들어 있는지 보기 위해 속성 테이블을 이용하는 방법을 알게 됐습니다. 여러분에게 필요한 속성이 없다면 어떤 데이터셋이라도 쓸모없는 데이터입니다. 어떤 속성이 필요한지 알고 있다면 어떤 데이터셋을 사용할 수 있는지, 또는 필요한 속성 데이터를 가진 다른 데이터셋을 찾아야 하는지 빨리 결정할 수 있습니다.
3.1.4. What’s Next?
목적이 다르다면 쓸모 있는 속성도 달라집니다. 속성 중 일부는 맵 사용자가 볼 수 있도록 텍스트로 직접 나타낼 수 있습니다. 다음 강의에서는 그 방법을 배워보겠습니다.