17.2.5. The Legend Item
The Legend item is a box or a table that explains the meanings
of the symbols used on the map. A legend is then bound to a map item. You can
add a legend item with the  Add Legend tool following
items creation instructions and manipulate it the
same way as exposed in Interacting with layout items.
By default, the legend item displays all available layers and can be refined using its Item Properties panel. Other than the items common properties, this feature has the following functionalities (see figure_layout_legend):
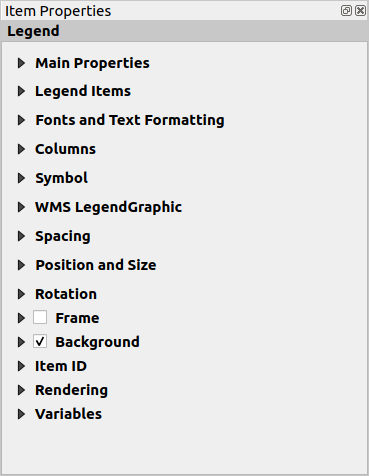
Fig. 17.24 Legend Item Properties Panel
17.2.5.1. Main properties
The Main properties group of the legend Item Properties panel provides the following functionalities (see figure_layout_legend_ppt):
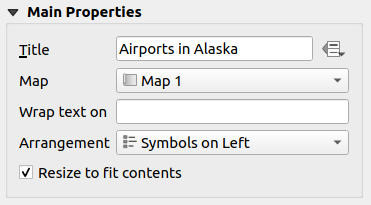
Fig. 17.25 Legend Main properties group
In Main properties you can:
Change the Title of the legend. It can be made dynamic using the data-defined override setting, useful for example when generating an atlas;
Choose which Map item the current legend will refer to. By default, the map over which the legend item is drawn is picked. If none, then it falls back to the reference map.
Note
Variables of the linked map item (@map_id, @map_scale, @map_extent…) are also accessible from data-defined properties of the legend.
Wrap the text of the legend on a given character: each time the character appears, it’s replaced with a line break;
Set the symbols and text placement in the legend: the Arrangement can be Symbols on left or Symbols on right. The default value depends on the locale in use (right-to-left based or not).
Use
 Resize to fit contents to control whether or
not a legend should be automatically resized to fit its contents. If
unchecked, then the legend will never resize and instead just stick to
whatever size the user has set. Any content which doesn’t fit the size
is cropped out.
17.2.5.2. Legend items
The Legend items group of the legend Item Properties panel provides the following functionalities (see figure_layout_legend_items):
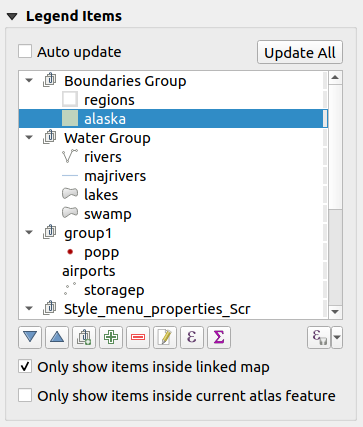
Fig. 17.26 Legend Items group
The legend will be updated automatically if
 Auto-update
is checked. When Auto-update is unchecked this will give you more
control over the legend items. All the icons below the legend items list will
be activated.
Auto-update
is checked. When Auto-update is unchecked this will give you more
control over the legend items. All the icons below the legend items list will
be activated.The legend items window lists all legend items and allows you to change item order, group layers, remove and restore items in the list, edit layer names and add a filter.
The item order can be changed using the
 and
and  buttons or
with ‘drag-and-drop’ functionality. The order can not be changed for WMS
legend graphics.
buttons or
with ‘drag-and-drop’ functionality. The order can not be changed for WMS
legend graphics.Use the
 button to add layers and
  button to remove
groups, layers or symbol classes.
button to remove
groups, layers or symbol classes.The
 button is used to edit the layer, group name or title.
First you need to select the legend item. Double-clicking the item also
opens the text box to rename it.
 allows you to add expressions to each symbol label of a given
layer. New variables (
allows you to add expressions to each symbol label of a given
layer. New variables (@symbol_label,@symbol_idand@symbol_count) help you interact with the legend entry.For example, given a categorized layer, you can append to each class in the legend their number of features, ie class (number):
The
 button adds a feature count for each class of vector layer.
The
 Filter legend by expression helps you filter
which of the legend items of a layer will be displayed, i.e. using a layer
that has different legend items (e.g., from a rule-based or categorized
symbology), you can specify a boolean expression to remove from the legend
tree, styles that have no feature satisfying a condition. Note that the
features are nevertheless kept and shown in the layout map item.
While the default behavior of the legend item is to mimic the Layers panel tree, displaying the same groups, layers and classes of symbology, right-click any item offers you options to hide layer’s name or raise it as a group or subgroup. In case you have made some changes to a layer, you can revert them by choosing Reset to defaults from the contextual menu of the legend entry.
After changing the symbology in the QGIS main window, you can click on Update All to adapt the changes in the legend element of the print layout.
With the
 Only show items inside linked map, only the
legend items visible in the linked map will be listed in the legend. This tool
remains available when
  Auto-update is active
While generating an atlas with polygon features, you can filter out legend items that lie outside the current atlas feature. To do that, check the
 Only show items inside current atlas feature option.
17.2.5.3. Fonts
The Fonts group of the legend Item Properties panel provides the following functionalities:
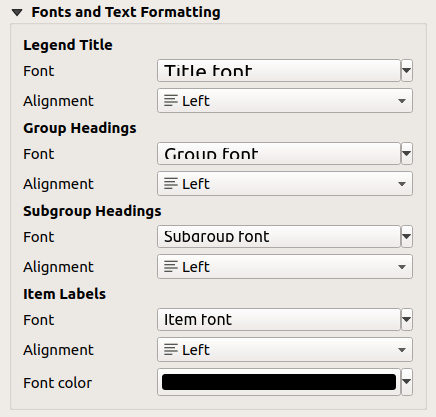
Fig. 17.27 Legend Fonts properties
You can change the font of the legend title, group, subgroup and item (feature) in the legend item using the font selector widget
For each of these levels you can set the text Alignment: it can be Left (default for left-to-right based locales), Center or Right (default for right-to-left based locales).
You set the Color of the labels using the color selector widget. The selected color will apply to all the font items in the legend.
17.2.5.4. Columns
Under the Columns group of the legend Item Properties panel, legend items can be arranged over several columns:
Set the number of columns in the Count
 field.
This value can be made dynamic e.g., following atlas features, legend
contents, the frame size…
 Equal column widths sets how legend columns should be
adjusted.
Equal column widths sets how legend columns should be
adjusted.The
 Split layers option allows a categorized or a
graduated layer legend to be divided between columns.

Fig. 17.28 Legend Columns settings
17.2.5.5. Symbol
The Symbol group of the legend Item Properties panel configures the size of symbols displayed next to the legend labels. You can:
Set the Symbol width and Symbol height
 Draw stroke for raster symbols: this adds an outline
to the symbol representing the band color of the raster layer; you can set
both the Stroke color and Tickness.
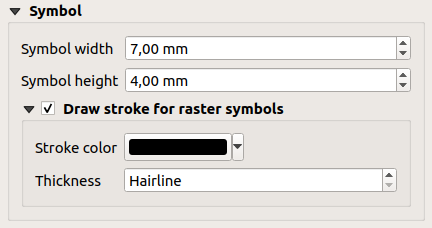
Fig. 17.29 Legend Symbol configuration
17.2.5.6. WMS LegendGraphic and Spacing
The WMS LegendGraphic and Spacing groups of the legend Item Properties panel provide the following functionalities (see figure_layout_legend_wms):
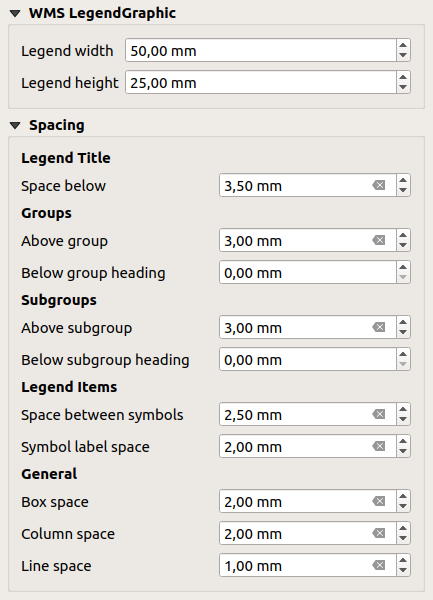
Fig. 17.30 WMS LegendGraphic and Spacing groups
When you have added a WMS layer and you insert a legend item, a request will be sent to the WMS server to provide a WMS legend. This Legend will only be shown if the WMS server provides the GetLegendGraphic capability. The WMS legend content will be provided as a raster image.
WMS LegendGraphic is used to be able to adjust the Legend width and the Legend height of the WMS legend raster image.
Spacing around title, groups, subgroups, symbols, labels, boxes, columns and lines can be customized through this dialog.
