16.5. Lesson: Geometry Construction
In this section we are going to delve a little deeper into how simple geometries are constructed in SQL. In reality, you will probably use a GIS like QGIS to create complex geometries using their digitising tools; however, understanding how they are formulated can be handy for writing queries and understanding how the database is assembled.
The goal of this lesson: To better understand how to create spatial entities directly in PostgreSQL/PostGIS.
16.5.1. Creating Linestrings
Going back to our address database, let’s get our streets table matching the others; i.e., having a constraint on the geometry, an index and an entry in the geometry_columns table.
16.5.2. Try Yourself 
Modify the streets table so that it has a geometry column of type ST_LineString.
Don’t forget to do the accompanying update to the geometry columns table!
Also add a constraint to prevent any geometries being added that are not LINESTRINGS or null.
Create a spatial index on the new geometry column
Now let’s insert a linestring into our streets table. In this case we will update an existing street record:
update streets
set the_geom = 'SRID=4326;LINESTRING(20 -33, 21 -34, 24 -33)'
where streets.id=2;
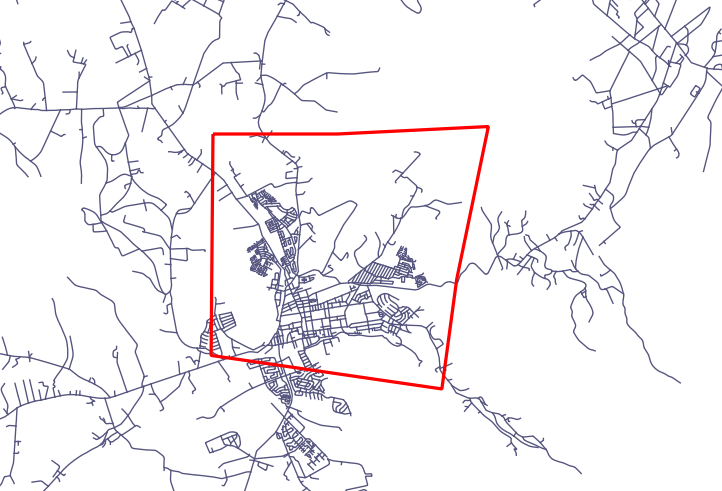
Take a look at the results in QGIS. (You may need to right-click on the streets layer in the ‘Layers’ panel, and choose ‘Zoom to layer extent’.)
Now create some more streets entries - some in QGIS and some from the command line.
16.5.3. Creating Polygons
Creating polygons is just as easy. One thing to remember is that by definition, polygons have at least four vertices, with the last and first being co-located:
insert into cities (name, the_geom)
values ('Tokyo', 'SRID=4326;POLYGON((10 -10, 5 -32, 30 -27, 10 -10))');
Note
A polygon requires double brackets around its coordinate list; this is to allow you to add complex polygons with multiple unconnected areas. For instance
insert into cities (name, the_geom)
values ('Tokyo Outer Wards',
        'SRID=4326;POLYGON((20 10, 20 20, 35 20, 20 10),
                           (-10 -30, -5 0, -15 -15, -10 -30))'
        );
If you followed this step, you can check what it did by loading the cities dataset into QGIS, opening its attribute table, and selecting the new entry. Note how the two new polygons behave like one polygon.
16.5.4. Exercise: Linking Cities to People
For this exercise you should do the following:
Delete all data from your people table.
Add a foreign key column to people that references the primary key of the cities table.
Use QGIS to capture some cities.
Use SQL to insert some new people records, ensuring that each has an associated street and city.
Your updated people schema should look something like this:
\d people

Table "public.people"
   Column   |         Type          |                      Modifiers
 -----------+-----------------------+--------------------------------------------
  id        | integer               | not null
            |                       | default nextval('people_id_seq'::regclass)
  name      | character varying(50) |
  house_no  | integer               | not null
  street_id | integer               | not null
  phone_no  | character varying     |
  the_geom  | geometry              |
  city_id   | integer               | not null
Indexes:
  "people_pkey" PRIMARY KEY, btree (id)
  "people_name_idx" btree (name)
Check constraints:
  "people_geom_point_chk" CHECK (st_geometrytype(the_geom) =
                       'ST_Point'::text OR the_geom IS NULL)
Foreign-key constraints:
  "people_city_id_fkey" FOREIGN KEY (city_id) REFERENCES cities(id)
  "people_street_id_fkey" FOREIGN KEY (street_id) REFERENCES streets(id)
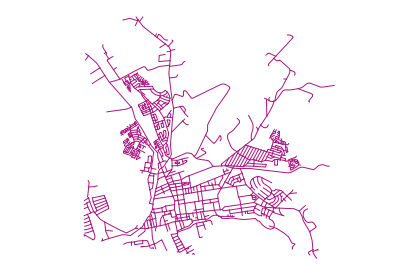
16.5.5. Looking at Our Schema
By now our schema should be looking like this:

16.5.6. Try Yourself 
Create city boundaries by computing the minimum convex hull of all addresses for that city and computing a buffer around that area.
16.5.7. Access Sub-Objects
With the SFS-Model functions, you have a wide variety of options to access sub-objects of SFS Geometries. When you want to select the first vertex point of every polygon geometry in the table myPolygonTable, you have to do this in this way:
Transform the polygon boundary to a linestring:
select st_boundary(geometry) from myPolygonTable;
Select the first vertex point of the resultant linestring:
select st_startpoint(myGeometry)
from (
    select st_boundary(geometry) as myGeometry
    from myPolygonTable) as foo;
16.5.8. Data Processing
PostGIS supports all OGC SFS/MM standard conform functions. All these functions
start with ST_.
16.5.9. Clipping
To clip a subpart of your data you can use the ST_INTERSECT() function.
To avoid empty geometries, use:
where not st_isempty(st_intersection(a.the_geom, b.the_geom))
select st_intersection(a.the_geom, b.the_geom), b.*
from clip as a, road_lines as b
where not st_isempty(st_intersection(st_setsrid(a.the_geom,32734),
  b.the_geom));
16.5.10. Building Geometries from Other Geometries
From a given point table, you want to generate a linestring. The order of the points is defined by their id. Another ordering method could be a timestamp, such as the one you get when you capture waypoints with a GPS receiver.
To create a linestring from a new point layer called ‘points’, you can run the following command:
select ST_LineFromMultiPoint(st_collect(the_geom)), 1 as id
from (
  select the_geom
  from points
  order by id
) as foo;
To see how it works without creating a new layer, you could also run this command on the ‘people’ layer, although of course it would make little real-world sense to do this.
16.5.11. Geometry Cleaning
You can get more information for this topic in this blog entry.
16.5.12. Differences between tables
To detect the difference between two tables with the same structure, you can
use the PostgreSQL keyword EXCEPT:
select * from table_a
except
select * from table_b;
As the result, you will get all records from table_a which are not stored in table_b.
16.5.13. Tablespaces
You can define where postgres should store its data on disk by creating tablespaces:
CREATE TABLESPACE homespace LOCATION '/home/pg';
When you create a database, you can then specify which tablespace to use e.g.:
createdb --tablespace=homespace t4a
16.5.14. In Conclusion
You’ve learned how to create more complex geometries using PostGIS statements. Keep in mind that this is mostly to improve your tacit knowledge when working with geo-enabled databases through a GIS frontend. You usually won’t need to actually enter these statements manually, but having a general idea of their structure will help you when using a GIS, especially if you encounter errors that would otherwise seem cryptic.