Importante
La traduzione è uno sforzo comunitario you can join. Questa pagina è attualmente tradotta al 81.67%.
16.5. Lezione: Costruzione Geometria
In questa sezione approfondirai come puoi costruire semplici geometrie con SQL. In realtà userai un GIS come QGIS per creare geometrie complesse con gli strumenti di digitalizzazione; tuttavia, capire come li puoi formulre può essere utile per scrivere interrogazioni e capire come è costruito il database.
The goal of this lesson: To better understand how to create spatial entities directly in PostgreSQL.
16.5.1. Crea linee
Going back to our address database, let’s get our streets table matching
the others; i.e., having a constraint on the geometry, an index and an entry in
the geometry_columns table.
16.5.2. Prova Tu: ★★☆
Modify the
streetstable so that it has a geometry column of type ST_LineString.Don’t forget to do the accompanying update to the geometry columns table!
Also add a constraint to prevent any geometries being added that are not LINESTRINGS or null.
Create a spatial index on the new geometry column
Soluzione
alter table streets add column geom geometry;
alter table streets add constraint streets_geom_point_chk check
     (st_geometrytype(geom) = 'ST_LineString'::text OR geom IS NULL);
insert into geometry_columns values ('','public','streets','geom',2,4326,
     'LINESTRING');
create index streets_geo_idx
  on streets
  using gist
  (geom);
Inserisci una linea nella tabella streets. In questo caso aggiornerai un record di strada esistente:
update streets
set geom = 'SRID=4326;LINESTRING(20 -33, 21 -34, 24 -33)'
where streets.id=2;
Dai un’occhiata ai risultati in QGIS. (Potresti aver bisogno di fare clic-destro del mouse sul vettore streets nel pannello “Layers” e scegliere “Zoom sul layer”.)
Ora crea altre voci per le strade: alcune in QGIS e altre dalla riga di comando.
16.5.3. Crea poligoni
Creare poligoni è altrettanto facile. Una cosa da ricordare è che, per definizione, i poligoni hanno almeno quattro vertici, con l’ultimo e il primo essere coincidenti:
insert into cities (name, geom)
values ('Tokyo', 'SRID=4326;POLYGON((10 -10, 5 -32, 30 -27, 10 -10))');
Nota
Un poligono richiede doppie parentesi attorno alla sua lista di coordinate; questo per consentire di aggiungere poligoni complessi con più aree non connesse. Per esempio
insert into cities (name, geom)
values ('Tokyo Outer Wards',
        'SRID=4326;POLYGON((20 10, 20 20, 35 20, 20 10),
                           (-10 -30, -5 0, -15 -15, -10 -30))'
        );
Se hai seguito questo passaggio, puoi verificare cosa ha fatto caricando l’insieme di dati della città in QGIS, aprendo la sua tabella degli attributi e selezionando la nuova voce. Nota come i due nuovi poligoni si comportano come un poligono.
16.5.4. Esercizio: Collega delle città alle persone
Per questo esercizio dovresti fare quanto segue:
Cancella tutti i dati dalla tabella people.
Add a foreign key column to people that references the primary key of the cities table.
Usa QGIS per inserire qualche città.
Usa SQL per inserire qualche nuovo record in people, assicurandoti che ognuno abbia una via e una città associata
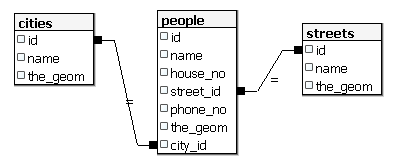
Il tuo schema aggiornato dovrebbe assomigliare a qualcosa come questo:
\d people

Table "public.people"
   Column   |         Type          |                      Modifiers
 -----------+-----------------------+--------------------------------------------
  id        | integer               | not null
            |                       | default nextval('people_id_seq'::regclass)
  name      | character varying(50) |
  house_no  | integer               | not null
  street_id | integer               | not null
  phone_no  | character varying     |
  geom      | geometry              |
  city_id   | integer               | not null
Indexes:
  "people_pkey" PRIMARY KEY, btree (id)
  "people_name_idx" btree (name)
Check constraints:
  "people_geom_point_chk" CHECK (st_geometrytype(geom) =
                       'ST_Point'::text OR geom IS NULL)
Foreign-key constraints:
  "people_city_id_fkey" FOREIGN KEY (city_id) REFERENCES cities(id)
  "people_street_id_fkey" FOREIGN KEY (street_id) REFERENCES streets(id)
Soluzione
delete from people;
alter table people add column city_id int not null references cities(id);
(acquisizione città in QGIS)
insert into people (name,house_no, street_id, phone_no, city_id, geom)
   values ('Faulty Towers',
           34,
           3,
           '072 812 31 28',
           1,
           'SRID=4326;POINT(13 -15)');

insert into people (name,house_no, street_id, phone_no, city_id, geom)
   values ('IP Knightly',
           32,
           1,
           '071 812 31 28',
           1,
           'SRID=4326;POINT(18 -24)');

insert into people (name,house_no, street_id, phone_no, city_id, geom)
   values ('Rusty Bedsprings',
           39,
           1,
           '071 822 31 28',
           1,
           'SRID=4326;POINT(22 -25)');
Se stai riscontrando il seguente messaggio di errore:
ERROR:  insert or update on table "people" violates foreign key constraint
        "people_city_id_fkey"
DETAIL: Key (city_id)=(1) is not present in table "cities".
then it means that while experimenting with creating polygons for the
cities table, you must have deleted some of them and started over. Just
check the entries in your cities table and use any id which exists.
16.5.5. Guarda lo schema
Adesso lo schema dovrebbe assomigliare a questo:
16.5.6. Prova Tu: ★★★
Crea limiti di città calcolando il minimopoligono convesso di tutti gli indirizzi per quella città e calcolando un buffer attorno a quell’area.
Soluzione
Aggiungi alcune persone nella città di “Tokyo Outer Wards”
INSERT INTO people (name, house_no, street_id, phone_no, city_id, geom)
   VALUES ('Bad Aboum',
           57,
           2,
           '073 712 31 21',
           2,
           'SRID=4326;POINT(22 18)');

INSERT INTO people (name, house_no, street_id, phone_no, city_id, geom)
   VALUES ('Pat Atra',
           59,
           2,
           '074 712 31 25',
           2,
           'SRID=4326;POINT(23 14)');

INSERT INTO people (name, house_no, street_id, phone_no, city_id, geom)
   VALUES ('Kat Herin',
           65,
           2,
           '074 722 31 28',
           2,
           'SRID=4326;POINT(29 18)');
Crea tabella myPolygonTable
CREATE TABLE myPolygonTable (
  id serial NOT NULL PRIMARY KEY,
  city_id int NOT NULL REFERENCES cities(id),
  geom geometry NOT NULL
);

ALTER TABLE myPolygonTable
  ADD CONSTRAINT myPolygonTable_geom_polygon_chk
  CHECK (st_geometrytype(geom) = 'ST_Polygon'::text );
Crea e carica la delimitazione minima convessa
INSERT INTO myPolygonTable (city_id, geom)
  SELECT * FROM
  (
    SELECT
      ROW_NUMBER() over (order by city_id)::integer AS city_id,
      ST_CONVEXHULL(ST_COLLECT(geom)) AS geom
        FROM people
        GROUP BY city_id
  ) convexHulls;
16.5.7. Accedi agli oggetti
With the SFS-Model functions, you have a wide variety of options to access
sub-objects of SFS Geometries. When you want to select the first vertex point of
every polygon geometry in the table myPolygonTable, you have to do this in this
way:
Trasforma il policono di confine in una linea:
select st_boundary(geom) from myPolygonTable;
Seleziona il primo vertice della linea risultante:
select st_startpoint(myGeometry)
from (
    select st_boundary(geom) as myGeometry
    from myPolygonTable) as foo;
16.5.8. Elaborazione
PostGIS supporta tutte le funzioni conformi agli standard OGC SFS/MM. Tutte queste funzioni iniziano ST_.
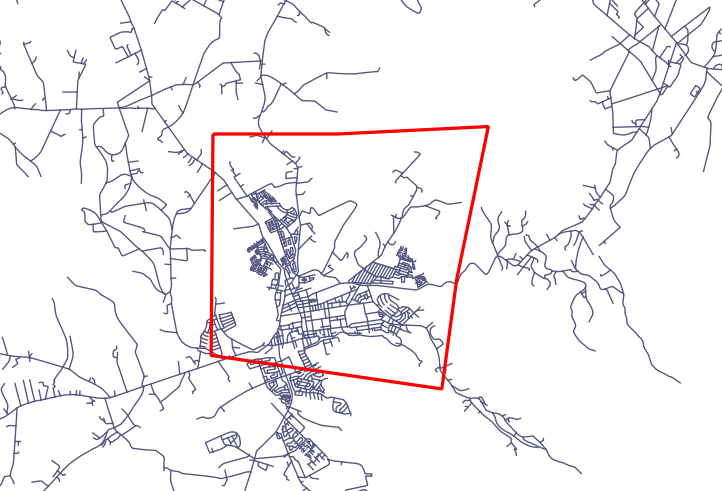
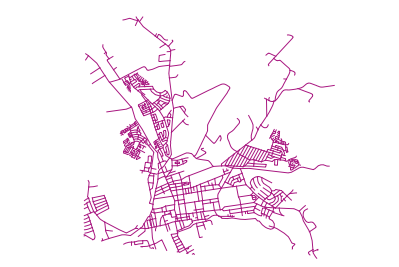
16.5.9. Ritaglio
Per ritagliare una parte dei ati puoi usare la funzione ST_INTERSECT(). Per evitare geometrie vuote usa:
where not st_isempty(st_intersection(a.geom, b.geom))
select st_intersection(a.geom, b.geom), b.*
from clip as a, road_lines as b
where not st_isempty(st_intersection(st_setsrid(a.geom,32734),
  b.geom));
16.5.10. Costruisci geometrie da altre geometrie
From a given point table, you want to generate a linestring. The order of the
points is defined by their id. Another ordering method could be a
timestamp, such as the one you get when you capture waypoints with a GPS
receiver.
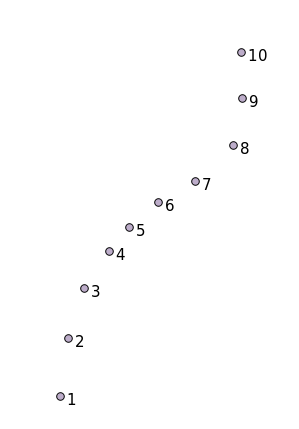
Per creare una linea da un vettore punti chiamato “points”, puoi eseguire il seguente comando:
select ST_LineFromMultiPoint(st_collect(geom)), 1 as id
from (
  select geom
  from points
  order by id
) as foo;
Per vedere come funziona senza creare un nuovo livello, è possibile eseguire questo comando anche sul livello “people”, anche se ovviamente sarebbe poco consueto.

16.5.11. Pulire la geometria
Puoi ottenere maggiori informazioni su questo argomento in this blog entry.
16.5.12. Differenze tra tabelle
Per rilevare la differenza tra due tabelle con la stessa struttura, è possibile utilizzare la parola PostgreSQL EXCEPT:
select * from table_a
except
select * from table_b;
As the result, you will get all records from table_a which are not stored in
table_b.
16.5.13. Archiviazione delle tabelle
Puoi definire dove postgres deve memorizzare i propri dati su disco creando tablespaces:
CREATE TABLESPACE homespace LOCATION '/home/pg';
Quando crei un database puoi specificare quale spazio di archiviazione usare ad esempio:
createdb --tablespace=homespace t4a
16.5.14. In Conclusione
Hai imparato come creare geometrie più complesse usando le istruzioni PostGIS. Tieni presente che questo è per migliorare la tua conoscenza quando lavori con database spaziali tramite un GIS. Di solito non è necessario inserire queste affermazioni manualmente, ma avere un’idea generale della loro struttura ti aiuterà quando utilizzi un GIS, specialmente se incontri errori che altrimenti sembrerebbero incomprensibili.