Fontos
A fordítás közösségi munka eredménye, amelyhez itt tudsz csatlakozni <https://qgis.org/en/site/getinvolved/translate.html#becoming-a-translator>`_. Ennek az oldalnak eddig a 57.53% részét fordítottuk le.
19. Vektorcsempék
19.1. Mik azok a vektorcsempék?
A vektorcsempék földrajzi adatokat tartalmazó csomagok, amelyek előre meghatározott, nagyjából négyzet alakú „csempékbe” vannak csomagolva az interneten keresztüli átvitelhez. Egyesítik az előre renderelt raszteres térképcsempéket és a vektoros térképcsempéket. A vektorcsempe-szerver egy előre renderelt térképi kép helyett vektoros térképadatokat ad vissza, amelyeket az egyes csempék határaira vágott. A levágott csempék lefedik a szolgáltatás nagyítási szintjeit, piramisszerű elrendezésben. Ezzel a struktúrával az adatátvitel lecsökken a nem csempézett vektortérképekhez képest. Csak az aktuális térképnézetben és az aktuális nagyítási szinten lévő adatokat kell átvinni. Ezenkívül a csempézett raszteres térképhez képest az adatátvitel is jelentősen csökken, mivel a vektoros adatok jellemzően sokkal kisebbek, mint egy renderelt raszteres kép. A vektorcsempékhez nincsenek stílusinformációk hozzárendelve, ezért a QGIS-nek kartográfiai stílust kell alkalmaznia az adatok megjelenítéséhez.
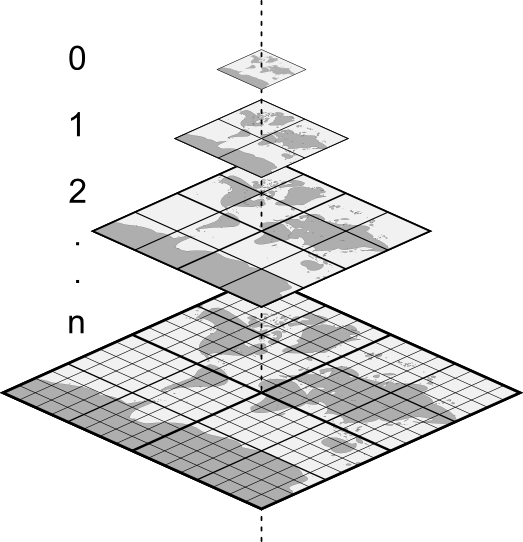
19.1. ábra Vektorcsempék piramisszerű szerkezete nagyítási szintekkel
19.2. Támogatott formátumok
A vektorcsempék támogatása a következő módokon érhető el:
távoli erőforrások (HTTP/S) – XYZ-sablonnal. Pl.
type=xyz&url=http://example.com/{z}/{x}/{y}.pbfhelyi fájlok – XYZ-sablonnal. Pl.
type=xyz&url=file:///path/to/tiles/{z}/{x}/{y}.pbfhelyi MBTiles-adatbázis. Pl.
type=mbtiles&url=file:///path/to/file.mbtiles
Vektorcsempe adathalmazok QGIS-be való betöltéséhez használja a  Vektorcsempe fület az Adatforrás-kezelő párbeszédablakban. További részletekért olvassa el a Using Vector Tiles services részt.
19.3. Vektorcsempe adathalmaz tulajdonságai
The vector tiles Layer Properties dialog provides the following sections:
|
||
|


[1] Elérhetőek a Rétegstílus panelről is
19.3.1. Információ lap
Az Információ fül csak olvasható, és tömör összefoglalást ad az aktuális rétegről és metaadatairól. A következő információk láthatóak rajta:
a réteg szolgáltatójától függően: név, URI, forrás típusa és útvonala, zoomszintek száma
a koordináta-rendszer: neve, mértékegysége, módszere, pontossága, alappontja (statikus vagy dinamikus)
a kitöltött metaadatok közül válogatva: hozzáférés, terjedelem, hivatkozások, névjegyek, előzmények…
19.3.2. Forrás lap
The  Source tab displays basic information about
the selected vector tile, including:
Source tab displays basic information about
the selected vector tile, including:
a Réteg neve, ami megjelenik a Rétegek panelen;
the Coordinate Reference System: Displays the layer’s Coordinate Reference System (CRS). You can change the layer’s CRS, by selecting a recently used one in the drop-down list or clicking on the
 Select CRS button (see Koordináta-rendszer választó).
Use this process only if the layer CRS is wrong or not specified.
Select CRS button (see Koordináta-rendszer választó).
Use this process only if the layer CRS is wrong or not specified.

19.2. ábra Vector Tiles Properties - Source Dialog
19.3.3. Symbology and Labels Properties
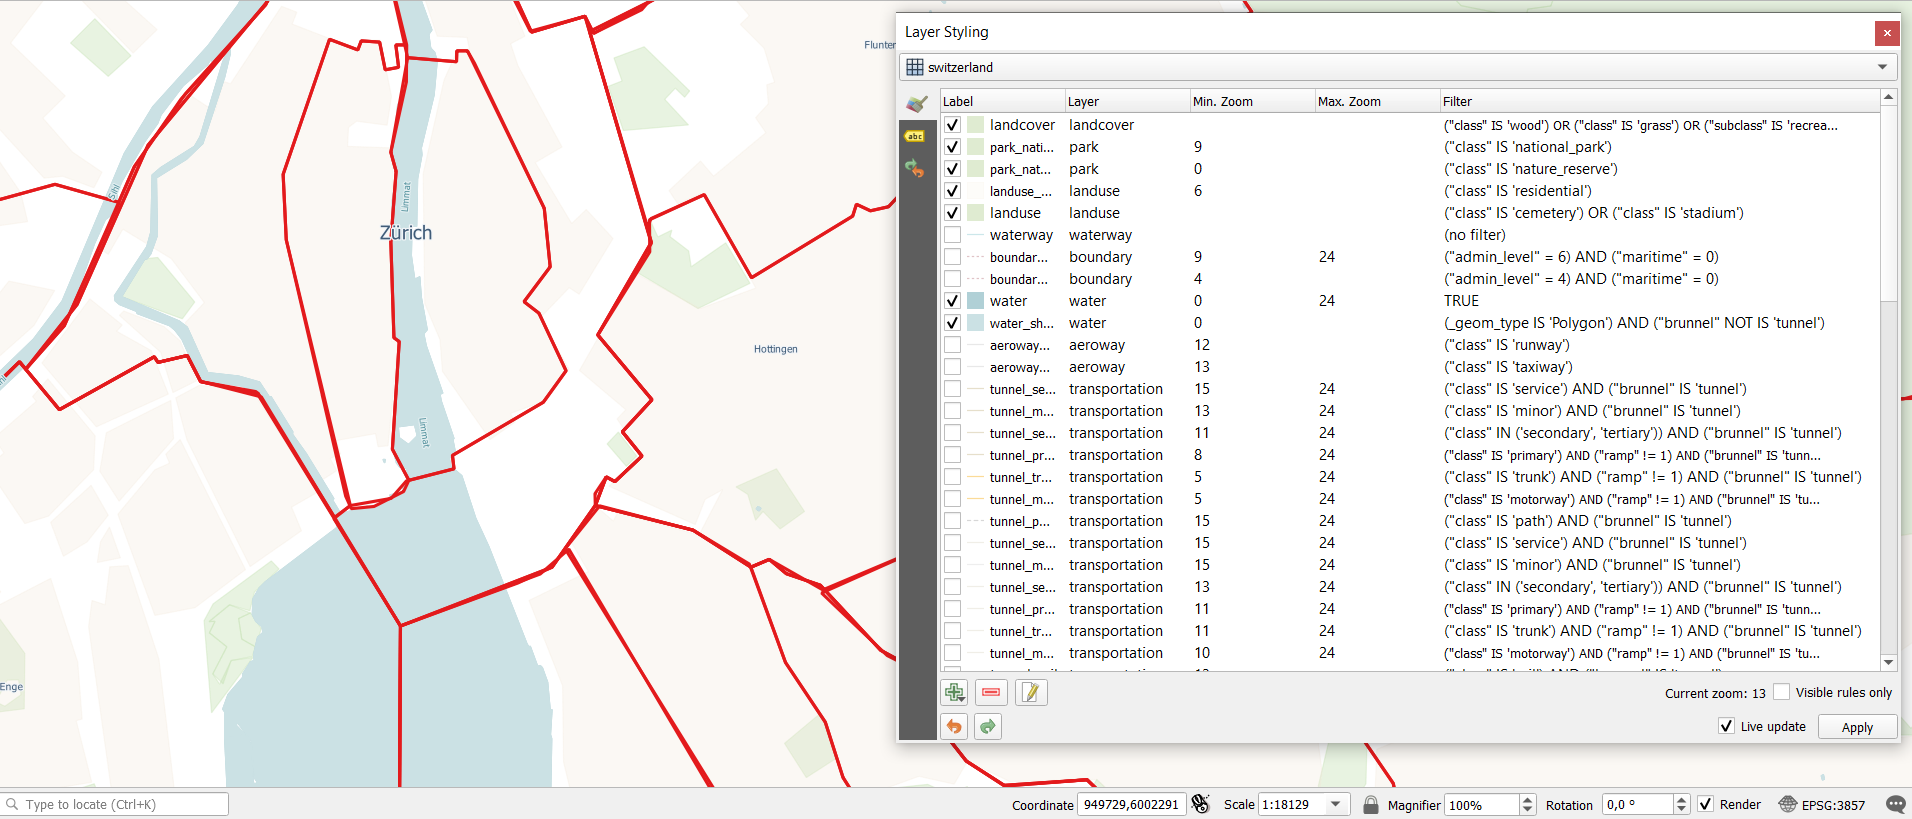
19.3. ábra Egy vektorcsempe-réteg jelrendszere
19.3.3.1. Setting rules
As vector tiles consist of point, line and polygon geometries, the respective symbols are available. To apply a cartographic style (with symbology and/or labels), you can either:
Use a Style URL when creating the Vector Tiles Connection. The symbology will be shown immediately in the
 Symbology tab
after the layer is loaded in QGIS.
Symbology tab
after the layer is loaded in QGIS.Or build your own symbology and labeling in the corresponding tabs of the layer properties. By default, QGIS assigns an identical symbol to the features based on their geometry type.
In both cases, setting a style for a vector tile relies on a set of rules applied to the features, indicating:
a Label, a title for comprehensive identification of the rule
the name of a particular Layer the rule should apply to, if not applied to
(all layers)a Min. Zoom and a Max. Zoom, for the range of display. Symbology and labeling can be dependent on the zoom level.
a Filter, a QGIS expression to identify the features to apply the style to
Each rule is added pressing the  Add rule button
and selecting the type of symbols (Marker, Line, Fill)
corresponding to the features geometry type.
You can as well
Add rule button
and selecting the type of symbols (Marker, Line, Fill)
corresponding to the features geometry type.
You can as well  Remove selected rules or
  Edit current rule.
At the bottom the Current Zoom is shown.
Check the  Visible rules only option at the top of the dialog
to filter the list of rules to only those that are visible at the current zoom level.
This makes it easier to work with complex vector styling and to locate troublesome rules.
The
Visible rules only option at the top of the dialog
to filter the list of rules to only those that are visible at the current zoom level.
This makes it easier to work with complex vector styling and to locate troublesome rules.
The  Filter rules text box also helps you easily find a rule,
by searching the Label, Layer and Filter fields.
Filter rules text box also helps you easily find a rule,
by searching the Label, Layer and Filter fields.
In 19.3. ábra we set up style for the OpenStreetMap landuse layer.
For better visibility most of the rules are deselected.
19.3.3.2. Rétegmegjelenítés
From the Symbology tab, you can also set some options that invariably act on all features of the layer:
Átlátszatlanság: Ezzel az eszközzel láthatóvá teheti a térképvásznon az alsóbb rétegeket. A csúszkával a vektorréteg láthatóságát az igényeihez igazíthatja. A csúszka melletti menüben a láthatóság százalékos mértékét is pontosan meghatározhatja.
Blending mode: You can achieve special rendering effects with these tools that you may previously only know from graphics programs. The pixels of your overlaying and underlaying layers are mixed through the settings described in Keverési módok.
19.3.3.3. Styles
Available at the bottom of most of the tabs, the menu provides shortcuts to save, load, create, switch styles to apply to the vector tiles. Vector tiles can have their style saved from QGIS as QML files and they can be imported as:
QML fájlból (QML – a QGIS stílusfájl formátuma)
MapBox GL Json stíluskonfigurációs fájlból
More details at Rétegtulajdonságok mentése és megosztása.
19.3.4. Megjelenítési beállítások
Under Scale dependent visibility,
you can set the Maximum (inclusive)
and Minimum (exclusive) scales,
defining a range of scales in which features will be visible.
Out of this range, they are hidden.
The  Set to current canvas scale button helps you
use the current map canvas scale as boundary of the range visibility.
See Méretarányfüggő láthatóság választó for more information.
Set to current canvas scale button helps you
use the current map canvas scale as boundary of the range visibility.
See Méretarányfüggő láthatóság választó for more information.
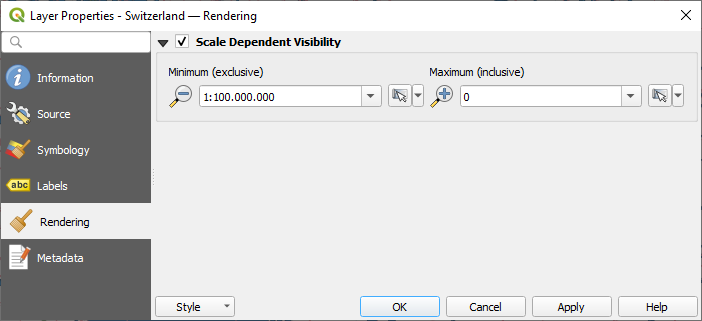
19.4. ábra Vector Tiles Properties - Rendering Dialog
19.3.5. Metaadatok beállításai
A  Metaadatok lapon lehetőség nyílik a réteghez metaadat-jelentés létrehozására és szerkesztésére. További információért lásd a Metaadatok fejezetet.