The Label Item
The Label item is a tool that helps decorate your map with
texts that would help to understand it; it can be the title, author, data
sources or any other information…
You can add a label with the  Add Label tool following
items creation instructions and manipulate it the
same way as exposed in Interacting with layout items.
Add Label tool following
items creation instructions and manipulate it the
same way as exposed in Interacting with layout items.
By default, the label item provides a default text that you can customize using its Item Properties panel. Other than the items common properties, this feature has the following functionalities (see figure_layout_label):
Label Item Properties Panel
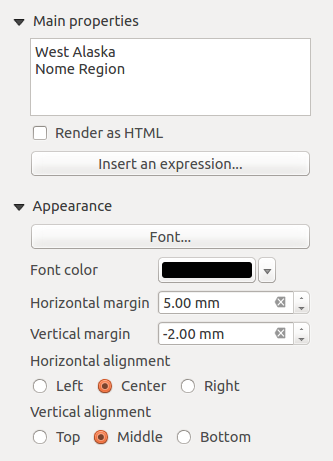
Main properties
The Main properties group is the place to provide the text (it can
be in HTML) or the expression to build the label. Expressions need to be
surrounded by [% and %] in order to be interpreted as such.
Labels can be interpreted as HTML code: check
 Render as HTML. You can now insert a URL, a clickable image that
links to a web page or something more complex.
Render as HTML. You can now insert a URL, a clickable image that
links to a web page or something more complex.You can also use expressions: click on Insert an expression button, write your formula as usual and when the dialog is applied, QGIS automatically adds the surrounding characters.
Note
Clicking the Insert an Expression button when no selection is made in the textbox will append the new expression to the existing text. If you want to update an existing text, you need to select it the part of interest beforehand.
You can combine HTML rendering and expressions, leading to e.g. a text like:
[% '<b>Check out the new logo for ' || '<a href="https://www.qgis.org" title="Nice logo" target="_blank">QGIS ' ||@qgis_short_version || '</a>' || ' : <img src="https://qgis.org/en/_downloads/qgis-icon128.png" alt="QGIS icon"/>' %]
which will render:
Check out the new logo for QGIS 3.0 : ![]()
Appearance
Define Font by clicking on the Font… button or a Font color by pushing the color widget.
You can specify different horizontal and vertical margins in
mm. This is the margin from the edge of the layout item. The label can be positioned outside the bounds of the label e.g. to align label items with other items. In this case you have to use negative values for the margin.Using the text alignment is another way to position your label. It can be:
Left, Center, Right or Justify for Horizontal alignment
and Top, Middle, Bottom for Vertical alignment.
Exploring expressions in a label item
Below some examples of expressions you can use to populate the label item with
interesting information - remember that the code, or at least the calculated part,
should be surrounded by [% and %] in the Main properties frame:
Display a title with the current atlas feature value in “field1”:
'This is the map for ' || "field1"
or, written in the Main properties section:
This is the map for [% "field1" %]
Add a pagination for processed atlas features (eg,
Page 1/10):concat( 'Page ', @atlas_featurenumber, '/', @atlas_totalfeatures )
Return the X coordinate of the bottom left corner of a map canvas:
x_min( map_get( item_variables( 'Map 1' ), 'map_extent' ) )
Retrieve the name of the layers in the current layout ‘Map 1’ item, and formats in one name by line:
array_to_string(
  array_foreach(
    map_get( item_variables( 'Map 1' ), 'map_layers' ), -- retrieve the layers list
    layer_property( @element, 'name' ) -- retrieve each layer name
  ),
  '\n' -- converts the list to string separated by breaklines
)