8.1. Lesson: Working with Raster Data
Raster data is quite different from vector data. Vector data has discrete features constructed out of vertices, and perhaps connected with lines and/or areas. Raster data, however, is like any image. Although it may portray various properties of objects in the real world, these objects don’t exist as separate objects; rather, they are represented using pixels of various different color values.
During this module you’re going to use raster data to supplement your existing GIS analysis.
The goal for this lesson: To learn how to work with raster data in the QGIS environment.
8.1.1.  Follow Along: Loading Raster Data
Raster data can be loaded with the same methods we used for vector data. However we suggest to use the Browser Panel.
Open the Browser Panel and expand the
exercise_data/rasterfolder.Load all the data in this folder:
3320C_2010_314_RGB_LATLNG.tif3320D_2010_315_RGB_LATLNG.tif3420B_2010_328_RGB_LATLNG.tif3420C_2010_327_RGB_LATLNG.tif
You should see the following map:
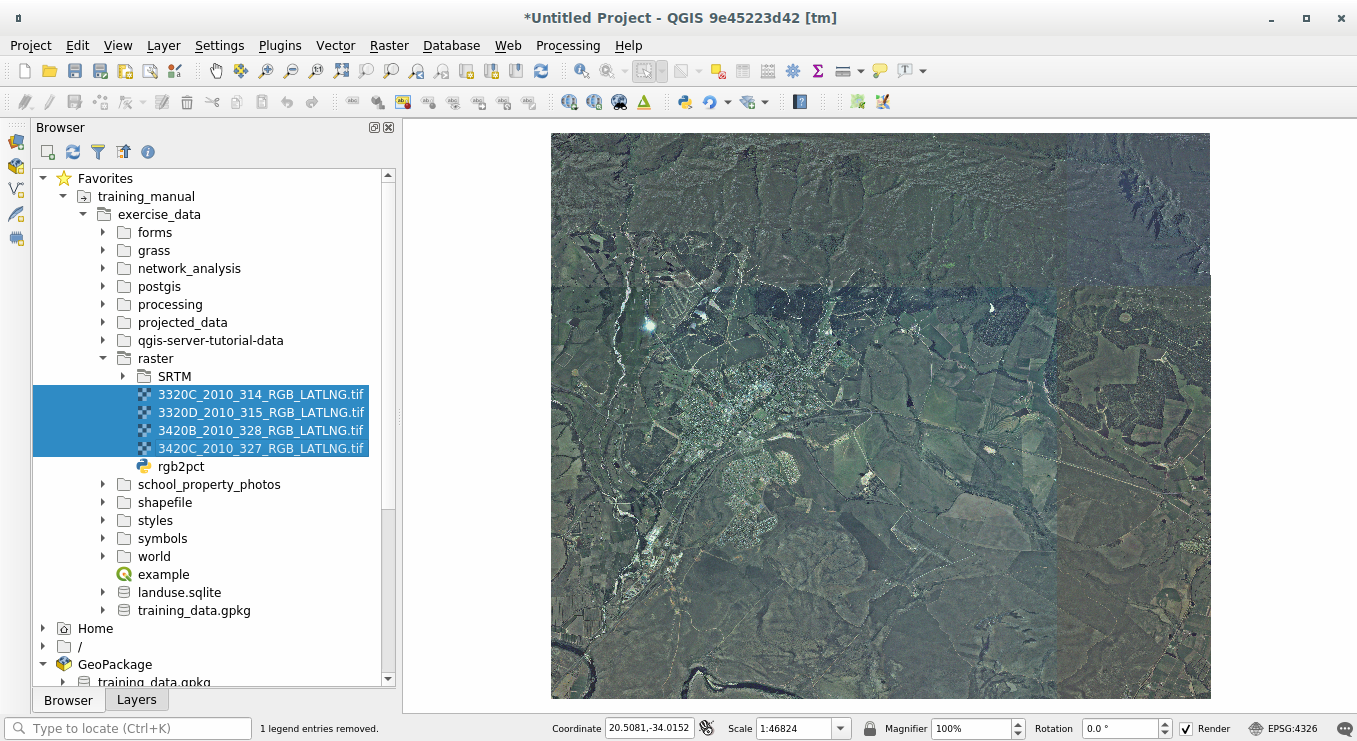
There we have it - four aerial photographs covering our whole study area.
8.1.2. Follow Along: Create a Virtual Raster
Now as you can see from this, your solution layer lies across all four photographs. What this means is that you’re going to have to work with four rasters all the time. That’s not ideal; it would be better to have one file for one (composite) image, right?
Luckily, QGIS allows you to do exactly this, and without needing to actually create a new raster file, which could take up a lot of space. Instead, you can create a Virtual Raster. This is also often called a Catalog, which explains its function. It’s not really a new raster. Rather, it’s a way to organize your existing rasters into one catalog: one file for easy access.
To make a catalog we will use the .
Open the Build virtual raster algorithm from the ;
In the dialog that appears click on the … button next to the Input layers parameter and check all the layers or use the Select All button;
Uncheck the Place each input file into a separate band parameter- Notice the text field below. What this dialog is actually doing is that it’s writing that text for you. It’s a long command that QGIS is going to run.
Note
Keep in mind that you can copy and paste the text in the
OSGeo Shell(Windows user) orTerminal(Linux and OSX users) to run the command. You can also create a script for each GDAL command. This is very handy when the procedure is taking a long time or when you want to schedule specific tasks. Use the Help button to get more help on the syntax of GDAL commands.Finally click on Run.
Note
As you know from the previous modules, Processing creates temporary layers by default. To save the file click on the … button.
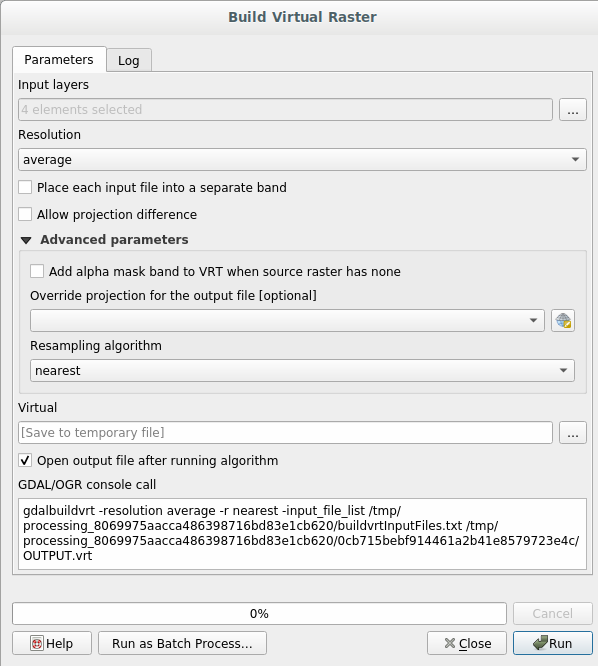
You can now remove the original four rasters from the Layers Panel and leave only the output virtual catalog raster.
8.1.3.  Transforming Raster Data
The above methods allow you to virtually merge datasets using a catalog, and to reproject them “on the fly”. However, if you are setting up data that you’ll be using for quite a while, it may be more efficient to create new rasters that are already merged and reprojected. This improves performance while using the rasters in a map, but it may take some time to set up initially.
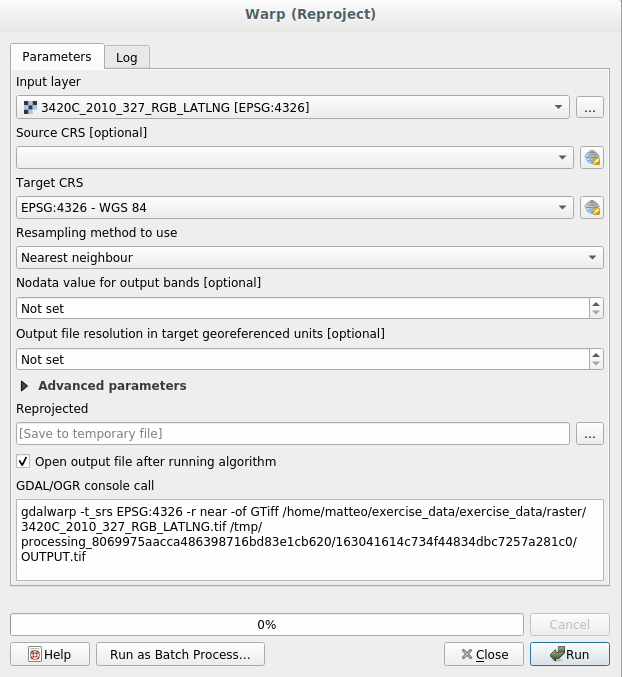
8.1.3.1. Reprojecting rasters
Open Warp (reproject) from .
You can also reproject virtual rasters (catalogs), enable multithreaded processing, and more.
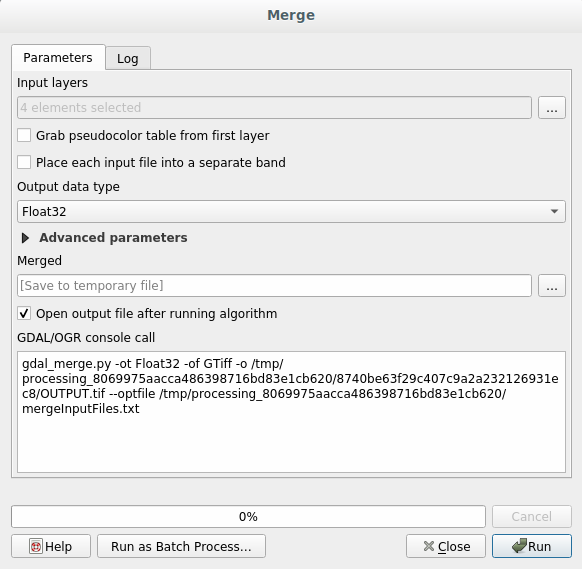
8.1.3.2. Merging rasters
If you need to create a new raster layer and save it to disk you can use the merge algorithm.
Note
Depending on how many raster files you are merging and their resolution, the new raster file created can be really big. Consider instead to create a raster catalog as described in the Create a Virtual Raster section.
Click on the Merge algorithm from the menu.
As we did for the Create a Virtual raster, use the … button to choose which layers you want to merge.
You can also specify a Virtual raster as input, and then all of the rasters that it consists of will be processed.
If you know the GDAL library, you can also add your own options by opening the Advanced parameters menu.
8.1.4. In Conclusion
QGIS makes it easy to include raster data into your existing projects.
8.1.5. What’s Next?
Next, we’ll use raster data that isn’t aerial imagery, and see how symbolization is useful in the case of rasters as well.