Getting Started
Installation on Debian-based systems
At this point, we will give a short and simple installation how-to for a minimal working configuration on Debian based systems. However, many other distributions and OSs provide packages for QGIS Server.
Requirements and steps to install QGIS Server on a Debian based system are provided in QGIS installers page. Please refer to that section.
HTTP Server configuration
Apache
Apache and its mod_fcgid module may be used for executing QGIS Server.
Install Apache and mod_fcgid:
sudo apt install apache2 libapache2-mod-fcgid
Here we assume that an Apache VirtualHost is already set up. For example this is what a basic
VirtualHost configuration may look like:
<VirtualHost *:80>

 ServerAdmin webmaster@localhost
 DocumentRoot /var/www/html

 ErrorLog ${APACHE_LOG_DIR}/error.log
 CustomLog ${APACHE_LOG_DIR}/access.log combined

</VirtualHost>
Note
On Debian systems, a default VirtualHost is available in
/etc/apache2/sites-available/000-default.conf.
Let’s now add mod_fcgid configuration directives for QGIS Server:
<VirtualHost *:80>

 ServerAdmin webmaster@localhost
 DocumentRoot /var/www/html

 ErrorLog ${APACHE_LOG_DIR}/error.log
 CustomLog ${APACHE_LOG_DIR}/access.log combined

 FcgidInitialEnv DISPLAY ":99"
 FcgidInitialEnv QGIS_SERVER_LOG_LEVEL "0"
 FcgidInitialEnv QGIS_SERVER_LOG_STDERR "1"

 <Location /qgisserver>
  SetHandler fcgid-script
  FcgidWrapper /usr/lib/cgi-bin/qgis_mapserv.fcgi virtual
  Options +ExecCGI -MultiViews +FollowSymLinks
  Require all granted
 </Location>

</VirtualHost>
See the mod_fcgid documentation for more information on the Fcgid parameters
used. And see below to understand when and why the DISPLAY environment variable
needs to be set.
Now restart Apache for the new configuration to be taken into account:
sudo service apache2 restart
QGIS Server is now available at http://localhost/qgisserver.
NGINX
You can also use QGIS Server with NGINX. Unlike Apache, NGINX does not automatically spawn FastCGI processes. The FastCGI processes are to be started by something else.
On Debian-based systems, you may use fcgiwrap or spawn-fcgi to start and manage the QGIS Server processes. Official Debian packages exist for both.
Note
fcgiwrap is easier to set up than spawn-fcgi, because it’s already wrapped in a Systemd service. But it also leads to a solution that is much slower than using spawn-fcgi. With fcgiwrap a new QGIS Server process is created on each request, meaning that the QGIS Server initialization process, which includes reading and parsing the QGIS project file, is done on each request. With spawn-fcgi, the QGIS Server process remains alive between requests, resulting in much better performance. For that reason, spawn-fcgi is recommended for production use.
Install NGINX:
sudo apt install nginx
fcgiwrap
If you want to use fcgiwrap to run QGIS Server, you first have to install the corresponding package:
sudo apt install fcgiwrap
Then, introduce the following block in your NGINX server configuration:
1 2 3 4 5 6 | location /qgisserver {
gzip off;
include fastcgi_params;
fastcgi_pass unix:/var/run/fcgiwrap.socket;
fastcgi_param SCRIPT_FILENAME /usr/lib/cgi-bin/qgis_mapserv.fcgi;
}
|
Finally, restart NGINX and fcgiwrap to take into account the new configuration:
sudo service nginx restart
sudo service fcgiwrap restart
QGIS Server is now available at http://localhost/qgisserver.
spawn-fcgi
If you prefer to use spawn-fcgi instead of fcgiwrap, the first step is to install the package:
sudo apt install spawn-fcgi
Then, introduce the following block in your NGINX server configuration:
location /qgisserver {
    gzip           off;
    include        fastcgi_params;
    fastcgi_pass   unix:/var/run/qgisserver.socket;
}
And restart NGINX to take into account the new configuration:
sudo service nginx restart
Finally, considering that there is no default service file for spawn-fcgi, you have to manually start QGIS Server in your terminal:
sudo spawn-fcgi -s /var/run/qgisserver.socket \
                -U www-data -G www-data -n \
                /usr/lib/bin/cgi-bin/qgis_mapserv.fcgi
Of course, you may write an init script (like a qgisserver.service file
with Systemd) to start QGIS Server at boot time or whenever you want.
QGIS Server is now available at http://localhost/qgisserver.
Note
With the above command spawn-fcgi spawns only one QGIS Server process. To use more than one QGIS Server process you can combine spawn-fcgi with the multiwatch tool, which is also packaged in Debian.
Configuration
The include fastcgi_params; used in previous configuration is important
as it adds the parameters from /etc/nginx/fastcgi_params:
fastcgi_param  QUERY_STRING       $query_string;
fastcgi_param  REQUEST_METHOD     $request_method;
fastcgi_param  CONTENT_TYPE       $content_type;
fastcgi_param  CONTENT_LENGTH     $content_length;

fastcgi_param  SCRIPT_NAME        $fastcgi_script_name;
fastcgi_param  REQUEST_URI        $request_uri;
fastcgi_param  DOCUMENT_URI       $document_uri;
fastcgi_param  DOCUMENT_ROOT      $document_root;
fastcgi_param  SERVER_PROTOCOL    $server_protocol;
fastcgi_param  REQUEST_SCHEME     $scheme;
fastcgi_param  HTTPS              $https if_not_empty;

fastcgi_param  GATEWAY_INTERFACE  CGI/1.1;
fastcgi_param  SERVER_SOFTWARE    nginx/$nginx_version;

fastcgi_param  REMOTE_ADDR        $remote_addr;
fastcgi_param  REMOTE_PORT        $remote_port;
fastcgi_param  SERVER_ADDR        $server_addr;
fastcgi_param  SERVER_PORT        $server_port;
fastcgi_param  SERVER_NAME        $server_name;

# PHP only, required if PHP was built with --enable-force-cgi-redirect
fastcgi_param  REDIRECT_STATUS    200;
Of course, you may override these variables in your own configuration. For example:
include fastcgi_params;
fastcgi_param SERVER_NAME domain.name.eu;
Moreover, you can use some Environment variables to configure QGIS Server.
With NGINX as HTTP Server, you have to use fastcgi_param to define these
variables as shown below:
fastcgi_param  QGIS_DEBUG              1;
fastcgi_param  QGIS_SERVER_LOG_FILE    /tmp/qgis-000.log;
fastcgi_param  QGIS_SERVER_LOG_LEVEL   0;
Note
When using spawn-fcgi, you may directly define environment variables
before running the server. For example:
export QGIS_SERVER_LOG_FILE=/home/user/qgis.log
Xvfb
QGIS Server needs a running X Server to be fully usable. But if you don’t have one, you may use xvfb to have a virtual X environment.
To install the package:
sudo apt install xvfb
Then, according to your HTTP server, you should configure the DISPLAY parameter or directly use xvfb-run.
For example with NGINX and spawn-fcgi using xvfb-run:
xvfb-run /usr/bin/spawn-fcgi -f /usr/lib/bin/cgi-bin/qgis_mapserv.fcgi \
                             -s /tmp/qgisserver.socket \
                             -G www-data -U www-data -n
The other option is to start a virtual X server environment with a specific display number thanks to Xvfb:
/usr/bin/Xvfb :99 -screen 0 1024x768x24 -ac +extension GLX +render -noreset
Then we just have to set the DISPLAY environment variable in the HTTP server configuration. For example with NGINX:
fastcgi_param DISPLAY ":99";
Or with Apache:
FcgidInitialEnv DISPLAY ":99"
Installation on Windows
QGIS Server can also be installed on Windows systems. While the QGIS Server package is available in the 64 bit version of the OSGeo4W network installer (https://qgis.org/en/site/forusers/download.html) there is no Apache (or other web server) package available, so this must be installed by other means.
A simple procedure is the following:
Download the XAMPP installer (https://www.apachefriends.org/download.html) for Windows and install Apache

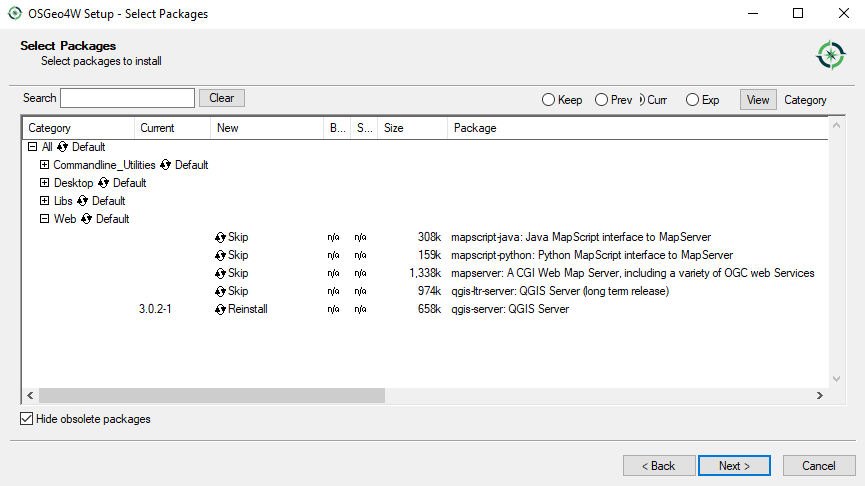
Download the OSGeo4W installer, follow the “Advanced Install” and install both the QGIS Desktop and QGIS Server packages
Edit the httpd.conf file (
C:\xampp\apache\httpd.confif the default installation paths have been used) and make the following changes:
From:
ScriptAlias /cgi-bin/ "C:/xampp/cgi-bin/"
To:
ScriptAlias /cgi-bin/ "c:/OSGeo4W64/apps/qgis/bin/"
From:
<Directory "C:/xampp/cgi-bin">
AllowOverride None
Options None
Require all granted
</Directory>
To:
<Directory "c:/OSGeo4W64/apps/qgis/bin">
SetHandler cgi-script
AllowOverride None
Options ExecCGI
Order allow,deny
Allow from all
Require all granted
</Directory>
From:
AddHandler cgi-script .cgi .pl .asp
To:
AddHandler cgi-script .cgi .pl .asp .exe
Then at the bottom of httpd.conf add:
SetEnv GDAL_DATA "C:\OSGeo4W64\share\gdal"
SetEnv QGIS_AUTH_DB_DIR_PATH "C:\OSGeo4W64\apps\qgis\resources"
SetEnv PYTHONHOME "C:\OSGeo4W64\apps\Python36"
SetEnv PATH "C:\OSGeo4W64\bin;C:\OSGeo4W64\apps\qgis\bin;C:\OSGeo4W64\apps\Qt5\bin;C:\WINDOWS\system32;C:\WINDOWS;C:\WINDOWS\System32\Wbem"
SetEnv QGIS_PREFIX_PATH "C:\OSGeo4W64\apps\qgis"
SetEnv QT_PLUGIN_PATH "C:\OSGeo4W64\apps\qgis\qtplugins;C:\OSGeo4W64\apps\Qt5\plugins"
Restart the Apache web server from the XAMPP Control Panel and open browser window to testing a GetCapabilities request to QGIS Server
http://localhost/cgi-bin/qgis_mapserv.fcgi.exe?SERVICE=WMS&VERSION=1.3.0&REQUEST=GetCapabilities
Serve a project
Now that QGIS Server is installed and running, we just have to use it.
Obviously, we need a QGIS project to work on. Of course, you can fully customize your project by defining contact information, precise some restrictions on CRS or even exclude some layers. Everything you need to know about that is described later in Configure your project.
But for now, we are going to use a simple project already configured. To retrieve the project:
cd /home/user/
wget https://github.com/qgis/QGIS-Training-Data/archive/QGIS-Training-Data-v2.0.zip -O qgis-server-tutorial.zip
unzip qgis-server-tutorial.zip
mv QGIS-Training-Data-QGIS-Training-Data-v2.0/training_manual_data/qgis-server-tutorial-data ~
The project file is qgis-server-tutorial-data-master/world.qgs. Of course,
you can use your favorite GIS software to open this file and take a look on the
configuration and available layers.
By opening the project and taking a quick look on layers, we know that 4 layers are currently available:
airports
places
countries
countries_shapeburst
You don’t have to understand the full request for now but you may retrieve a map with some of the previous layers thanks to QGIS Server by doing something like this in your web browser to retrieve the countries layer:
http://localhost/qgisserver?
  MAP=/home/user/qgis-server-tutorial-data-master/world.qgs&
  LAYERS=countries&
  SERVICE=WMS&
  REQUEST=GetMap&
  CRS=EPSG:4326&
  WIDTH=400&
  HEIGHT=200
If you obtain the next image, then QGIS Server is running correctly:
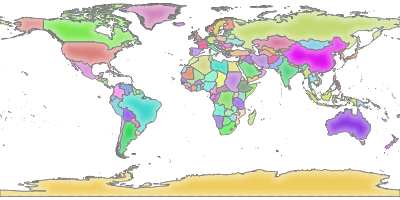
Server response to a basic GetMap request
Note that you may define PROJECT_FILE environment variable to use a project by default instead of giving a MAP parameter (see Environment variables).
For example with spawn-fcgi:
export PROJECT_FILE=/home/user/qgis-server-tutorial-data-master/world.qgs
spawn-fcgi -f /usr/lib/bin/cgi-bin/qgis_mapserv.fcgi \
           -s /var/run/qgisserver.socket \
           -U www-data -G www-data -n
Configure your project
To provide a new QGIS Server WMS, WFS or WCS, you have to create a QGIS project file with some data or use one of your current project. Define the colors and styles of the layers in QGIS and the project CRS, if not already defined.
Definitions for a QGIS Server WMS/WFS/WCS project
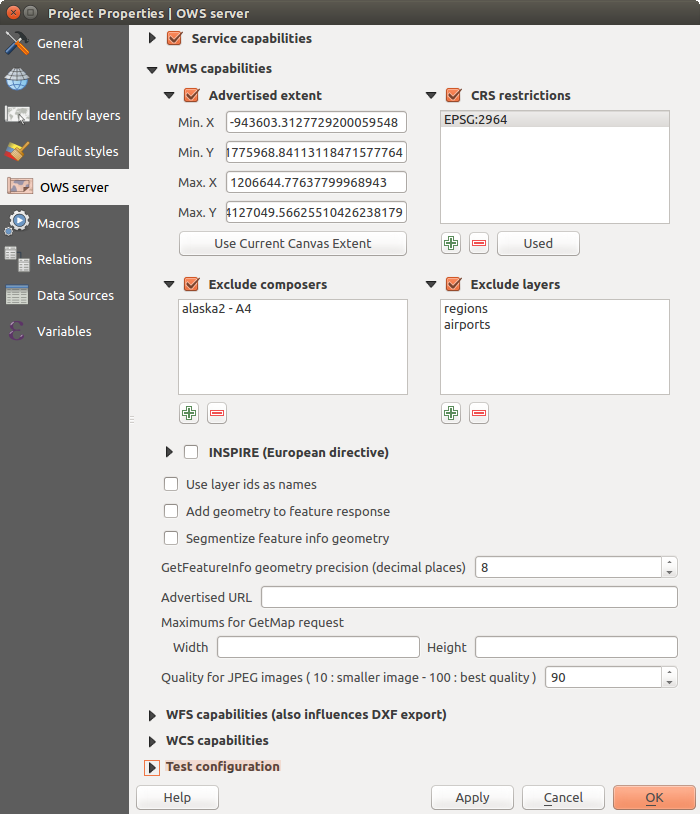
Then, go to the QGIS Server menu of the
dialog and provide
some information about the OWS in the fields under
Service Capabilities.
This will appear in the GetCapabilities response of the WMS, WFS or WCS.
If you don’t check  Service capabilities,
QGIS Server will use the information given in the
Service capabilities,
QGIS Server will use the information given in the wms_metadata.xml file
located in the cgi-bin folder.
WMS capabilities
In the WMS capabilities section, you can define
the extent advertised in the WMS GetCapabilities response by entering
the minimum and maximum X and Y values in the fields under
Advertised extent.
Clicking Use Current Canvas Extent sets these values to the
extent currently displayed in the QGIS map canvas.
By checking CRS restrictions, you can restrict
in which coordinate reference systems (CRS) QGIS Server will offer
to render maps. It is recommended that you restrict the offered CRS as this
reduces the size of the WMS GetCapabilities response.
Use the  button below to select those CRSs
from the Coordinate Reference System Selector, or click Used
to add the CRSs used in the QGIS project to the list.
button below to select those CRSs
from the Coordinate Reference System Selector, or click Used
to add the CRSs used in the QGIS project to the list.
If you have print layouts defined in your project, they will be listed in the
GetProjectSettings response, and they can be used by the GetPrint request to
create prints, using one of the print layout layouts as a template.
This is a QGIS-specific extension to the WMS 1.3.0 specification.
If you want to exclude any print layout from being published by the WMS,
check Exclude layouts and click the
button below.
Then, select a print layout from the Select print layout dialog
in order to add it to the excluded layouts list.
If you want to exclude any layer or layer group from being published by the
WMS, check Exclude Layers and click the
button below.
This opens the Select restricted layers and groups dialog, which
allows you to choose the layers and groups that you don’t want to be published.
Use the Shift or Ctrl key if you want to select multiple entries.
It is recommended that you exclude from publishing the layers that you don’t
need as this reduces the size of the WMS GetCapabilities response which leads
to faster loading times on the client side.
You can receive requested GetFeatureInfo as plain text, XML and GML. Default is XML, text or GML format depends the output format chosen for the GetFeatureInfo request.
If you wish, you can check Add geometry to feature response.
This will include in the GetFeatureInfo response the geometries of the
features in a text format.
As many web clients can’t display circular arcs in geometries you have the option
to segmentize the geometry before sending it to the client in a GetFeatureInfo
response. This allows such clients to still display a feature’s geometry
(e.g. for highlighting the feature). You need to check the
Segmentize feature info geometry to activate the option.
You can also use the GetFeatureInfo geometry precision option to set the precision of the GetFeatureInfo geometry. This enables you to save bandwidth when you don’t need the full precision.
If you want QGIS Server to advertise specific request URLs in the WMS GetCapabilities response, enter the corresponding URL in the Advertised URL field.
Furthermore, you can restrict the maximum size of the maps returned by the GetMap request by entering the maximum width and height into the respective fields under Maximums for GetMap request.
If one of your layers uses the Map Tip display (i.e. to show text using expressions) this will be listed inside the GetFeatureInfo output. If the layer uses a Value Map for one of its attributes, this information will also be shown in the GetFeatureInfo output.
WFS capabilities
In the WFS capabilities area you can select the layers you want to publish as WFS, and specify if they will allow update, insert and delete operations. If you enter a URL in the Advertised URL field of the WFS capabilities section, QGIS Server will advertise this specific URL in the WFS GetCapabilities response.
WCS capabilities
In the WCS capabilities area, you can select the layers that you want to publish as WCS. If you enter a URL in the Advertised URL field of the WCS capabilities section, QGIS Server will advertise this specific URL in the WCS GetCapabilities response.
Fine tuning your OWS
For vector layers, the Fields menu of the dialog allows you to define for each attribute if it will be published or not. By default, all the attributes are published by your WMS and WFS. If you don’t want a specific attribute to be published, uncheck the corresponding checkbox in the WMS or WFS column.
You can overlay watermarks over the maps produced by your WMS by adding text annotations or SVG annotations to the project file. See the Annotation Tools section for instructions on creating annotations. For annotations to be displayed as watermarks on the WMS output, the Fixed map position checkbox in the Annotation text dialog must be unchecked. This can be accessed by double clicking the annotation while one of the annotation tools is active. For SVG annotations, you will need either to set the project to save absolute paths (in the General menu of the dialog) or to manually modify the path to the SVG image so that it represents a valid relative path.