Важно
Перевод - это работа сообщества : ссылка:Вы можете присоединиться. Эта страница в настоящее время переводится |прогресс перевода|.
25.2.1. Плагин для управления базами данных
The DB Manager Plugin is intended to be the main tool to integrate and
manage spatial database formats supported by QGIS (PostgreSQL, SpatiaLite,
GeoPackage, Oracle Spatial, Virtual layers) in one user interface.
The  DB Manager Plugin provides several features.
You can drag layers from the QGIS Browser into the DB Manager, and it
will import your layer into your spatial database.
You can drag and drop tables between spatial databases and they will
get imported.
DB Manager Plugin provides several features.
You can drag layers from the QGIS Browser into the DB Manager, and it
will import your layer into your spatial database.
You can drag and drop tables between spatial databases and they will
get imported.
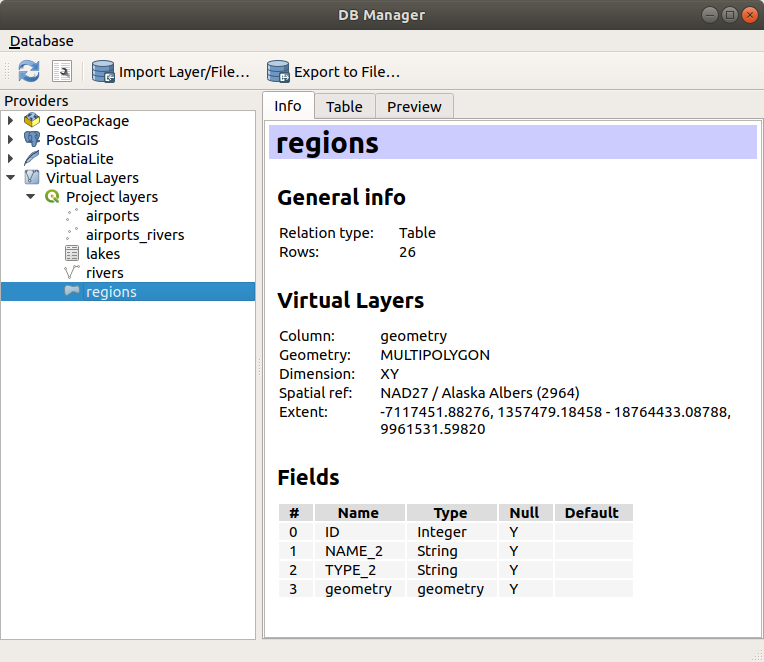
Рис. 25.4 Диалог менеджера БД
The menu allows you to connect to an existing database, to start the SQL window and to exit the DB Manager Plugin. Once you are connected to an existing database, the menus (relevant for DBMSs, such as PostgreSQL) and will appear.
Меню включает инструменты для создания и удаления (только если пусто) схем и, если доступна топология (например, с топологией PostGIS), для запуска TopoViewer.
Меню позволяет создавать и редактировать таблицы, а также удалять таблицы и представления. Также можно опустошать таблицы и перемещать таблицы между схемами. Вы можете Запустить вакуумный анализ для выбранной таблицы. Функция Vacuum освобождает пространство и делает его доступным для повторного использования, а функция analyze обновляет статистику, которая используется для определения наиболее эффективного способа выполнения запроса. Change Logging… позволяет добавить поддержку ведения журнала изменений в таблицу. Наконец, вы можете Импортировать слой/файл… и Экспортировать в файл….
Примечание
С помощью DB Manager можно добавлять комментарии к таблицам и столбцам базы данных PostgreSQL.
В окне Providers перечислены все существующие базы данных, поддерживаемые QGIS. Двойным щелчком мыши можно подключиться к базе данных. С помощью правой кнопки мыши можно переименовывать и удалять существующие схемы и таблицы. Таблицы также можно добавлять на холст QGIS с помощью контекстного меню.
При подключении к базе данных в главном окне DB Manager открываются четыре вкладки. Вкладка Info предоставляет информацию о таблице и ее геометрии, а также о существующих полях, ограничениях и индексах. Она позволяет создать пространственный индекс для выбранной таблицы. Вкладка Table отображает таблицу, а вкладка Preview отображает геометрию в виде предварительного просмотра. Когда вы открываете окно SQL Window, оно будет помещено в новую вкладку.
25.2.1.1. Работа с окном SQL
Вы можете использовать DB Manager для выполнения SQL-запросов к вашей пространственной базе данных. Запросы можно сохранять и загружать, а SQL Query Builder поможет вам сформулировать запросы. Вы даже можете просмотреть пространственный вывод, отметив Загрузить как новый слой и указав Колонки с уникальными значениями (IDs), Геометрический столбец и Имя слоя (префикс). Можно выделить часть SQL, чтобы при нажатии Ctrl+R или нажатии кнопки Execute выполнялась только эта часть.
QGIS also adds support for the REGEXP function in some providers.
This allows users to use regular expressions in SQL filters or expressions, for example:
SELECT * FROM places WHERE name REGEXP '^A';
This returns all features where the name field starts with the letter A.
После выполнения запроса вы можете выбрать определенные ячейки в наборе результатов. Используйте сочетание клавиш Ctrl+C, чтобы скопировать выделенные ячейки в буфер обмена. Скопированные данные доступны в виде отформатированной таблицы. Это позволит вам вставить данные в другие приложения, например в электронную таблицу, где они будут отображаться в виде таблицы.
Кнопка История запросов хранит последние 20 запросов к каждой базе данных и провайдеру.
Двойной щелчок по записи добавит строку в окно SQL.
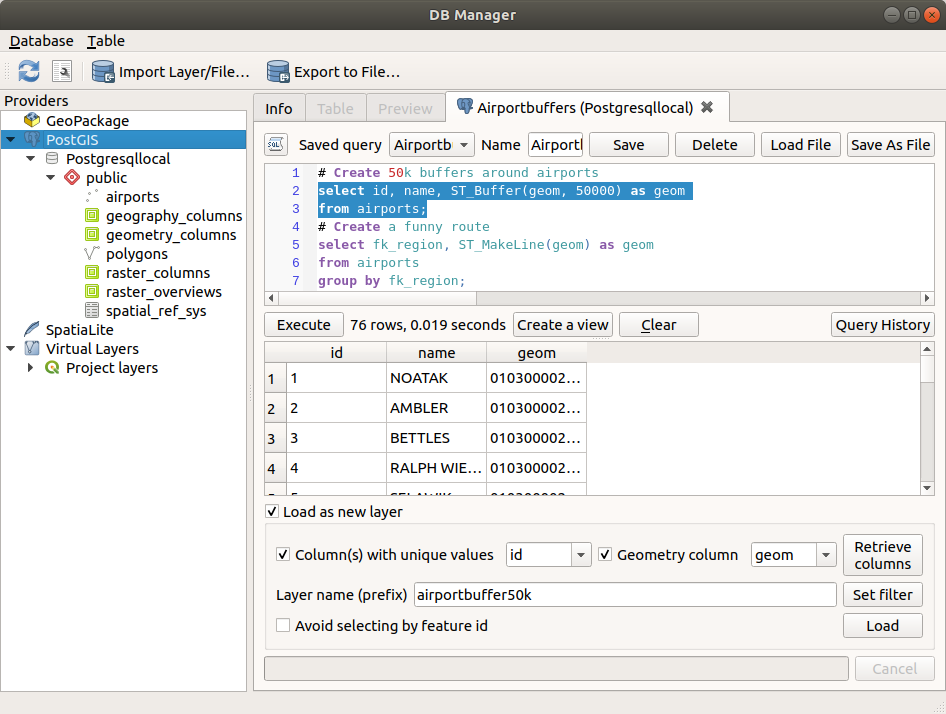
Рис. 25.5 Выполнение SQL-запросов в окне SQL DB Manager
Примечание
Окно SQL также можно использовать для создания виртуальных слоев. В этом случае вместо выбора базы данных выберите QGIS Layers в разделе Virtual Layers перед открытием окна SQL. Инструкции по использованию синтаксиса SQL см. в Creating virtual layers.
25.2.1.2. Import Vector Layer
You can import layer or file into your database. Here are the parameters you can set for the import process:
Input: Select the layer or file to import. Using the dropdown menu, select from the list of loaded layers in QGIS or click on the … button to select a file from disk. Check the
 Import only selected features to import only the selected
features of the layer.
Import only selected features to import only the selected
features of the layer.Output table: Choose the Schema and provide a name for the new table.
Options: Here are some options for the import process:
- Primary key: Provide naming for the primary key field.
By default, it is named
id. - Geometry column: Provide naming for the geometry column.
By default, it is named
geom. - Source SRID: Define the SRID for the geometry column.
By default, it uses the layer’s CRS.
- Target SRID: Define the target SRID to reproject the geometries
during the import process. By default, it uses the layer’s CRS.
- Encoding: Define the encoding of the source data. By default, it uses
Automatic. It is QGIS’s automatic detection mode that attempts to guess the file’s character encoding based on available metadata or system locale. - Replace destination table (if exists): If a table with the same name already exists in the selected schema,
it will be replaced.
- Do not promote to multi-part: Geometries will be imported as single-part geometries.
- Convert field names to lower case: All field names will be converted to lower case.
- Create spatial index: A spatial index will be created on the geometry column after import.
- Comment: Add comments to table. Only available for PostgreSQL databases.

Рис. 25.6 Importing a vector layer into a spatial database using DB Manager
25.2.1.3. Export to Vector File
To export a table from your database to a vector file, select the desired Format and Save as location. Under Options, you can set the following parameters:
- Source SRID: Define the source SRID of the geometry column.
By default, it uses the layer’s CRS.
- Target SRID: Define the target SRID to reproject the geometries
during the export process. By default, it uses the layer’s CRS.
- Encoding: Define the encoding of the output data.
- Replace destination table (if exists): If a table with the same name already exists at the selected location,
it will be replaced.

Рис. 25.7 Exporting a table to a vector file using DB Manager