Svarbu
Vertimas yra bendruomenės pastangos, prie kurių jūs galite prisijungti. Šis puslapis šiuo metu išverstas 91.35%.
2. Pradžia
2.1. Diegimas Debian-pagrindo sistemose
Mes pateiksime trumpą bet paprastą instrukciją, kaip sukurti minimalią veikiančią konfigūraciją Debian tipo sistemose (įskaitant Ubuntu ir jos išvestines). Dauguma kitų distribucijų ir OS teikia QGIS Serverio paketus.
Pastaba
Ubuntu jūs galite naudoti jūsų paprastą naudotoją, pridėdami sudo prie komandų, kurioms reikia administravimo teisių. Debian sistemose jūs galite dirbti kaip administratorius (root), nenaudodami sudo.
Reikalavimai ir žingsniai, kaip pridėti oficialias QGIS repozitorijas ir įdiegti QGIS Serverį Debian tipo sistemose rasite QGIS diegimo puslapyje. Jūs tikriausiai norite įdiegti bent jau paskutinę Ilgo laikotarpio laidą (LTS).
Sukonfigūravus paskirties versijos repozitoriją ir įdiegus QGIS Serverį, jūs galite patikrinti diegimą su:
/usr/lib/cgi-bin/qgis_mapserv.fcgi
Jei gausite tokią išvestį, serveris teisingai įdiegtas.
Pastaba
Priklausomai nuo QGIS versijos, galite matyti šiek tiek kitokią išvestį, kai paleidžiate qgis_mapserv.fcgi.
QFSFileEngine::open: No file name specified
Warning 1: Unable to find driver ECW to unload from GDAL_SKIP environment variable.
Warning 1: Unable to find driver ECW to unload from GDAL_SKIP environment variable.
Warning 1: Unable to find driver JP2ECW to unload from GDAL_SKIP environment variable.
Warning 1: Unable to find driver ECW to unload from GDAL_SKIP environment variable.
Warning 1: Unable to find driver JP2ECW to unload from GDAL_SKIP environment variable.
Content-Length: 206
Content-Type: text/xml; charset=utf-8

<ServiceExceptionReport version="1.3.0" xmlns="https://www.opengis.net/ogc">
 <ServiceException code="Service configuration error">Service unknown or unsupported</ServiceException>
</ServiceExceptionReport>
Pastaba
Kaip matote žemiau, QGIS grąžina būsenos kodą 400, kuris teisingai rodo, kad užklausa nepavyko, nes nėra aktyvios http sesijos. Tai nėra riktas ir nurodo, kad serveris veikia tinkamai.
Application path not initialized
Application path not initialized
Warning 1: Unable to find driver ECW to unload from GDAL_SKIP environment variable.
Warning 1: Unable to find driver ECW to unload from GDAL_SKIP environment variable.
Warning 1: Unable to find driver JP2ECW to unload from GDAL_SKIP environment variable.
"Loading native module /usr/lib/qgis/server/libdummy.so"
"Loading native module /usr/lib/qgis/server/liblandingpage.so"
"Loading native module /usr/lib/qgis/server/libwcs.so"
"Loading native module /usr/lib/qgis/server/libwfs.so"
"Loading native module /usr/lib/qgis/server/libwfs3.so"
"Loading native module /usr/lib/qgis/server/libwms.so"
"Loading native module /usr/lib/qgis/server/libwmts.so"
QFSFileEngine::open: No file name specified
Content-Length: 102
Content-Type: application/json
Server:  QGIS FCGI server - QGIS version 3.22.6-Białowieża
Status:  400
[{"code":"Bad request error","description":"Requested URI does not match any registered API handler"}]
Pridėkime pavyzdinį projektą. Galite naudoti savo arba pateikiamą Demonstraciniuose mokymo duomenyse:
mkdir /home/qgis/projects/
cd /home/qgis/projects/
wget https://github.com/qgis/QGIS-Training-Data/archive/release_3.22.zip
unzip release_3.22.zip
mv QGIS-Training-Data-release_3.22/exercise_data/qgis-server-tutorial-data/world.qgs .
mv QGIS-Training-Data-release_3.22/exercise_data/qgis-server-tutorial-data/naturalearth.sqlite .
Žinoma galite naudoti jūsų mėgstamiausią GIS programinę įrangą, kad atvertumėte šitą failą ir pažiūrėtumėte konfigūraciją bei teikiamus sluoksnius.
Kad galėtumėte tinkamai naudoti QGIS serverį, jums reikės HTTP serverio. Rekomenduojami variantai yra Apache ar NGINX.
2.1.1. Apache HTTP Serveris
Pastaba
Žemiau keiskite qgis.demo į jūsų serverio IP adresą.
Įdiekite Apache ir mod_fcgid:
apt install apache2 libapache2-mod-fcgid
Jūs galite paleisti QGIS Serverį jūsų numatytoje svetainėje, bet sukonfigūruokime atskirą virtualhost būtent tam, kaip pateikiama toliau.
Aplanke
/etc/apache2/sites-availablesukurkite failą, pavadintąqgis.demo.confsu tokiu turiniu:<VirtualHost *:80> ServerAdmin webmaster@localhost ServerName qgis.demo DocumentRoot /var/www/html # Apache logs (different than QGIS Server log) ErrorLog ${APACHE_LOG_DIR}/qgis.demo.error.log CustomLog ${APACHE_LOG_DIR}/qgis.demo.access.log combined # Longer timeout for WPS... default = 40 FcgidIOTimeout 120 FcgidInitialEnv LC_ALL "en_US.UTF-8" FcgidInitialEnv PYTHONIOENCODING UTF-8 FcgidInitialEnv LANG "en_US.UTF-8" # QGIS log FcgidInitialEnv QGIS_SERVER_LOG_STDERR 1 FcgidInitialEnv QGIS_SERVER_LOG_LEVEL 0 # default QGIS project SetEnv QGIS_PROJECT_FILE /home/qgis/projects/world.qgs # QGIS_AUTH_DB_DIR_PATH must lead to a directory writeable by the Server's FCGI process user FcgidInitialEnv QGIS_AUTH_DB_DIR_PATH "/home/qgis/qgisserverdb/" FcgidInitialEnv QGIS_AUTH_PASSWORD_FILE "/home/qgis/qgisserverdb/qgis-auth.db" # Set pg access via pg_service file SetEnv PGSERVICEFILE /home/qgis/.pg_service.conf FcgidInitialEnv PGPASSFILE "/home/qgis/.pgpass" # if qgis-server is installed from packages in debian based distros this is usually /usr/lib/cgi-bin/ # run "locate qgis_mapserv.fcgi" if you don't know where qgis_mapserv.fcgi is ScriptAlias /cgi-bin/ /usr/lib/cgi-bin/ <Directory "/usr/lib/cgi-bin/"> AllowOverride None Options +ExecCGI -MultiViews -SymLinksIfOwnerMatch Require all granted </Directory> <IfModule mod_fcgid.c> FcgidMaxRequestLen 26214400 FcgidConnectTimeout 60 </IfModule> </VirtualHost>
Pastaba
Kai kurios iš aukščiau matomų konfigūracijos parinkčių yra paaiškintos skiltyse Serverio aplinkos kintamieji ir pg_service faiilas.
Sukurkime aplankus, kuriuose bus saugomi QGIS Serverio žurnalai ir autentifikacijos duomenų bazė:
mkdir -p /var/log/qgis/
chown www-data:www-data /var/log/qgis
mkdir -p /home/qgis/qgisserverdb
chown www-data:www-data /home/qgis/qgisserverdb
Pastaba
www-datayra Apache naudotojas Debian paremtose sistemose ir mums reikia, kad Apache galėtų pasiekti tas vietas ir failus.chown www-data...komandos keičia atitinkamų aplankų ir failų savininkus įwww-data.
Dabar galime įjungti virtualų mazgą ir
fcgidmodulį, jei tai dar nebuvo padaryta:a2enmod fcgid a2enmod rewrite a2ensite qgis.demo
Dabar iš naujo paleiskite Apache, kad įsigaliotų nauja konfigūracija:
systemctl restart apache2
Dabar, kai Apache žino, kad turi atsakinėti į užklausas, skirtas http://qgis.demo, mums taipogi reikia nustatyti kliento sistemą, kad ji žinotų, kas yra
qgis.demo. Tai mes padarysime pridėdami127.0.0.1 qgis.demoį hosts failą.# Replace 127.0.0.1 with the IP of your server. sh -c "echo '127.0.0.1 qgis.demo' >> /etc/hosts"
Svarbu
Prisiminkite, kad tiek qgis.demo.conf, tiek /etc/hosts failai turi būti sukonfigūruoti, kad jūsų nustatymai veiktų. Jūs taipogi galite patikrinti prieigą prie jūsų QGIS Serverio iš kitų tinklo klientų (pvz. Windows ar macos mašinų) eidami į jų /etc/hosts failą ir nukreipdami vardą qgis.demo į tokį serverio IP, kokiu jis pasiekiamas tinkle (ne 127.0.0.1, nes tai yra vietinis IP, kuris pasiekiamas tik iš pačios mašinos). *nix mašinose hosts failą rasite /etc, o Windows jis yra aplanke C:\Windows\System32\drivers\etc. Jei naudojate Windows, jums reikės paleisti teksto redaktorių su administratoriaus teisėmis, kad galėtumėte atverti hosts failą.
QGIS Serveris dabar pasiekiamas http://qgis.demo. Norėdami patikrinti, įrašykite į naršyklę tokią paprastą užklausą:
http://qgis.demo/cgi-bin/qgis_mapserv.fcgi?SERVICE=WMS&VERSION=1.3.0&REQUEST=GetCapabilities
2.1.2. NGINX HTTP Serveris
Pastaba
Žemiau keiskite qgis.demo į jūsų serverio IP adresą.
Jūs taipogi galite naudoti QGIS Serverį su NGINX. Priešingai nei Apache, NGINX nemoka automatiškai pakelti FastCGI procesų. FastCGI procesus pakelti turi kas nors kitas.
Įdiekite NGINX:
apt install nginx
Kaip pirmą pasirinkimą galite naudoti spawn-fcgi ar fcgiwrap, kuris paleistų ir valdytų QGIS Serverio procesus. Abu turi oficialius Debian paketus. Jei neturite veikiančio X serverio ir jums reikia, pavyzdžiui, spausdinimo, galite naudoti xvfb.
Kitas variantas yra naudoti Systemd, GNU/Linux inicializavimo sistemą, kurią šiandien naudoja dauguma distribucijų. Vienas iš šio metodo pranašumų yra tas, kad tai nereikalauja jokių kitų komponentų ar procesų. Jis turėtų būti paprastas, bet stabilus ir efektyvus gamybos aplinkose.
NGINX konfigūracija
Svarbus ankstesnėje konfigūracijoje naudotas include fastcgi_params;, nes jis prideda parametrus iš /etc/nginx/fastcgi_params:
fastcgi_param  QUERY_STRING       $query_string;
fastcgi_param  REQUEST_METHOD     $request_method;
fastcgi_param  CONTENT_TYPE       $content_type;
fastcgi_param  CONTENT_LENGTH     $content_length;

fastcgi_param  SCRIPT_NAME        $fastcgi_script_name;
fastcgi_param  REQUEST_URI        $request_uri;
fastcgi_param  DOCUMENT_URI       $document_uri;
fastcgi_param  DOCUMENT_ROOT      $document_root;
fastcgi_param  SERVER_PROTOCOL    $server_protocol;
fastcgi_param  REQUEST_SCHEME     $scheme;
fastcgi_param  HTTPS              $https if_not_empty;

fastcgi_param  GATEWAY_INTERFACE  CGI/1.1;
fastcgi_param  SERVER_SOFTWARE    nginx/$nginx_version;

fastcgi_param  REMOTE_ADDR        $remote_addr;
fastcgi_param  REMOTE_PORT        $remote_port;
fastcgi_param  SERVER_ADDR        $server_addr;
fastcgi_param  SERVER_PORT        $server_port;
fastcgi_param  SERVER_NAME        $server_name;

# PHP only, required if PHP was built with --enable-force-cgi-redirect
fastcgi_param  REDIRECT_STATUS    200;
Taipogi galite naudoti kai kuriuos Aplinkos kintamieji skirtus QGIS Serverio konfigūravimui. NGINX konfigūracijos faile, /etc/nginx/nginx.conf, jūs turite naudoti instrukciją fastcgi_param, kad apibrėžtumėte šiuos kintamuosius taip, kaip parodyta žemiau:
location /qgisserver {
     gzip           off;
     include        fastcgi_params;
     fastcgi_param  QGIS_SERVER_LOG_STDERR  1;
     fastcgi_param  QGIS_SERVER_LOG_LEVEL   0;
     fastcgi_pass   unix:/var/run/qgisserver.socket;
 }
FastCGI įpakavimai
Įspėjimas
fcgiwrap lengviau paruošti nei spawn-fcgi, nes jis jau įpakuotas kaip Systemd paslauga. Bet tai taipogi veda į sprendimą, kuris yra daug lėtesnis nei naudojant spawn-fcgi. Su fcgiwrap, naujas QGIS Serverio procesas sukuriamas kiekvienam procesui, kas reiškia, kad QGIS Serverio inicializavimo procesas, kuriame yra ir QGIS projekto failo skaitymas ir nagrinėjimas, vykdomas kiekvienai užklausai. Su spawn-fcgi, QGIS Serverio procesas išlieka tarp užklausų, taip gaunant daug geresnę greitaveiką. Dėl šios priežasties gamyboje rekomenduojama naudoti spawn-fcgi.
spawn-fcgi
Jei norite naudoti spawn-fcgi:
Pirmas žingsnis yra įdiegti paketą:
apt install spawn-fcgi
Tada įterpkite tokį bloką į jūsų NGINX serverio konfigūraciją:
location /qgisserver {
    gzip           off;
    include        fastcgi_params;
    fastcgi_pass   unix:/var/run/qgisserver.socket;
}
Ir perstartuokite NGINX, kad būtų atsižvelgta į naują konfigūraciją:
systemctl restart nginx
O tada, jei nėra numatytojo spawn-fcgi paslaugos failo, jūs turite rankiniu būdu pradėti QGIS Serverį jūsų terminale:
spawn-fcgi -s /var/run/qgisserver.socket \
                -U www-data -G www-data -n \
                /usr/lib/cgi-bin/qgis_mapserv.fcgi
QGIS Serveris dabar pasiekiamas http://qgis.demo/qgisserver.
Pastaba
Kai naudojate spawn-fcgi, jūs galite tiesiogiai apibrėžti aplinkos kintamuosius prieš paleidžiant serverį. Pavyzdžiui: export QGIS_SERVER_LOG_STDERR=1
Be abejo, jūs galite pridėti init scenarijų, kuris paleistų QGIS Serverį sistemos paleidimo metu ar kada tik jūs norite. Pavyzdžiui su systemd:
Pakeiskite failą
/etc/systemd/system/qgis-server.servicešiuo turiniu:[Unit] Description=QGIS server After=network.target [Service] ;; set env var as needed ;Environment="LANG=en_EN.UTF-8" ;Environment="QGIS_SERVER_PARALLEL_RENDERING=1" ;Environment="QGIS_SERVER_MAX_THREADS=12" ;Environment="QGIS_SERVER_LOG_LEVEL=0" ;Environment="QGIS_SERVER_LOG_STDERR=1" ;; or use a file: ;EnvironmentFile=/etc/qgis-server/env ExecStart=spawn-fcgi -s /var/run/qgisserver.socket -U www-data -G www-data -n /usr/lib/cgi-bin/qgis_mapserv.fcgi [Install] WantedBy=multi-user.target
Tada įjunkite ir paleiskite paslaugą:
systemctl enable --now qgis-server
Įspėjimas
Su aukščiau nurodytomis komandomis spawn-fcgi paleidžia tik vieną QGIS Server procesą.
fcgiwrap
Using fcgiwrap is much easier to setup than spawn-fcgi but it’s much slower.
Jūs visų pirma turite įdiegti atitinkamą paketą:
apt install fcgiwrap
Tada įterpkite tokį bloką į jūsų NGINX serverio konfigūraciją:
1 location /qgisserver {
2     gzip           off;
3     include        fastcgi_params;
4     fastcgi_pass   unix:/var/run/fcgiwrap.socket;
5     fastcgi_param  SCRIPT_FILENAME /usr/lib/cgi-bin/qgis_mapserv.fcgi;
6 }
Ir pabaigai perstartuoti NGINX ir fcgiwrap, kad būtų atsižvelgta į naują konfigūraciją:
systemctl restart nginx
systemctl restart fcgiwrap
QGIS Serveris dabar pasiekiamas http://qgis.demo/qgisserver.
Systemd
Kad būtų pilnai panaudotas, konkrečiai spausdinimui, QGIS Serveriui reikia X Serverio. Jei jūs jau turite veikiantį X Serverį, jūs galite naudoti systemd paslaugas.
Šis QGIS Serverio paleidimo būdas remiasi dvejų Systemd vienetų konfigūracija: Jungties vienetas ir Paslaugos vienetas.
QGIS Serverio jungties vienetas apibrėžia ir sukuria failų sistemos jungtį, kurią NGINX naudoja QGIS Serverio paleidimui ir bendravimui su juo. Jungties vienetas turi būti sukonfigūruotas su
Accept=false, kas reiškia, kad sisteminiaiaccept()kvietimai perduodami procesui, kurį sukūrė Paslaugos vienetas. Jis yra/etc/systemd/system/qgis-server@.socket, kuris realiai yra šablonas:[Unit] Description=QGIS Server Listen Socket (instance %i) [Socket] Accept=false ListenStream=/var/run/qgis-server-%i.sock SocketUser=www-data SocketGroup=www-data SocketMode=0600 [Install] WantedBy=sockets.target
Dabar įjunkite ir paleiskite jungtis:
for i in 1 2 3 4; do systemctl enable --now qgis-server@$i.socket; done
QGIS Serverio paslaugos vienetas apibrėžia ir paleidžia QGIS Serverio procesą. Svarbi dalis yra tai, kad paslaugos proceso standartinė įvestis prijungiama prie jungties, kuri apibrėžta jungties vienete. Tai turi būti sukonfigūruota naudojant
StandardInput=socketpaslaugos vieneto konfigūracijoje, kuri yra/etc/systemd/system/qgis-server@.service:[Unit] Description=QGIS Server Service (instance %i) [Service] User=www-data Group=www-data StandardOutput=null StandardError=journal StandardInput=socket ExecStart=/usr/lib/cgi-bin/qgis_mapserv.fcgi EnvironmentFile=/etc/qgis-server/env [Install] WantedBy=multi-user.target
Pastaba
QGIS Serverio aplinkos kintamieji apibrėžiami atskirame faile
/etc/qgis-server/env. Jis gali atrodyti taip:QGIS_PROJECT_FILE=/etc/qgis/myproject.qgs QGIS_SERVER_LOG_STDERR=1 QGIS_SERVER_LOG_LEVEL=3
Dabar paleiskite jungties paslaugą:
for i in 1 2 3 4; do systemctl enable --now qgis-server@$i.service; done
Na ir pabaigai, pridėkime šių nustatymų konfigūraciją NGINX HTTP serveriui:
upstream qgis-server_backend {
   server unix:/var/run/qgis-server-1.sock;
   server unix:/var/run/qgis-server-2.sock;
   server unix:/var/run/qgis-server-3.sock;
   server unix:/var/run/qgis-server-4.sock;
}

server {
   …

   location /qgis-server {
       gzip off;
       include fastcgi_params;
       fastcgi_pass qgis-server_backend;
   }
}
Dabar iš naujo paleiskite NGINX, kad įsigaliotų nauja konfigūracija:
systemctl restart nginx
Ačiū Oslandia, kad pasidalino savo instrukcijomis.
2.1.3. Xvfb
QGIS Serveriui reikia veikiančio X Serverio, kad jis pilnai veiktų, konkrečiau, kad veiktų spausdinimas. Serveriuose paprastai rekomenduojama jo nediegti, taigi jums gali tekti naudoti xvfb, kad turėtumėte virtualią X aplinką.
Jei jūsų Serveris veikia grafinėje/X11 aplinkoje, tai jums nereikia diegti xvfb. Daugiau informacijos rasite https://www.itopen.it/qgis-server-setup-notes/.
Kad įdiegtumėte paketą:
apt install xvfb
Sukurkite paslaugos failą
/etc/systemd/system/xvfb.servicesu tokiu turiniu:[Unit] Description=X Virtual Frame Buffer Service After=network.target [Service] ExecStart=/usr/bin/Xvfb :99 -screen 0 1024x768x24 -ac +extension GLX +render -noreset [Install] WantedBy=multi-user.target
Įjunkite, paleiskite ir patikrinkite paslaugos
xvfb.servicebūseną:systemctl enable --now xvfb.service systemctl status xvfb.service
Tada, pagal jūsų HTTP serverį, jūs turėtumėte sukonfigūruoti DISPLAY parametrą arba tiesiogiai naudoti xvfb-run.
Naudojant Apache:
Pridėkite jūsų Fcgid konfigūraciją (žr. Apache HTTP Serveris):
FcgidInitialEnv DISPLAY ":99"
Iš naujo paleiskite Apache, kad įsigaliotų nauja konfigūracija:
systemctl restart apache2
Naudojant NGINX
Su spawn-fcgi naudojant
xvfb-run:xvfb-run /usr/bin/spawn-fcgi -f /usr/lib/cgi-bin/qgis_mapserv.fcgi \ -s /tmp/qgisserver.socket \ -G www-data -U www-data -n
Su DISPLAY aplinkos kintamuoju HTTP serverio konfigūracijoje.
fastcgi_param DISPLAY ":99";
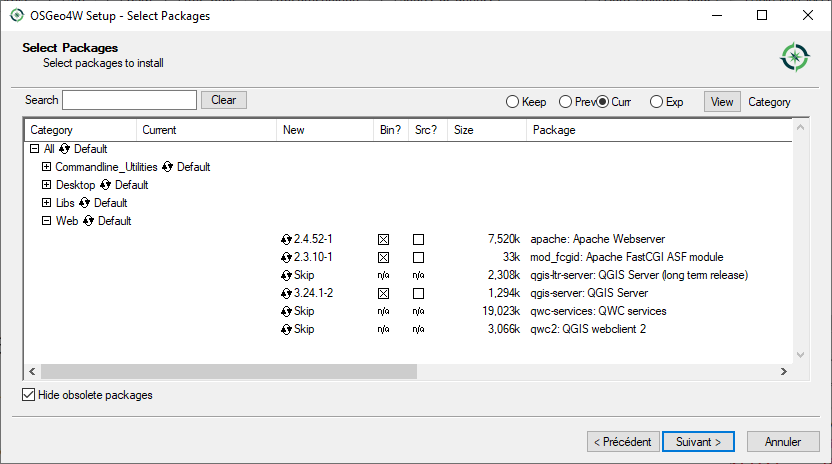
2.2. Diegimas Windows sistemose
QGIS Serverį taipogi galima įdiegti Windows sistemose naudojant OSGeo4W tinklo diegiklį (https://qgis.org/resources/installation-guide/#windows).
Paprasta procedūra yra tokia:
Atsisiųskite ir paleiskite OSGeo4W diegiklį
Vykdykite „Išmanųjį diegimą“ ir įdiekite QGIS Darbastalį, QGIS Serverį apache ir mod_fcgid paketus.
Windows sistemoje apache nėra tiesiogiai diegiamas kaip paslauga. Jums reikia:
Spausti dešinį mygtuką ant failo
OSGeo4W.bataplankoC:\OSGeo4W\šaknyje (jei buvo naudojami numatytieji diegimo keliai) ir parinkti Vykdyti kaip administratoriumiKonsolėje įvykdyti
apache-install.bat, kuris išves> apache-install.bat Installing the 'Apache OSGeo4W Web Server' service The 'Apache OSGeo4W Web Server' service is successfully installed. Testing httpd.conf.... Errors reported here must be corrected before the service can be started. ...
Paslauga paleidžiama, kaip jūs ir matote ataskaitoje. Bet serveris gali ir nepasileisti dėl trūkstamos savos konfigūracijos.
Faile
C:\OSGeo4w\apps\apache\conf\httpd.confpadarykite šiuos pakeitimus (galimos įvairios kitos kombinacijos):Table 2.1 Apache configuration update Tikslas
Esama konfigūracija
Pakeitimas
(Pasirinktinai) keiskite adresą, kuriuo klausytis, naudojant ip ir/ar prievadą. Jūs galite pridėti tiek įrašų, kiek tik norite.
Listen ${SRVPORT}
Listen localhost:8080
Nurodykite, kur rasti scenarijų failus
ScriptAlias /cgi-bin/ "${SRVROOT}/cgi-bin/"
ScriptAlias /cgi-bin/ "C:/OSGeo4W/apps/qgis/bin/"
Nurodykite scenarijų aplanko teises
<Directory "${SRVROOT}/cgi-bin">
    AllowOverride None
    Options None
    Require all granted
</Directory>
<Directory "C:/OSGeo4W/apps/qgis/bin">
    SetHandler cgi-script
    AllowOverride None
    Options ExecCGI
    Require all granted
</Directory>
Įjunkite failų plėtinį, kurį naudoti scenarijų failams. Atkomentuokite ir pabaikite
#AddHandler cgi-script .cgiAddHandler cgi-script .cgi .exe
Pridėkite daugiau OSGeo4W savo konfigūracijos kintamųjų
# parse OSGeo4W apache conf files
IncludeOptional "C:/OSGeo4W/httpd.d/httpd_*.conf"
# parse OSGeo4W apache conf files
IncludeOptional "C:/OSGeo4W/httpd.d/httpd_*.conf"
SetEnv GDAL_DATA "C:/OSGeo4W/share/gdal"
SetEnv QGIS_AUTH_DB_DIR_PATH "C:/OSGeo4W/apps/qgis/resources"

# default QGIS project
SetEnv QGIS_PROJECT_FILE "C:/Users/*Your USERNAME*/qgis_projects/qgis-server-tutorial-data/world.qgs"
Iš naujo paleiskite Apache serverį
> apache-restart.bat
Pridėkime pavyzdinį projektą. Galite naudoti savo duomenis arba pateikiamus Demonstraciniuose mokymo duomenyse. Įsitikinkite, kad duomenis padėjote į tą patį aplanką, į kurį rodo jūsų aplinkos kintamasis QGIS_PROJECT_FILE:
> "C:/Users/*Your USERNAME*/qgis_projects/qgis-server-tutorial-data/world.qgs"
Atverkite naršyklės langą QGIS Serverio GetCapabilities užklausos testavimui. Pakeiskite
localhost:8080į IP ir prievadą, kuriuo nurodėte klausytis.http://localhost:8080/cgi-bin/qgis_mapserv.fcgi.exe?SERVICE=WMS&VERSION=1.3.0&REQUEST=GetCapabilities
Turėtų būti grąžintas
XMLfailas su galimybėmis. Jūsų serveris paruoštas naudojimui.
2.3. Projekto pateikimas
Dabar, kai QGIS Serveris jau įdiegtas ir paleistas, jums reikia jį panaudoti.
Be abejo, jums reikia QGIS projekto, su kuriuo galėtumėte dirbti. Be abejo, jūs galite pilnai tinkinti savo projektą apibrėždami kontaktinę informaciją, apibrėžti CRS apribojimus ar net išimti kai kuriuos sluoksnius. Viskas, ką jums reikia apie tai žinoti, apibrėžta vėliau skyriuje Jūsų projekto konfigūravimas.
Bet pradžiai mes panaudosime paprastą projektą, kuris jau sukonfigūruotas ir anksčiau atsiųstas į /home/qgis/projects/world.qgs, kaip aprašyta aukščiau.
Atvėrę projektą ir greitai peržiūrėję sluoksnius mes žinome, kad galimi 4 sluoksniai:
airports
places
countries
countries_shapeburst
Jums kol kas nereikia suprasti visos užklausos, bet jūs galite ištraukti žemėlapį su kai kuriais iš ankstesnių sluoksnių, QGIS Serverio dėka, padarius kažką panašaus į tai jūsų naršyklėje, kad parsiųstumėte sluoksnį „countries“.
Jei sekėte aukščiau pateiktas instrukcijas, kaip įdiegti Apache HTTP serverį:
http://qgis.demo/cgi-bin/qgis_mapserv.fcgi?MAP=/home/qgis/projects/world.qgs&LAYERS=countries&SERVICE=WMS&VERSION=1.3.0&REQUEST=GetMap&CRS=EPSG:4326&WIDTH=400&HEIGHT=200&BBOX=-90,-180,90,180
Jei sekėte aukščiau pateiktas instrukcijas, kaip įdiegti NGINX HTTP serverį:
http://qgis.demo/qgisserver?MAP=/home/qgis/projects/world.qgs&LAYERS=countries&SERVICE=WMS&VERSION=1.3.0&REQUEST=GetMap&CRS=EPSG:4326&WIDTH=400&HEIGHT=200&BBOX=-90,-180,90,180
Jei sekėte Windows instrukcijas:
http://localhost:8080/cgi-bin/qgis_mapserv.fcgi.exe?SERVICE=WMS&LAYERS=countries&VERSION=1.3.0&REQUEST=GetMap&CRS=EPSG:4326&WIDTH=400&HEIGHT=200&BBOX=-90,-180,90,180
Jei gaunate šį vaizdą, tai QGIS serveris veikia tvarkingai:
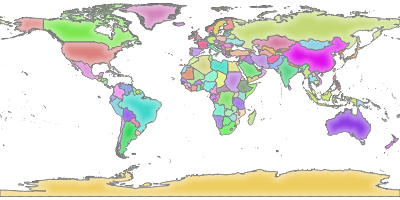
Fig. 2.2 Serverio atsakas į paprastą GetMap užklausą
Pastebėtina, kad jūs galite apibrėžti aplinkos kintamąjį QGIS_PROJECT_FILE, kuriame būtų nurodomas naudojamas projektas, vietoje to, kad nurodytumėte MAP parametrą (žr. Aplinkos kintamieji).
Pavyzdžiui su spawn-fcgi:
export QGIS_PROJECT_FILE=/home/qgis/projects/world.qgs
spawn-fcgi -f /usr/lib/bin/cgi-bin/qgis_mapserv.fcgi \
           -s /var/run/qgisserver.socket \
           -U www-data -G www-data -n
2.4. Jūsų projekto konfigūravimas
Norėdami su QGIS Serveriu teikti WMS, WFS, OAPIF ar WCS, jūs turite sukurti QGIS projektą su tais pačiais duomenimis arba naudoti vieną iš jūsų dabartinių projektų. QGIS’e apibrėžkite jūsų sluoksnių spalvas ir stilius, projekto CRS, jei ji dar nenurodyta. Tada eikite į meniu QGIS Serveris, kurį rasite dialoge ir pateikite papildomos informacijos apie OWS kortelėje Paslaugų galimybės.
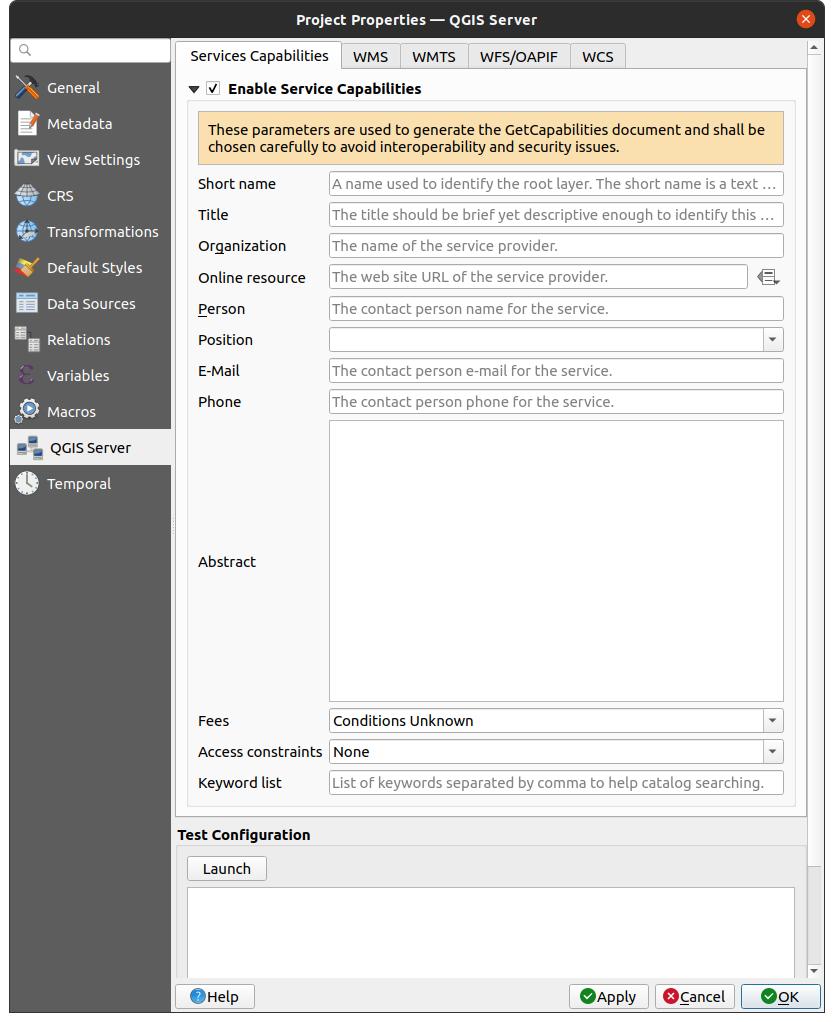
Fig. 2.3 QGIS serverio projekto WMS/WFS/WCS apibrėžimai
Jūs visų pirma turite Įgalinti paslaugų galimybes, jei jos išjungtos. Tai bus rodoma WMS, WFS ar WCS paslaugų GetCapabilities atsake. Jei neįjungiate  Įgalinti paslaugų galimybes, QGIS Serveris naudos informaciją, kuri pateikta
 wms_metadata.xml faile, esančiame cgi-bin aplanke.
2.4.1. WMS galimybės
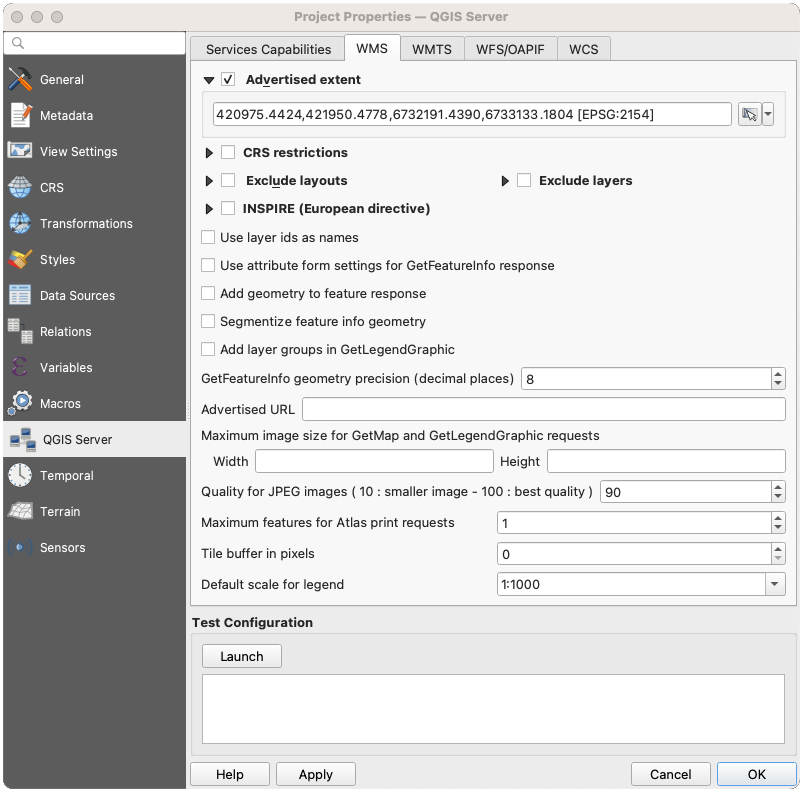
Fig. 2.4 WMS kortelės apibrėžimai
WMS kortelėje jūs galite apibrėžti WMS galimybių parinktis.
Įjunkite Reklamuojama apimtis, kad apibrėžtumėte apimtį, kuri reklamuojama WMS GetCapabilities atsake. Erdvinės apimties parinkimo valdiklis padeda jums įvesti apimtį kaip
xmin, xmax, ymin, ymaxtekstą ar leidžia pasirinkti jį iš žemėlapio drobės, sluoksnio ar žymeklių…
Įjungę
CRS apribojimus, jūs galite apriboti, kuriose koordinačių atskaitos sistemose (CRS) QGIS Serveris siūlys braižyti žemėlapius. Rekomenduojama apriboti siūlomas CRS, nes tai sumažina WMS GetCapabilities atsako dydį. Naudokite žemiau esantį mygtuką  , kad parinktumėte CRS iš koordinačių atskaitos sistemos parinkimo ar spauskite Naudotos, kad pridėtumėte QGIS projekte naudotą CRS į sąrašą.
Jei jūsų projekte yra apibrėžti spausdinimo išdėstymai, jie bus išvardinti
GetProjectSettingsatsake ir juos galima naudoti GetPrint užklausose, kuriant spausdinamus rezultatus, naudojant vieną iš spausdinimo išdėstymų kaip šabloną. Tai yra specifinis QGIS WMS 1.3.0 specifikacijos plėtinys. Jei nenorite, kad spausdinimo išdėstymai būtų publikuojami per WMS, įjunkite parinktį Išimti išdėstymus ir spauskite žemiau esantį mygtuką . Tada parinkite spausdinimo išdėstymą dialoge Parinkti spausdinimo išdėstymą, kad pridėtumėte jį į išimamų išdėstymų sąrašą.Jei norite kad koks kuris nors sluoksnis ar sluoksnių grupė nebūtų publikuojami WMS, įjunkite
Išimti sluoksnius ir spauskite žemiau esantį mygtuką . Tai atvers dialogą Parinkite apribotus sluoksnius ir grupes, kuriame galėsite pasirinkti sluoksnius ir grupes, kurių nenorite publikuoti. Naudokite Shift ar Ctrl mygtuką, jei norite parinkti kelis įrašus. Rekomenduojama išimti sluoksnius, kurių jums nereikia, nes tai sumažina WMS GetCapabilities atsako dydį, o tai reiškia greitesnį įkėlimą kliento pusėje.Sluoksnio ir geoobjekto parinktys
Paprašytą GetFeatureInfo galite gauti kaip paprastą tekstą, XML ir GML. Numatytas variantas yra XML.
Jei įjungiate parinktį
Naudoti sluoksnių id kaip pavadinimą, sluoksnių id bus naudojami apibūdinant sluoksnius GetCapabilitiesatsake arGetMap LAYERSparametre. Priešingu atveju naudojamas sluoksnio pavadinimas arba trumpas pavadinimas, jei toks apibrėžtas (žr. QGIS serverio savybės).Pagal nutylėjimą sluoksnių pavadinimai naudojami, kai jie skelbiami per WMS. Jei keli sluoksniai turi tokį patį pavadinimą, jie bus sujungti į vieną WMS sluoksnį ir jų negalima bus prašyti po vieną. Jums reikia pasirūpinti, kad šie sluoksniai būtų suderinami vienas su kitu. Parinktis Naudoti sluoksnio id kaip pavadinimą užtikrina, kad keli sluoksniai su tuo pačiu pavadinimu gali būti paprašyti kaip atskiri sluoksniai.
Jei norite, galite įjungti parinktį
Pridėti geometriją į geoobjekto atsaką. Tai pridės aprėpties stačiakampį kiekvienam geoobjektui GetFeatureInfo atsake. Taipogi žiūrėkite parametrą WITH_GEOMETRY.Kadangi dauguma žiniatinklio klientų negali rodyti lankų geometrijose, jūs turite galimybę segmentuoti geometriją prieš išsiunčiant ją klientui GetFeatureInfo atsake. Tai leidžia tokiems klientams vis tiek rodyti geoobjekto geometriją (pvz. geoobjekto paryškinimui). Jums reikia įjungti,
Segmentuoti geoobjekto informacijos geometriją, kad aktyvuotumėte šią parinktį.Jūs taipogi galite naudoti parinktį GetFeatureInfo geometrijos precizika, kad nustatytumėte GetFeatureInfo geometrijos preciziką. Tai leidžia jums sutaupyti tinklo pralaidumo, jei jums nereikia pilnos precizikos.
Jei vienas iš jūsų sluoksnių naudoja Žemėlapio pastabos rodymą (t.y. rodo tekstą pagal išraišką), tai bus rodoma GetFeatureInfo išvestyje. Jei sluoksnis naudoja reikšmių masyvą vienam iš atributų, ši informacija taipogi bus rodoma GetFeatureInfo išvestyje.
Jei jūs norite, kad QGIS Serveris siūlytų konkretų užklausos URL WMS GetCapabilities atsake, įveskite atitinkamą URL į lauką Siūlomas URL.
Žemėlapio ir legendos parinktys
Kai sluoksnių grupė pateikiama
GetLegendGraphicužklausoje, visi jos vaikiniai sluoksniai pridedami į legendos paveikslą (nors ir be grupės užrašų). Įjunkite parinktį Pridėti sluoksnių grupes į GetLegendGraphic, jei norite taipogi pridėti sluoksnių grupių (ir sub-grupių) pavadinimus į sluoksnių medį, taip kaip QGIS Darbastalio legendoje.Kai QGIS projekte yra sluoksnių grupės, jų sąrašas pateikiamas WMS galimybių dokumente kartu su sluoksniais. Jei grupė (jos pavadinimas, kaip paminėta galimybėse) įtraukiama į WMS GetMap
LAYERSparametrą kartu su tos grupės sluoksniais, QGIS pateiks šių sluoksnių dublius: vieną kartą pagal grupę ir antrą kartą pagal konkretų sluoksnį. Jei įjungsite parinktį Praleisti pavadinimo atributą grupėms, GetCapabilities grąžins tik grupės antraštės atributą, todėl bus neįmanoma jo įtraukti į sluoksnių sąrašą siunčiant GetMap užklausą.Taipogi galite apriboti maksimalų užklausų gražinamų žemėlapių dydį įvesdami į atitinkamus laukus maksimalų plotį ir aukštį Maksimalus piešinio dydis GetMap ir GetLegendGraphic užklausoms.
Jūs galite pakeisti JPEG ir WebP nuotraukų kokybės faktorių. Kokybės faktorius turi būti tarp 0 ir 100. Nurodykite 0, jei norite maksimalaus suspaudimo, 100 jei nenorite spausti visai.
Jūs galite pakeisti limitą atlaso goobjektų, kurie spausdinami viena užklausa užpildydami lauką Maksimalus spausdinamų Atlaso geoobjektų skaičius užklausoje.
Kai QGIS Serveris naudojamas kaladėlių režime (žr. TILED parametrą), jūs galite nustatyti Kaladėlių buferį taškais. Rekomenduojama reikšmė yra jūsų QGIS projekto didžiausio simbolio dydis arba maksimalus linijos plotis.
Priklausomai nuo to, ar žemėlapis naudoja projektuotą ar geografinę CRS ir ar nėra informacijos žemėlapio vieneto dydžio simboliams, jūs galite pateikti dydžio atskaitą arba per Numatytas legendos mastelis arba Numatyti žemėlapio vienetai per mm legendoje.
2.4.2. WMTS galimybės
WMTS kortelėje jūs galite parinkti sluoksnius, kuriuos norite publikuoti kaip WMTS, ir nurodyti, ar norite publikuoti kaip PNG, ar JPEG.
Skiltyje Tinkleliai, kiekvienai apribotai CRS jūs galite nurodyti, ar turi būti publikuojama kaladėlių matrica ir sukonfigūruoti jų viršutinį kairįjį kampą, minimalų ir maksimalų mastelius bei paskutinį kaladėlių matricos lygį. Pastebėtina, kad EPSG:3857 ir EPSG:4326 CRS galima keisti tik paskutinį kaladėlių matricos lygį.
Jūs taipogi galite nurodyti Minimalų mastelį kaladėlių rodymui.
Jei jūs įvedate URL į lauką Siūlomas URL, QGIS Serveris siūlys šį konkretų URL WMTS GetCapabilities atsake.
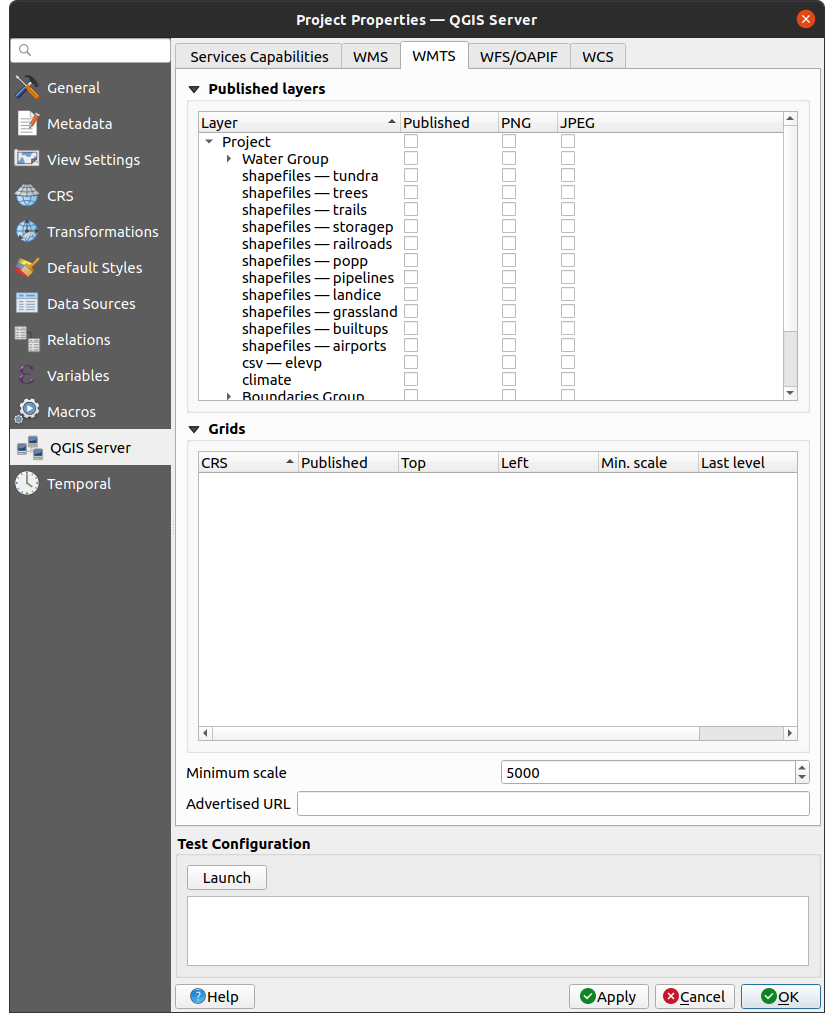
Fig. 2.5 WMTS kortelės apibrėžimai
2.4.3. WFS/OAPIF galimybės
WFS/OAPIF kortelėje jūs galite parinkti sluoksnius, kuriuos norite publikuoti kaip WFS ar OAPIF ir nurodyti, ar leisti juose keitimo, įterpimo ir trynimo veiksmus.
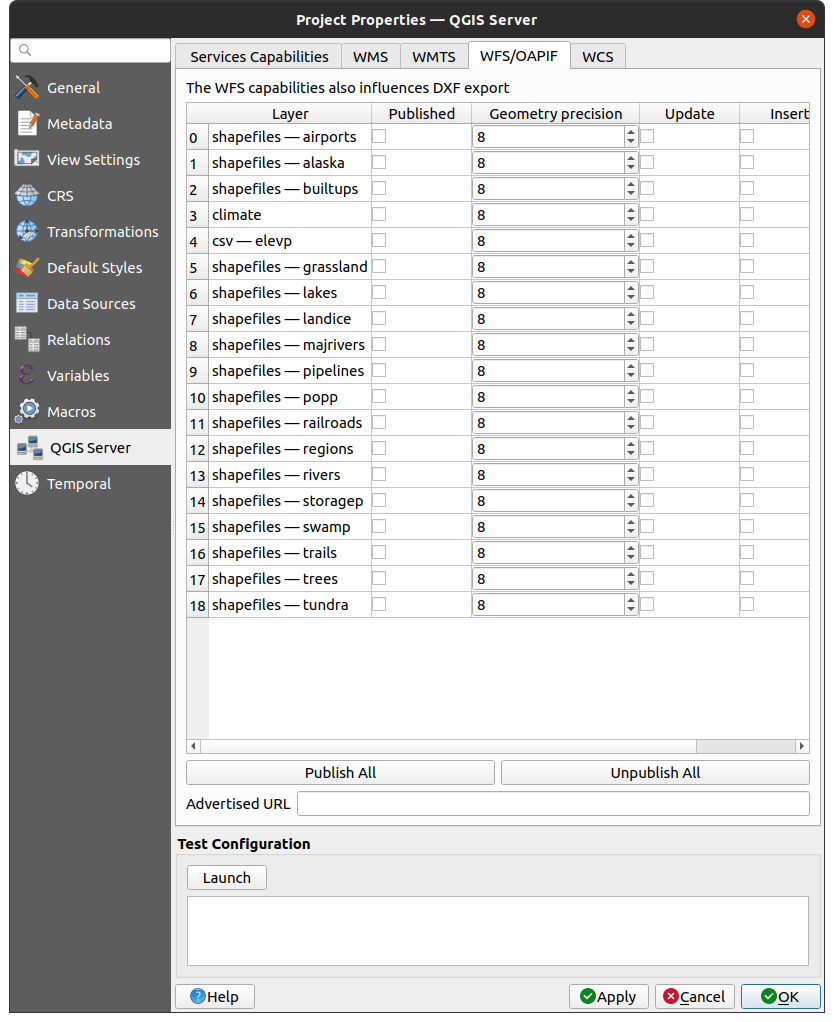
Fig. 2.6 WFS/OAPIF kortelės apibrėžimai
Jei jūs įvedate URL į lauką Siūlomas URL, QGIS Serveris siūlys šį konkretų URL WFS GetCapabilities atsake.
2.4.4. WCS galimybės
WCS kortelėje jūs galite parinkti sluoksnius, kuriuos norite publikuoti kaip WCS.
Jei jūs įvedate URL į lauką Siūlomas URL skiltyje WCS galimybės, QGIS Serveris siūlys šį konkretų URL WCS GetCapabilities atsake.
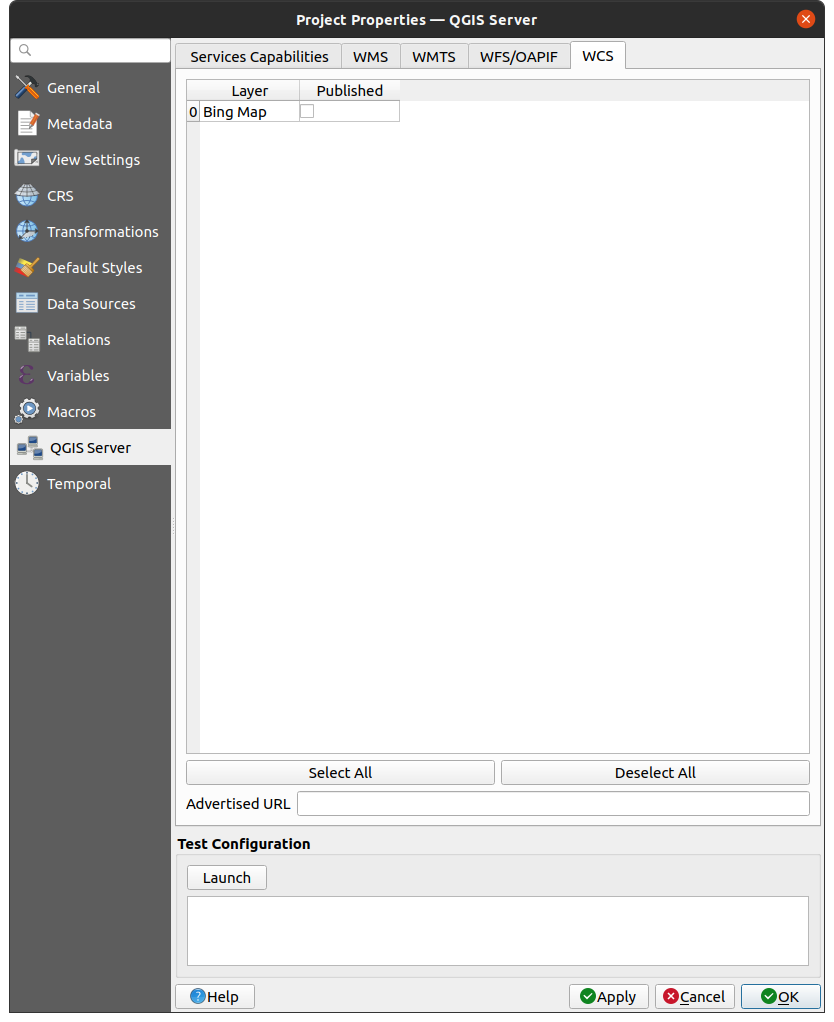
Fig. 2.7 WCS kortelės apibrėžimai
2.4.5. Jūsų OWS tikslinimas
Apart from configuring metadata individually for each layer, in QGIS you can fine tune your group of WMS layers. This is useful if you want the group to appear as a single entity in the WMS GetCapabilities, instead of exposing only its child layers. By setting metadata at the group level, you can provide a clearer description of related layers and improve the usability of your service. To configure metadata for a group of layers:
In the Layers panel, right-click the desired layer group and select Set Group WMS Data.
In the dialog that opens, fill in the information:
a Description: the abstract of the layer group.
a Attribution: the attribution of the layer group.
a Metadata URL: the URL of a metadata document for the layer group.
a Legend URL: the URL of a legend image for the layer group.
Optionally, you can check
Compute TIME dimension from children
to have QGIS Server compute the TIME dimension for the group
based on the TIME dimensions of its child layers.
Vektoriniams sluoksniams kortelė Laukai iš dialogo leidžia jums nurodyti kiekvienam atributui, ar jis turėtų būti publikuojamas ar ne. Pagal nutylėjimą visi atributai publikuojami jūsų WMS ir WFS. Jei nenorite publikuoti kažkokio konkretaus atributo, atjunkite atitinkamą varnelę Konfigūracijos stulpelyje:
Nepateikti WFS
Nepateikti WMS
Jūs galite perdengti vandens ženklus virš žemėlapių, kuriuos sukuria jūsų WMS, pridėdami teksto arba SVG anotacijas į projekto failą. Anotacijų kūrimo instrukcijas rasite skiltyje Anotacijų įrankiai. Kad anotacijos būtų rodomos kaip vandens ženklai WMS išvestyje, reikia išjungti varnelę Fiksuota žemėlapio pozicija dialoge Anotacijos tekstas. Ją galima pasiekti du kartus paspaudus anotaciją, kai aktyvus anotacijų įrankis. SVG anotacijoms jūs turėsite arba nurodyti, kad projektas saugotų absoliučius kelius (dalis Bendra dialoge ) arba rankiniu būdu pakeisti kelią iki SVG piešinio taip, kad jis būtų tinkamas santykinis kelias.
2.5. Integracija su trečiosiomis šalimis
QGIS Server provides standard OGC web services like WMS, WFS, etc. thus it can be used by a wide variety of end user tools.
2.5.1. Integracija su QGIS Darbastaliu
QGIS Darbastalis yra žemėlapių kūrimo įrankis, o QGIS Serveris - žemėlapių serveris. Žemėlapius ar QGIS projektus QGIS Serveris teikia pagal OGC standartus. Šie QGIS projektai gali būti arba failai, arba įrašai duomenų bazėje (QGIS Darbastalyje naudojant ).
Taipogi reikia sukurti tam skirtą procesą, kaip atnaujinamas QGIS Serverio naudojamas projektas (t.y. kopijuoti projekto failus į serverio vietą ir perstartuoti QGIS Serverį). Šiuo metu automatinis procesas (kaip serveris perkraunantis pagal žinučių eilę) dar neįgyvendintas.
2.5.2. Integracija su MapProxy
MapProxy is a tile cache server and as it can read and serve any WMS/WMTS map server, it can be directly connected to QGIS server web services and improve end user experience.
2.5.3. Integracija su QWC2
QWC2 yra žiniatinklio aplikacija skirta QGIS Serveriui. Ji padeda jums kurti stipriai pritaikytas žemėlapio žiūrykles su sluoksnių pasirinkimu, geoobjektų informacija ir pan. Taipogi yra ir daug priedų, tokių kaip autentifikacijos ar spausdinimo paslaugų, pilną sąrašą rasite šioje repozitorijoje.