중요
번역은 여러분이 참여할 수 있는 커뮤니티 활동입니다. 이 페이지는 현재 94.39% 번역되었습니다.
5.4. 수업: 액션
이전 수업에서 기본 액션을 알게 되었으니, 이제 여러분 자신의 액션을 정의해볼 차례입니다.
액션이란 여러분이 피처를 클릭했을 때 일어나는 어떤 일을 말합니다. 액션을 통해 여러분의 맵에 수많은 추가 기능을 추가할 수 있습니다. 예를 들어 객체에 대한 추가적인 정보를 검색할 수 있게 해줄 수 있죠. 액션을 할당함으로써 여러분의 맵에 완전히 새로운 차원을 추가할 수 있습니다!
이 수업의 목표: 사용자 정의 액션을 추가하는 방법을 배우기.
In this lesson you will use the school_property layer you
created previously.
The sample data include photos of each of the three properties you
digitized.
What we are going to do is to associate each property with its image.
Then we will create an action that will open the image for a property
when clicking on the property.
5.4.1. ★☆☆ 따라해보세요: 이미지 용 필드 추가하기
school_property 레이어에는 아직 부지와 이미지를 연결시킬 방법이 없습니다. 먼저 이를 목적으로 하는 필드 하나를 생성할 것입니다.
Layer Properties 대화창을 여십시오.
Fields 탭을 클릭하십시오.
편집 모드를 켭니다:
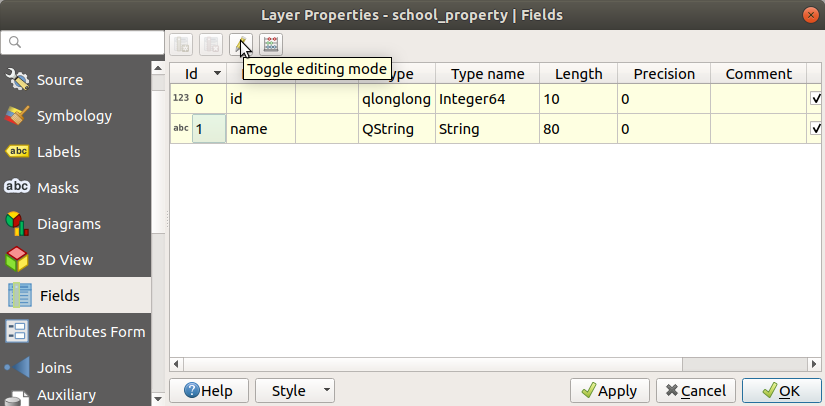
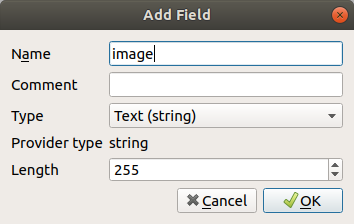
다음 새 열을 추가하십시오:
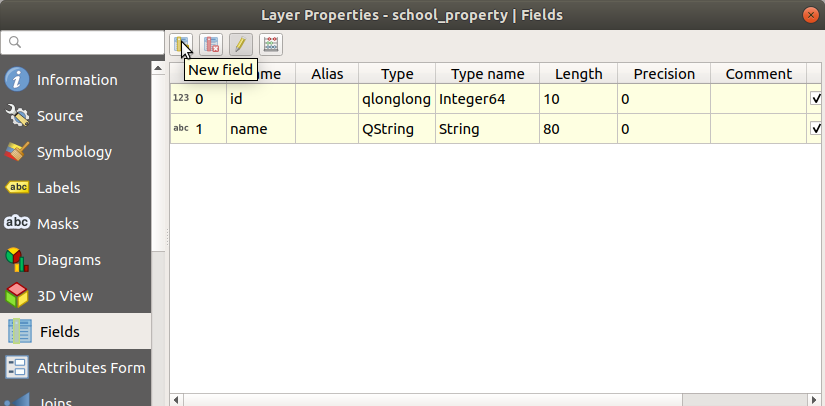
다음 값을 입력하십시오:
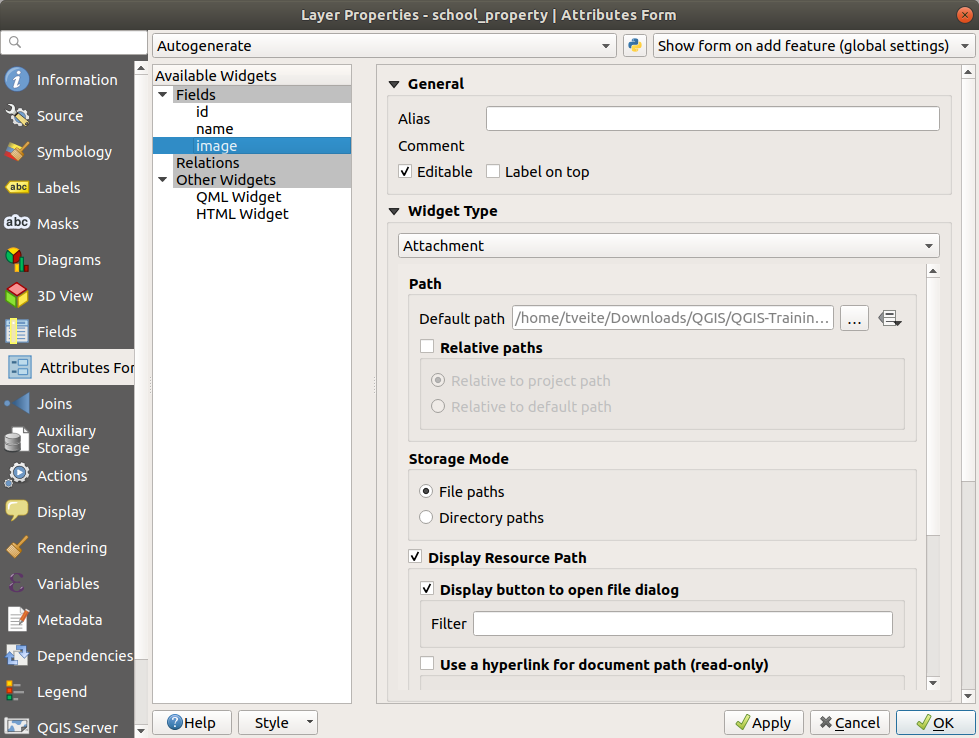
필드를 생성한 다음, Attributes Form 탭으로 가서
image필드를 선택하십시오.Widget Type 을 Attachment 로 설정하십시오:
Layer Properties 대화창의 OK 버튼을 클릭하십시오.
Use the
 Identify Features tool to click on one of the three
features in the
Identify Features tool to click on one of the three
features in the school_propertylayer.아직 편집 모드 상태이기 때문에, 다음과 같이 보이는 대화창이 활성화될 것입니다:
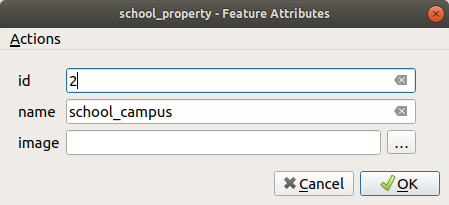
image 필드 옆의 … 탐색 버튼을 클릭하십시오.
여러분의 이미지를 가리키는 경로를 선택하십시오. 이미지들은
exercise_data/school_property_photos/폴더에 있으며 연결되어야 할 피처들과 동일한 이름을 가지고 있습니다.:guilabel:`OK`를 클릭하십시오.
이런 방법으로 모든 이미지들을 알맞은 피처와 연결하십시오.
편집 내용을 저장하고 편집 모드를 끕니다.
5.4.2. ★☆☆ 따라해보세요: 액션 생성하기
Open the Actions tab for the
school_propertylayer, and click on the Add a new action button.
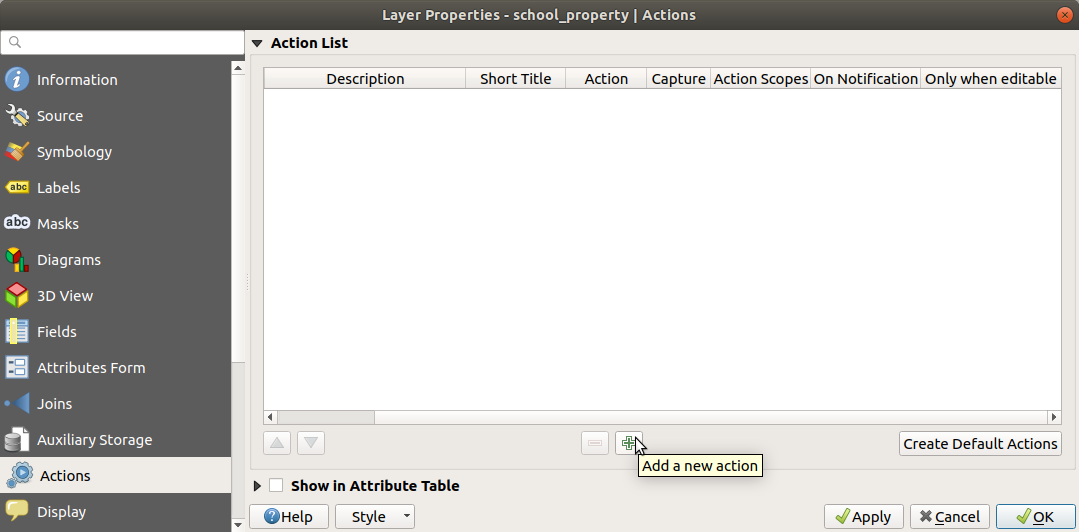
Add New Action 대화창에 있는 Description 란에
Show Image라는 텍스트를 입력하십시오: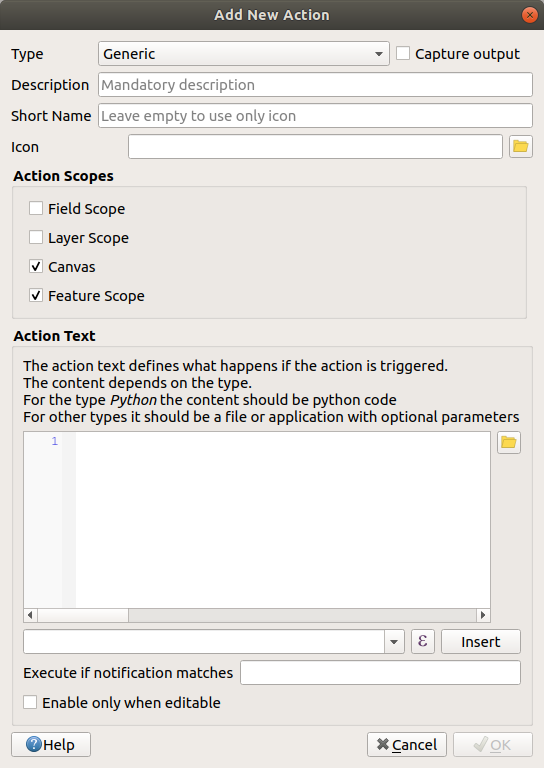
다음 단계는 사용자의 OS에 따라 달라지기 때문에, 다음 가운데 적합한 지침을 선택하십시오:
윈도우
Type 드롭다운 메뉴를 클릭하고 Open 을 선택합니다.
Ubuntu Linux
Action 아래에서 그놈 이미지 뷰어(Gnome Image Viewer) 에
eog를 입력하거나, 이미지매직(ImageMagick) 을 사용하려면display를 입력합니다. 명령어 다음에 공백 문자를 하나 넣어야 한다는 것을 잊지 마세요!맥OS
Type 드롭다운 메뉴를 클릭하고 Mac 을 선택합니다.
Action 아래에
open을 입력합니다. 명령어 다음에 공백 문자를 하나 넣어야 한다는 것을 잊지 마세요!
이제 명령어를 계속 입력하면 됩니다.
여러분은 이미지를 열기 원하고, QGIS는 이미지의 경로를 알고 있습니다. 이제 남은 것은 Action 에 이미지의 경로를 알려주는 일뿐입니다.
다음 목록에서 image 를 선택하십시오:
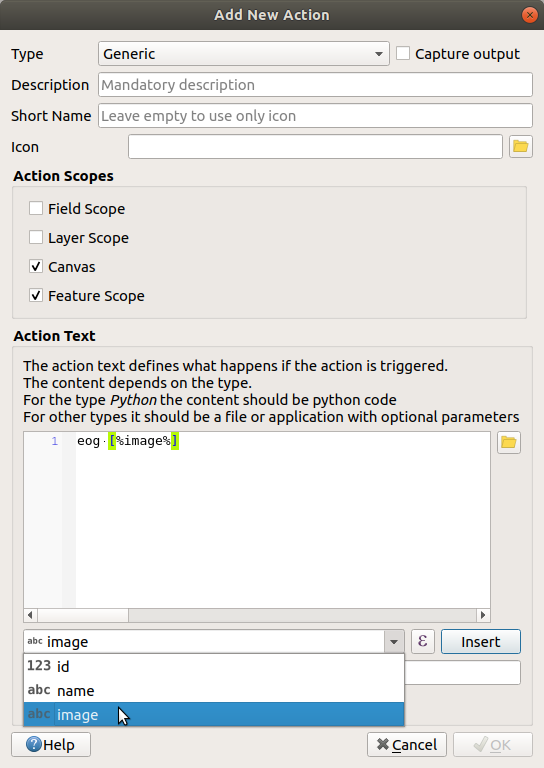
Insert field 버튼을 클릭하십시오. QGIS가 Action Text 란에
[% "image" %]구절을 추가할 것입니다.OK 버튼을 클릭해서 Add New Action 대화창을 닫으십시오.
OK 버튼을 클릭해서 Layer Properties 대화창을 닫으십시오.
이제 새로운 액션을 테스트해볼 시간입니다:
Click on the
school_propertylayer in the Layers panel so that it is highlighted.(Attributes Toolbar 에 있는)
 Run feature action 버튼을 찾으십시오.
이 버튼의 오른쪽에 있는 아래 방향 화살표를 클릭하십시오. 아직까지 이 레이어에 정의된 액션은 여러분이 방금 생성한 액션 하나뿐입니다.

버튼을 클릭해서 도구를 활성화합니다.
이 도구를 사용해서, 학교 부지 세 곳 가운데 하나를 클릭하십시오.
해당 부지의 이미지가 열릴 것입니다.
5.4.3. ★★☆ 따라해보세요: 인터넷 검색하기
맵을 살펴보면서 농장이 있는 지역에 대해 더 자세히 알고 싶어졌다고 해봅시다. 여러분은 문제의 지역에 대해 아무것도 모르기 때문에, 이 지역에 대한 일반적인 정보를 찾고 싶어졌다고 가정합니다. 여러분이 지금 컴퓨터를 사용하고 있다는 점을 생각해보면, 아마도 구글에 이 지역의 이름을 검색해보자는 생각이 가장 먼저 들 것입니다. 그러면 QGIS에 자동으로 검색해보라고 해보도록 하죠!
Open the attribute table for the
landuselayer.구글에 각 토지이용구역의
name필드의 값을 검색하도록 할 것입니다.속성 테이블을 닫으십시오.
Layer Properties 대화창의 Actions 탭으로 돌아가십시오.
사전 정의 액션들을 몇 개 추가하기 위해 Create Default Actions 버튼을 클릭합니다.
아래에 있는
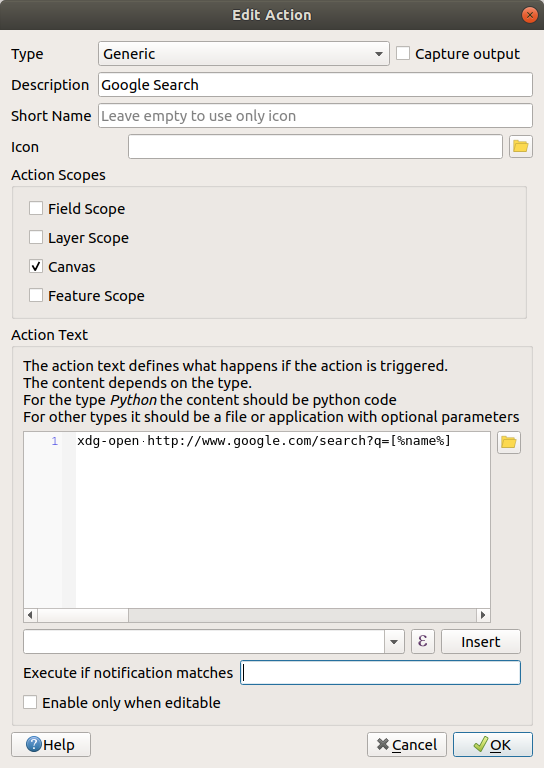
 Remove the selected action 버튼을 사용해서 Search Web 이라는 짧은 이름을 가진 Open URL 액션만 남기고 다른 액션들을 모두 제거하십시오.
남아 있는 액션을 더블 클릭해서 편집하십시오.
Description 을
Google Search로 변경한 다음, Short Name 란의 내용을 삭제하십시오.Action scopes 가운데 Canvas 가 체크되어 있는지 확인하십시오.
다음 단계는 사용자의 OS에 따라 달라지기 때문에, 다음 가운데 적합한 지침을 선택하십시오:
윈도우
Type 아래에 있는 Open 을 선택하면, 윈도우에 인터넷 익스플로러 같은 기본 브라우저에서 인터넷 주소를 열도록 명령할 것입니다.
Ubuntu Linux
Action 아래에
xdg-open이라고 입력하면, 우분투에 크롬이나 파이어폭스 같은 기본 브라우저에서 인터넷 주소를 열도록 명령할 것입니다.맥OS
Action 아래에
open이라고 입력하면, 맥OS에 사파리 같은 기본 브라우저에서 인터넷 주소를 열도록 명령할 것입니다.
이제 명령어를 계속 입력하면 됩니다.
앞에 나열한 명령어 가운데 어떤 것을 사용하든, 이제 어떤 인터넷 주소를 열 것인지 알려줘야 합니다. 즉 QGIS가 구글 사이트로 가서 자동으로 지역 이름을 검색해야 합니다.
구글을 사용할 때 보통 구글 검색란에 검색 문구를 입력합니다. 하지만 이 예제의 경우, 여러분은 여러분의 컴퓨터가 이를 대신 해주기를 바랍니다. (구글 검색란을 직접 사용하길 원치 않는다면) 구글에 무언가를 검색하라고 명령하는 방법은 인터넷 브라우저에
https://www.google.com/search?q=SEARCH_PHRASE라는 주소를 넘겨주는 것입니다. 이때SEARCH_PHRASE가 여러분이 검색하길 원하는 무언가입니다. 아직 어떤 문구를 검색할지 모르기 때문에, (SEARCH_PHRASE없이) 앞 부분만을 입력할 것입니다.Action 란에
https://www.google.com/search?q=라고 입력하십시오. 이 주소를 입력하기 전에 초기 명령어 뒤에 공백 문자를 하나 넣어야 한다는 것을 잊지 마세요!이제 QGIS가 브라우저에 구글에서 여러분이 클릭한 모든 피처의
name필드 값을 검색하라고 명령하게 해야 합니다.name필드를 선택하십시오.Insert 버튼을 클릭하십시오:
이렇게 하면 QGIS가 브라우저를 연 다음
https://www.google.com/search?q=[% "name" %]라는 주소를 전달하게 됩니다.[% "name" %]이 QGIS에name필드의 내용을 검색 문구로 사용하라고 명령하는 부분입니다.따라서, 예를 들면 여러분이 클릭한 토지이용구역의 이름이
Marloth Nature Reserve인 경우, QGIS는 브라우저에https://www.google.com/search?q=Marloth%20Nature%20Reserve라는 주소를 전달하게 됩니다. 이 주소는 여러분의 브라우저가 구글 사이트로 가서 “Marloth Nature Reserve” 를 검색하게 할 것입니다.아직 아무것도 하지 않았다면, 앞에서 설명한 대로 모든 것을 설정하십시오.
OK 버튼을 클릭해서 Add New Action 대화창을 닫으십시오.
OK 버튼을 클릭해서 Layer Properties 대화창을 닫으십시오.
이제 새로운 액션을 테스트해봅시다.
With the
landuselayer active in the Layers panel, click on the down arrow to the right of the Run feature action button, and select the
only action (Google Search) defined for this layer.맵 상에 보이는 토지이용구역 가운데 아무거나 클릭하십시오. 여러분의 브라우저가 열리고, 구글에 해당 구역의
name필드 값으로 기록된 장소를 검색하기 시작할 것입니다.
참고
액션이 제대로 실행되지 않을 경우, 모든 명령어를 제대로 입력했는지 확인해보십시오. 이런 작업 시 오타가 흔하게 날 수 있습니다!
5.4.4. ★★★ 따라해보세요: QGIS에서 웹페이지를 직접 열기
앞에서 외부 브라우저에서 웹페이지를 여는 방법을 배웠습니다. 알 수 없는 의존성이 추가된다는 점에서 이 접근법에는 몇 가지 단점이 존재합니다 — 최종 사용자가 자신의 시스템 상에 이 액션을 실행하는 데 필요한 소프트웨어를 가지고 있을까요? 앞에서 보았듯이 최종 사용자가 어떤 OS를 사용할지 모른다면, 최종 사용자의 시스템 상에서 동일한 유형의 액션에 필요한 동일한 유형의 기본 명령어도 반드시 사용할 수 있을 거라고 단언할 수 없습니다. OS의 어떤 버전에서는 브라우저를 열기 위한 앞의 명령어들이 전혀 작동하지 않을 수도 있습니다. 이는 대처 불가능한 문제점이 될 수 있습니다.
하지만, QGIS는 엄청나게 강력하고 다재다능한 Qt 라이브러리를 가지고 있습니다. 또한, QGIS 액션은 임의적이고 토큰화된 (즉 필드 속성의 내용을 바탕으로 한 다양한 정보를 사용하는) 파이썬 명령어이지요!
이제 웹페이지를 열기 위해 파이썬 액션을 사용하는 방법을 보게 될 것입니다. 외부 브라우저에서 사이트를 여는 것과 동일한 일반적인 아이디어이지만, 이 방법은 팝업 창에 콘텐츠를 보여주는 (HTML 위젯 기반 웹킷인) Qt QWebView 클래스를 사용하기 때문에 사용자 시스템 상에 브라우저가 없어도 됩니다.
이번엔 위키백과를 사용해봅시다. 즉 여러분이 요청하는 URL은 다음처럼 보일 것입니다:
https://ko.wikipedia.org/wiki/SEARCH_PHRASE
레이어 액션을 생성하려면,
Layer Properties 대화창을 열고 Actions 탭을 선택합니다.
액션을 위한 다음 속성들을 사용해서 새 액션을 설정하십시오:
Type:
PythonDescription:
WikipediaScope:
Feature,CanvasAction Text:
from qgis.PyQt.QtCore import QUrl
from qgis.PyQt.QtWebKitWidgets import QWebView

myWV = QWebView(None)
myWV.load(QUrl('https://wikipedia.org/wiki/[%name%]'))
myWV.show()
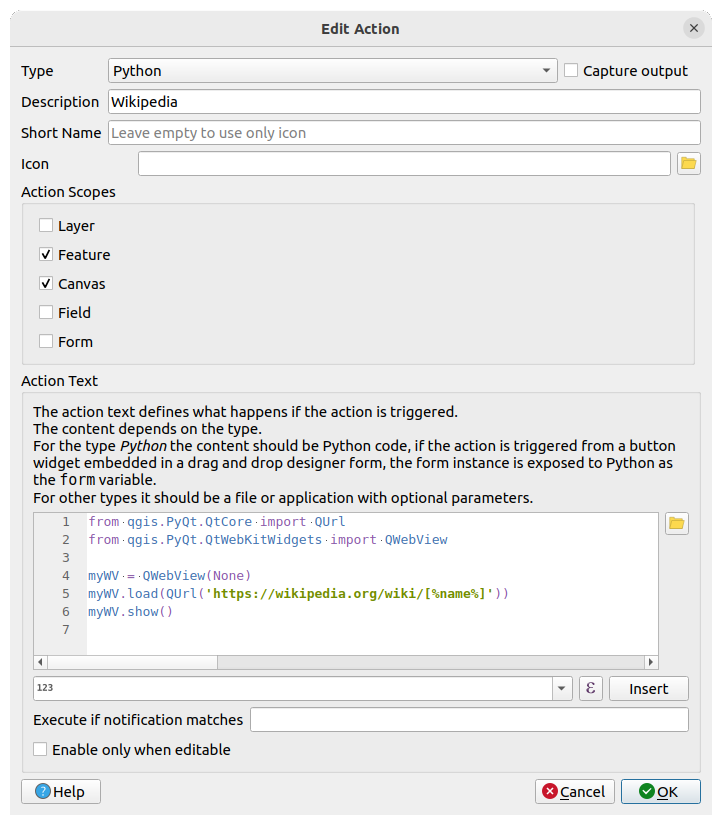
이 코드에 대해 설명하겠습니다:
[%name%]은 액션이 호출될 때 (이전과 마찬가지로) 실제 속성 값으로 대체될 것입니다.이 코드는 새
QWebView인스턴스를 생성하고, URL를 설정한 다음, 이 인스턴스에show()를 호출해서 사용자 데스크탑 상에 해당 URL을 창으로 가시화시킬 뿐입니다.
이 접근법을 통해 사용자 시스템 상에 특정 이미지 뷰어를 설치할 필요 없이 이미지를 보여주도록 할 수도 있습니다.
앞에서 설명한 방법들을 사용해서, 여러분이 방금 생성한 위키백과 액션을 통해 위키백과 페이지를 불러오도록 해보십시오.
5.4.5. 결론
액션을 사용하면 맵에 QGIS에서 동일한 맵을 보는 최종 사용자에게 유용한 추가 기능을 제공할 수 있습니다. 호출된 프로세스가 파이썬은 물론 모든 운영 체제에 대한 셸 명령어가 될 수 있다는 사실 덕분에, 통합할 수 있는 기능들이라는 측면에서 볼 때 가능성은 무한합니다!
5.4.6. 다음은 무엇을 배우게 될까요?
모든 종류의 벡터 데이터 생성을 다 해봤으니, 이제 데이터를 분석해서 문제를 해결하는 방법을 배울 것입니다. 이것이 다음 강의의 주제입니다.