Важно
Перевод - это работа сообщества : ссылка:Вы можете присоединиться. Эта страница в настоящее время переводится |прогресс перевода|.
2. Первые шаги
2.1. Installation on Debian-based systems
We will give a short and simple installation how-to for a minimal working configuration on Debian based systems (including Ubuntu and derivatives). However, many other distributions and OSs provide packages for QGIS Server.
Примечание
In Ubuntu you can use your regular user, prepending sudo to
commands requiring admin permissions. In Debian you can work as admin (root),
without using sudo.
Requirements and steps to add official QGIS repositories to install QGIS Server on a Debian based system are provided in QGIS installers page. You may want to install at least the latest Long Term Release.
Once the target version repository is configured and QGIS Server installed, you can test the installation with:
/usr/lib/cgi-bin/qgis_mapserv.fcgi
If you get the following output, the server is correctly installed.
Примечание
Depending on the version of QGIS, you might see slightly different output
reported when you run qgis_mapserv.fcgi.
QFSFileEngine::open: No file name specified
Warning 1: Unable to find driver ECW to unload from GDAL_SKIP environment variable.
Warning 1: Unable to find driver ECW to unload from GDAL_SKIP environment variable.
Warning 1: Unable to find driver JP2ECW to unload from GDAL_SKIP environment variable.
Warning 1: Unable to find driver ECW to unload from GDAL_SKIP environment variable.
Warning 1: Unable to find driver JP2ECW to unload from GDAL_SKIP environment variable.
Content-Length: 206
Content-Type: text/xml; charset=utf-8

<ServiceExceptionReport version="1.3.0" xmlns="https://www.opengis.net/ogc">
 <ServiceException code="Service configuration error">Service unknown or unsupported</ServiceException>
</ServiceExceptionReport>
Примечание
As seen below, QGIS reports a Status 400 code, which correctly identifies the request has failed because there is no active http session. This is not a bug and indicates the server is functioning properly.
Application path not initialized
Application path not initialized
Warning 1: Unable to find driver ECW to unload from GDAL_SKIP environment variable.
Warning 1: Unable to find driver ECW to unload from GDAL_SKIP environment variable.
Warning 1: Unable to find driver JP2ECW to unload from GDAL_SKIP environment variable.
"Loading native module /usr/lib/qgis/server/libdummy.so"
"Loading native module /usr/lib/qgis/server/liblandingpage.so"
"Loading native module /usr/lib/qgis/server/libwcs.so"
"Loading native module /usr/lib/qgis/server/libwfs.so"
"Loading native module /usr/lib/qgis/server/libwfs3.so"
"Loading native module /usr/lib/qgis/server/libwms.so"
"Loading native module /usr/lib/qgis/server/libwmts.so"
QFSFileEngine::open: No file name specified
Content-Length: 102
Content-Type: application/json
Server:  QGIS FCGI server - QGIS version 3.22.6-Białowieża
Status:  400
[{"code":"Bad request error","description":"Requested URI does not match any registered API handler"}]
Let’s add a sample project. You can use your own, or one from Training demo data:
mkdir /home/qgis/projects/
cd /home/qgis/projects/
wget https://github.com/qgis/QGIS-Training-Data/archive/release_3.22.zip
unzip release_3.22.zip
mv QGIS-Training-Data-release_3.22/exercise_data/qgis-server-tutorial-data/world.qgs .
mv QGIS-Training-Data-release_3.22/exercise_data/qgis-server-tutorial-data/naturalearth.sqlite .
Of course, you can use your favorite GIS software to open this file and take a look at the configuration and available layers.
To properly deploy QGIS server you need a HTTP server. Recommended choices are Apache or NGINX.
2.1.1. Apache HTTP Server
Примечание
In the following, please replace qgis.demo with the name or IP address of your server.
Install Apache and mod_fcgid:
apt install apache2 libapache2-mod-fcgid
You can run QGIS Server on your default website, but let’s configure a virtualhost specifically for this, as follows.
In the
/etc/apache2/sites-availabledirectory, create a file calledqgis.demo.conf, with this content:<VirtualHost *:80> ServerAdmin webmaster@localhost ServerName qgis.demo DocumentRoot /var/www/html # Apache logs (different than QGIS Server log) ErrorLog ${APACHE_LOG_DIR}/qgis.demo.error.log CustomLog ${APACHE_LOG_DIR}/qgis.demo.access.log combined # Longer timeout for WPS... default = 40 FcgidIOTimeout 120 FcgidInitialEnv LC_ALL "en_US.UTF-8" FcgidInitialEnv PYTHONIOENCODING UTF-8 FcgidInitialEnv LANG "en_US.UTF-8" # QGIS log FcgidInitialEnv QGIS_SERVER_LOG_STDERR 1 FcgidInitialEnv QGIS_SERVER_LOG_LEVEL 0 # default QGIS project SetEnv QGIS_PROJECT_FILE /home/qgis/projects/world.qgs # QGIS_AUTH_DB_DIR_PATH must lead to a directory writeable by the Server's FCGI process user FcgidInitialEnv QGIS_AUTH_DB_DIR_PATH "/home/qgis/qgisserverdb/" FcgidInitialEnv QGIS_AUTH_PASSWORD_FILE "/home/qgis/qgisserverdb/qgis-auth.db" # Set pg access via pg_service file SetEnv PGSERVICEFILE /home/qgis/.pg_service.conf FcgidInitialEnv PGPASSFILE "/home/qgis/.pgpass" # if qgis-server is installed from packages in debian based distros this is usually /usr/lib/cgi-bin/ # run "locate qgis_mapserv.fcgi" if you don't know where qgis_mapserv.fcgi is ScriptAlias /cgi-bin/ /usr/lib/cgi-bin/ <Directory "/usr/lib/cgi-bin/"> AllowOverride None Options +ExecCGI -MultiViews -SymLinksIfOwnerMatch Require all granted </Directory> <IfModule mod_fcgid.c> FcgidMaxRequestLen 26214400 FcgidConnectTimeout 60 </IfModule> </VirtualHost>
Примечание
Some of the above configuration options are explained in the Server environment variables and pg_service file sections.
Let’s now create the directories that will store the QGIS Server logs and the authentication database:
mkdir -p /var/log/qgis/
chown www-data:www-data /var/log/qgis
mkdir -p /home/qgis/qgisserverdb
chown www-data:www-data /home/qgis/qgisserverdb
Примечание
www-datais the Apache user on Debian based systems and we need Apache to have access to those locations or files. Thechown www-data...commands change the owner of the respective directories and files towww-data.
We can now enable the virtual host and the
fcgidmod if it’s not already done:a2enmod fcgid a2enmod rewrite a2ensite qgis.demo
Now restart Apache for the new configuration to be taken into account:
systemctl restart apache2
Now that Apache knows that he should answer requests to http://qgis.demo we also need to setup the client system so that it knows who
qgis.demois. We do that by adding127.0.0.1 qgis.demoin the hosts file.# Replace 127.0.0.1 with the IP of your server. sh -c "echo '127.0.0.1 qgis.demo' >> /etc/hosts"
Важно
Remember that both the qgis.demo.conf and /etc/hosts files should
be configured for your setup to work.
You can also test the access to your QGIS Server from other clients on the
network (e.g. Windows or macos machines) by going to their /etc/hosts
file and point the qgis.demo name to whatever IP the server machine has on the
network (not 127.0.0.1 as it is the local IP, only accessible from the
local machine). On *nix machines the
hosts file is located in /etc, while on Windows it’s under
the C:\Windows\System32\drivers\etc directory. Under Windows you
need to start your text editor with administrator privileges before opening
the hosts file.
QGIS Server is now available at http://qgis.demo. To check, type in a browser, as in the simple case:
http://qgis.demo/cgi-bin/qgis_mapserv.fcgi?SERVICE=WMS&VERSION=1.3.0&REQUEST=GetCapabilities
2.1.2. NGINX HTTP Server
Примечание
In the following, please replace qgis.demo with the name or IP address of your server.
You can also use QGIS Server with NGINX. Unlike Apache, NGINX does not automatically spawn FastCGI processes. The FastCGI processes are to be started by something else.
Install NGINX:
apt install nginx
As a first option, you can use spawn-fcgi or fcgiwrap to start and manage the QGIS Server processes. Official Debian packages exist for both. When you have no X server running and you need, for example, printing, you can use xvfb.
Another option is to rely on Systemd, the init system for GNU/Linux that most Linux distributions use today. One of the advantages of this method is that it requires no other components or processes. It’s meant to be simple, yet robust and efficient for production deployments.
NGINX Configuration
The include fastcgi_params; used in the previous configuration is important,
as it adds the parameters from /etc/nginx/fastcgi_params:
fastcgi_param  QUERY_STRING       $query_string;
fastcgi_param  REQUEST_METHOD     $request_method;
fastcgi_param  CONTENT_TYPE       $content_type;
fastcgi_param  CONTENT_LENGTH     $content_length;

fastcgi_param  SCRIPT_NAME        $fastcgi_script_name;
fastcgi_param  REQUEST_URI        $request_uri;
fastcgi_param  DOCUMENT_URI       $document_uri;
fastcgi_param  DOCUMENT_ROOT      $document_root;
fastcgi_param  SERVER_PROTOCOL    $server_protocol;
fastcgi_param  REQUEST_SCHEME     $scheme;
fastcgi_param  HTTPS              $https if_not_empty;

fastcgi_param  GATEWAY_INTERFACE  CGI/1.1;
fastcgi_param  SERVER_SOFTWARE    nginx/$nginx_version;

fastcgi_param  REMOTE_ADDR        $remote_addr;
fastcgi_param  REMOTE_PORT        $remote_port;
fastcgi_param  SERVER_ADDR        $server_addr;
fastcgi_param  SERVER_PORT        $server_port;
fastcgi_param  SERVER_NAME        $server_name;

# PHP only, required if PHP was built with --enable-force-cgi-redirect
fastcgi_param  REDIRECT_STATUS    200;
Moreover, you can use some Переменные среды to configure QGIS Server.
In the NGINX configuration file, /etc/nginx/nginx.conf, you have to use
fastcgi_param instruction to define these variables as shown below:
location /qgisserver {
     gzip           off;
     include        fastcgi_params;
     fastcgi_param  QGIS_SERVER_LOG_STDERR  1;
     fastcgi_param  QGIS_SERVER_LOG_LEVEL   0;
     fastcgi_pass   unix:/var/run/qgisserver.socket;
 }
FastCGI wrappers
Предупреждение
fcgiwrap is easier to set up than spawn-fcgi, because it’s already wrapped in a Systemd service. But it also leads to a solution that is much slower than using spawn-fcgi. With fcgiwrap, a new QGIS Server process is created on each request, meaning that the QGIS Server initialization process, which includes reading and parsing the QGIS project file, is done on each request. With spawn-fcgi, the QGIS Server process remains alive between requests, resulting in much better performance. For that reason, spawn-fcgi is recommended for production use.
spawn-fcgi
If you want to use spawn-fcgi:
The first step is to install the package:
apt install spawn-fcgi
Then, introduce the following block in your NGINX server configuration:
location /qgisserver {
    gzip           off;
    include        fastcgi_params;
    fastcgi_pass   unix:/var/run/qgisserver.socket;
}
And restart NGINX to take into account the new configuration:
systemctl restart nginx
Finally, considering that there is no default service file for spawn-fcgi, you have to manually start QGIS Server in your terminal:
spawn-fcgi -s /var/run/qgisserver.socket \
                -U www-data -G www-data -n \
                /usr/lib/cgi-bin/qgis_mapserv.fcgi
QGIS Server is now available at http://qgis.demo/qgisserver.
Примечание
When using spawn-fcgi, you may directly define environment variables
before running the server. For example:
export QGIS_SERVER_LOG_STDERR=1
Of course, you can add an init script to start QGIS Server at boot time or whenever you want. For example with systemd:
Edit the file
/etc/systemd/system/qgis-server.servicewith this content:[Unit] Description=QGIS server After=network.target [Service] ;; set env var as needed ;Environment="LANG=en_EN.UTF-8" ;Environment="QGIS_SERVER_PARALLEL_RENDERING=1" ;Environment="QGIS_SERVER_MAX_THREADS=12" ;Environment="QGIS_SERVER_LOG_LEVEL=0" ;Environment="QGIS_SERVER_LOG_STDERR=1" ;; or use a file: ;EnvironmentFile=/etc/qgis-server/env ExecStart=spawn-fcgi -s /var/run/qgisserver.socket -U www-data -G www-data -n /usr/lib/cgi-bin/qgis_mapserv.fcgi [Install] WantedBy=multi-user.target
Then enable and start the service:
systemctl enable --now qgis-server
Предупреждение
With the above commands spawn-fcgi spawns only one QGIS Server process.
fcgiwrap
Using fcgiwrap is much easier to setup than spawn-fcgi but it’s much slower.
You first have to install the corresponding package:
apt install fcgiwrap
Then, introduce the following block in your NGINX server configuration:
1 location /qgisserver {
2     gzip           off;
3     include        fastcgi_params;
4     fastcgi_pass   unix:/var/run/fcgiwrap.socket;
5     fastcgi_param  SCRIPT_FILENAME /usr/lib/cgi-bin/qgis_mapserv.fcgi;
6 }
Finally, restart NGINX and fcgiwrap to take into account the new configuration:
systemctl restart nginx
systemctl restart fcgiwrap
QGIS Server is now available at http://qgis.demo/qgisserver.
Systemd
QGIS Server needs a running X Server to be fully usable, in particular for printing. In the case you already have a running X Server, you can use systemd services.
This method, to deploy QGIS Server, relies on two Systemd units to configure: a Socket unit and a Service unit.
The QGIS Server Socket unit defines and creates a file system socket, used by NGINX to start and communicate with QGIS Server. The Socket unit has to be configured with
Accept=false, meaning that the calls to theaccept()system call are delegated to the process created by the Service unit. It is located in/etc/systemd/system/qgis-server@.socket, which is actually a template:[Unit] Description=QGIS Server Listen Socket (instance %i) [Socket] Accept=false ListenStream=/var/run/qgis-server-%i.sock SocketUser=www-data SocketGroup=www-data SocketMode=0600 [Install] WantedBy=sockets.target
Now enable and start sockets:
for i in 1 2 3 4; do systemctl enable --now qgis-server@$i.socket; done
The QGIS Server Service unit defines and starts the QGIS Server process. The important part is that the Service process’ standard input is connected to the socket defined by the Socket unit. This has to be configured using
StandardInput=socketin the Service unit configuration located in/etc/systemd/system/qgis-server@.service:[Unit] Description=QGIS Server Service (instance %i) [Service] User=www-data Group=www-data StandardOutput=null StandardError=journal StandardInput=socket ExecStart=/usr/lib/cgi-bin/qgis_mapserv.fcgi EnvironmentFile=/etc/qgis-server/env [Install] WantedBy=multi-user.target
Примечание
The QGIS Server environment variables are defined in a separate file,
/etc/qgis-server/env. It could look like this:QGIS_PROJECT_FILE=/etc/qgis/myproject.qgs QGIS_SERVER_LOG_STDERR=1 QGIS_SERVER_LOG_LEVEL=3
Now start socket service:
for i in 1 2 3 4; do systemctl enable --now qgis-server@$i.service; done
Finally, for the NGINX HTTP server, let’s introduce the configuration for this setup:
upstream qgis-server_backend {
   server unix:/var/run/qgis-server-1.sock;
   server unix:/var/run/qgis-server-2.sock;
   server unix:/var/run/qgis-server-3.sock;
   server unix:/var/run/qgis-server-4.sock;
}

server {
   …

   location /qgis-server {
       gzip off;
       include fastcgi_params;
       fastcgi_pass qgis-server_backend;
   }
}
Now restart NGINX for the new configuration to be taken into account:
systemctl restart nginx
Thanks to Oslandia for sharing their tutorial.
2.1.3. Xvfb
QGIS Server needs a running X Server to be fully usable, in particular for printing.
On servers it is usually recommended not to install it, so you may use xvfb
to have a virtual X environment.
If you’re running the Server in graphic/X11 environment then there is no need to install xvfb. More info at https://www.itopen.it/qgis-server-setup-notes/.
To install the package:
apt install xvfb
Create the service file,
/etc/systemd/system/xvfb.service, with this content:[Unit] Description=X Virtual Frame Buffer Service After=network.target [Service] ExecStart=/usr/bin/Xvfb :99 -screen 0 1024x768x24 -ac +extension GLX +render -noreset [Install] WantedBy=multi-user.target
Enable, start and check the status of the
xvfb.service:systemctl enable --now xvfb.service systemctl status xvfb.service
Then, according to your HTTP server, you should configure the DISPLAY parameter or directly use xvfb-run.
Using Apache:
Add to your Fcgid configuration (see Apache HTTP Server):
FcgidInitialEnv DISPLAY ":99"
Restart Apache for the new configuration to be taken into account:
systemctl restart apache2
Using NGINX
With spawn-fcgi using
xvfb-run:xvfb-run /usr/bin/spawn-fcgi -f /usr/lib/cgi-bin/qgis_mapserv.fcgi \ -s /tmp/qgisserver.socket \ -G www-data -U www-data -n
With the DISPLAY environment variable in the HTTP server configuration.
fastcgi_param DISPLAY ":99";
2.2. Installation on Windows
QGIS Server can also be installed on Windows systems using the OSGeo4W network installer (https://qgis.org/resources/installation-guide/#windows).
A simple procedure is the following:
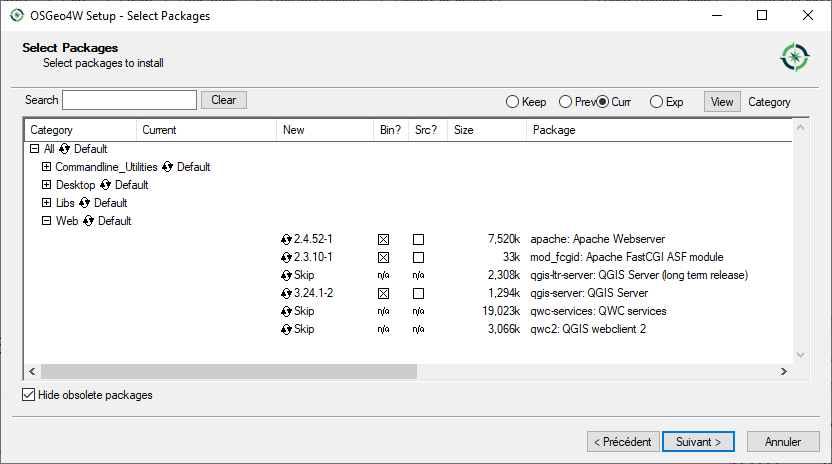
Download and run the OSGeo4W installer
Follow the «Advanced Install» and install the QGIS Desktop, QGIS Server apache and mod_fcgid packages.
Apache is not directly installed as a service on Windows. You need to:
Right-click the
OSGeo4W.batfile at the root of theC:\OSGeo4W\folder (if the default installation paths have been used) and select Run as administratorIn the console, run
apache-install.bat, which will output> apache-install.bat Installing the 'Apache OSGeo4W Web Server' service The 'Apache OSGeo4W Web Server' service is successfully installed. Testing httpd.conf.... Errors reported here must be corrected before the service can be started. ...
The service is started as you can notice in the report. But the server may fail to run due to missing custom configuration.
Edit the
C:\OSGeo4w\apps\apache\conf\httpd.conffile with the following changes (various other combinations are possible):Таблица 2.1 Apache configuration update Назначение
Existing config
Замена
(Optional) Customize the address to listen to using an IP and/or port, You can and add as many entries as you wish.
Listen ${SRVPORT}
Listen localhost:8080
Indicate where to find the script files
ScriptAlias /cgi-bin/ "${SRVROOT}/cgi-bin/"
ScriptAlias /cgi-bin/ "C:/OSGeo4W/apps/qgis/bin/"
Provide permissions on the script folder
<Directory "${SRVROOT}/cgi-bin">
    AllowOverride None
    Options None
    Require all granted
</Directory>
<Directory "C:/OSGeo4W/apps/qgis/bin">
    SetHandler cgi-script
    AllowOverride None
    Options ExecCGI
    Require all granted
</Directory>
Enable file extensions to use for script files. Uncomment and complete
#AddHandler cgi-script .cgiAddHandler cgi-script .cgi .exe
Add more OSGeo4W custom configuration variables
# parse OSGeo4W apache conf files
IncludeOptional "C:/OSGeo4W/httpd.d/httpd_*.conf"
# parse OSGeo4W apache conf files
IncludeOptional "C:/OSGeo4W/httpd.d/httpd_*.conf"
SetEnv GDAL_DATA "C:/OSGeo4W/share/gdal"
SetEnv QGIS_AUTH_DB_DIR_PATH "C:/OSGeo4W/apps/qgis/resources"

# default QGIS project
SetEnv QGIS_PROJECT_FILE "C:/Users/*Your USERNAME*/qgis_projects/qgis-server-tutorial-data/world.qgs"
Restart the Apache web server
> apache-restart.bat
Let’s add a sample project. You can use your own, or one from Training demo data. Make sure that you place it in the same folder that your QGIS_PROJECT_FILE environment variable is pointing to:
> "C:/Users/*Your USERNAME*/qgis_projects/qgis-server-tutorial-data/world.qgs"
Open browser window to testing a GetCapabilities request to QGIS Server. Replace
localhost:8080with the IP and port you set to listen.http://localhost:8080/cgi-bin/qgis_mapserv.fcgi.exe?SERVICE=WMS&VERSION=1.3.0&REQUEST=GetCapabilities
A
XMLfile with the capabilities should be returned. Your server is ready to use.
2.3. Serve a project
Now that QGIS Server is installed and running, we just have to use it.
Obviously, we need a QGIS project to work on. Of course, you can fully customize your project by defining contact information, precise some restrictions on CRS or even exclude some layers. Everything you need to know about that is described later in Configure your project.
But for now, we are going to use a simple project already configured and
previously downloaded in /home/qgis/projects/world.qgs, as described above.
By opening the project and taking a quick look on layers, we know that 4 layers are currently available:
airports
places
countries
countries_shapeburst
You don’t have to understand the full request for now but you may retrieve a map with some of the previous layers thanks to QGIS Server by doing something like this in your web browser to retrieve the countries layer:
If you followed the above instructions to install an Apache HTTP Server:
http://qgis.demo/cgi-bin/qgis_mapserv.fcgi?MAP=/home/qgis/projects/world.qgs&LAYERS=countries&SERVICE=WMS&VERSION=1.3.0&REQUEST=GetMap&CRS=EPSG:4326&WIDTH=400&HEIGHT=200&BBOX=-90,-180,90,180
If you followed the above instructions to install an NGINX HTTP Server:
http://qgis.demo/qgisserver?MAP=/home/qgis/projects/world.qgs&LAYERS=countries&SERVICE=WMS&VERSION=1.3.0&REQUEST=GetMap&CRS=EPSG:4326&WIDTH=400&HEIGHT=200&BBOX=-90,-180,90,180
If you followed the instructions for Windows:
http://localhost:8080/cgi-bin/qgis_mapserv.fcgi.exe?SERVICE=WMS&LAYERS=countries&VERSION=1.3.0&REQUEST=GetMap&CRS=EPSG:4326&WIDTH=400&HEIGHT=200&BBOX=-90,-180,90,180
If you obtain the next image, then QGIS Server is running correctly:
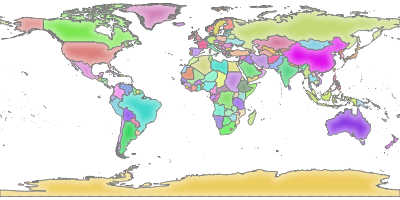
Рис. 2.2 Server response to a basic GetMap request
Note that you may define QGIS_PROJECT_FILE environment variable to use a project by default instead of giving a MAP parameter (see Переменные среды).
For example with spawn-fcgi:
export QGIS_PROJECT_FILE=/home/qgis/projects/world.qgs
spawn-fcgi -f /usr/lib/bin/cgi-bin/qgis_mapserv.fcgi \
           -s /var/run/qgisserver.socket \
           -U www-data -G www-data -n
2.4. Configure your project
To provide a new QGIS Server WMS, WFS, OAPIF or WCS, you have to create a QGIS project file with some data or use one of your current projects. Define the colors and styles of the layers in QGIS and the project CRS, if not already defined. Then, go to the QGIS Server menu of the dialog and provide some information about the OWS in the Service Capabilities tab.
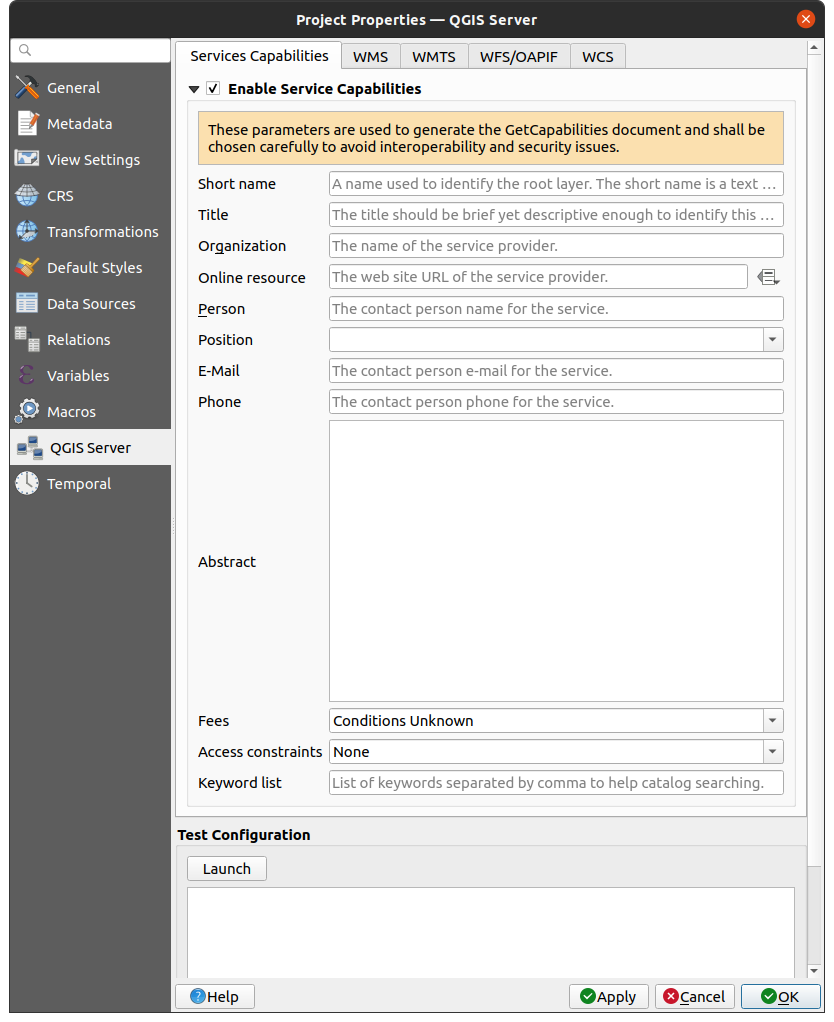
Рис. 2.3 Definitions for a QGIS Server WMS/WFS/WCS project
You have to Enable Service Capabilities first, if it is deactivated.
This will appear in the GetCapabilities response of the WMS, WFS or WCS.
If you don’t check  Enable Service capabilities,
QGIS Server will use the information given in the
Enable Service capabilities,
QGIS Server will use the information given in the wms_metadata.xml file
located in the cgi-bin folder.
2.4.1. WMS capabilities
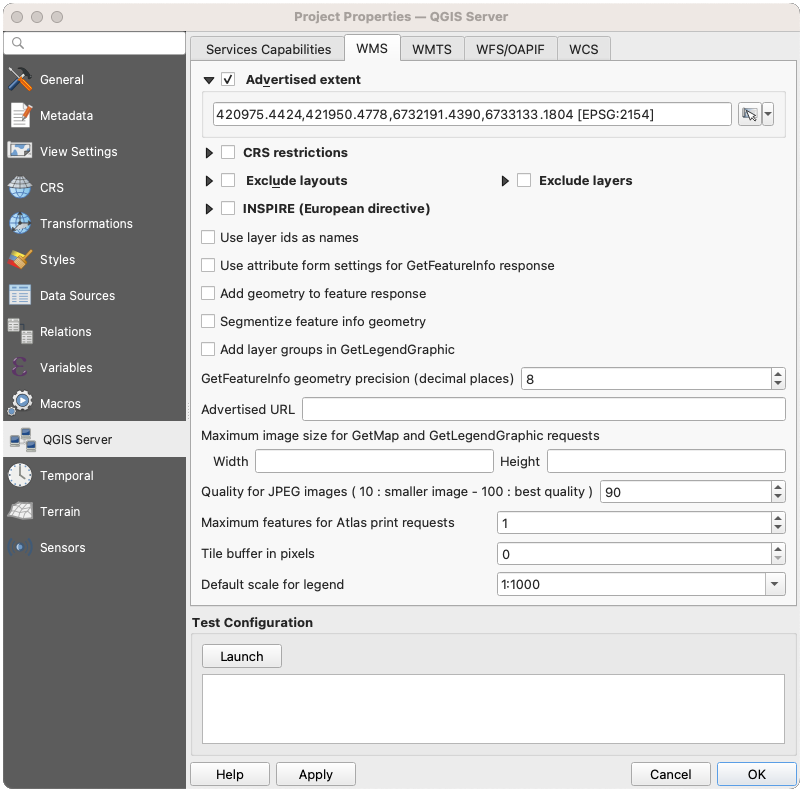
Рис. 2.4 Definitions in the WMS tab
In the WMS tab, you can define the options for the WMS capabilities.
Check Advertised extent to define the extent advertised in the WMS GetCapabilities response. The spatial extent selector widget helps you enter the extent as a
xmin, xmax, ymin, ymaxtext or pick it from the map canvas, layers, bookmarks…
By checking
CRS restrictions, you can restrict
in which coordinate reference systems (CRS) QGIS Server will offer
to render maps. It is recommended that you restrict the offered CRS as this
reduces the size of the WMS GetCapabilities response.
Use the  button below to select those CRSs
from the Coordinate Reference System Selector, or click Used
to add the CRSs used in the QGIS project to the list.
button below to select those CRSs
from the Coordinate Reference System Selector, or click Used
to add the CRSs used in the QGIS project to the list.If you have print layouts defined in your project, they will be listed in the
GetProjectSettingsresponse, and they can be used by the GetPrint request to create prints, using one of the print layouts as a template. This is a QGIS-specific extension to the WMS 1.3.0 specification. If you want to exclude any print layout from being published by the WMS, check Exclude layouts and click the button below.
Then, select a print layout from the Select print layout dialog
in order to add it to the excluded layouts list.If you want to exclude any layer or layer group from being published by the WMS, check
Exclude Layers and click the button below.
This opens the Select restricted layers and groups dialog,
which allows you to choose the layers and groups that you don’t want to be published.
Use the Shift or Ctrl key if you want to select multiple entries.
It is recommended that you exclude from publishing the layers that you don’t need
as this reduces the size of the WMS GetCapabilities response
which leads to faster loading times on the client side.Layer and Feature Options
You can receive requested GetFeatureInfo as plain text, XML and GML. The default is XML.
If you check
Use layer ids as name, layer ids will be used
to reference layers in the GetCapabilitiesresponse orGetMap LAYERSparameter. If not, layer name or short name if defined (see QGIS Server Properties) is used.By default, layer names are used to expose layers through WMS. If multiple layers have the same name, they will be merged to a single WMS layer and cannot be requested individually. You need to take care of these layers being compatible with each other. Using the Use layer ids as name option ensures that multiple layers with the same name can be requested as individual layers.
If you wish, you can check
Add geometry to feature response.
This will include the bounding box for each feature in the GetFeatureInfo response.
See also the WITH_GEOMETRY parameter.As many web clients can’t display circular arcs in geometries you have the option to segmentize the geometry before sending it to the client in a GetFeatureInfo response. This allows such clients to still display a feature’s geometry (e.g. for highlighting the feature). You need to check the
Segmentize feature info geometry to activate the option.You can also use the GetFeatureInfo geometry precision option to set the precision of the GetFeatureInfo geometry. This enables you to save bandwidth when you don’t need the full precision.
If one of your layers uses the Map Tip display (i.e. to show text using expressions) this will be listed inside the GetFeatureInfo output. If the layer uses a Value Map for one of its attributes, this information will also be shown in the GetFeatureInfo output.
If you want QGIS Server to advertise specific request URLs in the WMS GetCapabilities response, enter the corresponding URL in the Advertised URL field.
Map and Legend Options
When a layer group is passed to
GetLegendGraphicrequest, all of its leaf layers are added to the legend picture (however without the groups“ labels). Check the Add layer groups in GetLegendGraphic option
if you want to also insert the layer groups (and subgroups) names
into the layer tree, just like in QGIS Desktop legend.When QGIS project contains layer groups, they are listed in WMS capabilities document alongside with layers. If a group (its name as listed in capabilities) is included in WMS GetMap
LAYERSparameter alongside with names of layers in that group, QGIS would duplicate the layers: once for the group and once for specific layer. If you check the Skip name attribute for groups option,
GetCapabilities will only return title attribute for the group but not its name attribute,
making it impossible to include groups in list of layers of GetMap request.Furthermore, you can restrict the maximum size of the maps returned by the requests by entering the maximum width and height into the respective fields under Maximum image size for GetMap and GetLegendGraphic requests.
You can change the Quality for JPEG and WebP images factor. The quality factor must be in the range 0 to 100. Specify 0 for maximum compression, 100 for no compression.
You can change the limit for atlas features to be printed in one request by setting the Maximum features for Atlas print requests field.
When QGIS Server is used in tiled mode (see TILED parameter), you can set the Tile buffer in pixels. The recommended value is the size of the largest symbol or line width in your QGIS project.
Depending on whether the map uses a projected CRS or a geographic CRS and if there is no information to evaluate the map unit sized symbols, you can provide reference for size through either a Default scale for legend or Default map units per mm in legend.
2.4.2. WMTS capabilities
In the WMTS tab you can select the layers you want to publish as WMTS and specify if you want to publish as PNG or JPEG.
Under Grids, for each restricted CRS,
you can indicate whether the tile matrices should be published
and configure their top-left corner, minimum and maximum scales
and the last level of the tile matrices.
Note that for EPSG:3857 and EPSG:4326 CRS, only the last level of the tile matrices can be edited.
You can also set a Minimum scale for the tiles display.
If you enter a URL in the Advertised URL field, QGIS Server will advertise this specific URL in the WMTS GetCapabilities response.
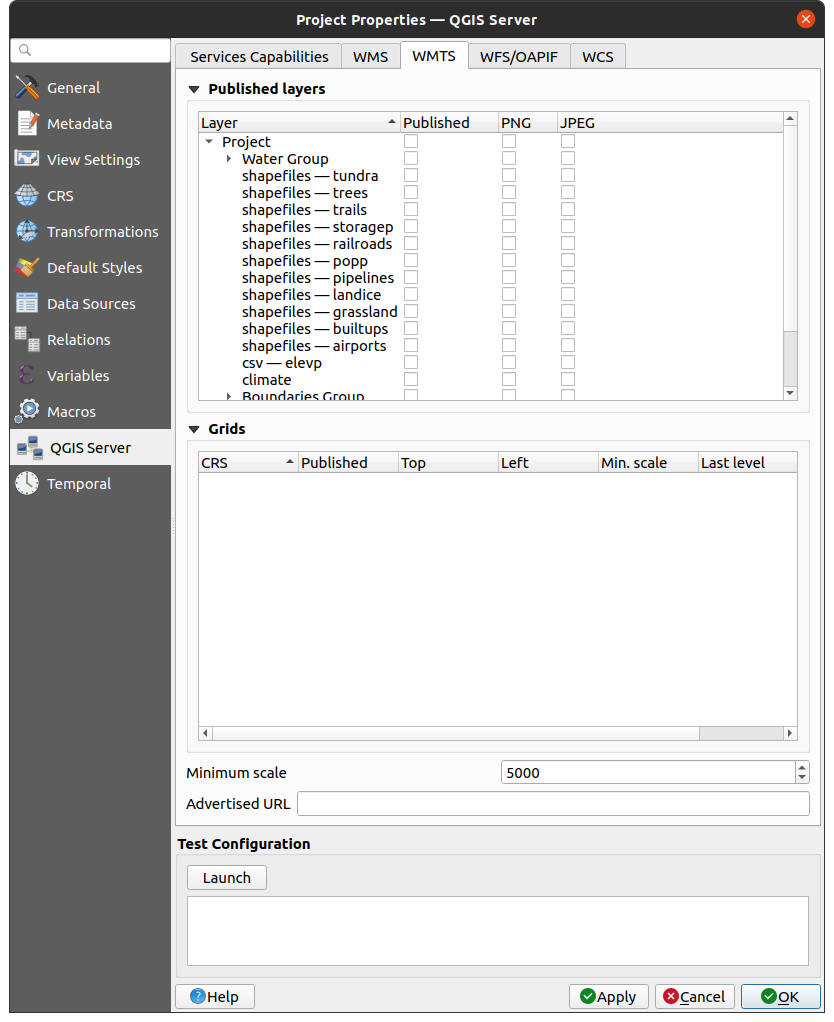
Рис. 2.5 Definitions in the WMTS tab
2.4.3. WFS/OAPIF capabilities
In the WFS/OAPIF tab, you can select the layers you want to publish as WFS or OAPIF, and specify if they will allow update, insert and delete operations.
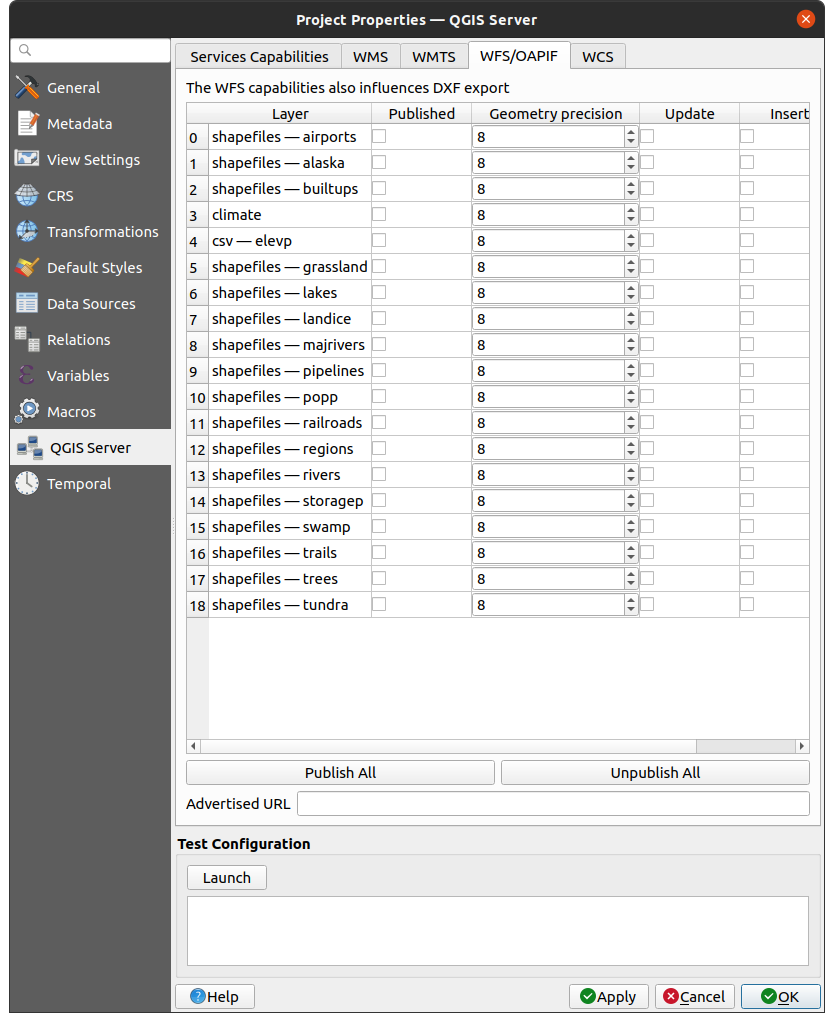
Рис. 2.6 Definitions in the WFS/OAPIF tab
If you enter a URL in the Advertised URL field, QGIS Server will advertise this specific URL in the WFS GetCapabilities response.
2.4.4. WCS capabilities
In the WCS tab, you can select the layers that you want to publish as WCS.
If you enter a URL in the Advertised URL field of the WCS capabilities section, QGIS Server will advertise this specific URL in the WCS GetCapabilities response.
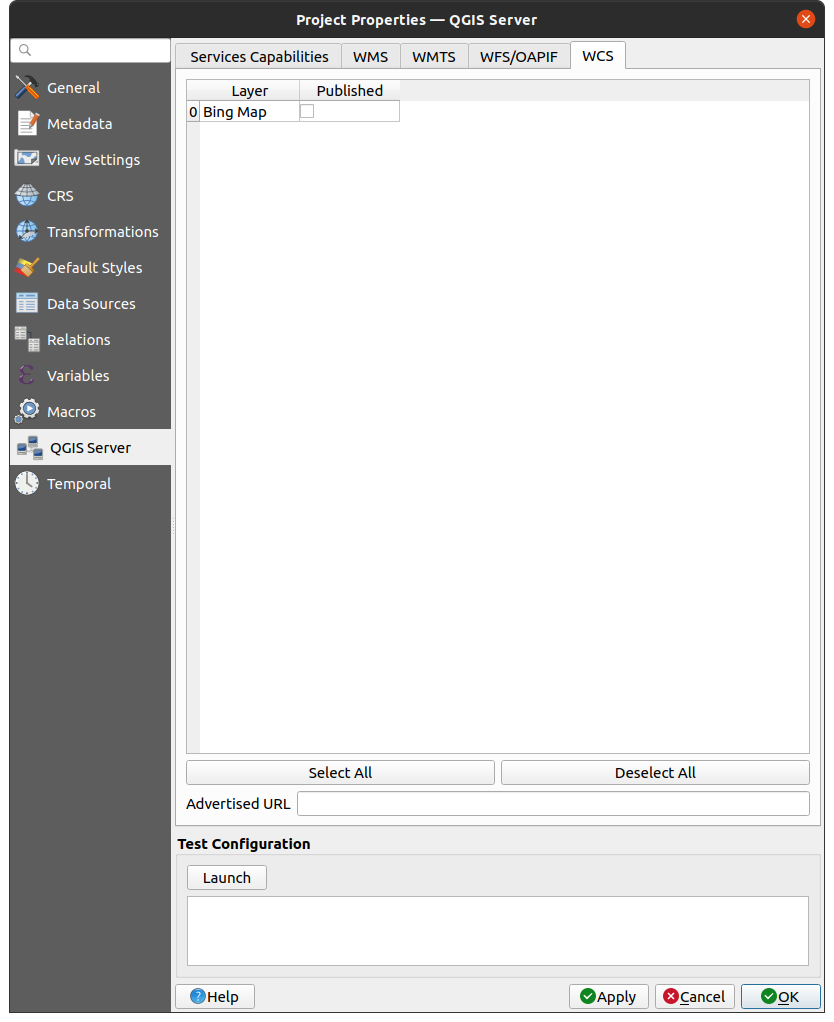
Рис. 2.7 Definitions in the WCS tab
2.4.5. Fine tuning your OWS
Apart from configuring metadata individually for each layer, in QGIS you can fine tune your group of WMS layers. This is useful if you want the group to appear as a single entity in the WMS GetCapabilities, instead of exposing only its child layers. By setting metadata at the group level, you can provide a clearer description of related layers and improve the usability of your service. To configure metadata for a group of layers:
In the Layers panel, right-click the desired layer group and select Set Group WMS Data.
In the dialog that opens, fill in the information:
a Description: the abstract of the layer group.
a Attribution: the attribution of the layer group.
a Metadata URL: the URL of a metadata document for the layer group.
a Legend URL: the URL of a legend image for the layer group.
Optionally, you can check
Compute TIME dimension from children
to have QGIS Server compute the TIME dimension for the group
based on the TIME dimensions of its child layers.
For vector layers, the Fields tab of the dialog allows you to define for each attribute if it will be published or not. By default, all the attributes are published by your WMS and WFS. If you don’t want a specific attribute to be published, uncheck the appropriate checkbox in the Configuration column:
Do not expose in WFS
Do not expose in WMS
You can overlay watermarks over the maps produced by your WMS by adding text annotations or SVG annotations to the project file. See the Инструменты аннотации section for instructions on creating annotations. For annotations to be displayed as watermarks on the WMS output, the Fixed map position checkbox in the Annotation text dialog must be unchecked. This can be accessed by double clicking the annotation while one of the annotation tools is active. For SVG annotations, you will need either to set the project to save absolute paths (in the General menu of the dialog) or to manually modify the path to the SVG image so that it represents a valid relative path.
2.5. Integration with third parties
QGIS Server provides standard OGC web services like WMS, WFS, etc. thus it can be used by a wide variety of end user tools.
2.5.1. Integration with QGIS Desktop
QGIS Desktop is the map designer where QGIS Server is the map server. The maps or QGIS projects will be served by the QGIS Server to provide OGC standards. These QGIS projects can either be files or entries in a database (by using in QGIS Desktop).
Furthermore, dedicated update workflow must be established to refresh a project used by a QGIS Server (ie. copy project files into server location and restart QGIS Server). For now, automated processes (as server reloading over message queue service) are not implemented yet.
2.5.2. Integration with MapProxy
MapProxy is a tile cache server and as it can read and serve any WMS/WMTS map server, it can be directly connected to QGIS server web services and improve end user experience.
2.5.3. Integration with QWC2
QWC2 is a responsive web application dedicated to QGIS Server. It helps you to build a highly customized map viewer with layer selection, feature info, etc.. Also many plugins are available like authentication or print service, the full list is available in this repository.