Importante
A tradução é um esforço comunitário você pode contribuir. Esta página está atualmente traduzida em 40.00%.
13.2. Análise raster
13.2.1. Calculadora raster
The in the menu allows you to perform calculations on the basis of existing raster pixel values (see Fig. 13.33). The results are written to a new raster layer in a GDAL-supported format.
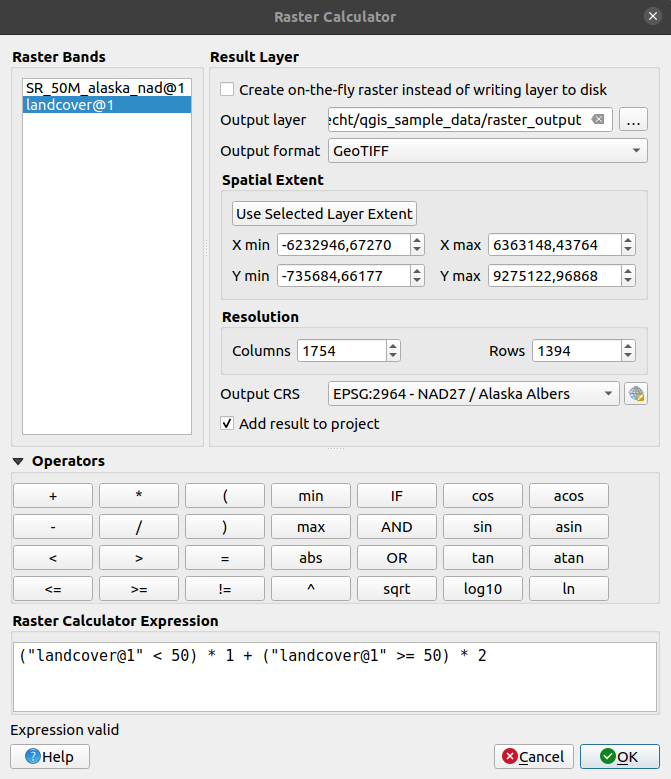
Fig. 13.33 Calculadora raster
The Raster bands list contains all loaded raster layers that can be used. To add a raster to the raster calculator expression field, double click its name in the Fields list. You can then use the operators to construct calculation expressions, or you can just type them into the box.
Na seção :guilabel:’camada de resultado’, você precisará definir uma camada de saída. Você pode:
 Create on-the-fly raster instead of writing layer to disk:
If unchecked, the output is stored on the disk as a new plain file. An Output layer path and an Output format are required.
If checked, a virtual raster layer, i.e. a raster layer defined by its URI and whose pixels are calculated on-the-fly, is created. It’s not a new file on disk; the virtual layer is still connected to the rasters used in the calculation meaning that deleting or moving these rasters would break it. A Layer name can be provided, otherwise the calculation expression is used as such. Removing the virtual layer from the project deletes it, and it can be made persistent in file using the layer contextual menu.
Define the Spatial extent of the calculation using the extent selector widget.
Set the Resolution of the layer using columns and rows number. If the input layer has a different resolution, the values will be resampled with the nearest neighbor algorithm.
Enable the
Create Options to define additional raster creation options.
These options let you control how the output file is structured and compressed,
including format, compression method, and other driver-specific settings.
See more at Raster driver options.With the
Add result to project checkbox, the result layer
will automatically be added to the legend area and can be visualized.
Checked by default for virtual rasters.
The Operators section contains all available operators. To add an operator
to the raster calculator expression box, click the appropriate button. Mathematical
calculations (+, -, *, … ) and trigonometric functions (sin,
cos, tan, … ) are available. Conditional expressions (=, !=,
<, >=, … ) return either 0 for false or 1 for true, and therefore can be
used with other operators and functions.
Ver também
Calculadora Raster and Raster calculator (virtual) algorithms
13.2.1.1. Raster calculator expression
The dialog
The Raster calculator expression dialog provides means to write expressions for pixels calculations between a set of raster layers.
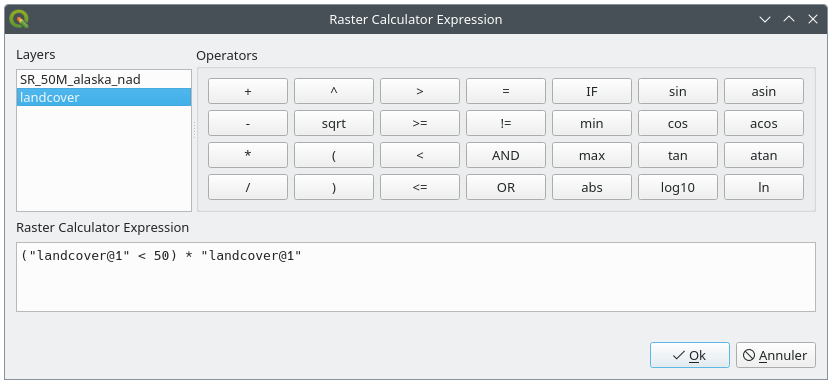
Fig. 13.34 Raster Expression Calculator
Layers: Shows the list of all raster layers loaded in the legend. These can be used to fill the expression box (double click to add). Raster layers are referred by their name and the number of the band:
layer_name@band_number. For instance, the first band from a layer namedDEMwill be referred asDEM@1.Operators: contains a number of calculation operators for pixels manipulation:
Arithmetical:
+,-,*,sqrt,abs,ln, …Trigonometric:
sin,cos,tan, …Comparison:
=,!=,<,>=, …Logical:
IF,AND,OR,(,)Statistical:
min,max
To add an operator to the raster calculator expression box, click the appropriate button.
Raster calculator expression is the area in which the expression is composed
Exemplos
Converter valores de elevação de metros para pés
Para criar um raster de elevação em pés a partir de um raster em metros, você precisa usar o fator de conversão de metros para pés: 3,28. A expressão é:
"elevation@1" * 3.28
Usando uma máscara
Se você deseja mascarar partes de um raster – digamos, por exemplo, porque você só está interessado em elevações acima de 0 metros – você pode usar a seguinte expressão para criar uma máscara e aplicar o resultado a um raster em um passo.
("elevation@1" >= 0) * "elevation@1"
Em outras palavras, para cada célula maior ou igual a 0, a expressão condicional é avaliada como 1, o que mantém o valor original multiplicando-o por 1. Caso contrário, a expressão condicional é avaliada como 0, que define o valor raster como 0. Isso cria a máscara em vôo.
Classificar um Raster
Se você deseja classificar um raster – por exemplo, em duas classes de elevação, é possível usar a expressão a seguir para criar um raster com dois valores 1 e 2 em um passo.
("elevation@1" < 50) * 1 + ("elevation@1" >= 50) * 2
Em outras palavras, para cada célula menor que 50, defina seu valor como 1. Para cada célula maior ou igual a 50, defina seu valor como 2.
Ou você pode utilizar o operador SE.
if ( elevation@1 < 50 , 1 , 2 )