8.1. Lesson: Trabajando con Datos Ráster
Los datos ráster son bastante diferentes de los datos vectoriales. Los datos vectoriales tienen elementos discretos construidos a partir de vértices, y puede que conectados con líneas y/o áreas. Los datos ráster, sin embargo, son como cualquier imagen. Aunque pueden describir propiedades de los objetos en el mundo real, esos objetos no existen como objetos delimitados, en lugar de ello están representados utilizando píxeles de distintos valores de color.
Durante este módulo utilizarás datos ráster para suplementar el análisis SIG que has hecho hasta ahora.
El objetivo de esta lección: Aprender como trabajar con datos ráster en el entorno del QGIS.
8.1.1.  Follow Along: Cargando Datos Ráster
Open your analysis.qgs map (which you should have created and saved during the previous module).
Deactivate all the layers except the solution and important_roads layers.
Click on the Load Raster Layer button:
The Load Raster Layer dialog will open. The data for this project is in exercise_data/raster.
- Either load them all in separately, or hold down ctrl and click on all four of them in turn, then open them at the same time.
The first thing you’ll notice is that nothing seems to be happening in your map. Are the rasters not loading? Well, there they are in the Layers list, so obviously they did load. The problem is that they’re not in the same projection. Luckily, we’ve already seen what to do in this situation.
- Select Project ‣ Project Properties in the menu:
- Select CRS tab in the menu:
- Enable “on the fly” reprojection.
- Set it to the same projection as the rest of your data (WGS 84 / UTM zone 33S).
- Click [OK].
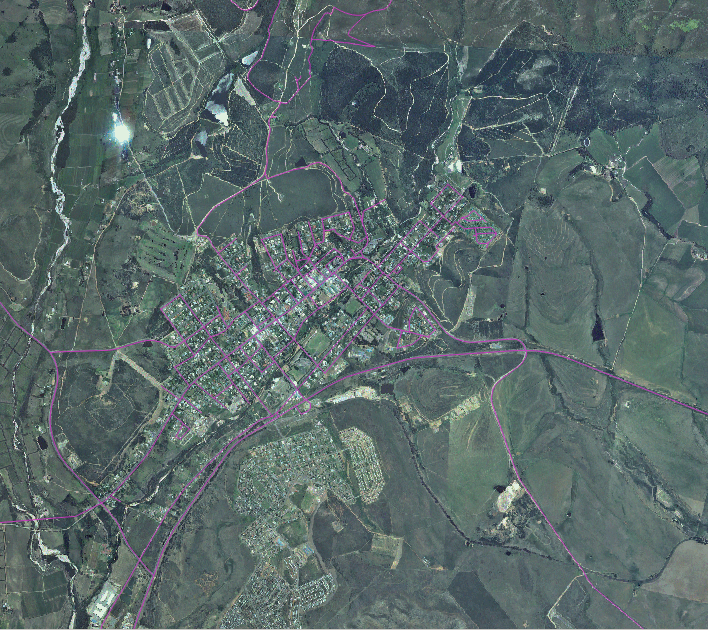
The rasters should fit nicely:

Ahí lo tenemos - cuatro fotografías aéreas cubriendo toda nuestra área de estudio.
8.1.2.  Follow Along: Creación de un Ráster Virtual
Ahora como puedes ver, tu capa de soluciones se encuentra sobre las cuatro fotografías. Lo que significa que vas a trabajar con los cuatro ráster al mismo tiempo. Esto no es ideal; sería mejor tener un solo archivo por cada imagen (composición), ¿No?
Luckily, QGIS allows you to do exactly this, and without needing to actually create a new raster file, which could take up a lot of space. Instead, you can create a Virtual Raster. This is also often called a Catalog, which explains its function. It’s not really a new raster. Rather, it’s a way to organize your existing rasters into one catalog: one file for easy access.
To make a catalog:
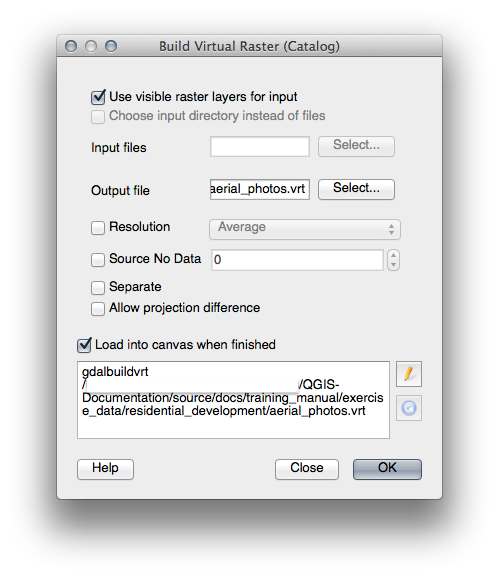
- Click on the menu item Raster ‣ Miscellaneous ‣ Build Virtual Raster (Catalog).
- In the dialog that appears, check the box next to Use visible raster layers for input.
- Enter exercise_data/residential_development as the output location.
- Enter aerial_photos.vrt as the file name.
- Check the Load into canvas when finished button.
Notice the text field below. What this dialog is actually doing is that it’s writing that text for you. It’s a long command that QGIS is going to run.
Nota
 Keep in mind that the command text is editable, so you can
customize the command further if preferred. Search online for the initial
command (in this case, gdalbuildvrt) for help on the syntax.
- Click OK to run the command.

It may take a while to complete. When it’s done, it will tell you so with a message box.
- Click OK to chase the message away.
- Click Close on the Build Virtual Raster (Catalog) dialog. (Don’t click OK again, otherwise it’s going to start running that command again.)
- You can now remove the original four rasters from the Layers list.
- If necessary, click and drag the new aerial_photos raster catalog layer to the bottom of the Layers list so that the other activated layers become visible.
8.1.3.  Transformando Datos Ráster
Los métodos anteriores te permiten unir virtualmente conjuntos de datos utilizando un catálogo, y reproyectarlos “al vuelo”. Sin embargo, si estás ajustando datos que utilizarás por mucho tiempo, puede ser más eficiente crear un nuevo ráster que ya esté unido y reproyectado. Esto mejora el rendimiento cuando utilizas rásters en un mapa, pero puede que lleve algún tiempo para ajustarlo inicialmente.
8.1.3.1. Reproyectando Ráster
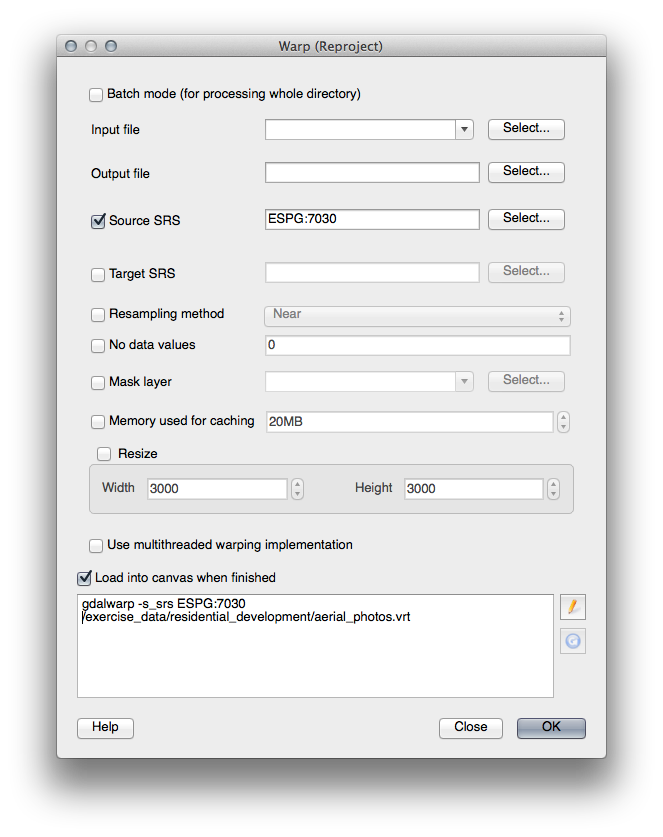
- Click on the menu item Raster ‣ Projections ‣ Warp (Reproject).
Note that this tool features a handy batch option for reprojecting the contents of whole directories. You can also reproject virtual rasters (catalogs), as well as enabling a multithreaded processing mode.

8.1.3.2. Uniendo rásters
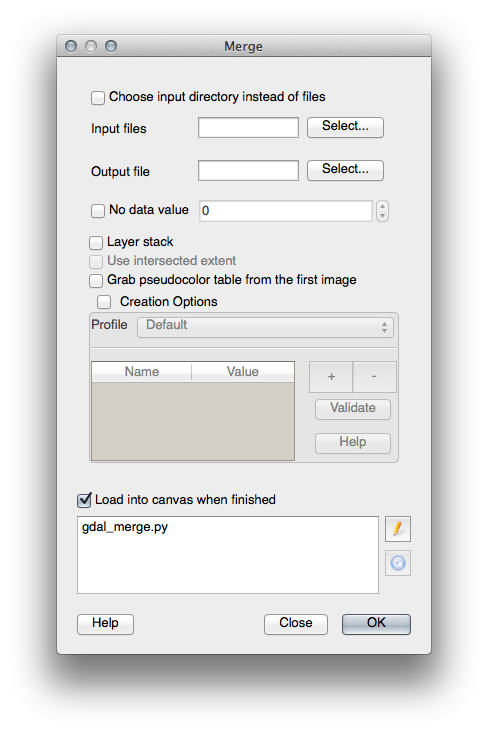
- Click on the menu item Raster ‣ Miscellaneous ‣ Merge.
You can choose to process entire directories instead of single files, giving you a very useful built-in batch processing capability. You can specify a virtual raster as input file, too, and all of the rasters that it consists of will be processed.
You can also add your own command line options using the Creation Options checkbox and list. This only applies if you have knowledge of the GDAL library’s operation.

8.1.4. In Conclusion
QGIS facilita inlcuir datos ráster a tus proyectos ya existentes.
8.1.5. What’s Next?
Lo siguiente será utilizar datos ráster que no sean imágenes aéreas, y veremos cómo la simbología también es útil en el caso de los rásters.
