Raster data in GIS are matrices of discrete cells that represent features on,
above or below the earth’s surface. Each cell in the raster grid has the same
size, and cells are usually rectangular (in QGIS they will always be
rectangular). Typical raster datasets include remote sensing data, such as
aerial photography, or satellite imagery and modelled data, such as an elevation
matrix.
Unlike vector data, raster data typically do not have an associated database
record for each cell. They are geocoded by pixel resolution and the x/y
coordinate of a corner pixel of the raster layer. This allows QGIS to position
the data correctly in the map canvas.
QGIS makes use of georeference information inside the raster layer (e.g.,
GeoTiff) or in an appropriate world file to properly display the data.
Many of the features available in QGIS work the same, regardless the vector
data source. However, because of the differences in formats specifications
(ESRI shapefiles, MapInfo and MicroStation file formats, AutoCAD DXF, PostGIS,
SpatiaLite, DB2, Oracle Spatial and MSSQL Spatial databases, and many more),
QGIS may handle differently some of their properties.
This section describes how to work with these specificities.
Catatan
QGIS supports (multi)point, (multi)line, (multi)polygon, CircularString,
CompoundCurve, CurvePolygon, MultiCurve, MultiSurface feature types, all
with Z and/or M values.
You should note also that some drivers don’t support some of these feature
types like CircularString, CompoundCurve, CurvePolygon, MultiCurve,
MultiSurface feature type. QGIS will convert them to (multi)polygon feature.
The ESRI shapefile is still one of the most used vector file format in QGIS.
However, this file format has some limitation that some other file format have
not (like Geopackage, spatialite). Support is provided by the
OGR Simple Feature Library.
A shapefile actually consists of several files. The following three are
required:
- .shp file containing the feature geometries
- .dbf file containing the attributes in dBase format
- .shx index file
Shapefiles also can include a file with a .prj suffix, which contains
the projection information. While it is very useful to have a projection file,
it is not mandatory. A shapefile dataset can contain additional files. For
further details, see the ESRI technical specification at
http://www.esri.com/library/whitepapers/pdfs/shapefile.pdf.
Improving Performance for Shapefiles
To improve the performance of drawing a shapefile, you can create a spatial
index. A spatial index will improve the speed of both zooming and panning.
Spatial indexes used by QGIS have a .qix extension.
Use these steps to create the index:
- Load a shapefile (see The Browser Panel);
- Open the Layer Properties dialog by double-clicking on the
shapefile name in the legend or by right-clicking and choosing
from the context menu.
- In the General tab, click the [Create Spatial Index] button.
Problem loading a shape .prj file
If you load a shapefile with a .prj file and QGIS is not able to read the
coordinate reference system from that file, you will need to define the proper
projection manually within the General tab of the
Layer Properties dialog of the layer by clicking the
[Specify...] button. This is due to the fact that .prj files
often do not provide the complete projection parameters as used in QGIS and
listed in the CRS dialog.
For the same reason, if you create a new shapefile with QGIS, two different
projection files are created: a .prj file with limited projection
parameters, compatible with ESRI software, and a .qpj file, providing
the complete parameters of the used CRS. Whenever QGIS finds a .qpj
file, it will be used instead of the .prj.
Tabular data is a very common and widely used format because of its simplicity
and readability – data can be viewed and edited even in a plain text editor.
A delimited text file is an attribute table with each column separated by a
defined character and each row separated by a line break. The first row usually
contains the column names. A common type of delimited text file is a CSV
(Comma Separated Values), with each column separated by a comma.
Such data files can also contain positional information in two main forms:
- As point coordinates in separate columns
- As well-known text (WKT) representation of geometry
QGIS allows you to load a delimited text file as a layer or ordinal table. But
first check that the file meets the following requirements:
- The file must have a delimited header row of field names. This must be the
first line in the text file.
- The header row must contain field(s) with geometry definition. These field(s)
can have any name.
- The X and Y coordinates (if geometry is defined by coordinates) must be
specified as numbers. The coordinate system is not important.
- If you have any data that is not a string (text) and the file is a CSV file,
you must have a CSVT file (see section CSVT Files).
As an example of a valid text file, we import the elevation point data file
elevp.csv that comes with the QGIS sample dataset (see section
Sample Data):
X;Y;ELEV
-300120;7689960;13
-654360;7562040;52
1640;7512840;3
[...]
Some items to note about the text file:
- The example text file uses ; (semicolon) as delimiter. Any character can
be used to delimit the fields.
- The first row is the header row. It contains the fields X, Y and
ELEV.
- No quotes (") are used to delimit text fields.
- The X coordinates are contained in the X field.
- The Y coordinates are contained in the Y field.
When loading CSV files, the OGR driver assumes all fields are strings (i.e. text)
unless it is told otherwise. You can create a CSVT file to tell OGR (and QGIS)
what data type the different columns are:
| Type |
Name |
Example |
|---|
| Whole number |
Integer |
4 |
| Decimal number |
Real |
3.456 |
| Date |
Date (YYYY-MM-DD) |
2016-07-28 |
| Time |
Time (HH:MM:SS+nn) |
18:33:12+00 |
| Date & Time |
DateTime (YYYY-MM-DD HH:MM:SS+nn) |
2016-07-28 18:33:12+00 |
The CSVT file is a ONE line plain text file with the data types in quotes
and separated by commas, e.g.:
"Integer","Real","String"
You can even specify width and precision of each column, e.g.:
"Integer(6)","Real(5.5)","String(22)"
This file is saved in the same folder as the .csv file, with the same
name, but .csvt as the extension.
You can find more information at GDAL CSV Driver.
PostGIS layers are stored in a PostgreSQL database. The advantages of PostGIS
are its spatial indexing, filtering and querying capabilities it provides. Using
PostGIS, vector functions such as select and identify work more accurately than
they do with OGR layers in QGIS.
Tip
PostGIS Layers
Normally, a PostGIS layer is defined by an entry in the geometry_columns
table. QGIS can load layers that do not have an entry in the geometry_columns
table. This includes both tables and views. Defining a spatial view provides
a powerful means to visualize your data. Refer to your PostgreSQL manual for
information on creating views.
This section contains some details on how QGIS accesses PostgreSQL layers.
Most of the time, QGIS should simply provide you with a list of database
tables that can be loaded, and it will load them on request. However, if you
have trouble loading a PostgreSQL table into QGIS, the information below may
help you understand any QGIS messages and give you direction on changing
the PostgreSQL table or view definition to allow QGIS to load it.
QGIS requires that PostgreSQL layers contain a column that can be used
as a unique key for the layer. For tables, this usually means that the table
needs a primary key, or a column with a unique constraint on it. In QGIS,
this column needs to be of type int4 (an integer of size 4 bytes).
Alternatively, the ctid column can be used as primary key. If a table lacks
these items, the oid column will be used instead. Performance will be
improved if the column is indexed (note that primary keys are automatically
indexed in PostgreSQL).
QGIS offers a checkbox Select at id that is activated by default. This
option gets the ids without the attributes which is faster in most cases.
If the PostgreSQL layer is a view, the same requirement exists, but views
do not always have primary keys or columns with unique constraints on them. You
have to define a primary key field (has to be integer) in the QGIS dialog before
you can load the view. If a suitable column does not exist in the view, QGIS
will not load the layer. If this occurs, the solution is to alter the view so
that it does include a suitable column (a type of integer and either a primary
key or with a unique constraint, preferably indexed).
As for table, a checkbox Select at id is activated by default (see above
for the meaning of the checkbox). It can make sense to disable this option when
you use expensive views.
If you want to make a backup of your PostGIS database using the pg_dump and
pg_restore commands, and the default layer styles as saved by QGIS fail to
restore afterwards, you need to set the XML option to DOCUMENT and the
restore will work.
QGIS allows to filter features already on server side. Check the
 checkbox to do so. Only supported expressions will be
sent to the database. Expressions using unsupported operators or functions will
gracefully fallback to local evaluation.
checkbox to do so. Only supported expressions will be
sent to the database. Expressions using unsupported operators or functions will
gracefully fallback to local evaluation.
Most of common data types are supported by the PostgreSQL provider: integer, float,
varchar, geometry and timestamp.
Array data types are not supported.
Data can be imported into PostgreSQL/PostGIS using several tools, including the
DB Manager plugin and the command line tools shp2pgsql and ogr2ogr.
QGIS comes with a core plugin named  DB Manager. It can
be used to load shapefiles and other data formats, and it includes support for
schemas. See section Plugin Pengelola DB for more information.
DB Manager. It can
be used to load shapefiles and other data formats, and it includes support for
schemas. See section Plugin Pengelola DB for more information.
PostGIS includes an utility called shp2pgsql that can be used to import
shapefiles into a PostGIS-enabled database. For example, to import a
shapefile named lakes.shp into a PostgreSQL database named
gis_data, use the following command:
shp2pgsql -s 2964 lakes.shp lakes_new | psql gis_data
This creates a new layer named lakes_new in the gis_data database.
The new layer will have a spatial reference identifier (SRID) of 2964.
See section Bekerja dengan Proyeksi for more information on spatial
reference systems and projections.
Tip
Exporting datasets from PostGIS
Like the import tool shp2pgsql, there is also a tool to export
PostGIS datasets as shapefiles: pgsql2shp. This is shipped within
your PostGIS distribution.
Besides shp2pgsql and DB Manager, there is another tool for feeding geodata
in PostGIS: ogr2ogr. This is part of your GDAL installation.
To import a shapefile into PostGIS, do the following:
ogr2ogr -f "PostgreSQL" PG:"dbname=postgis host=myhost.de user=postgres
password=topsecret" alaska.shp
This will import the shapefile alaska.shp into the PostGIS database
postgis using the user postgres with the password topsecret on host
server myhost.de.
Note that OGR must be built with PostgreSQL to support PostGIS.
You can verify this by typing (in  )
)
ogrinfo --formats | grep -i post
If you prefer to use PostgreSQL’s COPY command instead of the default
INSERT INTO method, you can export the following environment variable
(at least available on and  ):
):
ogr2ogr does not create spatial indexes like shp2pgsl does. You
need to create them manually, using the normal SQL command CREATE INDEX
afterwards as an extra step (as described in the next section
Improving Performance).
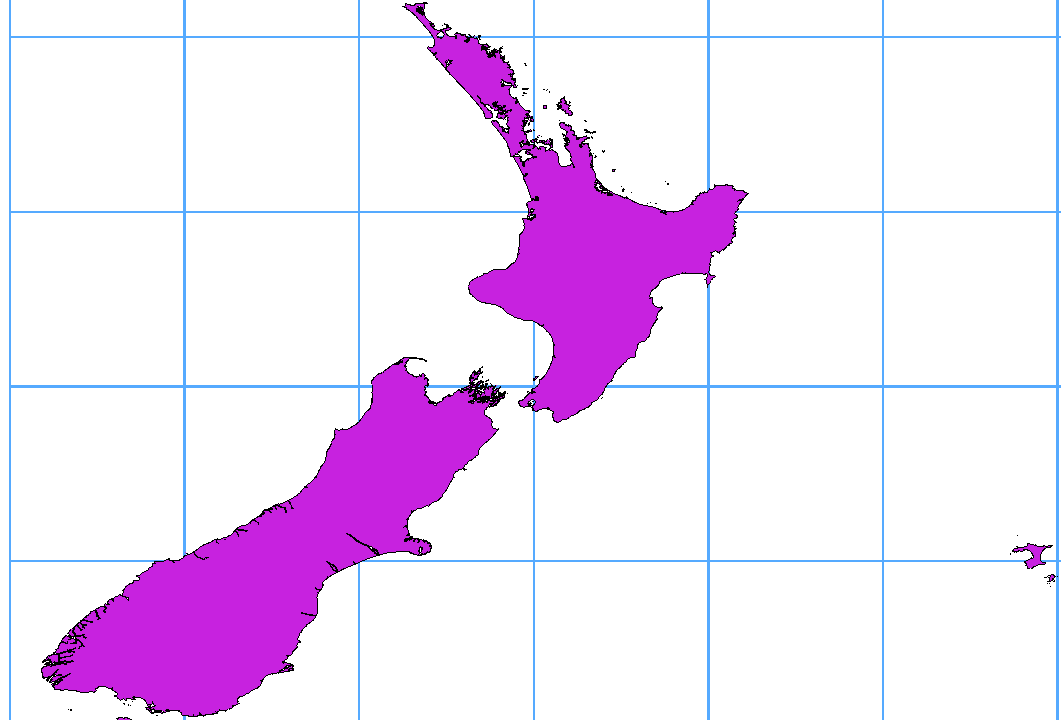
Many GIS packages don’t wrap vector maps with a geographic reference system
(lat/lon) crossing the 180 degrees longitude line
(http://postgis.refractions.net/documentation/manual-2.0/ST_Shift_Longitude.html).
As result, if we open such a map in QGIS, we will see two far, distinct locations,
that should appear near each other. In Figure_vector_crossing, the tiny point on the far
left of the map canvas (Chatham Islands) should be within the grid, to the right of the
New Zealand main islands.
A work-around is to transform the longitude values using PostGIS and the
ST_Shift_Longitude function. This function reads every point/vertex in every
component of every feature in a geometry, and if the longitude coordinate is
< 0°, it adds 360° to it. The result is a 0° - 360°
version of the data to be plotted in a 180°-centric map.
- Import data into PostGIS (Importing Data into PostgreSQL) using,
for example, the DB Manager plugin.
- Use the PostGIS command line interface to issue the following command
(in this example, “TABLE” is the actual name of your PostGIS table):
gis_data=# update TABLE set the_geom=ST_Shift_Longitude(the_geom);
- If everything went well, you should receive a confirmation about the
number of features that were updated. Then you’ll be able to load the
map and see the difference (Figure_vector_crossing_map).
If you want to save a vector layer to SpatiaLite format, you can do this by
right clicking the layer in the legend. Then, click on ,
define the name of the output file, and select ‘SpatiaLite’ as format and the CRS.
Also, you can select ‘SQLite’ as format and then add SPATIALITE=YES in the
OGR data source creation option field. This tells OGR to create a SpatiaLite
database. See also http://www.gdal.org/ogr/drv_sqlite.html.
QGIS also supports editable views in SpatiaLite.
If you want to create a new SpatiaLite layer, please refer to section
Creating a new SpatiaLite layer.
Tip
SpatiaLite data management Plugins
For SpatiaLite data management, you can also use several Python plugins:
QSpatiaLite, SpatiaLite Manager or DB Manager (core plugin,
recommended). If necessary, they can be downloaded and installed with the
Plugin Installer.
IBM DB2 for Linux, Unix and Windows (DB2 LUW), IBM DB2 for z/OS (mainframe)
and IBM DashDB products allow
users to store and analyse spatial data in relational table columns.
The DB2 provider for QGIS supports the full range of visualization, analysis
and manipulation of spatial data in these databases.
User documentation on these capabilities can be found at the
DB2 z/OS KnowledgeCenter, DB2 LUW KnowledgeCenter
and DB2 DashDB KnowledgeCenter.
For more information about working with the DB2 spatial capabilities, check out
the DB2 Spatial Tutorial on IBM DeveloperWorks.
The DB2 provider currently only supports the Windows environment through the
Windows ODBC driver.
The client running QGIS needs to have one of the following installed:
- DB2 LUW
- IBM Data Server Driver Package
- IBM Data Server Client
If you are accessing a DB2 LUW database on the same machine or using DB2 LUW as
a client, the DB2 executables and supporting files need to be included in the
Windows path. This can be done by creating a batch file like the following with
the name db2.bat and including it in the directory %OSGEO4W_ROOT%/etc/ini.
@echo off
REM Point the following to where DB2 is installed
SET db2path=C:\Program Files (x86)\sqllib
REM This should usually be ok - modify if necessary
SET gskpath=C:\Program Files (x86)\ibm\gsk8
SET Path=%db2path%\BIN;%db2path%\FUNCTION;%gskpath%\lib64;%gskpath%\lib;%path%