Important
Traducerea este un efort al comunității, la care puteți să vă alăturați. În prezent, această pagină este tradusă 36.36%.
5.3. Lesson: Forms
Atunci când adăugați prin digitizare noi date, vi se prezintă o fereastră de dialog care vă permite să completați atributele entităților. Totuși, acest dialog nu este, în mod implicit, prea aspectuos. Acest lucru poate cauza o problemă de uzabilitate, mai ales dacă aveți de creat seturi de date de mari dimensiuni, sau dacă doriți ca alte persoane să vă ajute la digitizare, aceștia descoperind repede că formularele implicite sunt confuze.
Din fericire, QGIS vă permite să creați propriile dialoguri personalizate pentru un strat. Această lecție vă arată cum.
Scopul acestei lecții: De a crea un formular pentru un strat.
5.3.1. ★☆☆ Follow Along: Using QGIS» Form Design Functionality
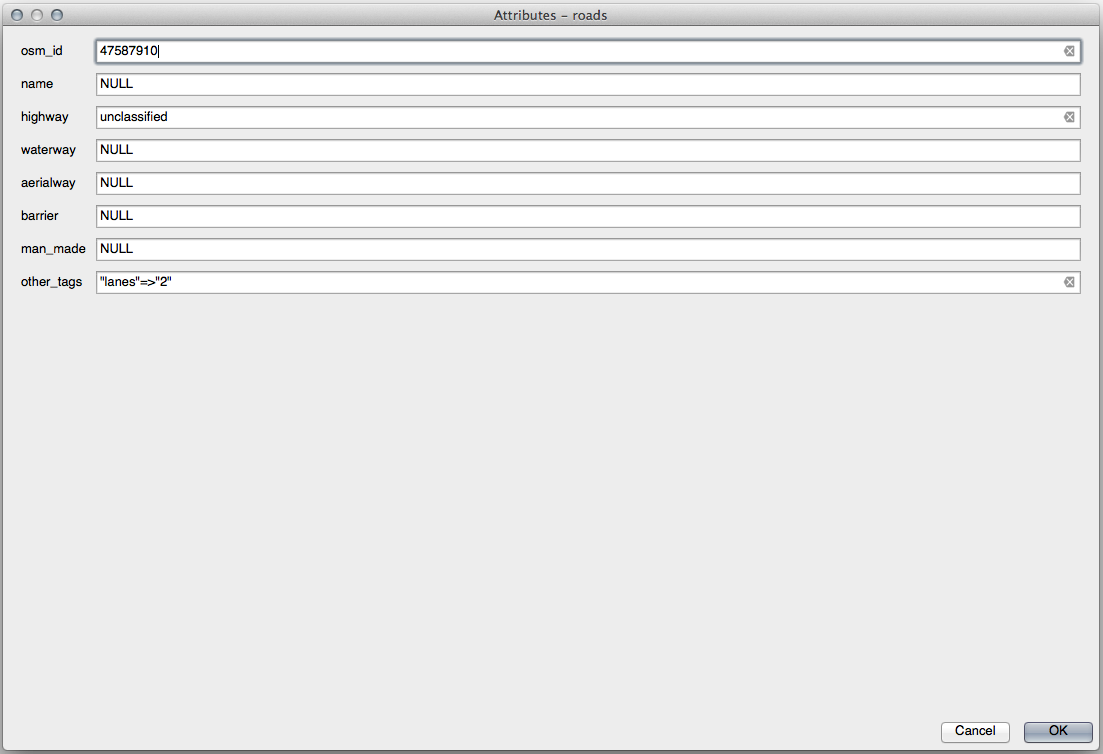
Select the
roadslayer in the Layers panelEnter Edit Mode as before
Open the
roadslayer’s attribute tableRight-click on any cell in the table. A short menu will appear, that includes the Open form entry.
Click on it to see the form that QGIS generates for this layer
Evident, ar fi frumos să fiți în măsură să faceți acest lucru, mai degrabă, în timp ce vă uitați la hartă, decât să fie nevoie să căutați tot timpul o stradă specifică în Tabela de Atribute.
Select the
roadslayer in the Layers panelUsing the
 Identify Features tool, click on any
street in the map.
Identify Features tool, click on any
street in the map.The Identify Results panel opens and shows a tree view of the fields values and other general information about the clicked feature.
At the top of the panel, check the Auto open form for single feature results checkbox in the
 Identify Settings menu.
Now, click again on any street in the map. Along the previous Identify Results dialog, you’ll see the now-familiar form:
Each time you click on a single feature with the
Identify Features tool,
its form pops up as long as the Auto open form is
checked.
5.3.2. ★☆☆ Try Yourself: Using the Form to Edit Values
Dacă sunteți în modul de editare, puteți utiliza acest formular pentru a edita atributele unei entități.
Activați modul de editare (dacă nu este deja activat).
Using the
Identify Features tool, click on the
main street running through Swellendam: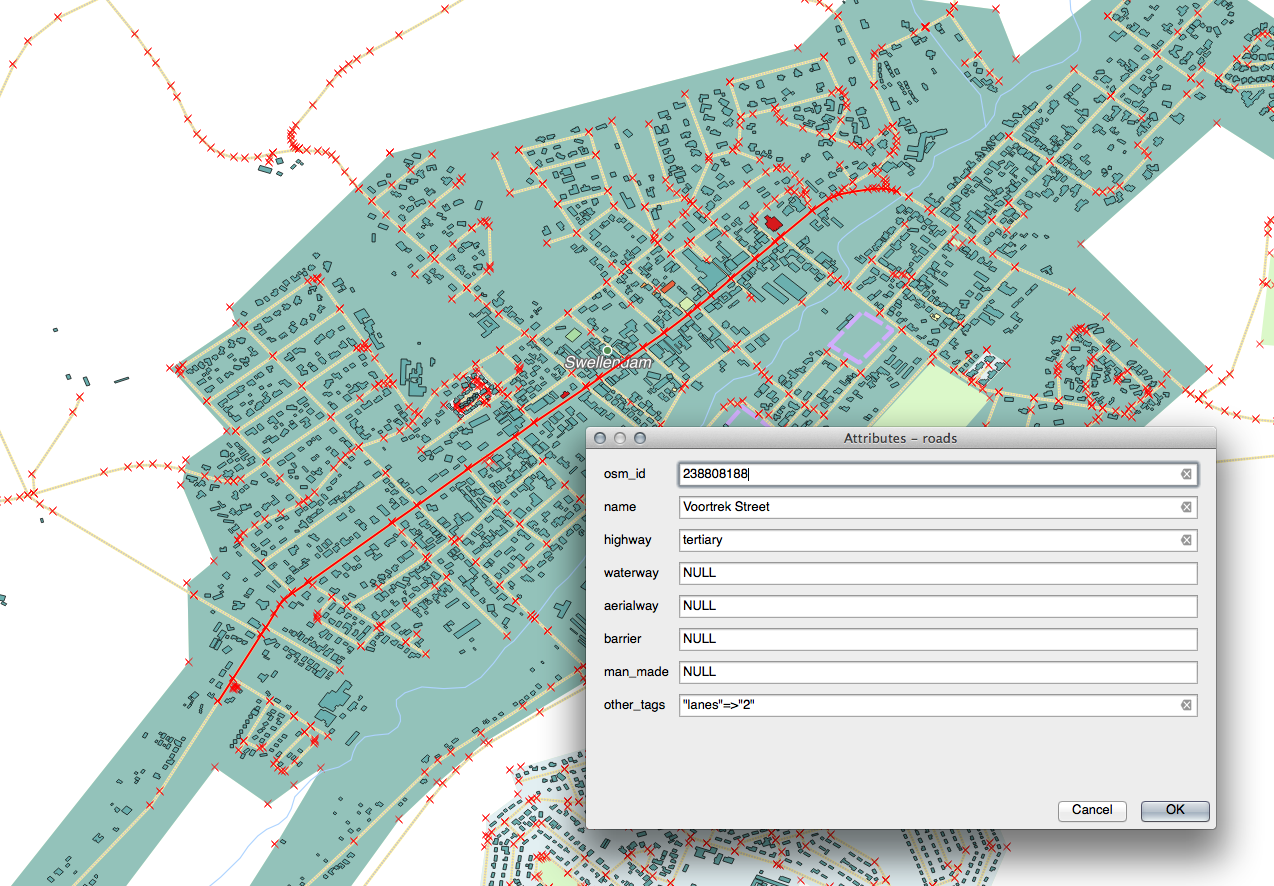
Edit its highway value to be
secondaryExit edit mode and save your edits
Open the Attribute Table and note that the value has been updated in the attributes table and therefore in the source data
5.3.3. ★★☆ Follow Along: Setting Form Field Types
E frumos să editați lucruri folosind un formular, dar tot trebuie să introduceți manual totul. Din fericire, formele au așa-numitele widgets, care vă permit să editați datele în diverse moduri.
Open the
roadslayer’s Properties…Mergeți la fila Câmpuri. Veți vedea următoarele:
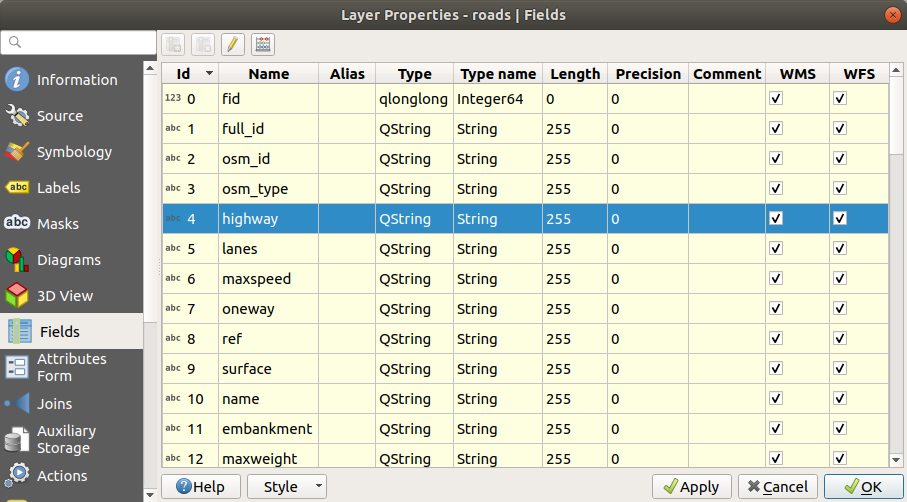
Switch to the Attributes Form tab. You’ll see this:
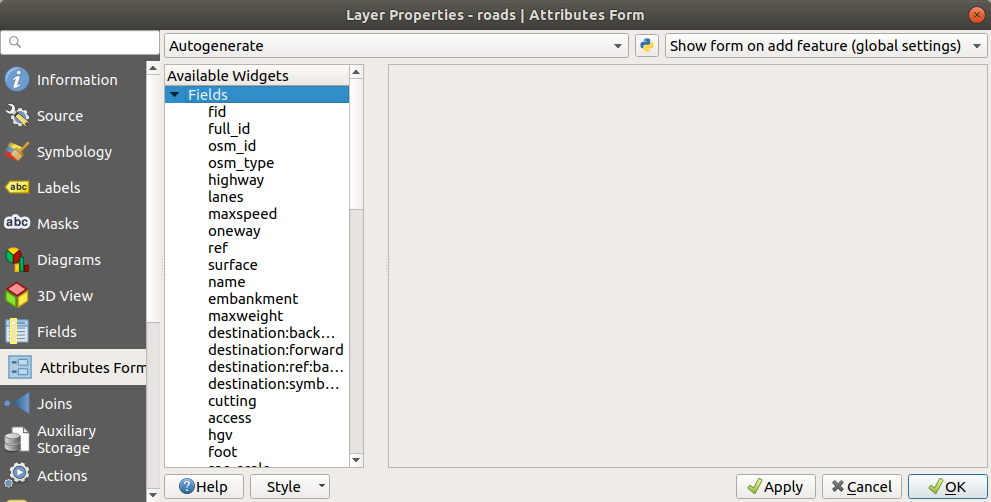
Click on the
onewayrow and choose Checkbox as Widget Type in the list of options: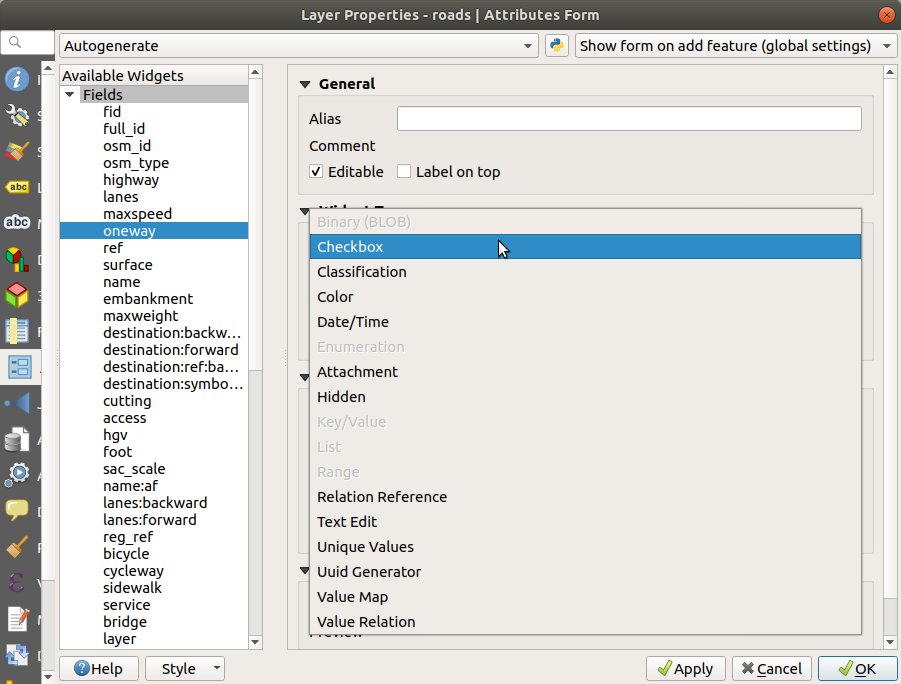
Clic pe OK
Enter edit mode (if the
roadslayer is not already in edit mode)Click on the
Identify Features toolClick on the same main road you chose earlier
You will now see that the oneway attribute has a
checkbox next to it denoting True (checked) or False
(unchecked).
5.3.4. ★★★ Încercați și dvs.:
Setați un widget mai adecvat pentru câmpul highway.
Răspuns
For the TYPE, there is obviously a limited amount of types that a road can be, and if you check the attribute table for this layer, you’ll see that they are predefined.
Set the widget to Value Map and click Load Data from Layer.
Select
roadsin the Label dropdown andhighwayfor both the Value and Description options: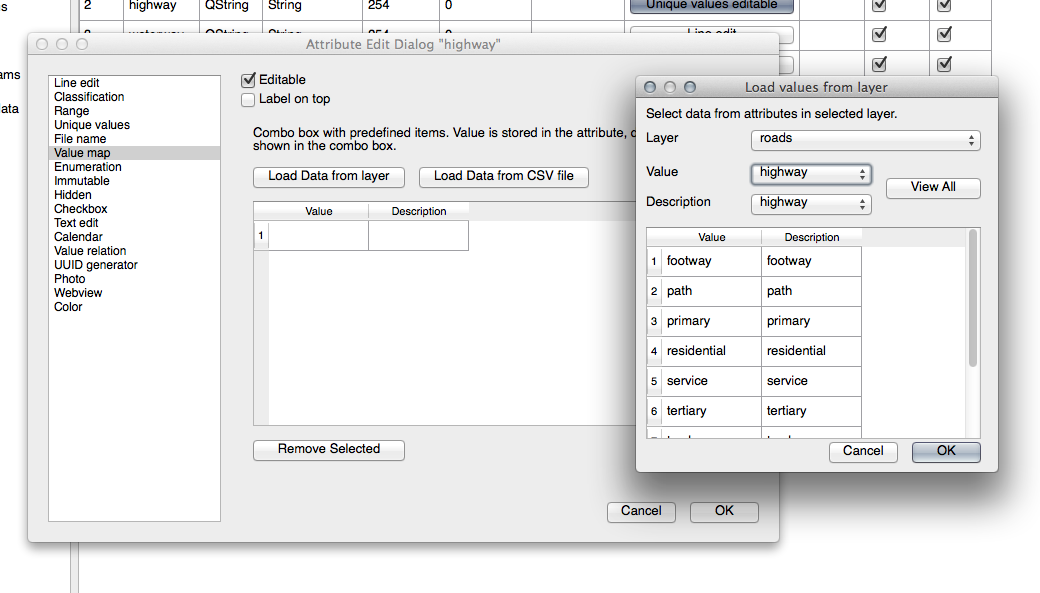
Click OK three times.
If you use the
Identify Features tool on a street now while edit mode is
active, the dialog you get should look like this: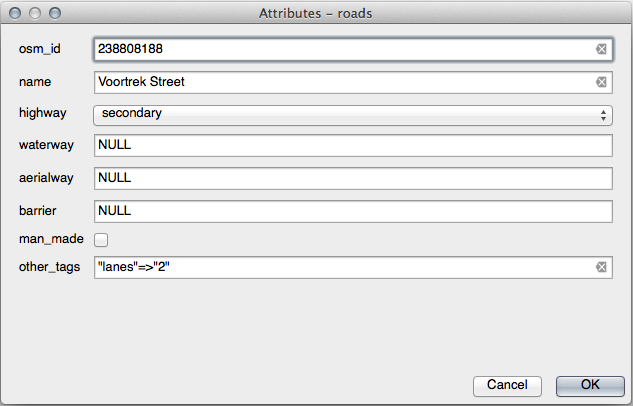
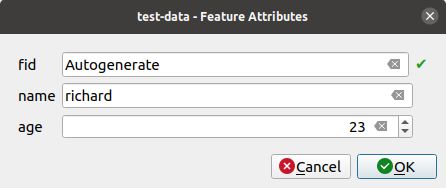
5.3.5. ★★★ Try Yourself: Creating Test Data
Aveți posibilitatea să proiectați, de asemenea, formularul propriu complet de la zero.
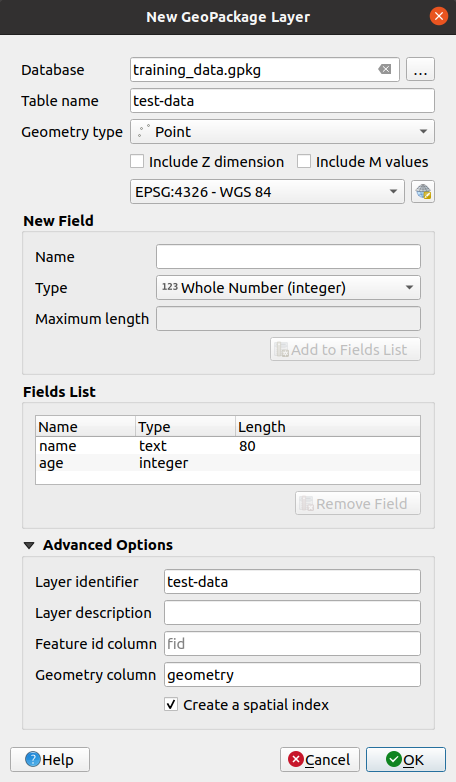
Create a simple point layer named
test-datawith two attributes:name (text)
age (integer)
Capturați câteva puncte de pe noul strat folosind instrumentele de digitizare, așa că veți avea un pic de date cu care să operați. Ar trebui să vedeți în continuare formularul implicit, generat de QGIS, de fiecare dată când capturați un nou punct.
Notă
Este posibil să trebuiască să dezactivați Acroșarea, dacă este activată în urma acțiunilor anterioare.
5.3.6. ★★★ Follow Along: Creating a New Form
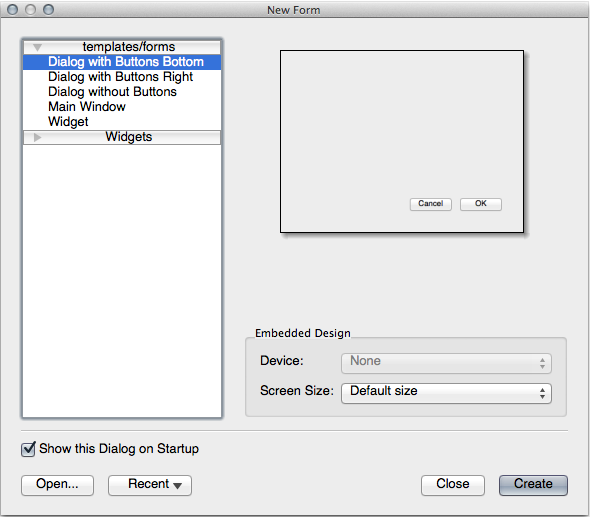
Now we want to create our own custom form for the attribute data capture phase. To do this, you need to have QT Designer installed (only needed for the person who creates the forms).
Start QT Designer.
În caseta de dialog care apare, creați un nou dialog:
Căutați Widget Box în partea stângă a ecranului (implicit). Aceasta conține un element denumit Line Edit.
Faceți clic și trageți acest articol în formular. Aceasta va crea o nouă Linie de Editare în formular.
Având selectat noul element de linie de editare, îi veți vedea proprietățile de-a lungul părții laterale a ecranului (din partea dreaptă, în mod implicit):
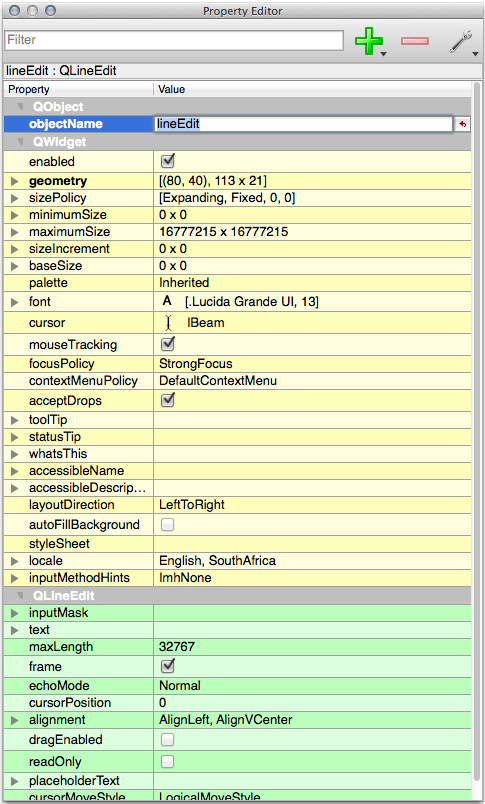
Set its name to
name.Using the same approach, create a new Spin Box and set its name to
age.Add a Label with the text
Add a New Personin a bold font (look in the object properties to find out how to set this). Alternatively, you may want to set the title of the dialog itself (rather than adding a label).Add a Label for your Line Edit and your Spin Box.
Arrange the elements to your own desire.
Faceți clic oriunde, în fereastra de dialog.
Find the Lay Out in a Form Layout button (in a toolbar along the top edge of the screen, by default). This lays out your dialog automatically.
Set the dialog’s maximum size (in its properties) to
200(width) by150(height).Your form should now look similar to this:
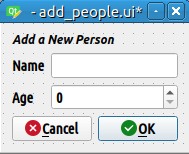
Save your new form as
exercise_data/forms/add_people.uiWhen it’s done saving, you can close Qt Designer
5.3.7. ★★★ Follow Along: Associating the Form with Your Layer
Go back to QGIS
Double click the
test-datalayer in the legend to access its properties.Click on the Attributes Form tab in the Layer Properties dialog
În caseta cu lista derulantă Attribute editor layout, selectați Provide ui-file.
Click the ellipsis button and choose the
add_people.uifile you just created: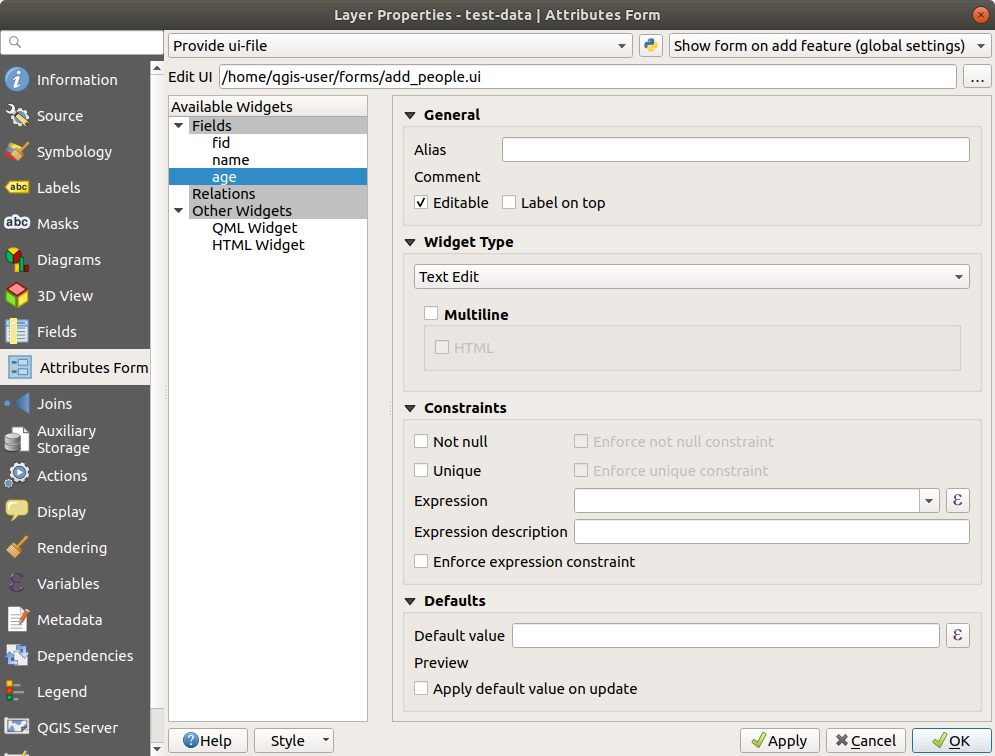
Click OK on the Layer Properties dialog
Enter edit mode and capture a new point
Când faceți acest lucru, vă va fi prezentat dialogul personalizat (în loc de cel generic, pe care îl creează de obicei QGIS).
If you click on one of your points using the
Identify Features tool, you can now bring up the
form by right clicking in the identify results window and choosing
from the context menu.If you are in edit mode for this layer, that context menu will show instead, and you can then adjust the attributes in the new form even after initial capture.
5.3.8. În concluzie
Folosind formularele, vă puteți face viața mai ușoară, atunci când editați sau când creați date. Prin editarea tipurilor de widget sau pin crearea unui formular cu totul nou, de la zero, puteți controla experiența cuiva care digitalizează date noi, minimizând, astfel, neînțelegerile și erorile inutile.
5.3.9. Further Reading
If you completed the advanced section above and have knowledge of Python, you may want to check out this blog entry about creating custom feature forms with Python logic, which allows advanced functions including data validation, autocompletion, etc.
5.3.10. Ce urmează?
Deschiderea unui formular o dată cu identificarea unei entități este una dintre acțiunile standard, pe care o poate efectua QGIS. Cu toate acestea, puteți efectua direct acțiunile personalizate pe care le definiți. Acesta este subiectul lecției următoare.